
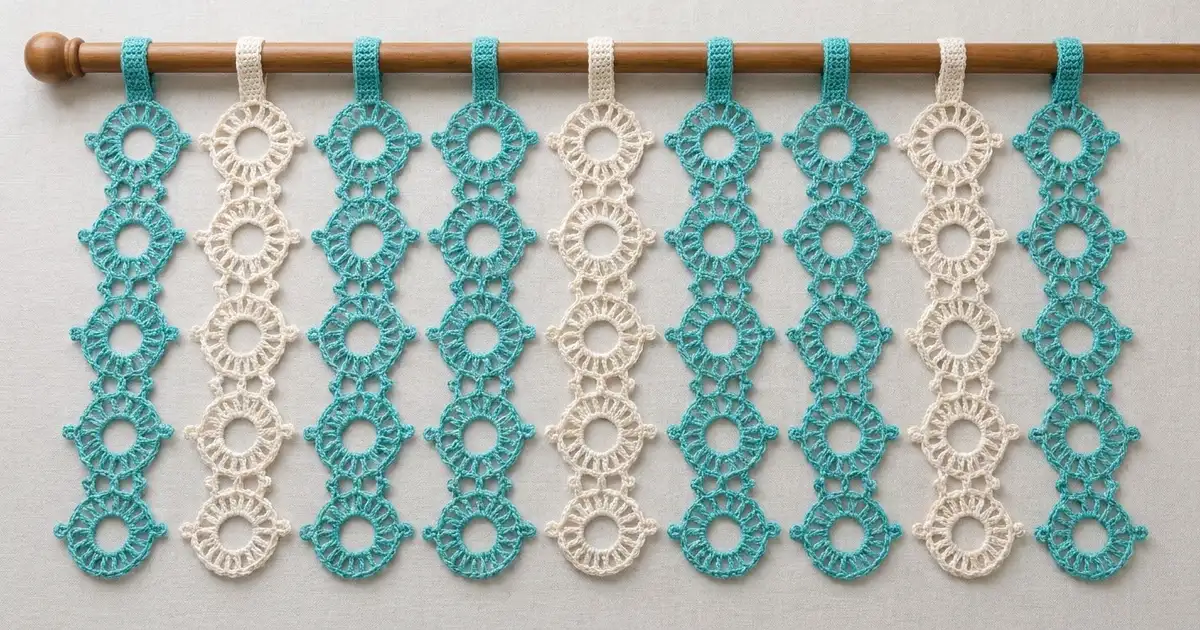
The Seaglass Rings Doorway Curtain is a light, airy screen made of open spoked motifs strung into long vertical strips. Each round motif has a clean center hole, a ring of long treble spokes and a firm single-crochet rim, so the light passes through without the curtain looking flimsy.
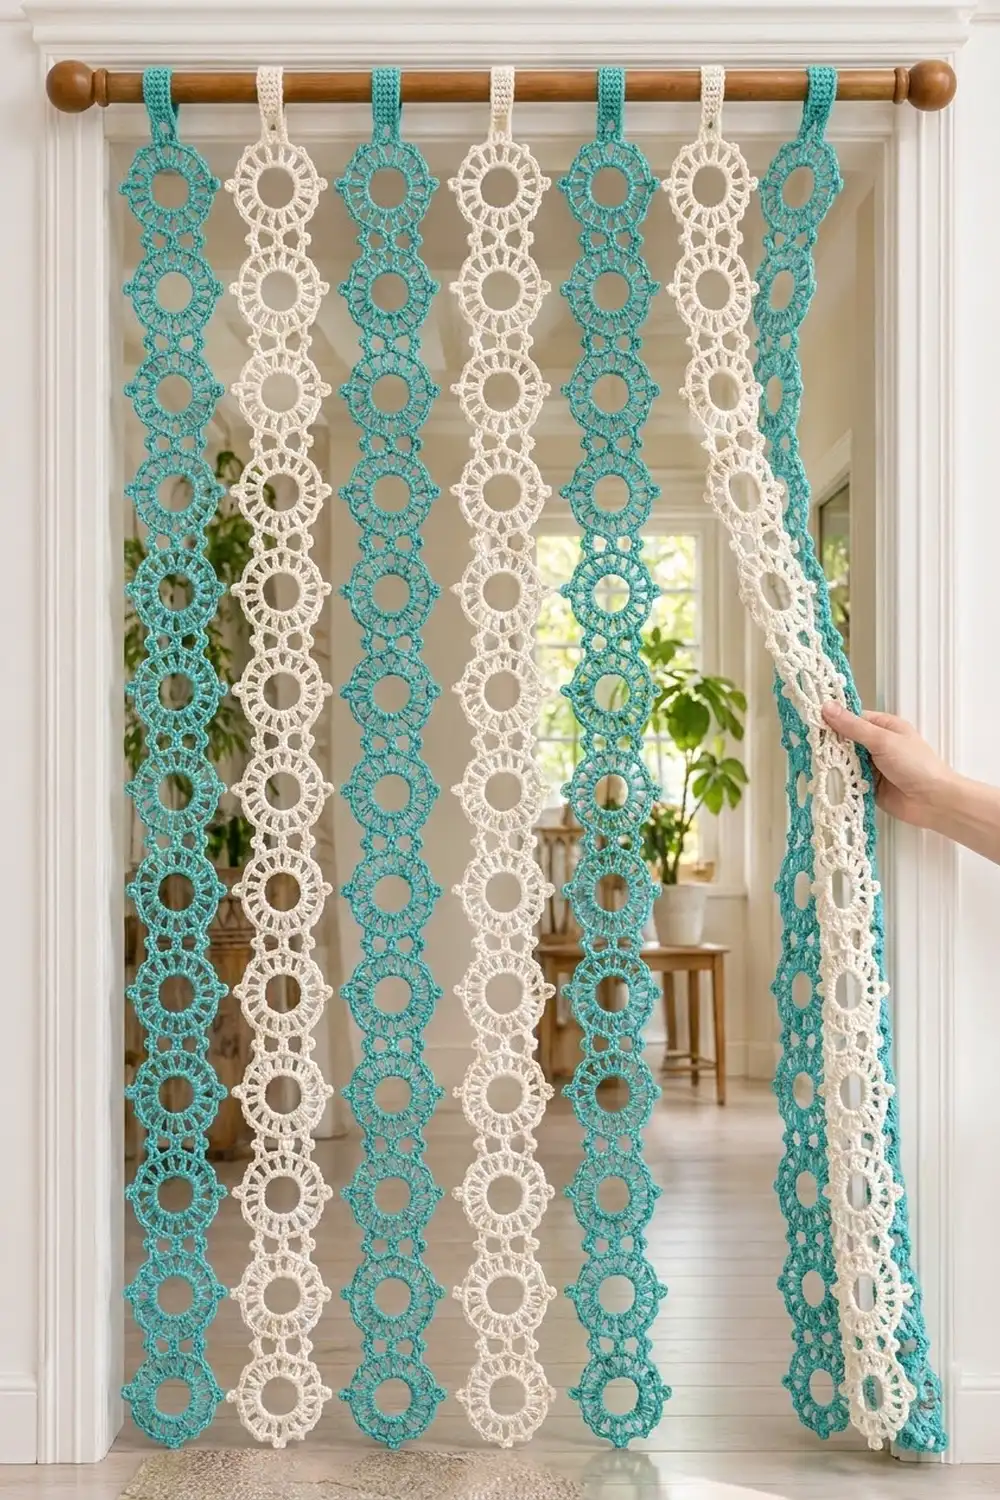
Seven strips alternate teal and cream: four teal and three cream, with teal on both outer edges. It looks coastal and fresh in a hallway, pantry door or patio entrance, and the strips part easily when you walk through.
This pattern uses US crochet terms. Each finished strip is 5 in (12.7 cm) wide across the side picots and 72 in (182.9 cm) long, plus a 3 in (7.6 cm) folded hanging tab. Hung with 0.5 in (1.3 cm) gaps, the curtain is about 38 in (96.5 cm) wide.
Construction is simple. You work one motif in three rounds, then add each later motif with join-as-you-go, linking its top picot to the bottom picot of the motif above. A short single-crochet tab finishes the top of each strip and folds over the rod.
Finished Size and Construction
- Finished curtain: about 38 in (96.5 cm) wide as hung × 75 in (190.5 cm) drop from the top of the rod
- Skill level: Easy-Intermediate
- Terminology: US
- Yarn weight: Worsted (#4), cotton or cotton blend
- Hook: 5 mm (H-8)
- Number of pieces: 7 strips (112 motifs total, 16 per strip)
- Layout: 7 strips side by side, 1 motif wide × 16 motifs long each
- Single motif size: 4 in (10.2 cm) across the body; 5 in (12.7 cm) picot tip to picot tip
- Strip length before tab: 72 in (182.9 cm)
- “Border” (hanging tab) depth: 6 in (15.2 cm) worked, folded to 3 in (7.6 cm)
Materials
Use a smooth, mercerized or matte worsted cotton. Cotton hangs straight, holds stitch definition and won’t stretch much under its own weight. Avoid fuzzy acrylic, which tends to pill as people brush past it.
- Teal (Color A): 280 g, about 435 m (4 strips, 64 motifs)
- Cream (Color B): 210 g, about 325 m (3 strips, 48 motifs)
These amounts are based on about 5.5 m per motif and 5 m per tab. They include a margin of roughly 15% for gauge differences and swatching.
Tools:
– 5 mm (H-8) crochet hook
– Tapestry needle
– Scissors
– Stitch markers (2–3)
– Measuring tape
– Rust-proof pins and a blocking surface
– Curtain rod at least 40 in (101.6 cm) long and up to 1.5 in (3.8 cm) in diameter
Abbreviations (US Terms)
- ch – chain
- sl st – slip stitch
- sc – single crochet
- tr – treble crochet
- sp(s) – space(s)
- sk – skip
- rep – repeat
- Rnd – round
Special stitches:
- Picot: Ch 4, sl st in the top of the last sc made. This makes a small free loop.
- Joining picot: Ch 2, sl st into the matching picot loop of the previous motif (insert the hook from front to back), ch 2, sl st in the top of the last sc made on the current motif. The two picots now share a link.
Gauge and Checkpoints
Gauge: 16 sc and 18 rows = 4 in (10.2 cm) in sc worked in rows.
Before starting the strips, make one full test motif and measure it at each stage:
- After Rnd 1: about 1.75 in (4.4 cm) across, with a center hole about 1 in (2.5 cm) across
- After Rnd 2: about 3.25 in (8.3 cm) across, spoke tip to spoke tip
- After Rnd 3: 4 in (10.2 cm) across the body and 5 in (12.7 cm) picot tip to picot tip
If your motif is too big, change to a 4.5 mm hook. Big motifs add up fast: every extra 0.25 in (0.6 cm) per motif adds 4 in (10.2 cm) to a 16-motif strip.
If your motif is too small, change to a 5.5 mm hook.
If only the spokes look off, adjust them alone. Pull up the tr loops a little taller if the spokes look stubby, or work them more firmly if they flare.
Keep your test motif. If it matches gauge, it can be the first motif of Strip 1.
Motif Pattern
First Motif of Each Strip
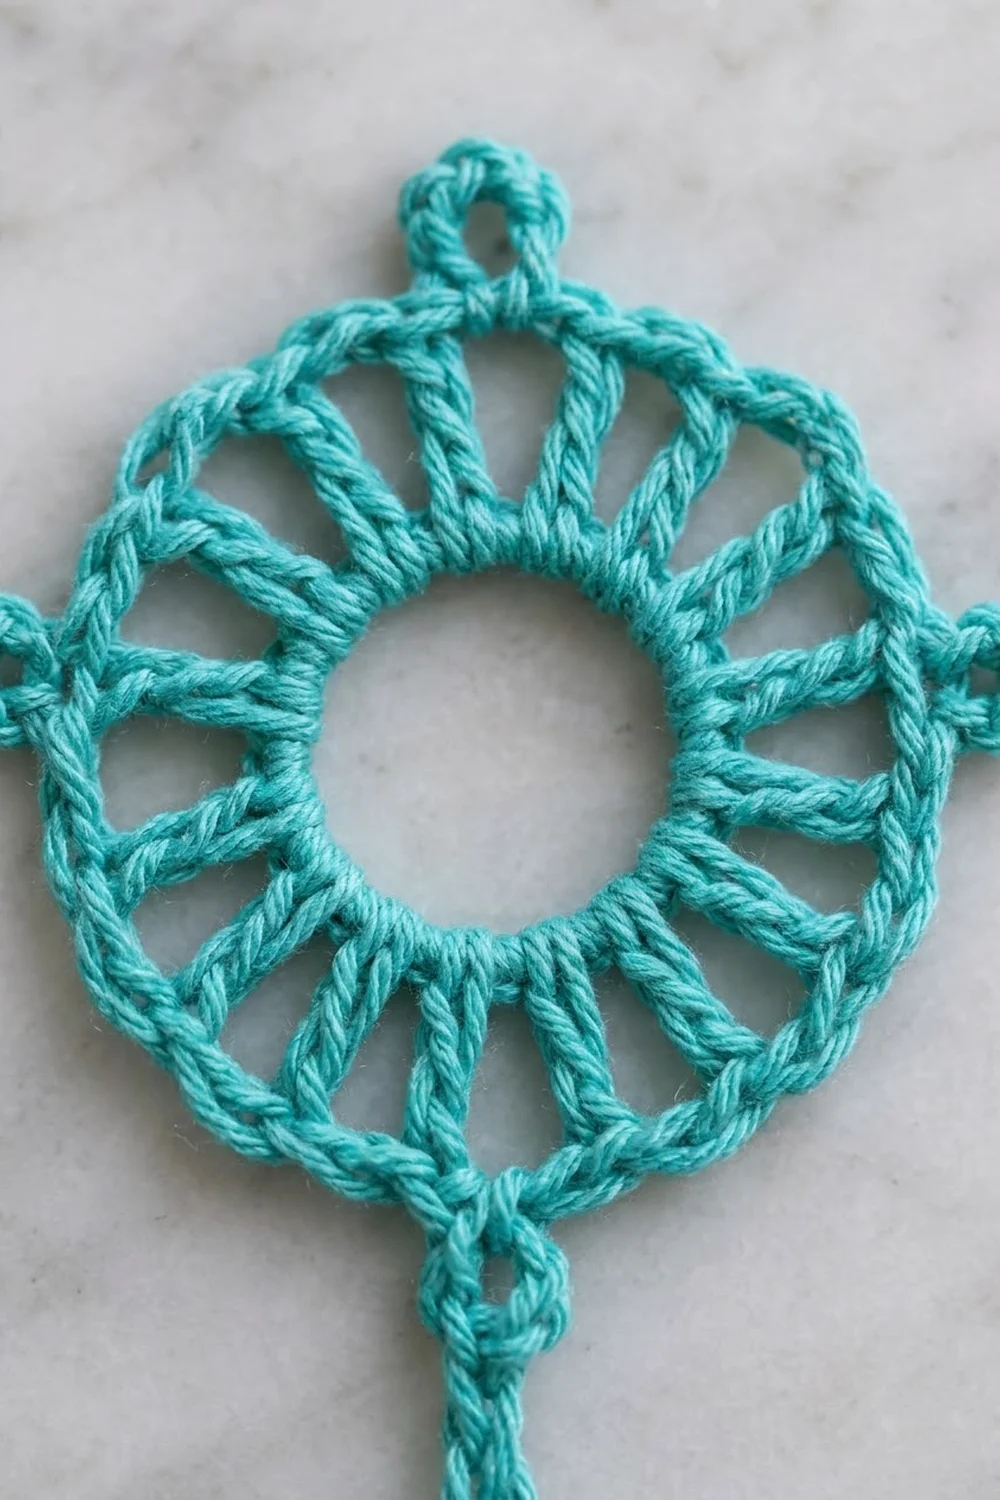
Foundation: Ch 12, sl st in the first ch to form a ring.
Rnd 1: Ch 1, work 24 sc into the ring. Sl st to the first sc to join. (24 sc)
Push the stitches together as you go so all 24 fit. This dense band forms the thick center ring.
Rnd 2: Ch 4 (counts as first tr), ch 3. Then sk next sc, tr in next sc, ch 3; rep from * 10 more times. Sl st to the top of the beginning ch-4. (12 tr and 12 ch-3 sps = 48 sts)
This round makes the 12 open spokes.
Rnd 3: Sl st into the first ch-3 sp, ch 1. Then work 4 sc in each of the next 3 ch-3 sps, picot; rep from * 3 more times. Sl st to the first sc. Fasten off. (48 sc + 4 picots)
The 4 picots sit at 90° intervals, with 12 sc between neighbors. Label them in working order:
- P1 (after space 3): side
- P2 (after space 6): bottom
- P3 (after space 9): side
- P4 (after space 12): top
Place a marker in P2 so you know which loop to join to next.
Motifs 2–16 (Join-As-You-Go)
Work the Foundation, Rnd 1 and Rnd 2 exactly as for the first motif.
Rnd 3 (joining): Sl st into the first ch-3 sp, ch 1.
- 4 sc in each of the next 3 ch-3 sps, picot; rep from * 2 more times. This makes P1, P2 and P3.
- 4 sc in each of the last 3 ch-3 sps.
- Make a joining picot into the marked P2 (bottom picot) of the previous motif. This forms P4.
- Sl st to the first sc. Fasten off.
(48 sc + 3 free picots + 1 joined picot)
Move the marker to the new motif’s P2. Keep the side picots P1 and P3 lined up on the same sides as on the motif above so the strip hangs straight.
Make All Pieces
Each strip is a single color.
- Teal (Color A): 4 strips × 16 motifs = 64 motifs
- Cream (Color B): 3 strips × 16 motifs = 48 motifs
- Total: 112 motifs, 7 tabs
Layout (as hung, viewed from the front; T = teal, C = cream):
Strip:   1  2  3  4  5  6  7
Tab:     T  C  T  C  T  C  T
Row 1:   T  C  T  C  T  C  T
Row 2:   T  C  T  C  T  C  T
 ...     (rows 3–15 continue the same)
Row 16:  T  C  T  C  T  C  T
Weave in the tails on each motif as you finish it. Working the ends into the dense sc of Rnd 1 or Rnd 3 hides them best.
Joining
Method: Join-as-you-go, picot to picot, as described above. Strips are not joined to each other. They hang separately so people can walk through.
Stitch-to-stitch logic: Each join uses exactly one sl st into the previous motif’s P2 loop. No stitches are added to or taken from either motif. Both motifs keep their 48 sc, so every motif is the same size and the pitch stays even.
Tension: Keep the 2 chains on each side of the joining sl st relaxed. If they are tight, the strip puckers and the motifs tilt toward each other. If they are loose, the connection sags. The joined link should measure about 0.5 in (1.3 cm) from one motif rim to the next.
Size checkpoints for each strip (motif body 4 in plus 0.5 in per join):
- 4 motifs: 4 × 4 in + 3 × 0.5 in = 17.5 in (44.5 cm)
- 8 motifs: 8 × 4 in + 7 × 0.5 in = 35.5 in (90.2 cm)
- 16 motifs: 16 × 4 in + 15 × 0.5 in = 71.5 in (181.6 cm). The free bottom picot adds 0.5 in, for 72 in (182.9 cm).
Measure each strip lying flat and relaxed, not stretched. All 7 strips should be within 1 in (2.5 cm) of each other before you add tabs.
Border (Hanging Tab)
The curtain has no surrounding border, because the strips hang free. Each strip gets a hanging tab at its top edge instead.
Tab gauge: Same as the main gauge: 16 sc and 18 rows = 4 in (10.2 cm). So 5 sc = 1.25 in (3.2 cm) and 27 rows = 6 in (15.2 cm).
Work each tab in the strip’s own color, into P4 (the top picot) of Motif 1.
Row 1: Join yarn in the P4 loop of Motif 1, ch 1, work 5 sc into the loop. Turn. (5 sc)
Rows 2–27: Ch 1, sc in each sc across. Turn. (5 sc per row)
Fasten off, leaving a 12 in (30.5 cm) tail. Fold the tab toward the back of the strip. Whipstitch the 5 sts of Row 27 to the back of Row 1, one stitch to one stitch. This makes a closed loop about 3 in (7.6 cm) deep.
Why the math works:
- A ch-4 picot loop comfortably holds 5 sc without flaring. The 1.25 in (3.2 cm) tab is narrow enough to sit centered above a 4 in (10.2 cm) motif.
- The folded loop has 6 in (15.2 cm) of fabric around it. That slides easily over rods up to 1.5 in (3.8 cm) in diameter and still leaves room to shift the strips.
- With the tab, each strip drops 72 in + 3 in = 75 in (190.5 cm) from the top of the rod. Seven strips at 5 in (12.7 cm) wide plus six gaps of 0.5 in (1.3 cm) give 35 in + 3 in = 38 in (96.5 cm) across.
Final Blocking
- Soak all 7 strips in cool water with a little wool wash or mild soap for 15 minutes.
- Press out the water gently. Roll each strip in a towel. Do not wring.
- Lay each strip flat on a blocking surface, motif by motif.
- Pin each motif body to a 4 in (10.2 cm) circle. Open the center hole to about 1 in (2.5 cm), and space the 12 spokes evenly.
- Pin each side picot out so the strip measures 5 in (12.7 cm) across.
- Check that the joined links are 0.5 in (1.3 cm) and the strip is 72 in (182.9 cm) long.
- Let the strips dry completely. Thread the tabs onto the rod and hang. Let the curtain hang for a day so the strips relax evenly.
Final Quality-Control Checklist
- Every motif has 24 sc in Rnd 1, 12 tr spokes in Rnd 2, and 48 sc plus 4 picots in Rnd 3.
- All joins use the bottom picot of the motif above and the top picot of the motif below.
- Side picots line up in straight vertical lines down each strip.
- Each strip has 16 motifs and measures 72 in (182.9 cm) blocked.
- The colors run T-C-T-C-T-C-T.
- Tabs are 5 sc wide, 27 rows long and sewn securely.
- All tails are woven in and trimmed.
Troubleshooting
Rnd 1 ruffles or the ring won’t hold 24 sc. Slide the stitches tightly around the ring as you work. If it still ruffles, start with ch 13 instead.
Spokes lean or twist. Make sure you skip exactly one sc between tr stitches and that each tr goes into a stitch, not between stitches.
The outer rim cups. Your 4 sc per ch-3 space are too tight. Loosen your tension or go up a hook size for Rnd 3 only.
The outer rim waves. Work a little tighter, or check that your ch-3 spaces haven’t grown into ch-4 spaces.
The strip twists when hung. A side picot was joined instead of the bottom picot. Undo Rnd 3 of that motif and rejoin to P2.
Strips hang at different lengths. Block again, or add or remove one tab row. One row changes the drop by about 0.1 in (0.3 cm) after folding.
Care
Hand wash in cool water, or machine wash cold on a gentle cycle in a mesh laundry bag. Lay flat to dry and reshape the motifs while damp.
Final Notes
The measurement chain is simple. First, a 4 in (10.2 cm) motif with 5 in (12.7 cm) picot width. Then 16 motifs with 0.5 in (1.3 cm) joins make a 72 in (182.9 cm) strip. A 6 in (15.2 cm) tab folds to 3 in (7.6 cm), so each strip drops 75 in (190.5 cm). Seven strips with small gaps span 38 in (96.5 cm). Get the first motif right and every later number follows. Happy crocheting!