
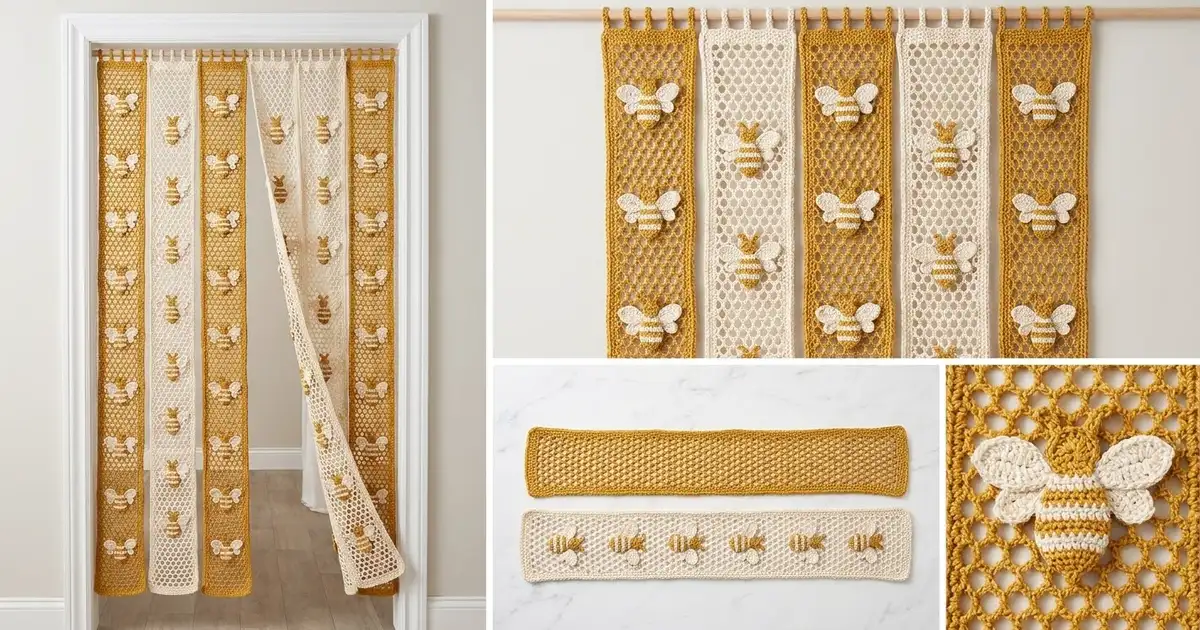
This curtain is a cheerful doorway screen made of seven long honeycomb strips, each with a row of little bees climbing down its center. The strips alternate mustard gold and cream, so the doorway stays bright and airy. Every strip moves on its own when someone walks through.
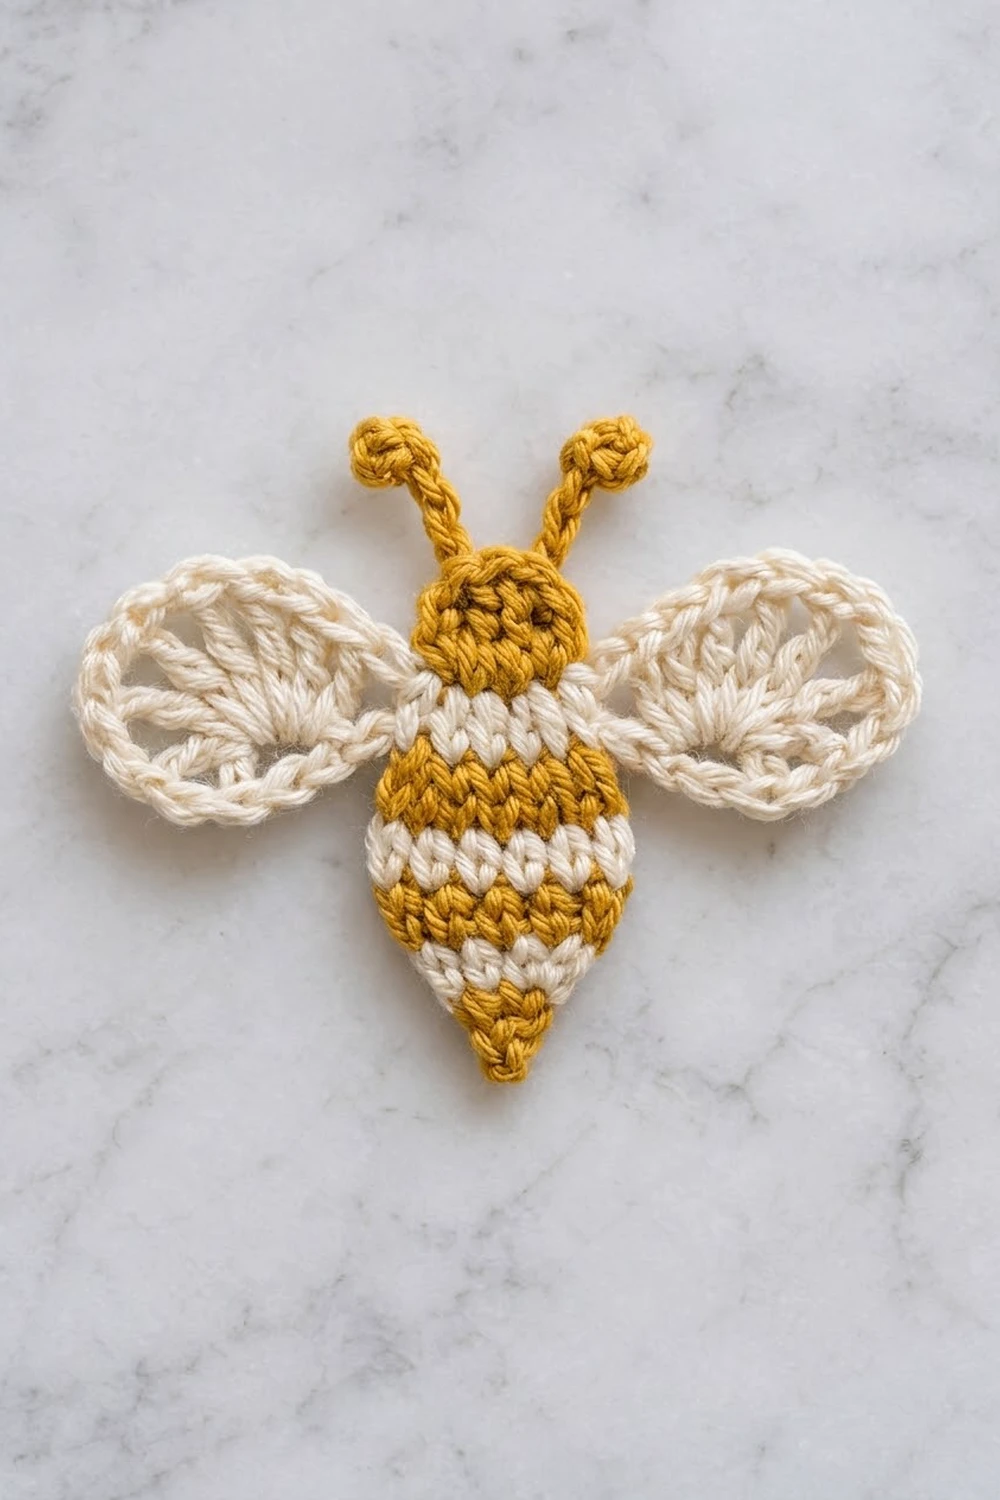
Each strip has a narrow rail down each side and an open mesh of chain loops between the rails, which looks like honeycomb cells. The layered bees have cream fan wings, a striped gold-and-cream body, a round gold head and knobbed antennae. You sew them on after the strips are finished.
This pattern uses US crochet terms. One strip measures 4.2 in (10.7 cm) wide after the border. The hanging length is about 74.0 in (188.0 cm) from the top of the rod pocket to the bottom edge. With seven strips and 0.5 in (1.3 cm) gaps, the curtain is about 32.4 in (82.3 cm) wide.
You work each strip in short rows from the bottom up. Then you add a plain tab at the top and a one-round border, fold the tab into a rod pocket, and sew on the bees. The strips are never stitched to each other; the rod is what holds them together as one curtain.
Finished Size and Construction
- Finished strip size: 4.2 in (10.7 cm) wide x about 74.0 in (188.0 cm) hanging length
- Curtain width: 32.4 in (82.3 cm), with 7 strips and 0.5 in (1.3 cm) gaps
- Skill level: Intermediate
- Terminology: US
- Yarn weight: DK (#3) cotton
- Hook: 4.0 mm (G-6)
- Number of pieces: 7 strips plus 70 bee appliqués (10 per strip)
- Layout: 7 strips in a single row on one rod
- Strip size before border: 3.8 in (9.7 cm) wide x 75.5 in (191.8 cm) long, flat with the tab
- Border depth: 0.2 in (0.5 cm), one round of sc
- Bee size: wingspan 3.6 in (9.1 cm), height 2.6 in (6.6 cm) without the antennae
Materials
Use a smooth mercerized or combed cotton in DK weight. Cotton keeps the mesh crisp and holds its shape when it hangs. Avoid stretchy acrylic, because a long hanging strip will slowly grow.
- Mustard gold: 300 g / about 690 m (4 strips, bee bodies, heads and antennae)
- Cream: 250 g / about 575 m (3 strips, bee stripes and wings)
One strip takes about 45 g / 100 m. One bee takes about 1.5 m of gold and 2.5 m of cream. These quantities include a margin of about 15% for gauge swatches, sewing and weaving in ends.
Tools:
– 4.0 mm (G-6) crochet hook
– Tapestry needle
– Stitch markers
– Rust-proof pins and a blocking surface
– Measuring tape
– Curtain rod or tension rod, up to 1 in (2.5 cm) in diameter
Abbreviations (US Terms)
- ch – chain
- sl st – slip stitch
- sc – single crochet
- dc – double crochet
- sc2tog – single crochet 2 together
- sk – skip
- sp – space
- st(s) – stitch(es)
- RS / WS – right side / wrong side
Special stitch – picot knob: Ch 3, then sl st in the first of those 3 ch. This makes a tiny round knob for the antenna tips.
Gauge and Checkpoints
- Solid gauge: 20 sc and 20 rows = 4 in (10.2 cm)
- Mesh gauge: 4 mesh rows = 2 in (5.1 cm), so each mesh row is 0.5 in (1.3 cm) tall
Before you start the full curtain, make 1 test strip up to Row 24. It should measure 3.8 in (9.7 cm) wide and about 11.7 in (29.7 cm) tall.
Checkpoints:
– After Row 1: 3.8 in (9.7 cm) wide
– After Row 10: 4.7 in (11.9 cm) tall
– After Row 144: 71.7 in (182.1 cm) tall
– After Row 145: 71.9 in (182.6 cm) tall
– After the tab (Row 163): 75.5 in (191.8 cm) tall
If your strip is too wide or the rows are too tall, go down 0.5 mm in hook size. If it is too narrow or too short, go up 0.5 mm. Check the length while the strip lies flat and is not stretched. A hanging strip will lengthen a little under its own weight.
Strip (Make 7)
Make 4 strips in gold and 3 in cream. Each strip is worked in one color.
Foundation: Ch 20.
Row 1 (RS): Sc in 2nd ch from hook and in each ch across. (19 sc)
Row 2: Ch 3 (counts as dc throughout), turn. Dc in next sc. [Ch 5, sk 3 sc, sc in next sc] 3 times. Ch 5, sk 3 sc, dc in each of last 2 sc. (4 dc, 3 sc, 4 ch-5 loops)
The 2 dc at each edge make the side rails. The ch-5 loops make the first row of honeycomb cells.
Row 3: Ch 3, turn. Dc in next dc, ch 2, sc in first ch-5 loop. [Ch 5, sc in next ch-5 loop] 3 times. Ch 2, dc in next dc, dc in top of turning ch. (4 dc, 4 sc, 3 ch-5 loops, 2 ch-2 sps)
Row 4: Ch 3, turn. Dc in next dc, ch 5, sk ch-2 sp, sc in next ch-5 loop. [Ch 5, sc in next ch-5 loop] 2 times. Ch 5, sk ch-2 sp, dc in next dc, dc in top of turning ch. (4 dc, 3 sc, 4 ch-5 loops)
Row 4 has the same counts as Row 2. The ch-2 spaces in Row 3 are half cells, and they keep the rails straight while the cells shift from row to row. That shift is what gives the mesh its honeycomb look.
Rows 5–144: Repeat Rows 3 and 4 seventy times. This is 143 mesh rows in total, from Row 2 to Row 144. Even-numbered rows match Row 4 and odd-numbered rows match Row 3. Row 144 ends on a full-loop row.
Row 145: Ch 1, turn. Sc in each of first 2 dc. [3 sc in next ch-5 loop, sc in next sc] 3 times. 3 sc in last ch-5 loop, sc in next dc, sc in top of turning ch. (19 sc: 2 + 12 + 3 + 2)
This is a conversion row. It puts 19 sc back on top of the mesh so the tab sits square.
Rows 146–163 (tab): Ch 1, turn. Sc in each sc across. (19 sc per row, 18 rows)
Do not fasten off. Go straight to the border, which you work in the same color.
Strip check: 3.8 in (9.7 cm) wide x 75.5 in (191.8 cm) long, flat.
Bee Appliqué (Make 70)
Body
Change color on the last yarn-over of the previous row. Carry the unused color up the edge.
With gold, ch 2.
- Row 1: 2 sc in 2nd ch from hook. (2)
- Row 2: Ch 1, turn, 2 sc in each sc. (4)
- Row 3 (cream): Ch 1, turn, 2 sc in first sc, sc in next 2, 2 sc in last. (6)
- Row 4 (cream): Ch 1, turn, sc across. (6)
- Row 5 (gold): Ch 1, turn, 2 sc in first sc, sc in next 4, 2 sc in last. (8)
- Row 6 (gold): Ch 1, turn, sc across. (8)
- Row 7 (cream): Ch 1, turn, sc across. (8)
- Row 8 (cream): Ch 1, turn, sc across. (8)
- Row 9 (gold): Ch 1, turn, sc2tog, sc in next 4, sc2tog. (6)
- Row 10 (gold): Ch 1, turn, sc across. (6)
Fasten off and leave a long gold tail for sewing. The body is 1.6 in (4.1 cm) wide and 2 in (5.1 cm) tall. It has a pointed gold tail and two cream stripes.
Head
With gold, make a magic ring.
- Rnd 1: 6 sc in ring, then sl st to first sc. (6)
- Rnd 2: Ch 1, 2 sc in each sc, then sl st to first sc. (12)
Fasten off with a tail. The head is 0.8 in (2.0 cm) across.
Wings (make 2 per bee)
With cream, ch 4 and sl st to the first ch to form a ring.
- Row 1: Ch 3 (counts as dc), 8 dc in ring. (9 dc)
- Row 2: Ch 1, turn. 2 sc in first dc, then [sc in next dc, 2 sc in next dc] 4 times. (14 sc)
Fasten off. Each wing is 1.4 in (3.6 cm) long. The dc fan forms the inner texture and the sc row makes a smooth rim.
Antennae (make 2 per bee)
With gold, work a picot knob, then ch 4 more. Fasten off. Each antenna is 0.6 in (1.5 cm) long.
Assembling the Layers
Put the layers together in this order:
1. Pin the 2 wings with their ring ends meeting at the center, angled slightly upward.
2. Lay the body over the wing bases, with its widest gold stripe level with the wings.
3. Overlap the head on top of Row 10 of the body.
4. Tuck the antenna ends under the top of the head.
Sew each layer down to the layer below it with small stitches through the back loops. Weave in all ends except the body tail, which you will use to attach the bee.
Make All Pieces
- Gold strips: 4
- Cream strips: 3
- Bees: 70 (10 per strip), with identical colors on every strip
Rod layout, left to right (G = gold, C = cream):
| G1 | C1 | G2 | C2 | G3 | C3 | G4 |
| 10 | 10 | 10 | 10 | 10 | 10 | 10 |  bees
Bee placement on every strip: Center each bee on mesh Rows 10, 24, 38, 52, 66, 80, 94, 108, 122 and 136. That puts them 7 in (17.8 cm) apart. Center each bee between the rails.
Sew through the mesh strands and sc points, not across open holes. On any strip, the wing tips should sit at least 0.1 in inside the rails.
Joining (Hanging Assembly)
The strips are joined only by the rod. Finish the Border (next section) on each strip before you fold the pocket.
Method: Fold the tab to the WS so the bordered top edge of Row 163 lies along the back of Row 145. Whipstitch the edges together stitch-to-stitch. Each of the 19 tab sts goes to 1 sc of Row 145, plus 1 border corner st at each end. This gives 21 matched pairs, so the pocket stays square and does not twist.
Tension: Keep the whipstitches firm but not tight. If the seam pulls, the pocket top will pucker and the strip will hang crooked.
Pocket checkpoint: The tab is 3.6 in (9.1 cm) long. With the 0.2 in (0.5 cm) border it gives a pocket circumference of 3.8 in (9.7 cm). That fits a rod up to 1 in (2.5 cm) in diameter. The pocket stands about 1.9 in (4.8 cm) above Row 145.
Slide the strips onto the rod in the order G1 to G4 and space them 0.5 in (1.3 cm) apart.
Size checkpoint: 7 x 4.2 in + 6 x 0.5 in = 32.4 in (82.3 cm) total width.
Border
The border uses the same gauge as the strip: 5 sc per inch along every edge.
Round 1 (RS): Use the strip color, continuing from Row 163.
- Top edge: Ch 1, 3 sc in first st of Row 163, sc in next 17 sts, 3 sc in last st.
- First long side: Work down the row ends. Work 1 sc in each sc row end (Rows 163–146, 145 and 1). Work 2 sc in each even-numbered mesh row end and 3 sc in each odd-numbered mesh row end. (377 sc)
- Bottom edge: Work into the free loops of the foundation ch. 3 sc in first ch, sc in next 17 ch, 3 sc in last ch.
- Second long side: Work as for the first long side. (377 sc)
- Sl st to the first sc and fasten off.
Counts per side:
– Top and bottom: 17 sc between corners
– Long sides: 377 sc between corners
– Corners: 4 groups of 3 sc
Round total: 2 x 17 + 2 x 377 + 4 x 3 = 34 + 754 + 12 = 800 sts
Why the math works:
– The short edges have 19 sts. The 2 end sts become the corner centers, which leaves 17 between them.
– Each mesh row is 0.5 in tall. Alternating 2 and 3 sc gives 5 sc per 1 in, which matches the sc gauge.
– The long side has 72 even rows x 2 = 144 sc and 71 odd rows x 3 = 213 sc, plus 20 sc rows x 1 = 20 sc. That gives 377 sc.
After the border: 4.2 in (10.7 cm) wide x 75.9 in (192.8 cm) long, flat.
Final Blocking
- Weave in all remaining ends along the rails, not through the open mesh.
- Soak each finished strip with its bees in cool water for 15 minutes.
- Press out the water in a towel. Do not wring it.
- Lay the strip flat and pin the rails straight at 4.2 in (10.7 cm) wide.
- Pin out the honeycomb cells evenly and pin each bee wing flat.
- Check the length but do not stretch it past 75.9 in (192.8 cm) flat.
- Let it dry completely before you hang it.
Final Quality-Control Checklist
- Every strip is 4.2 in (10.7 cm) wide, and all 7 strips are within 0.5 in (1.3 cm) of each other in length.
- The rails are straight with no waves at the border.
- Each strip has 10 bees centered at the right rows.
- The bee stripes run gold, cream, gold, cream, gold from tail to head.
- The pocket seams are even and slide freely on the rod.
- No ends are visible on the front.
Troubleshooting
Rails ripple: You have too many border sts. Use 2 sc in every mesh row end.
Rails pull in: You have too few border sts, or the dc rails are tight. Use a looser hook for the dc rail sts.
Mesh twists when it hangs: The loop chains are uneven. Count to exactly 5 ch on every loop.
Wings ruffle: Work Row 2 with 1 sc in each dc except the first, last and center dc.
Strips hang at different lengths: Block them together and pin to the same flat length.
Bees sag forward: Add tacking stitches at the wing tips and the tail.
Care
Hand wash in cool water with mild soap, then lay flat to dry. Do not tumble dry, because the long strips can stretch and tangle.

Final Notes
The measurement chain is simple:
– 19 sc gives 3.8 in (9.7 cm) wide.
– Row 1, then 143 mesh rows, then Row 145 gives 71.9 in (182.6 cm).
– The 18-row tab adds 3.6 in (9.1 cm).
– The 800-st border brings the strip to 4.2 in (10.7 cm) x 75.9 in (192.8 cm) flat.
– The rod pocket gives a hanging length of about 74.0 in (188.0 cm).
– Seven strips spaced 0.5 in (1.3 cm) apart fill 32.4 in (82.3 cm) of rod.
Check each number as you go and your curtain will hang straight and even.
Happy crocheting!