

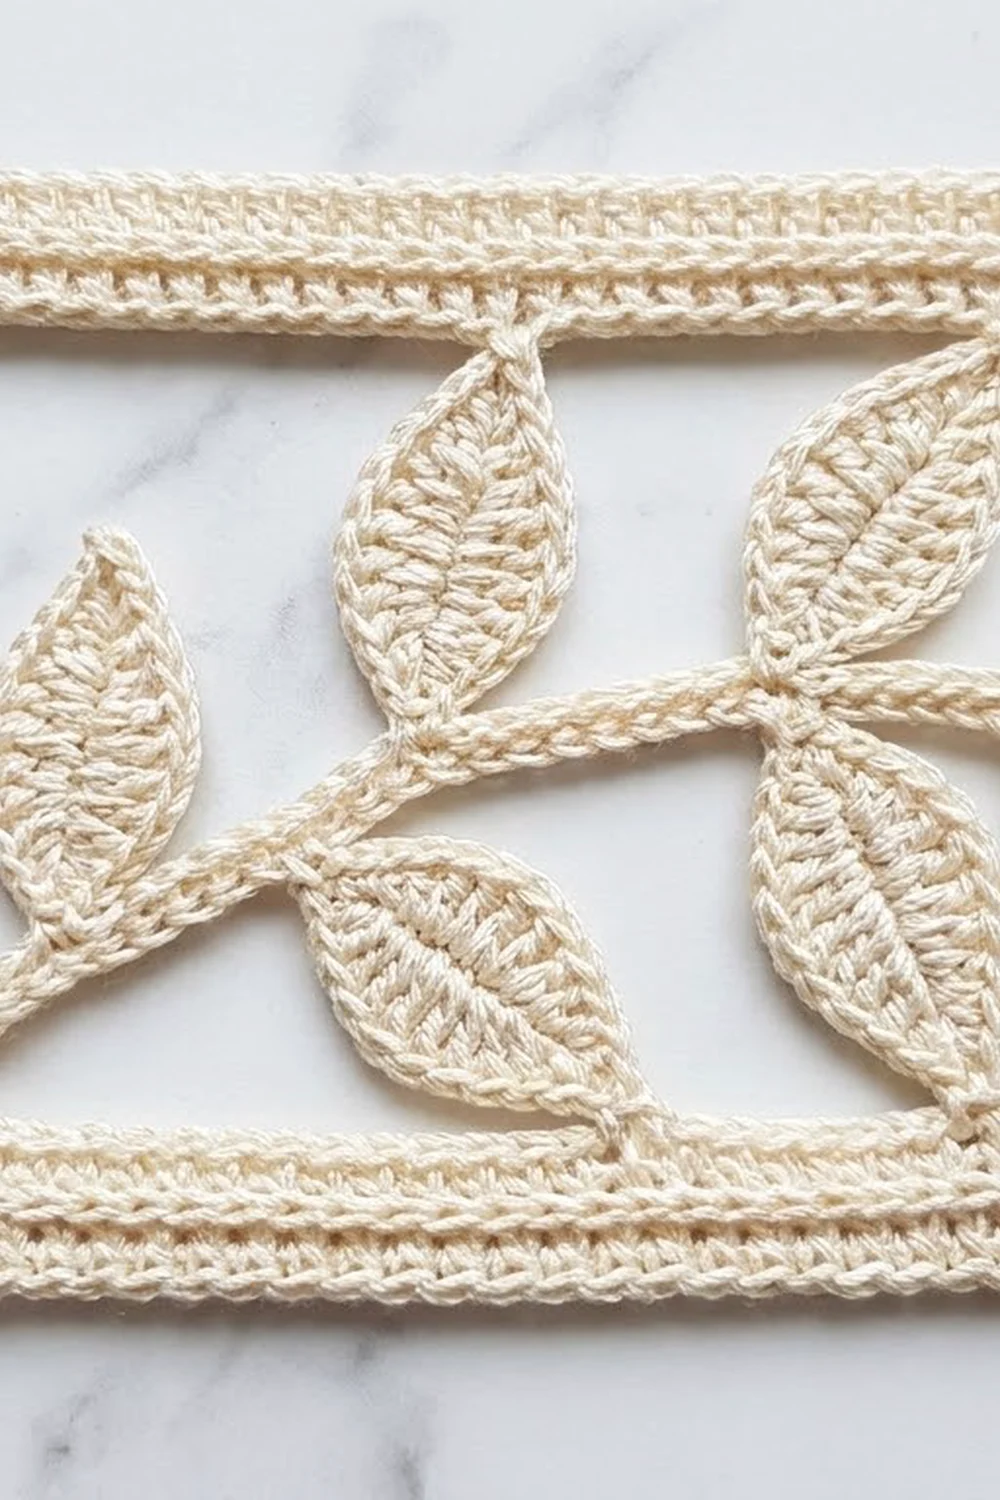
Seven slim lace strips, four in deep sage green and three in soft cream, hang side by side in a doorway. Each strip is a ladder-edged trellis split into tall sections. In every section an olive branch climbs from corner to corner, with raised leaves and two round berries.
The style is light and botanical with a vintage Irish-crochet feel. Because the strips are separate, they move and part easily when you walk through, and each one can be drawn aside on its own.
This pattern uses US crochet terms. Each finished strip measures 5.5 in (14.0 cm) wide by 78.5 in (199.4 cm) long, plus 2 in (5.1 cm) hanging tabs. Seven strips together cover about 38.5 in (97.8 cm) of rod width.
For each strip you make two ladder rails, connect them with 14 crossbars, crochet 13 vine motifs and tack them into the sections, then work one round of single crochet border and two tabs.
Finished Size and Construction
- Strip size: 5.5 in x 78.5 in (14.0 cm x 199.4 cm), excluding tabs
- Skill level: Intermediate
- Terminology: US
- Yarn weight: DK (3), mercerized cotton
- Hook: 4.0 mm (G-6)
- Number of pieces: 7 strips (4 green, 3 cream), not joined to each other
- Layout: G – C – G – C – G – C – G, hung side by side
- Size before border: 5 in x 78 in (12.7 cm x 198.1 cm)
- Section size: 3.5 in wide x 6 in tall (8.9 cm x 15.2 cm), 13 per strip
- Border depth: 0.25 in (0.6 cm) per side
Materials
Choose a smooth, mercerized DK cotton of about 110 m (120 yd) per 50 g. It shows off the leaf veins and hangs without stretching. Avoid fuzzy or very stretchy yarns, because long strips will grow.
- Green: 400 g (about 880 m / 960 yd), 8 balls
- Cream: 300 g (about 660 m / 720 yd), 6 balls
These quantities include a margin of roughly 10 g per strip for gauge swatches and tails.
Tools:
– 4.0 mm (G-6) hook
– Tapestry needle
– Stitch markers (about 30)
– Rust-proof pins and a long blocking surface
– Tape measure
– Curtain rod, about 1 in (2.5 cm) in diameter
Abbreviations (US Terms)
- ch – chain
- sl st – slip stitch
- sc – single crochet
- hdc – half double crochet
- dc – double crochet
- sp – space
- st(s) – stitch(es)
- RS – right side
Berry (special stitch): Ch 3. In the 3rd ch from the hook, work 5 dc, leaving the last loop of each on the hook (6 loops on hook). Yo and draw through all 6 loops, then ch 1 to lock.
Leaf (special stitch): Ch 8. Side 1: starting in the 2nd ch from the hook, work sc, hdc, dc, dc, hdc, sc, sl st (7 sts, tip to base). Side 2: working in the free loops of the same 7 ch, work sl st, sc, hdc, dc, dc, hdc, sc (7 sts, base to tip). Ch 2 for the point, then sl st in the first sc of Side 1. Vein: surface sl st 6 times down the center seam to the base. Each leaf has 14 sts plus a ch-2 tip and is 1.75 in (4.4 cm) long.
Gauge and Checkpoints
Gauge: 16 sc and 8 dc rows = 4 in (10.2 cm).
Test one section before committing to a full strip. Make two rails of 12 rows, connect them with a bar at the bottom and a bar at the top, and tack in one vine motif.
Checkpoints:
– Rail width: 0.75 in (1.9 cm)
– 12 rail rows: 6 in (15.2 cm)
– Bar length: 3.5 in (8.9 cm)
– Test section width: 5 in (12.7 cm)
– Vine stem chain before working back: 7 in (17.8 cm)
– Each leaf: 1.75 in (4.4 cm)
If your sample is too big, go down 0.5 mm. If it’s too small, go up 0.5 mm. Row height matters most. Over 156 rows, an error of only 0.05 in (0.1 cm) per row changes the strip length by 7.8 in (19.8 cm).
Part 1: Ladder Rails (make 2 per strip)
Each rail row is two dc posts joined by a ch-1 rung, which gives the stacked-rectangle ladder look.
Foundation: Ch 5, dc in the 5th ch from the hook. The skipped 4 ch count as the first post plus a ch-1 rung. This is Row 1: 2 posts and 1 rung.
Rows 2–156: Ch 4 (counts as dc + ch 1), turn, dc in the 3rd ch of the turning ch of the previous row. Each row has 2 posts and 1 rung.
Place a marker on the same edge at the top of Rows 12, 24, 36, 48, 60, 72, 84, 96, 108, 120, 132 and 144 (12 markers). This marked edge becomes the inner edge.
Fasten off. Each rail should measure 0.75 in x 78 in (1.9 cm x 198.1 cm).
Checkpoint: After Row 12, the rail measures 6 in (15.2 cm). After Row 78, it measures 39 in (99.1 cm).
Make a second rail. Place its markers on the opposite edge when the two rails lie side by side, so the markers face each other.
Part 2: Crossbars (14 per strip)
Lay the rails parallel with the marked edges facing in, and line up the rows exactly.
Bar method:
1. Join the yarn with a sl st around the inner post of the left rail at the bar position.
2. Ch 14.
3. Sl st around the inner post of the right rail at the same row.
4. Turn and work 1 sc in each ch across (14 sc).
5. Sl st around the same left-rail post. Fasten off.
Bar positions:
– Bottom bar: at the base of Row 1
– Internal bars: at each of the 12 markers
– Top bar: at the top of Row 156
That makes 1 + 12 + 1 = 14 bars, which create 13 sections of 12 rows each (13 x 12 = 156 ✓).
Each bar has 14 sc and measures 3.5 in (8.9 cm). The frame width is 0.75 + 3.5 + 0.75 = 5 in (12.7 cm).
Weave in the ends along the bars rather than up the rails. This keeps the rails from going stiff.
Part 3: Olive Vine Motif (13 per strip)
Stem: Ch 28 (7 in / 17.8 cm).
Tip leaf: Ch 8 and work 1 Leaf, ending at the base. Sl st in the last stem ch.
Working back along the stem: Work all sl sts in the back bump of the stem chain.
- Sl st in the next 4 ch, Leaf, sl st in the same stem ch.
- Sl st in the next 4 ch, Leaf, sl st in the same stem ch.
- Sl st in the next 4 ch, then work the Berry Twig:
- Ch 6, Berry.
- Sl st in the next 3 twig ch (this is the fork).
- Ch 4, Berry, sl st back in each of the 4 ch.
- Sl st in the remaining 3 twig ch, then sl st in the same stem ch.
- Sl st in the next 4 ch, Leaf, sl st in the same stem ch.
- Sl st in the next 4 ch, Leaf, sl st in the same stem ch.
- Sl st in the remaining 8 ch.
Check: 4 + 4 + 4 + 4 + 4 + 8 = 28 sl sts along the stem ✓. Each motif has 5 leaves (1 tip leaf + 4 side leaves) and 2 berries.
Make all the side leaves on the same side of the stem. Make the twig on the opposite side, so the leaves rise and the berries hang down.
Fasten off, leaving a 12 in (30.5 cm) tail for tacking.
Make All Pieces
Per strip: 2 rails, 14 bars, 13 vine motifs.
| Color | Strips | Rails | Bars | Motifs |
|---|---|---|---|---|
| Green | 4 | 8 | 56 | 52 |
| Cream | 3 | 6 | 42 | 39 |
Layout across the rod (left to right):
[G] [C] [G] [C] [G] [C] [G]
 1   2   3   4   5   6   7
All strips hang at the same length, and the bars line up across the curtain.
Joining
Joining here means tacking the motifs into each strip’s frame. The seven strips are never joined to each other, so each one can swing and be drawn aside on its own.
Stitch-to-stitch logic: Each motif fills one 12-row section. Using the motif tail, tack it with 3–4 small whipstitches at each of these 5 points:
- The stem base to the inner left-rail post 2 rows above the lower bar
- The tip-leaf point to the inner right-rail post 2 rows below the upper bar
- The tip of the first side leaf (nearest the tip) to the upper bar, at its 6th sc from the left
- The tip of the last side leaf (nearest the base) to the inner left-rail post, at the 7th row of the section
- The twig fork to the lower bar, at its 10th sc from the left
The vine should run diagonally from lower left to upper right, with the berries hanging toward the lower right corner.
Tension: Tack only enough to hold the motif flat. If you pull the stem taut, the section will pucker and the rails will bow inward.
Size checkpoint: After all 13 motifs are in, lay the strip flat. It should measure 5 in x 78 in (12.7 cm x 198.1 cm), and the rails should be straight and parallel.
Border
Border gauge: 4 sc per in (2.5 cm) along every edge, the same as the main gauge.
Round 1: With RS facing, join the yarn in the top right corner. Work the sides in this order:
- Top edge (20 sc): 3 sc across the top of the right rail (post, rung, post), 14 sc across the top bar, 3 sc across the top of the left rail. Ch 1 for the corner.
- Long side (312 sc): 2 sc around each of the 156 row-end posts. Ch 1 for the corner.
- Bottom edge (20 sc): 3 sc across the base of the rail, 14 sc in the free loops of the bottom bar chain, 3 sc across the base of the other rail. Ch 1 for the corner.
- Long side (312 sc): 2 sc around each of the 156 row-end posts. Ch 1, then sl st to the first sc.
Round 1 total: 664 sc plus 4 ch-1 corner spaces. The corner spaces are not counted in the side totals.
Why the math works:
– 2 dc rows make 1 in (2.5 cm), and 2 sc per row gives 4 sc per in. That matches the gauge, so the long edges stay flat: 312 sc ÷ 4 = 78 in (198.1 cm) ✓.
– The short edge is 3 + 14 + 3 = 20 sc. At 4 sc per in that is 5 in (12.7 cm), which matches the frame width ✓.
– The border adds 0.25 in (0.6 cm) on each side, giving a finished strip of 5.5 in x 78.5 in (14.0 cm x 199.4 cm).
Tabs (top edge only):
1. Join the yarn in the 1st sc of the top edge, ch 16, then sl st in the 3rd sc.
2. Turn and work 20 sc into the ch-16 loop. Sl st to the 1st sc and fasten off.
3. Repeat over the left rail, using the 18th and 20th sc of the top edge.
Each tab hangs 2 in (5.1 cm) and fits a rod up to 1 in (2.5 cm) in diameter.
Final Blocking
- Soak the strip in cool water for 15 minutes, then gently squeeze it out. Do not wring.
- Roll it in a towel to remove the excess water.
- Lay it on a long blocking surface. Two blocking mats end to end on a bed works well.
- Pin the rails straight at 5.5 in (14.0 cm) wide. Check the width every 12 in (30.5 cm).
- Pin the length to 78.5 in (199.4 cm). Do not stretch it past this, because cotton relaxes downward when it hangs.
- Smooth each leaf flat with your fingers, pin its point, and pinch each berry round.
- Let it dry completely, which takes about 24 hours.
- Hang it for one day, then re-measure before you trim any tails.
Final Quality-Control Checklist
- [ ] Each rail has 156 rows and measures 78 in (198.1 cm) before the border.
- [ ] There are 14 bars of 14 sc each, all level with the same row numbers on both rails.
- [ ] Each of the 13 sections has one motif with 5 leaves and 2 berries.
- [ ] All motifs run in the same direction, from lower left to upper right.
- [ ] Each motif is tacked at 5 points, and no section puckers.
- [ ] Border Round 1 has 664 sc: 20 + 312 + 20 + 312.
- [ ] Both tabs are the same size and spaced over the rails.
- [ ] There are 4 green strips and 3 cream strips, and all hang at the same length.
- [ ] All ends are woven in along the bars.
Troubleshooting
Rails bow inward: The bars are too tight. Re-chain them more loosely, or use a 4.5 mm hook for the ch 14 only.
Rails don’t line up: You missed a row. Count from the markers and fix it before adding bars.
Leaves curl: Your surface sl st vein is too tight. Work it more loosely, and wet block with pins at the tips.
Berries look flat: Pull each dc up to its full height before closing the bobble. Pinch the berries into shape while blocking.
Border edge ruffles: You have more than 2 sc per row. Count each long side and re-work to 312.
Border edge pulls in: You have fewer than 2 sc per row, or your border tension is tight. Re-work to 312 sc with a looser hand.
Strips hang at different lengths: Your row gauge drifted between strips. Measure every strip at Row 78, which should be 39 in (99.1 cm).
Care
Hand wash in cool water with mild soap, roll in a towel, and dry flat. Re-block if needed. Do not hang the strips wet, or they will stretch.

Final Notes
The measurements build on each other. Twelve rail rows make one 6 in (15.2 cm) section, and 13 sections make 78 in (198.1 cm). Two 0.75 in (1.9 cm) rails plus a 3.5 in (8.9 cm) bar make 5 in (12.7 cm) of width. The 0.25 in (0.6 cm) border brings each strip to 5.5 in x 78.5 in (14.0 cm x 199.4 cm), and seven strips span 38.5 in (97.8 cm). If you check your row gauge early, every strip will hang level with the others.
Happy crocheting!