
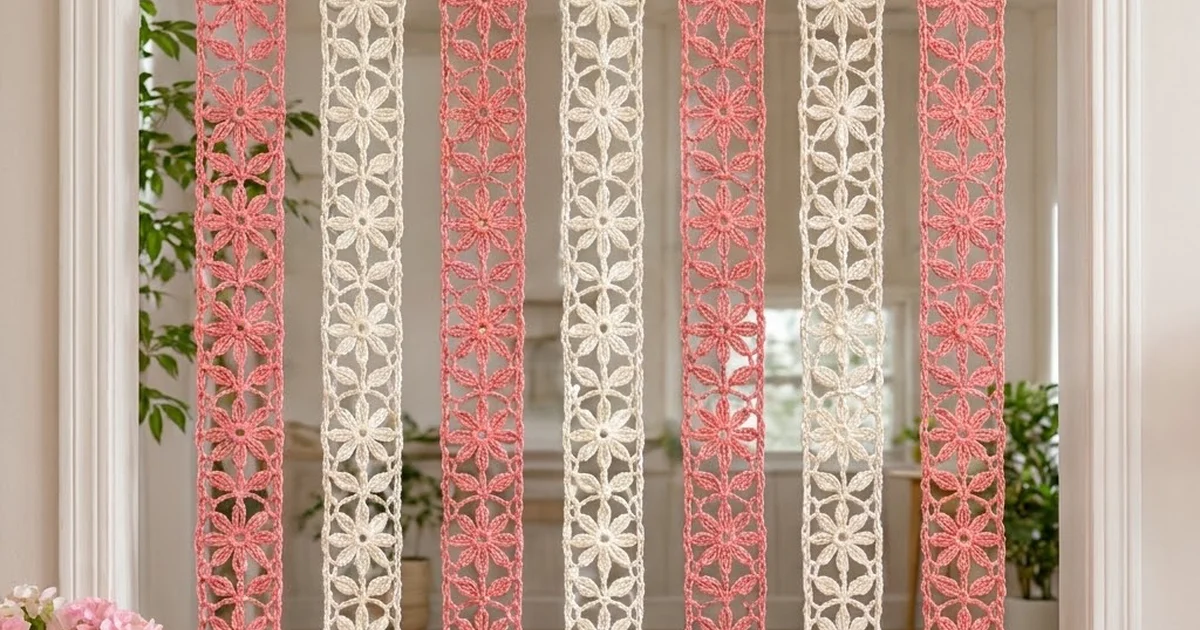
This airy door curtain is made of seven separate lace strips. Each strip is a column of eight-petal daisies with an open center, and between each pair of daisies sits a little leaf section. A light ladder-mesh border edges each strip, and two chain loops at the top hold it on the rod. The strips hang free, so the curtain moves when you walk through it and the light filters through the lace.
The sample alternates four coral-pink strips with three cream strips. The soft, cottage-style look works well in a doorway, a pantry opening, or across a closet. This pattern uses US crochet terms throughout.
Each finished strip measures 5.5 in (14.0 cm) wide and 77.5 in (196.9 cm) long. The hanging loops add about 2 in (5.1 cm), for a total drop of about 79.5 in (201.9 cm) from the top of the rod.
To build each strip, you crochet flower squares and leaf rectangles in rounds and join them into a column with slip stitches. Then you work a three-round border around the whole strip and add the two hanging loops in the last round.
Finished Size and Construction
- Finished strip size: 5.5 in x 77.5 in (14.0 cm x 196.9 cm), plus 2 in (5.1 cm) hanging loops
- Skill level: Intermediate
- Terminology: US crochet terms
- Yarn weight: DK (light worsted, weight 3) cotton
- Hook: 4.0 mm (US G-6)
- Number of pieces: 7 strips. Each strip is made from 25 motifs: 13 flower squares (Motif A) and 12 leaf rectangles (Motif B).
- Layout per strip: 1 column, alternating A, B, A, B… ending with A
- Motif A size: 4 in x 4 in (10.2 cm x 10.2 cm)
- Motif B size: 4 in wide x 2 in tall (10.2 cm x 5.1 cm)
- Strip size before border: 4 in x 76 in (10.2 cm x 193.0 cm)
- Border depth: 0.75 in (1.9 cm) on each side
Materials
Use a smooth mercerized or matte cotton in DK weight. Cotton keeps the petals crisp and hangs straight, and it doesn’t stretch out of shape the way acrylic can on a long hanging piece. The amounts below assume about 113 m per 50 g.
- Coral pink: about 600 g / 1,360 m (12 balls of 50 g), for 4 strips
- Cream: about 450 g / 1,020 m (9 balls of 50 g), for 3 strips
These amounts include a margin of about 15% for swatching, tension differences, and weaving in ends.
Tools:
– 4.0 mm (US G-6) crochet hook
– Tapestry needle
– Stitch markers (at least 4)
– Scissors
– Measuring tape
– Blocking mats and rust-proof pins
– Spray bottle
– Curtain rod up to 1 in (2.5 cm) in diameter
Abbreviations (US Terms)
- ch – chain
- sl st – slip stitch
- sc – single crochet
- hdc – half double crochet
- dc – double crochet
- sp(s) – space(s)
- st(s) – stitch(es)
- RS / WS – right side / wrong side
Special stitch – Petal (worked on a chain): Ch 8. Working back down the chain: sc in the 2nd ch from hook, hdc in the next ch, dc in each of the next 3 ch, hdc in the next ch, sc in the last ch. That’s 7 sts. The skipped chain at the far end is the petal tip.
Special stitch – Leaf (worked on a chain): Ch 10. Working back down the chain: sc in the 2nd ch from hook, hdc in the next ch, dc in each of the next 5 ch, hdc in the next ch, sc in the last ch. That’s 9 sts. The skipped chain at the far end is the leaf tip.
Special stitch – Stem (worked on a chain): Ch 5, then sl st in the 2nd ch from hook and in each of the next 3 ch. That’s 4 sl sts. The skipped chain is the stem tip.
Gauge and Checkpoints
Gauge: 18 sc = 4 in (10.2 cm) over a sc row.
Before you commit to a full strip, make one Motif A and one Motif B and block them lightly. Check them at each stage:
- Motif A, after Rnd 1: the ring is about 1.25 in (3.2 cm) across, with a center hole of about 0.5 in (1.3 cm).
- Motif A, after Rnd 2: the petals measure about 3.5 in (8.9 cm) from tip to tip.
- Motif A, after Rnd 4: the square measures 4 in (10.2 cm) on each side.
- Motif B, after Rnd 4: the rectangle measures 4 in x 2 in (10.2 cm x 5.1 cm).
If your motifs are too big: go down to a 3.75 mm hook.
If your motifs are too small: go up to a 4.5 mm hook.
Only the widths have to match exactly, because Motif A and Motif B are joined edge to edge across the strip. If the strip ends up slightly longer or shorter, it only changes the drop.
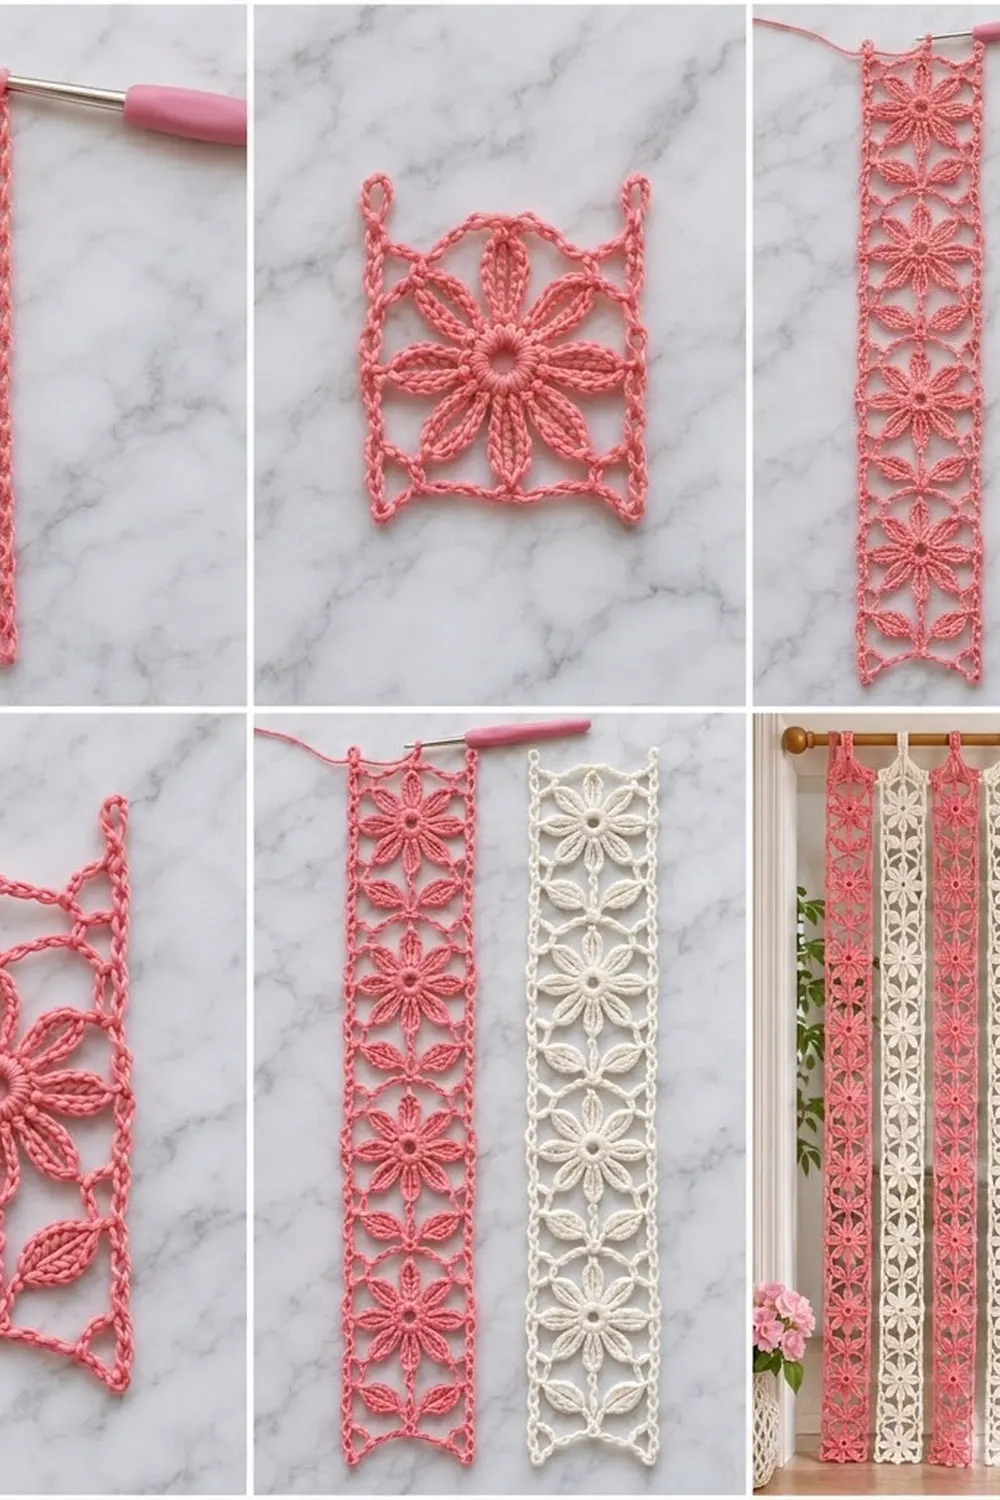
Motif A: Daisy Square (make 13 per strip)
Rnd 1 (RS): Ch 6 and join with a sl st to form a ring. Ch 3 (counts as dc), then work 23 dc in the ring. Join with a sl st to the top of the beginning ch-3. (24 dc)
Rnd 2 (petals):
1. Sl st in the same st as the join.
2. Work 1 Petal, skip the next 2 dc of Rnd 1, then sl st in the next dc. Repeat from * 7 more times.
3. On the last repeat, the final sl st goes into the first sl st of the round.
You now have 8 petals, each with 7 sts. Each petal spans 3 dc of Rnd 1. Fasten off.
Rnd 3 (frame chain):
1. Join the yarn with a sl st in the tip of any petal.
2. Ch 1. Sc in the petal tip, ch 7. Repeat from * 7 more times.
3. Join with a sl st to the first sc.
(8 sc, 8 ch-7 sps)
This round draws the thin chain frame that links the petal tips. Pick one petal tip and mark it as a corner. Going around, the tips now alternate: corner, side, corner, side, and so on.
Rnd 4 (squaring):
1. Ch 1. Work (sc, ch 2, sc) in the first sc, which is a corner.
2. 7 sc in the next ch-7 sp, sc in the next sc (side tip), 7 sc in the next ch-7 sp, then (sc, ch 2, sc) in the next sc (corner). Repeat from * 3 times.
3. Omit the last corner on the final repeat, and join with a sl st to the first sc.
Count: Each side has 17 sc between the corner ch-2 sps (1 + 7 + 1 + 7 + 1). That gives 68 sc + 4 ch-2 corner sps. Here, “per side” means the sc between two corner ch-2 sps; the ch-2 sps aren’t counted as stitches.
Fasten off and weave in the ends.
Motif B: Leaf Rectangle (make 12 per strip)
Rnd 1 (RS): Ch 4 and join with a sl st to form a ring. Ch 1, then work 8 sc in the ring. Join with a sl st to the first sc. (8 sc)
Rnd 2 (stems and leaves):
1. Work 1 Stem into the first sc, then sl st in the same sc.
2. Sl st in each of the next 2 sc.
3. Work 1 Leaf, then sl st in the same sc.
4. Sl st in each of the next 2 sc.
5. Repeat steps 1–4 once more. The last sl st lands in the first sc.
The result is a stem at the top (sc 1), a leaf to the right (sc 3), a stem at the bottom (sc 5), and a leaf to the left (sc 7). Fasten off.
Rnd 3 (frame chain):
1. Join the yarn in the top stem tip.
2. Ch 1. Sc in the stem tip, ch 9, sc in the right leaf tip, ch 9, sc in the bottom stem tip, ch 9, sc in the left leaf tip, ch 9.
3. Join with a sl st to the first sc.
(4 sc, 4 ch-9 sps)
Rnd 4 (squaring into a rectangle):
1. Ch 1. Sc in the first sc (top stem).
2. Work [8 sc, ch 2, 3 sc] in the next ch-9 sp, then sc in the next sc (right leaf).
3. Work [3 sc, ch 2, 8 sc] in the next ch-9 sp, then sc in the next sc (bottom stem).
4. Work [8 sc, ch 2, 3 sc] in the next ch-9 sp, then sc in the next sc (left leaf).
5. Work [3 sc, ch 2, 8 sc] in the last ch-9 sp.
6. Join with a sl st to the first sc.
Count:
– Top side and bottom side: 8 + 1 + 8 = 17 sc each
– Left side and right side: 3 + 1 + 3 = 7 sc each
– Total: 48 sc + 4 ch-2 corner sps
The top and bottom edges of Motif B have 17 sc, the same as each side of Motif A, so the two motifs join stitch to stitch.
Fasten off and weave in the ends.
Make All Pieces
You need 25 motifs for each strip.
| Color | Strips | Motif A | Motif B |
|---|---|---|---|
| Pink | 4 | 52 | 48 |
| Cream | 3 | 39 | 36 |
| Total | 7 | 91 | 84 |
Layout of one strip, top to bottom:
A  (top)
B
A
B
A
B
A
B
A
B
A
B
A  (middle, 7th A)
B
A
B
A
B
A
B
A
B
A
B
A  (bottom)
Curtain order, left to right: Pink – Cream – Pink – Cream – Pink – Cream – Pink
Joining
Block all the motifs to size before you join them. Blocking makes each 17-sc edge lie straight.
Method: Slip-stitch seam on the WS, through the back loops only.
- Hold the bottom edge of an A and the top edge of a B with WS together and RS facing out.
- Sl st through both matching corner ch-2 sps.
- Sl st through the back loops of each of the 17 matching sc pairs.
- Sl st through the 2 corner ch-2 sps at the other end, then fasten off.
Stitch-to-stitch logic: Each seam joins 17 sc to 17 sc. There are no extra stitches to ease in or skip.
Tension: Keep your slip stitches as loose as the sc you’re working through. Tight seams make the strip pucker and shorten it. If the seam ridge feels hard and stiff, use a 4.5 mm hook for the seams only.
Repeat until all 24 seams are done (13 A + 12 B in alternating order).
Size checkpoint: Lay the strip flat. It should measure 4 in x 76 in (10.2 cm x 193.0 cm). That’s 13 x 4 in for the flower squares plus 12 x 2 in for the leaf rectangles.
Border
Border gauge: Along the strip edges, 1 sc goes into each sc. At each seam, you also work 1 sc into each motif’s corner ch-2 sp, which is 2 sc per seam. This keeps the edge at about 4.5 sts per inch, matching the motif gauge.
Rnd 1 (sc):
1. With RS facing, join the yarn in the top right corner ch-2 sp of the top Motif A. Ch 1.
2. Work 3 sc in each of the 4 outer corner ch-2 sps of the strip, and mark the middle sc of each group as the corner st.
3. Along the edges, work 1 sc in each sc.
4. At each seam, work 1 sc in each of the 2 corner ch-2 sps that meet there.
5. Join with a sl st to the first sc.
Count:
– Each Motif A contributes 17 + 2 = 19 sts to each long side.
– Each Motif B contributes 7 + 2 = 9 sts to each long side.
– Long side, between corner sts: 13 x 19 + 12 x 9 = 247 + 108 = 355 sts
– Short side, between corner sts: 1 + 17 + 1 = 19 sts
– Total: 2 x 355 + 2 x 19 + 4 corner sts = 752 sc
Rnd 2 (ladder mesh):
1. Sl st to the first corner st and ch 6. This counts as dc + ch 3.
2. Dc in the same corner st.
3. Along each side: ch 1, skip 1 st, dc in the next st. Repeat across, ending with ch 1, skip 1 st.
4. At each corner st, work (dc, ch 3, dc).
5. Join with a sl st to the 3rd ch of the beginning ch-6.
Count:
– Long side: 177 dc + 178 ch-1 sps
– Short side: 9 dc + 10 ch-1 sps
– Corner dc: 8
– Total: 380 dc, 376 ch-1 sps, 4 ch-3 corner sps
Why the math works: Both side counts are odd (355 and 19). Because of that, the pattern of “skip 1, dc in next” starts and ends with a ch-1 sp on every side, and the corners come out symmetrical.
Rnd 3 (sc edge and hanging loops):
1. Ch 1. Sc in each dc and in each ch-1 sp around.
2. In each of the 2 bottom corner ch-3 sps, work 3 sc.
3. In each of the 2 top corner ch-3 sps, work (sc, ch 20, sc). The ch-20 forms a hanging loop.
4. Join with a sl st to the first sc and fasten off.
Count:
– Long side: 2 + 177 + 178 = 357 sc
– Short side: 2 + 9 + 10 = 21 sc
– Corners: 6 sc at the bottom + 4 sc at the top
– Total: 766 sc + 2 ch-20 loops
Border checkpoint: The strip should now measure 5.5 in x 77.5 in (14.0 cm x 196.9 cm). That’s 4 in (10.2 cm) plus 0.75 in (1.9 cm) on each side for the width, and 76 in (193.0 cm) plus 0.75 in (1.9 cm) at each end for the length.
Final Blocking
- Weave in all the ends before blocking. Run them along the frame lines so they stay hidden.
- Spray the strip until it’s evenly damp, but not dripping.
- Lay it flat on blocking mats in sections. Pin the long edges straight at 5.5 in (14.0 cm) wide.
- Pin each petal tip and leaf tip outward so the petals look pointed and evenly spaced.
- Open each flower’s center hole with a fingertip.
- Pin each hanging loop flat so it forms a smooth oval.
- Let it dry completely, then unpin it and move on to the next section.
- Hang the strips for 24 hours before trimming any length. Cotton can drop slightly under its own weight.
Final Quality-Control Checklist
- Every Motif A has 8 petals and an open center, and measures 4 in (10.2 cm) square.
- Every Motif B has 2 leaves, 2 stems, and 17 sc on its top and bottom edges.
- All 24 seams lie flat, with no puckers.
- The border counts are 752 (Rnd 1), 380 dc (Rnd 2), and 766 sc (Rnd 3).
- Every strip is 5.5 in (14.0 cm) wide.
- All 7 strips are within 0.5 in (1.3 cm) of each other in length.
- Each hanging loop slides easily over the rod.
Troubleshooting
Petals curl or cup: The Rnd 1 ring is too tight. Loosen your tension on the dc, or use a ch-7 ring instead.
The square ripples in Rnd 4: Your ch-7 frame is too long for your tension. Go down to ch 6 and work 6 sc in each sp, then recheck that each side has 17 sc. If you change the count, change it on every motif.
Motif B is narrower than Motif A: The leaves are tight. Use a hook 0.25 mm larger for the Leaf chains only.
The border waves along the long edges: Rnd 1 has too many stitches. Recheck the 355 count, and make sure you put only 1 sc in each seam corner sp.
The border pulls the strip in: Your Rnd 2 chains are tight. Work the ch-1s more loosely, or use a 4.5 mm hook for Rnd 2.
Strips hang at different lengths: Block them again together. Pin all 7 strips to the same length while damp.
Care
Hand wash in cool water with a mild detergent and press out the water without twisting. Dry flat and re-pin the petal tips if they need it, then rehang.

Final Notes
The measurement chain is simple. The motif gauge of 18 sc = 4 in (10.2 cm) gives you 4 in (10.2 cm) daisy squares and 4 in x 2 in (10.2 cm x 5.1 cm) leaf rectangles. Thirteen squares and twelve rectangles make a 4 in x 76 in (10.2 cm x 193.0 cm) column. The three-round border adds 0.75 in (1.9 cm) on each side, so each strip finishes at 5.5 in x 77.5 in (14.0 cm x 196.9 cm). Check each stage before moving on, and all seven strips will hang evenly in your doorway.
Happy crocheting!