

The Starflutter Lace Door Curtain is a set of seven airy hanging strips that fill a doorway with stars and butterflies. Each strip is a single column of motifs, with five-point stars alternating with open-winged butterflies. A chain lattice holds the motifs and forms small diamond windows between them.
The sample alternates coral and cream strips: four coral and three cream. Each strip is worked in one color only, so the stripes stay crisp and planning is simple. The style is light, graphic lace that lets light through without hiding the room beyond.
This pattern uses US crochet terms. Each finished strip measures 4 in (10.2 cm) wide and 74 in (188.0 cm) long, including the hanging loop. Seven strips hung with 1.25 in (3.2 cm) gaps cover 35.5 in (90.2 cm) of rod.
Construction is modular. You crochet the stars and butterflies in the round, joining each new motif to the one above as you go. A three-round chain border then builds the lattice, the straight side rails, and the hanging loop. The strips are never sewn to each other, and each one hangs on its own loop.
Finished Size and Construction
- Finished strip size: 4 in (10.2 cm) wide x 74 in (188.0 cm) long
- Finished curtain: 35.5 in (90.2 cm) wide across the rod
- Skill level: Intermediate
- Terminology: US
- Yarn weight: Worsted (#4), 100% cotton
- Hook: 5.0 mm (H-8)
- Number of pieces: 7 strips, each with 17 motifs (9 stars, 8 butterflies)
- Layout: 7 strips side by side, unjoined
- Motif size: star 3.5 in (8.9 cm) tip to tip; butterfly 3.5 in (8.9 cm) wide x 3 in (7.6 cm) tall
- Size before border: motif column 3.5 in (8.9 cm) wide x 71.5 in (181.6 cm) long
- Border depth: about 0.25 in (0.6 cm) per side, plus a 2 in (5.1 cm) hanging loop
Materials
Choose a smooth 100% cotton in worsted weight. Cotton holds the star points crisply, blocks well, and stretches less than acrylic when it hangs. Avoid splitty or fuzzy yarns, because the lattice depends on clean chains.
- Coral: 340 g (about 545 m) for 4 strips
- Cream: 260 g (about 415 m) for 3 strips
Each strip uses about 75 g (about 120 m). The quantities above include a margin of roughly 10–15% for swatches and tension differences.
Tools:
- 5.0 mm (H-8) crochet hook
- Tapestry needle
- Stitch markers
- Scissors
- Measuring tape and ruler
- Blocking mats, rustproof pins, and a spray bottle
- Curtain rod at least 36 in (91.4 cm) long and up to 1 in (2.5 cm) thick
Abbreviations (US Terms)
- ch – chain
- sl st – slip stitch
- sc – single crochet
- hdc – half double crochet
- dc – double crochet
- tr – treble crochet
- MR – magic ring
- sp – space
- st(s) – stitch(es)
- Rnd – round
Special stitch – Connector bar: ch 4, sl st into the bottom point of the motif above, ch 4. This makes a two-strand bar about 1 in (2.5 cm) long that links two motifs.
Gauge and Checkpoints
Most of the strip is open lace, so check your gauge on the motifs and on the rails.
- Rail gauge: 16 sc = 4 in (10.2 cm); 4 ch is about 1 in (2.5 cm)
- Star Rnd 1: 1 in (2.5 cm) diameter
- Finished star: 3.5 in (8.9 cm) tip to tip
- Finished butterfly: 3.5 in (8.9 cm) wide x 3 in (7.6 cm) tall
Make one star and one butterfly first, then measure them after a light steam. If your star is larger than 3.5 in (8.9 cm), go down to a 4.5 mm hook. If it is smaller, go up to a 5.5 mm hook. Check again after the first join: the star, the connector bar and the butterfly together should measure 7.5 in (19.1 cm) from the star’s top tip to the butterfly’s bottom.
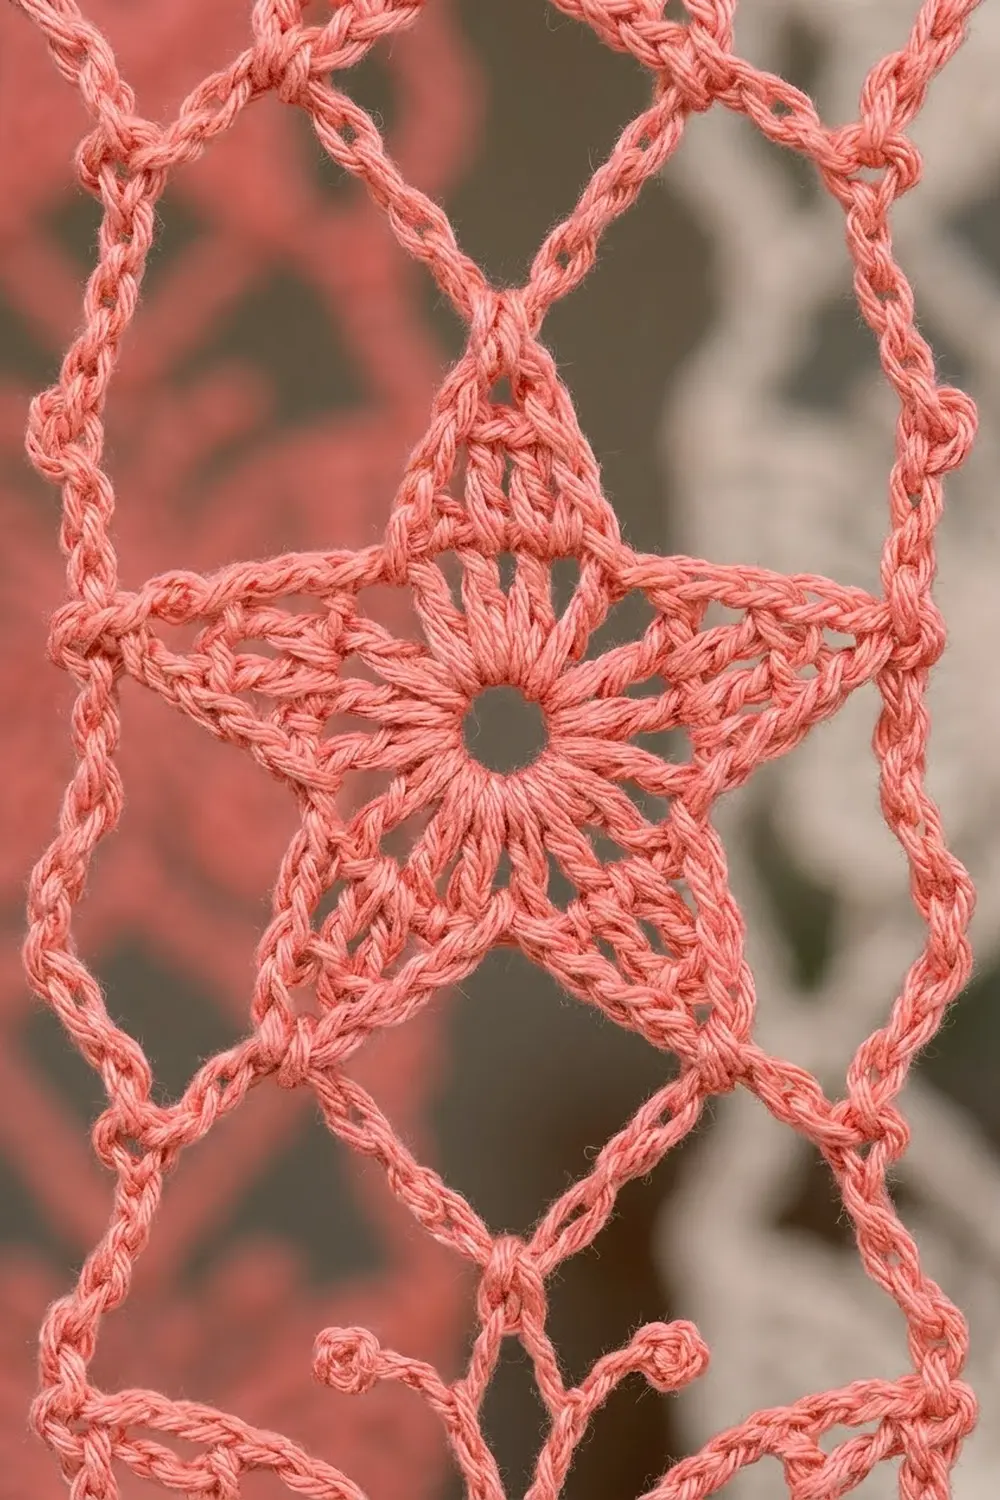
Star Motif
Make 9 per strip.
Rnd 1: MR, ch 3 (counts as dc), 14 dc in ring, sl st to top of ch-3. Pull the ring snug but leave a small center hole. (15 dc)
Rnd 2 (points): *Ch 6, sc in 2nd ch from hook, hdc in next ch, dc in next ch, tr in next 2 ch, skip next 2 dc of Rnd 1, sl st in next dc; repeat from * 4 more times. The last sl st lands in the joining st. (5 points, 5 sts each)
Rnd 3 (outline): Sl st along the first point to its tip. This point is the top tip (T). Ch 1, (sc, ch 3, sc) in tip, *work 5 sc evenly down the side of the point, sc in the sl st at the valley, work 5 sc evenly up the next point, (sc, ch 3, sc) in tip; repeat from * 3 more times, 5 sc down, sc in the last valley, 5 sc up, sl st to first sc. Fasten off. (65 sc and 5 ch-3 tip sps)
Each point has 13 sc: 2 at the tip, 5 down each side and 1 in the valley. Work Rnd 3 exactly as written only for the first star of each strip. Every other star works Rnd 3 with the connector bar (see Joining).
Star landmarks: the star has a top tip (T), an upper-left and an upper-right tip, a lower-left and a lower-right tip, and a bottom valley sc between the two lower points.
Butterfly Motif
Make 8 per strip.
Rnd 1: MR, ch 1, 8 sc in ring, sl st to first sc. (8 sc) Number them 1–8; sc 1 is the top of the body.
Rnd 2 (wing frames): Ch 1, sc in sc 1, ch 12, skip sc 2, sc in sc 3, ch 8, skip sc 4, sc in sc 5, ch 8, skip sc 6, sc in sc 7, ch 12, skip sc 8, sl st to first sc. (4 sc, two ch-12 loops, two ch-8 loops)
Rnd 3 (wings): Sl st in the top sc (the connector bar attaches here). Work the four wings in this order, with a sl st in the next sc of Rnd 2 after each one:
- Upper wing: in the ch-12 sp work (sc, hdc, 3 dc, 3 tr, 3 dc, hdc, sc).
- Lower wing: in the ch-8 sp work (sc, hdc, 2 dc, 3 tr, 2 dc, hdc, sc). The sl st after this wing goes in the bottom sc (sc 5).
- Lower wing: work it in the next ch-8 sp.
- Upper wing: work it in the last ch-12 sp.
Finish the round with a sl st in the first sl st, then fasten off. (Upper wings 13 sts each, lower wings 11 sts each: 48 sts plus 4 sl sts)
Butterfly landmarks: the center tr of each upper wing is an upper side tip; the center tr of each lower wing is a lower side tip. The top and bottom sl sts are the top and bottom points.
Body: Ch 9, sl st in 2nd ch from hook and in each ch across. (8 sl sts) Sew it vertically over the center, from the top point to the bottom point.
Antennae: Join at the top of the body, ch 6, sl st in 4th ch from hook to make a tiny curled tip, sl st in next 2 ch. Repeat once. Sew each antenna so it curves outward. Weave in all ends.
Make All Pieces
Each strip uses 17 motifs, top to bottom: star, butterfly, star, butterfly, and so on, ending with a star. That is 9 stars and 8 butterflies per strip.
- Coral (4 strips): 36 stars, 32 butterflies
- Cream (3 strips): 27 stars, 24 butterflies
- Total: 63 stars, 56 butterflies, 119 motifs
Strip layout across the rod (C = coral, W = cream):
C   W   C   W   C   W   C
1   2   3   4   5   6   7
Joining
You join the motifs in each strip as you go, on their final round. The strips are not joined to each other.
Stitch-to-stitch logic: every connector bar runs from the top point of the new motif to the bottom point of the motif above it. A star’s bottom point is its bottom valley sc. A butterfly’s bottom point is the sl st on sc 5.
Star joined below a butterfly: Work Rnd 3 as written, but at the top tip work (sc, connector bar, sc) instead of (sc, ch 3, sc). The bar replaces the ch-3 tip sp, so the count stays at 65 sc.
Butterfly joined below a star: In Rnd 3, after the first sl st in the top sc, work a connector bar into the star’s bottom valley sc, then sl st in the same top sc. Continue the round as written.
Before each join, check that both motifs are right side up. Work the bar chains at your rail-gauge tension so each bar is 1 in (2.5 cm). Tight bars make the strip pucker, and loose bars make it sag.
Size checkpoint: after 5 motifs (star, butterfly, star, butterfly, star) the column measures 20.5 in (52.1 cm). The full column measures 71.5 in (181.6 cm): 9 stars at 3.5 in (8.9 cm), 8 butterflies at 3 in (7.6 cm), and 16 bars at 1 in (2.5 cm).
Hanging: After blocking, slide the loops onto the rod in this order: coral, cream, coral, cream, coral, cream, coral. Space the loop centers 5.25 in (13.3 cm) apart. This leaves 1.25 in (3.2 cm) gaps and a total width of 35.5 in (90.2 cm).
Border
Work the border around each finished column. Rnd 1 makes the inner lattice, Rnd 2 builds the straight rails and the hanging loop, and Rnd 3 firms up the rails. The border gauge is the rail gauge: 16 sc = 4 in (10.2 cm).
Anchors per side: each long side has 17 motifs x 2 side tips = 34 tip anchors, plus 16 connector anchors. A star’s side tips are its ch-3 sps. A butterfly’s side tips are the center tr of each wing.
Rnd 1 (lattice): Join in the T ch-3 sp of the first star, ch 1, sc in same sp.
- Top: ch 7, sc in upper-left tip.
- Left side: *ch 7, sc in lower-left tip of the same motif, ch 5, sc around the connector bar at its middle, ch 5, sc in upper-left tip of the next motif; repeat from * down the strip, ending with ch 7, sc in lower-left tip of the last star.
- Bottom: ch 5, sc in bottom valley sc, ch 5, sc in lower-right tip.
- Right side: work as for the left side, going up the strip, ending with sc in the upper-right tip of the first star.
- Top: ch 7, sl st to first sc.
Counts: the top has 1 sc and 2 ch-7 sps. Each long side has 50 sc (34 tips + 16 connectors), 17 ch-7 sps and 32 ch-5 sps. The bottom has 1 sc and 2 ch-5 sps. Total: 102 sc.
Each ch-5, connector sc, ch-5 section forms an inward V shape. These V shapes become the diamond windows between the motifs.
Rnd 2 (rails and loop): Ch 1.
- Top: (sc, ch 20, sc) in the T sc for the hanging loop, 7 sc in the ch-7 sp.
- Left side: *sc in upper tip sc, 7 sc in ch-7 sp, sc in lower tip sc, ch 8, skip the V (ch-5, connector sc, ch-5); repeat from * for all 17 motifs, leaving out the last ch 8.
- Bottom: 5 sc in ch-5 sp, sc in valley sc, 5 sc in ch-5 sp.
- Right side: work as for the left side, going up.
- Top: 7 sc in the last ch-7 sp, sl st to first sc.
Counts: the top has 16 sc plus the ch-20 loop. Each long side has 153 sc (17 motifs x 9 sc) plus 16 ch-8 bridges (128 ch). The bottom has 11 sc. Total: 333 sc and 276 ch.
Rnd 3 (firm rails): Ch 1, sc in each sc and each ch around, except work 24 sc into the ch-20 loop instead of 1 sc per ch. Sl st to first sc and fasten off.
Counts: the top has 40 sc (2 + 24 + 14), each long side has 281 sc (153 + 128) and the bottom has 11 sc. Total: 609 sc worked 1 per existing st + 4 extra in the loop = 613 sc.
Why the math works: at 4 sc per inch, 281 sc make a rail 70.25 in (178.4 cm) long. The rail runs from the first star’s side tip to the last star’s lower tip. That distance is the 71.5 in (181.6 cm) column minus the 1.25 in (3.2 cm) drop from T to the side tips, which is also 70.25 in (178.4 cm). Because the rail and the column match, the strip hangs flat without rippling or pulling in.
Final Blocking
- Weave in all ends.
- Soak one strip in cool water for 10 minutes, then roll it in a towel and press out the water. Do not wring it.
- Lay the strip flat on mats. If it doesn’t fit, block it in sections of about 20 in (50.8 cm).
- Pin each star to 3.5 in (8.9 cm) tip to tip, with T pointing straight up.
- Pin each butterfly to 3.5 in (8.9 cm) wide, opening the wings evenly.
- Use a ruler to pin both rails straight, keeping the strip 4 in (10.2 cm) wide.
- Check that each connector bar is 1 in (2.5 cm) long and the diamond windows match.
- Shape the hanging loop into a round and curl the antennae.
- Let it dry completely, then unpin and move on to the next section.
Final Quality-Control Checklist
- Each strip has 17 motifs, starting and ending with a star.
- Every star has 5 sharp points and 65 sc on Rnd 3.
- Every butterfly has a body and two curled antennae.
- Every connector bar is 1 in (2.5 cm) long.
- Each rail has 281 sc and lies straight.
- Each strip is 4 in (10.2 cm) wide and 74 in (188.0 cm) long.
- All hanging loops are the same size.
- Four coral and three cream strips are ready to hang in alternating order.
Troubleshooting
- Star points curl: Rnd 3 is too tight. Go up a hook size for Rnd 3 only, or pin more firmly.
- Butterfly wings ruffle: There are too many sts in a loop. Recount: 13 sts per upper wing, 11 per lower wing.
- Edges ripple: The rails are too long. Check that each bridge is ch 8.
- Strip curves sideways: One rail is shorter than the other. Recount both sides to 281 sc.
- Strips differ in length: Measure the connector bars and re-block to 74 in (188.0 cm).
- Motifs face different ways: Check the right sides before each join.
Care
Hand wash in cool water with mild soap, roll in a towel and dry flat. Re-block lightly if the rails wave after washing.

Final Notes
The measurement chain is simple. A 1 in (2.5 cm) star center grows into a 3.5 in (8.9 cm) star, and each butterfly matches it at 3.5 in (8.9 cm) wide. Seventeen motifs and sixteen 1 in (2.5 cm) bars make a 71.5 in (181.6 cm) column. A 281-sc rail on each side sets the strip at 4 in (10.2 cm) wide, and the hanging loop brings it to 74 in (188.0 cm). Seven evenly spaced strips fill 35.5 in (90.2 cm) of doorway.
Happy crocheting!