
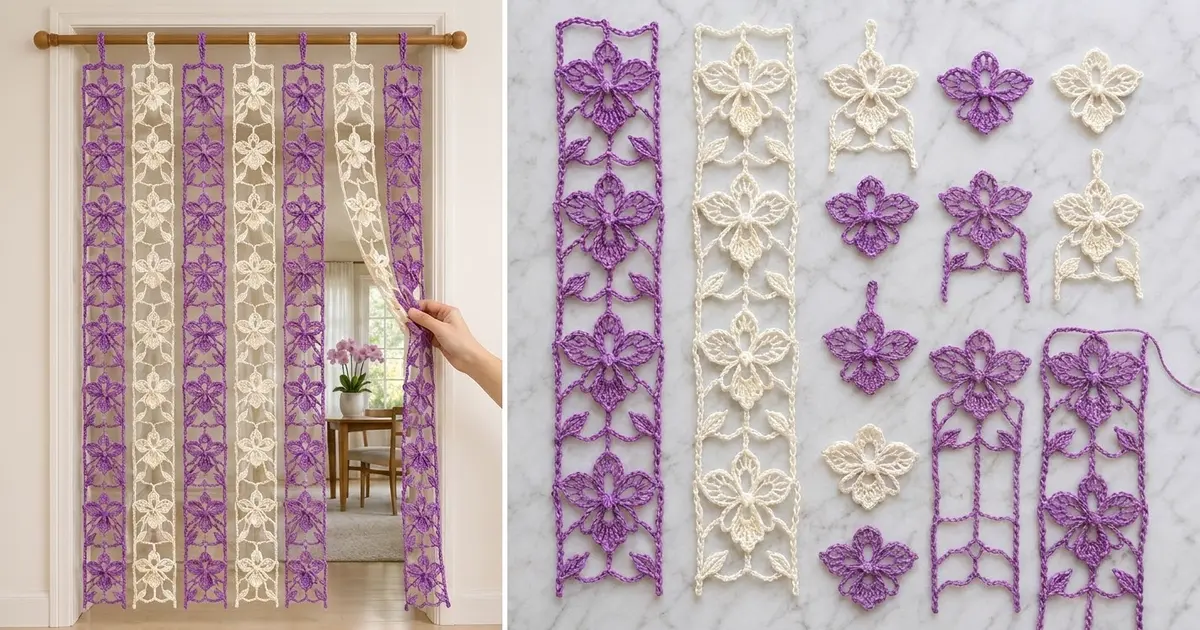
This door curtain is a set of seven airy lace strips. Each strip is a column of orchid flowers framed by straight chain rails. Every flower has an open fan at the top, four pointed lace petals, a solid lip, and a small raised center. Below each flower, a slim stem with two leaves leads down to the next unit.
The strips alternate between violet purple and soft cream: four purple and three cream. Light passes through easily, and the strips part when you walk through, so the curtain works well in a doorway, closet opening, or pantry. The style is vintage filet-inspired lace with a botanical feel.
All terms are US crochet terms. Each finished strip is 4.2 in (10.7 cm) wide and 75.8 in (192.5 cm) long. The hanging tab adds about 2 in (5.1 cm), for a hanging length of about 77.8 in (197.6 cm).
To build it, you make small rectangular flower units in rounds, sew 15 of them into a column with slip stitches, add a two-round single crochet border around the whole strip, and finish with a loop tab at the top. The strips are never joined to each other; each one hangs on the rod separately.
Finished Size and Construction
- Finished strip size: 4.2 x 75.8 in (10.7 x 192.5 cm), plus a 2 in (5.1 cm) tab
- Skill level: Intermediate
- Terminology: US
- Yarn weight: DK (3), mercerized cotton
- Hook: 3.5 mm (E-4)
- Number of pieces: 105 flower units (60 purple, 45 cream), assembled into 7 strips
- Layout: 7 strips side by side, 15 units tall each, not joined to each other
- Unit size: 3.4 x 5.0 in (8.6 x 12.7 cm)
- Strip size before border: 3.4 x 75 in (8.6 x 190.5 cm)
- Border depth: 2 rounds, 0.4 in (1.0 cm) on every side
Materials
Mercerized cotton is the best choice here. It holds the petal shapes, blocks crisply, and won’t stretch much under its own weight. Avoid acrylic or soft wool: long hanging strips made from those will grow in length over time.
- Purple: 400 g / 920 m (eight 50 g / 115 m balls)
- Cream: 300 g / 690 m (six 50 g / 115 m balls)
- 3.5 mm (E-4) crochet hook
- Tapestry needle
- Stitch markers (at least 4)
- Rust-proof pins and blocking mats
- Spray bottle
- Measuring tape
- Curtain rod or tension rod, up to 1.25 in (3.2 cm) diameter
These quantities include a margin of about 15% for gauge differences, swatching, and weaving in ends.
Abbreviations (US Terms)
- ch – chain
- sl st – slip stitch
- sc – single crochet
- hdc – half double crochet
- dc – double crochet
- tr – treble crochet
- sp – space
- st(s) – stitch(es)
- RS / WS – right side / wrong side
Special stitch – Standing sc: Start with a slip knot on your hook. Insert the hook into the stitch or space, yarn over, pull up a loop, yarn over, and draw through both loops.
Leaf: Ch 7. Working back along the chain: sl st in the 2nd ch from the hook, then sc, hdc, dc, hdc, sc in the next 5 ch. You now have a solid pointed leaf of 6 sts, and the last st sits at the base of the leaf.
Gauge and Checkpoints
Gauge: 20 sc and 20 sc rounds = 4 in (10.2 cm), which is 5 sc = 1 in (2.5 cm). Gauge matters more than usual for this project, because a tiny error in each unit is multiplied 15 times along the length.
Make one complete unit first, block it lightly, and check it:
- After Rnd 1: the center button is about 0.6 in (1.5 cm) across.
- After Rnd 3: the flower measures about 3 in (7.6 cm) from pointed tip to pointed tip.
- After Rnd 5: the unit measures 3.4 x 5.0 in (8.6 x 12.7 cm), with 17 sts on the top and bottom edges and 25 sts on each long side.
If your unit is too big, go down a hook size (3.25 mm). If it is too small, go up to 3.75 mm. If the width is right but the length is off, check that you are not stretching the long chains in Rnd 4. Those chains should lie flat, not tight and not loopy.
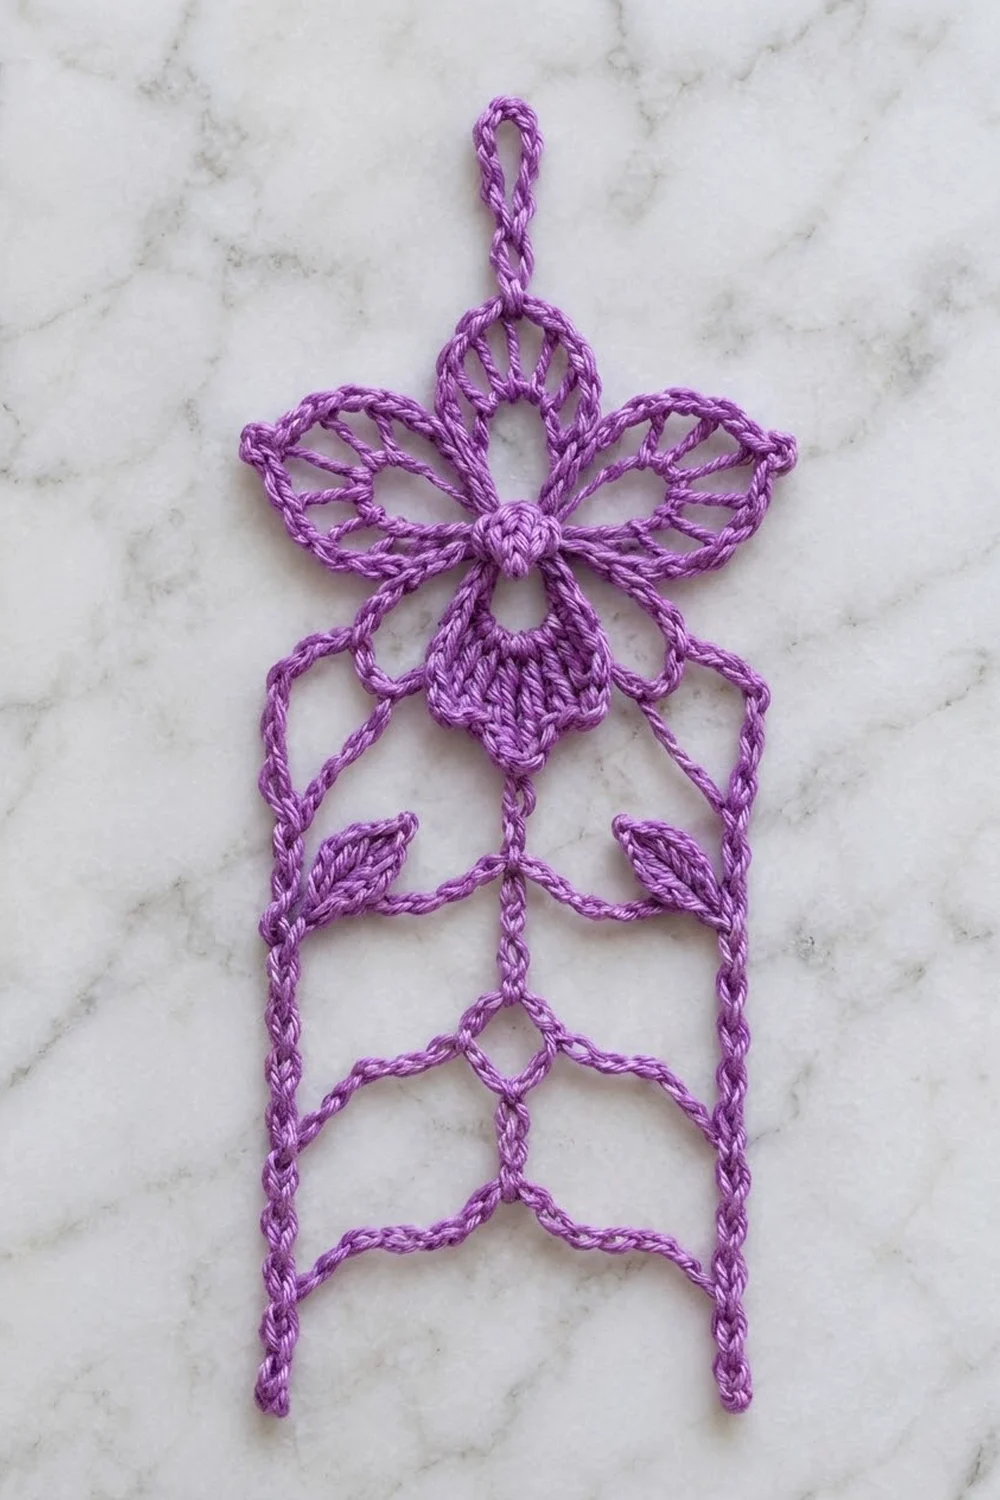
Flower Unit (make 105)
Turn the work so that the top petal is at the top. The loops in Rnd 2 are numbered in working order: loop 1 is the top, loops 2 and 3 run down one side, loop 4 is the bottom, and loops 5 and 6 run back up the other side.
Rnd 1: Magic ring, ch 1, 12 sc in the ring. Pull the tail tight so the ring cups into a small raised button. Sl st to the first sc. (12 sc)
Rnd 2: Ch 1, sc in the same st, [ch 7, skip 1 sc, sc in next sc] 5 times, ch 7, skip 1 sc, sl st to the first sc. (6 sc, 6 ch-7 loops)
Rnd 3 (petals): Sl st into loop 1.
- Loop 1 (top fan): (sc, ch 1, [dc, ch 1] 4 times, sc) in the loop, then sl st in the next Rnd 2 sc.
- Loops 2 and 3 (pointed petals): In each loop, work (sc, hdc, dc, ch 2, tr, ch 3, tr, ch 2, dc, hdc, sc), then sl st in the next Rnd 2 sc.
- Loop 4 (lip): (sc, hdc, 9 dc, hdc, sc) in the loop, then sl st in the next Rnd 2 sc.
- Loops 5 and 6 (pointed petals): Work the same as loops 2 and 3. The last sl st goes into the first sl st.
Fasten off. (51 petal sts: top fan 6 sts with 5 ch-1 sps; 4 pointed petals of 8 sts each with a ch-3 tip; lip 13 sts. There are also 6 sl sts between petals.)
Rnd 4 (frame, stem, and leaves): Join with a standing sc in the center ch-1 sp of the top fan (the 3rd ch-1 sp). This sc is point A.
- Ch 14 (7 for the top edge, 2 for the corner, 5 for the side). Sc in the ch-3 tip of the loop 2 petal.
- Ch 5, sc in the ch-3 tip of the loop 3 petal.
- Ch 4, make a Leaf, then ch 16 (7 for the side, 2 for the corner, 7 for the bottom edge).
- Stem: Ch 11, sl st in the center dc of the lip (the 7th st of 13). Sl st back down each of the 11 stem chains. You finish at the base of the stem, which is point B.
- Ch 16 (7 for the bottom edge, 2 for the corner, 7 for the side), make a Leaf, then ch 4. Sc in the ch-3 tip of the loop 5 petal.
- Ch 5, sc in the ch-3 tip of the loop 6 petal.
- Ch 14 (5 for the side, 2 for the corner, 7 for the top edge). Sl st to the first sc.
(8 sc and sl st anchors, 2 Leaves, 1 stem, chain frame)
Rnd 5 (trim to rectangle): Ch 1. Push both leaves toward the inside of the frame as you go.
- Sc in A.
- In the ch-14 sp: 7 sc, (sc, ch 1, sc) for the corner, 5 sc.
- Sc in the petal-tip sc, 5 sc in the ch-5 sp, sc in the next petal-tip sc.
- 4 sc in the ch-4 sp.
- In the ch-16 sp: 7 sc, (sc, ch 1, sc) for the corner, 7 sc.
- Sc in B.
- In the next ch-16 sp: 7 sc, (sc, ch 1, sc) for the corner, 7 sc.
- 4 sc in the ch-4 sp.
- Sc in the petal-tip sc, 5 sc in the ch-5 sp, sc in the next petal-tip sc.
- In the last ch-14 sp: 5 sc, (sc, ch 1, sc) for the corner, 7 sc.
- Sl st to the first sc and fasten off.
This round is worked 1 sc per chain or anchor stitch, plus 1 extra sc at each corner: 80 + 4 = 84 sc, with 4 corner ch-1 sps.
Per side, counting each side’s own 2 corner sc:
- Top: 1 + 7 + 1 (A) + 7 + 1 = 17 sts
- Long side: 1 + 5 + 1 + 5 + 1 + 4 + 7 + 1 = 25 sts
- Bottom: 1 + 7 + 1 (B) + 7 + 1 = 17 sts
- Other long side: 1 + 7 + 4 + 1 + 5 + 1 + 5 + 1 = 25 sts
Check: 17 + 25 + 17 + 25 = 84.
Make All Pieces
- Purple: 60 units (4 strips x 15)
- Cream: 45 units (3 strips x 15)
Weave in the ends on each unit as you finish it. Then steam or mist-block the units in batches to 3.4 x 5.0 in (8.6 x 12.7 cm) before joining them.
Layout seen from the front (P = purple strip, C = cream strip). Each column is one strip, and every strip has 15 units:
 P   C   P   C   P   C   P
[1] [1] [1] [1] [1] [1] [1]
[2] [2] [2] [2] [2] [2] [2]
 :   :   :   :   :   :   :
[15][15][15][15][15][15][15]
Joining
Join the units in each strip end to end. The strips are not joined to each other.
Method: Slip stitch seam. Hold unit 1 above unit 2, both with the top fan pointing up. Place them WS together so that the bottom edge of unit 1 lines up with the top edge of unit 2.
Stitch-to-stitch logic: Each edge has 17 sts. Match the corner sc to the corner sc, and match B (the stem base) to A (the top-fan center). Working from the RS, sl st through both loops of both layers in all 17 matching sts. That makes 17 sl sts per seam. Do not work into the corner ch-1 sps.
The seam forms the double horizontal bar between flowers.
Tension: Keep the slip stitches loose, about the width of a sc. When you finish, the seam should measure 3.4 in (8.6 cm), the same as the edges. If it puckers, go up one hook size for seams only.
Checkpoint: Every 5 joined units measure 25 in (63.5 cm). One full strip of 15 units (14 seams) measures 3.4 x 75 in (8.6 x 190.5 cm). The flat seam adds no measurable length.
Border
Work the border on each strip separately, in that strip’s own color.
Border gauge: 5 sc = 1 in (2.5 cm), and each sc round adds 0.2 in (0.5 cm) to every side.
Border Rnd 1: With the RS facing, join with a standing sc in the first sc of the top edge (just after the corner ch-1 sp).
- Sc in each of the next 16 sts. (17 sc along the top)
- Ch 2, skipping the corner ch-1 sp.
- Down the long side, sc in all 25 sts of each unit, skipping the ch-1 sps at the seams. (15 x 25 = 375 sc)
- Ch 2.
- Bottom: 17 sc.
- Ch 2.
- Up the other long side: 375 sc.
- Ch 2, sl st to the first sc.
This round is worked 1 per existing st, plus 0 extra: 784 sc and 4 ch-2 corner sps.
Border Rnd 2: Ch 1. Sc in each sc around, and work (sc, ch 2, sc) in each corner ch-2 sp. Sl st to the first sc and fasten off.
Per side: top 17 + 2 = 19 sts, long sides 375 + 2 = 377 sts, bottom 19 sts. Total: 792 sc and 4 ch-2 corner sps.
Why the math works: A long side has 15 units with 25 sts each. Those 375 sts already include every unit’s own corner sc, so nothing extra is added at the seams. Rnd 1 adds no stitches, and the ch-2 at each corner covers the 0.2 in (0.5 cm) corner turn.
- After Rnd 1: width 17 sts (3.4 in) + 2 corners (0.4 in) = 3.8 in (9.7 cm).
- After Rnd 2: 19 sts (3.8 in) + 2 corners (0.4 in) = 4.2 in (10.7 cm).
- Length: 75 + 0.8 = 75.8 in (192.5 cm).
Hanging Tab: Join with a sl st in the 10th (center) st of the top edge. Ch 20, then sl st in the same st to form a loop. Work 22 sc into the loop and sl st to the first sc. Fasten off.
The tab stands about 2 in (5.1 cm) tall and fits a rod up to 1.25 in (3.2 cm) in diameter.
Final Blocking
- Soak one strip in cool water for 10 minutes. Gently press out the water; do not wring.
- Roll the strip in a towel to remove most of the moisture.
- Lay it on blocking mats in sections of 5 units, about 25 in (63.5 cm) at a time.
- Pin the rails straight at 4.2 in (10.7 cm) wide. Put pins at every seam and at every petal-tip anchor.
- Open each petal and pin the pointed ch-3 tips. Pin the leaves so their points face the stem.
- Make sure the stem runs straight down the center and the top fan is spread evenly.
- Let that section dry completely, then move on to the next section.
- Check the length: 75.8 in (192.5 cm) plus the tab.
Final Quality-Control Checklist
- Every unit measures 3.4 x 5.0 in (8.6 x 12.7 cm) and has 17/25/17/25 sts.
- All flowers face the same way, with the top fan up and the lip down.
- Both leaves in each unit point inward.
- Each seam has 17 sl sts and lies flat.
- Border Rnd 1 has 784 sc and Border Rnd 2 has 792 sc.
- Each strip measures 4.2 x 75.8 in (10.7 x 192.5 cm).
- Tabs are centered and secure.
- All ends are woven in through solid stitches.
- The strips hang in the order P–C–P–C–P–C–P.
Troubleshooting
- Flower is cupping: The Rnd 2 chains are too tight. Make the ch-7 loops looser, or go up a hook size for Rnds 2–3.
- Rails are wavy: There are too many sc over the chains in Rnd 5. Recount against 25 per side.
- Unit is too long: The Rnd 4 chains are loose. Pull each chain snug before making the next one.
- Leaf is stuck in the rail: It was caught under the Rnd 5 sc. Undo back to the leaf and hold it to the inside.
- Strip twists: Block it again, and pin the rails parallel along the whole length.
- Strips hang at different lengths: Compare unit sizes and reblock the shorter strip with a little more length.
Care
Hand wash in cool water with a mild detergent and dry flat. Re-pin any curled petals while the strip is damp.
Final Notes
The measurement chain is simple:
- One unit is 17 x 25 sts, or 3.4 x 5.0 in (8.6 x 12.7 cm).
- Fifteen joined units make a 3.4 x 75 in (8.6 x 190.5 cm) strip.
- The two-round border brings each strip to 4.2 x 75.8 in (10.7 x 192.5 cm).
- The tab adds 2 in (5.1 cm), for a total hanging length of about 77.8 in (197.6 cm).
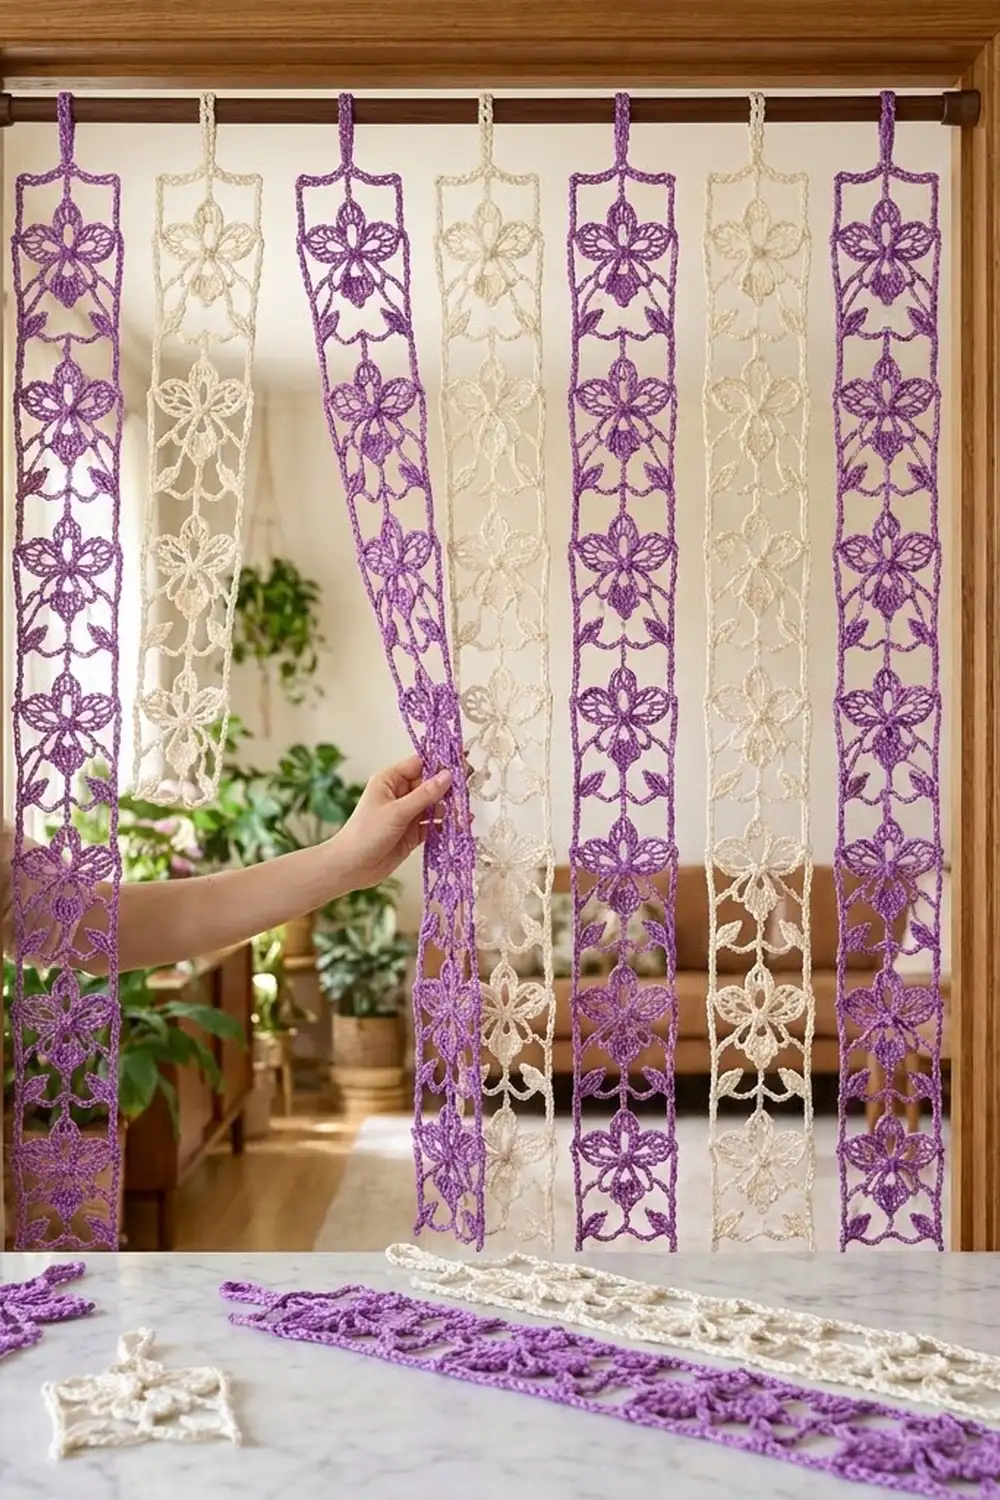
Seven strips hung with 0.75 in (1.9 cm) gaps cover about 33.9 in (86.1 cm), which suits a standard interior doorway. Check your first unit carefully, and the other 104 will follow easily.
Happy crocheting!