

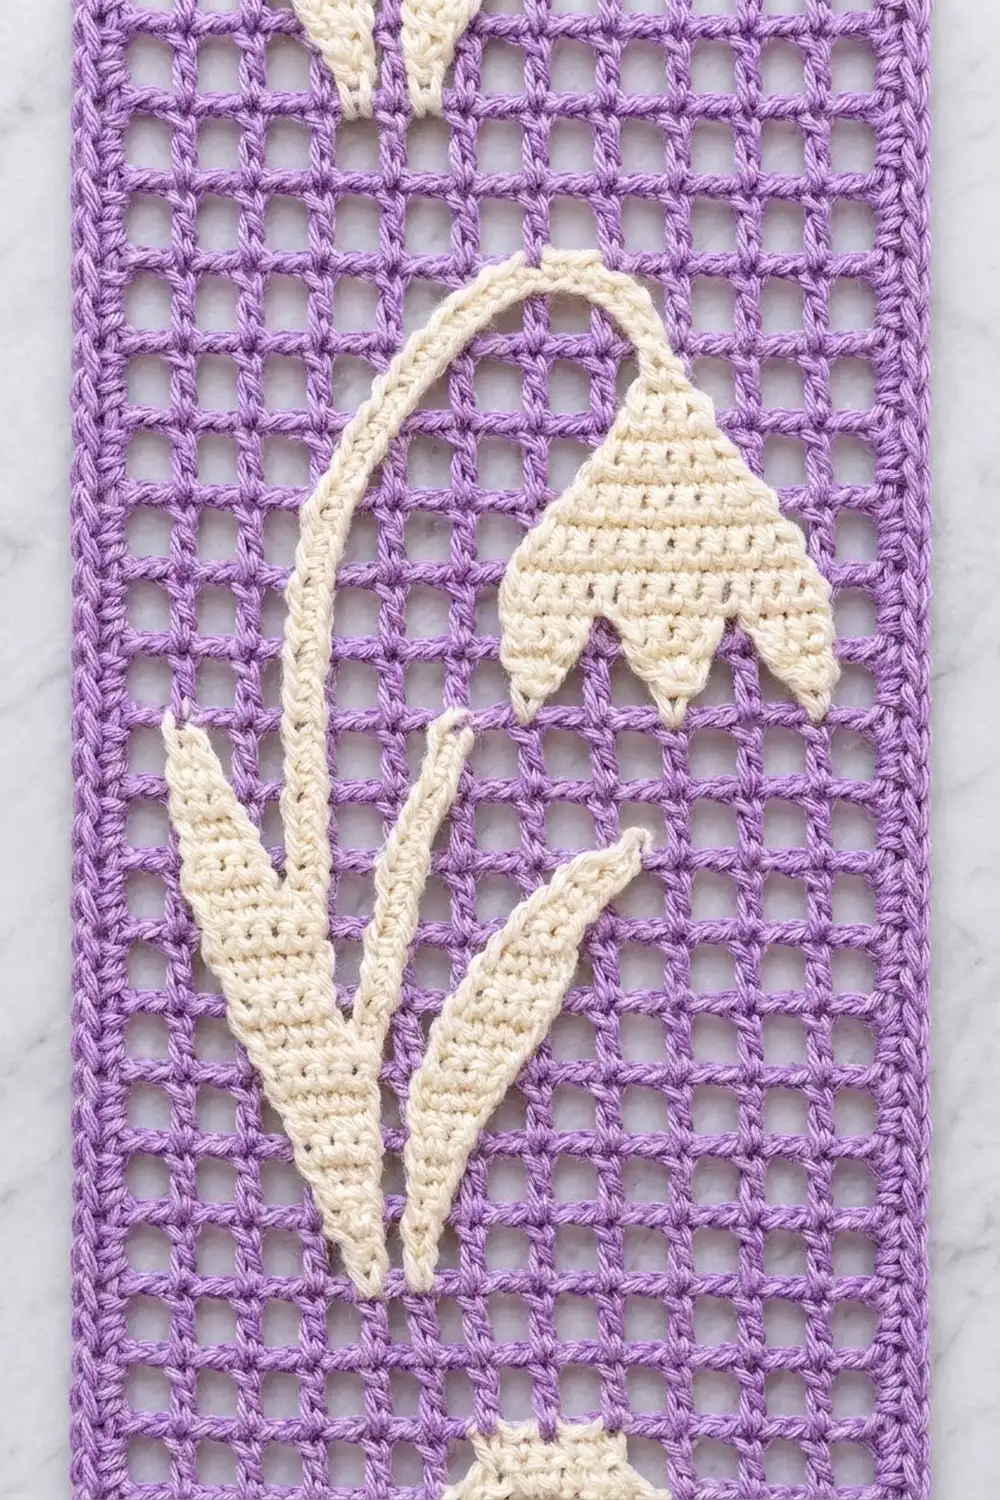
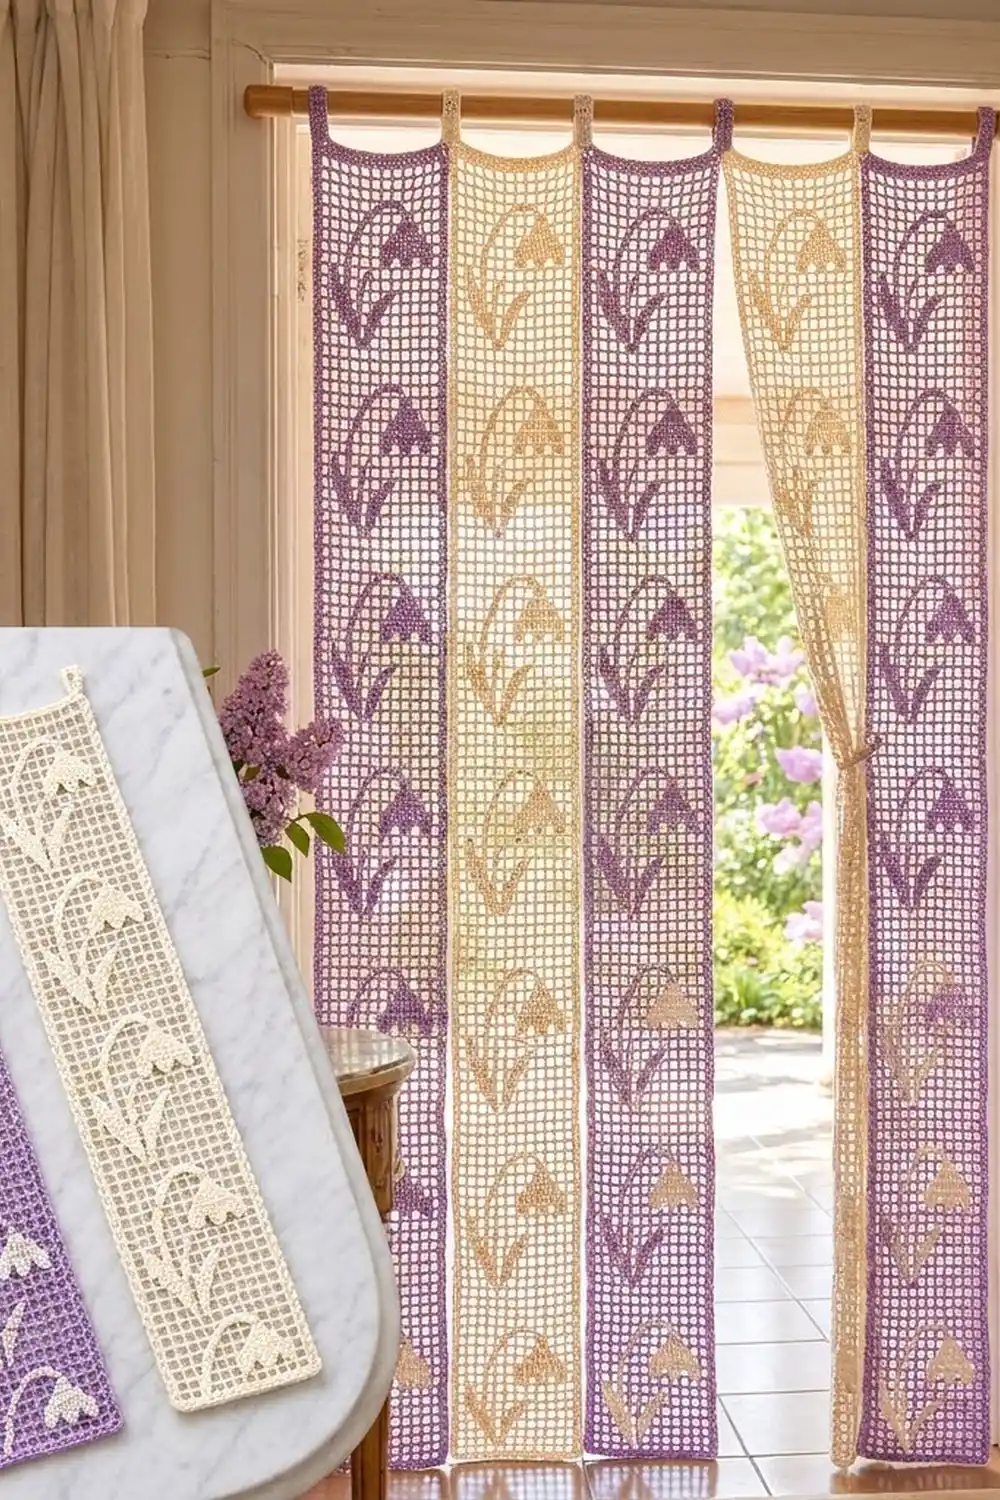
This door curtain is made of seven slim filet strips, each with a column of nodding snowdrops. Lavender and cream strips alternate across the rod. The lavender strips have crisp cream flowers and the cream strips have soft, tone-on-tone blooms. The open mesh lets light and air through, and the strips part easily when you walk through the doorway.
The look is calm and slightly vintage. Square filet mesh, solid filled blocks for the flowers and a neat single-crochet edge keep every strip tidy. Each strip hangs from two small loops, so you can take strips down to wash them or swap their order.
This pattern uses US crochet terms. Each finished strip is 6 in (15.2 cm) wide and 73.5 in (186.7 cm) long, or 75.5 in (191.8 cm) including the tabs. With all seven strips side by side, the curtain is 42 in (106.7 cm) wide. Gathered on the rod, it fits a standard 36 in (91.4 cm) doorway nicely.
To make it, you work each strip flat in rows of filet mesh from the bottom up, following a 20-row snowdrop repeat seven times. Then you add a one-round single-crochet border and two tab loops. The strips are never seamed together.
Finished Size and Construction
- Finished strip size: 6 in × 73.5 in (15.2 cm × 186.7 cm), plus 2 in (5.1 cm) tabs
- Curtain width (7 strips edge to edge): 42 in (106.7 cm)
- Skill level: Intermediate (the filet itself is easy; the colorwork on the lavender strips takes care)
- Terminology: US
- Yarn weight: DK (#3) cotton
- Hook: 3.5 mm (E/4)
- Number of pieces: 7 strips (4 lavender, 3 cream)
- Layout: 7 strips hung side by side, alternating colors, not seamed
- Mesh per strip: 11 blocks wide × 146 rows tall
- Strip size before border: 5.5 in × 73 in (14.0 cm × 185.4 cm)
- Border depth: 0.25 in (0.6 cm) on each edge
Materials
Use a smooth, mercerized or combed DK cotton. Cotton keeps the mesh square, holds its shape when hanging and washes well. Avoid fuzzy yarns, because they blur the open squares.
- Lavender: 500 g / about 1150 m
- Cream: 500 g / about 1150 m (3 full strips plus the motif blocks on the 4 lavender strips)
These quantities include a margin of roughly 10–15% for your gauge swatch and for differences in tension.
Tools:
– 3.5 mm (E/4) crochet hook
– Tapestry needle
– 6–8 small yarn bobbins or clips (for cream on the lavender strips)
– Stitch markers
– Measuring tape
– Rust-proof pins and a long blocking surface
– Curtain rod, up to 1 in (2.5 cm) in diameter
Abbreviations (US Terms)
- ch – chain
- sl st – slip stitch
- sc – single crochet
- dc – double crochet
- sk – skip
- sp – space
- st(s) – stitch(es)
- RS / WS – right side / wrong side
Special filet terms
– Space (sp): ch 2, sk 2 sts (or the next ch-2 sp), dc in next dc.
– Block (bl): 2 dc into the next ch-2 sp (or 1 dc in each of the next 2 dc), then dc in the next dc.
– First space of a row: ch 5 (counts as dc + ch 2), turn, sk the first 2 sts, dc in next dc.
– First block of a row: ch 3 (counts as dc), turn, work 2 dc over the next block position, dc in next dc.
– Last stitch of a row: work the final dc into the 3rd ch of the turning chain.
Every row has 12 posts (dc) and 11 blocks or spaces, which makes 34 stitch positions.
Cream blocks on lavender strips: Work the last yarn-over of the post before a cream block in cream. Work the block’s 2 dc and its closing dc in cream, and change back to lavender on the last yarn-over of that closing dc. Use a separate bobbin of about 24 in (61.0 cm) for each separate cream area in a row. Carry each bobbin up along the back of its cream post. Never carry cream across open spaces.
Gauge and Checkpoints
Gauge: 8 blocks and 8 rows = 4 in (10.2 cm) in filet mesh, so each block is 0.5 in (1.3 cm) square.
Test one piece first. Before you start all seven strips, make one lavender strip up to Row 22 (one bottom margin plus the first snowdrop) and measure it flat:
- Width after Row 1: 5.5 in (14.0 cm)
- Height after Row 2: 1 in (2.5 cm)
- Height after Row 22: 11 in (27.9 cm)
- Height after Row 42: 21 in (53.3 cm)
- Height after Row 82: 41 in (104.1 cm)
- Height after Row 142: 71 in (180.3 cm)
- Height after Row 146: 73 in (185.4 cm)
Too big: Go down to a 3.25 mm hook, or keep your ch-2 spaces snugger.
Too small: Go up to a 3.75 mm hook.
Blocks taller than wide: Pull the first loop of each dc shorter. Blocks wider than tall: Keep your chains firmer.
Blocks that are square to within 1/8 in (0.3 cm) will block out perfectly.
Strip Pattern
Odd rows are RS rows and are worked from block 1 to block 11. Even rows are WS rows and are worked from block 11 back to block 1. The sequences below are already written in working order, so just follow each row from left to right.
Foundation (both colors): In the strip’s main color, ch 38.
Row 1 (RS): Dc in 8th ch from hook, ch 2, sk 2 ch, dc in next ch 10 times. Turn. (11 sp; 12 posts; 34 stitch positions)
Row 2 (WS): 11 sp. Turn. (11 sp)
Snowdrop Repeat (Motif Rows M1–M20)
Rows 3–22 are motif rows M1–M20. On lavender strips, every block below is worked in cream. On cream strips, every block is cream as usual. Every row totals 11 blocks and spaces.
- M1 (RS): 3 sp, 1 bl, 7 sp
- M2 (WS): 7 sp, 2 bl, 2 sp
- M3: 2 sp, 3 bl, 6 sp
- M4: 6 sp, 2 bl, 1 sp, 1 bl, 1 sp
- M5: 1 sp, 1 bl, 1 sp, 1 bl, 1 sp, 1 bl, 5 sp
- M6: 5 sp, 1 bl, 1 sp, 1 bl, 1 sp, 1 bl, 1 sp
- M7: 3 sp, 1 bl, 1 sp, 1 bl, 5 sp
- M8: 7 sp, 1 bl, 3 sp
- M9: 3 sp, 1 bl, 7 sp
- M10: 7 sp, 1 bl, 3 sp
- M11: 3 sp, 1 bl, 7 sp
- M12: 7 sp, 1 bl, 3 sp
- M13: 3 sp, 1 bl, 2 sp, 1 bl, 1 sp, 1 bl, 2 sp
- M14: 2 sp, 3 bl, 2 sp, 1 bl, 3 sp
- M15: 3 sp, 1 bl, 1 sp, 5 bl, 1 sp
- M16: 2 sp, 3 bl, 2 sp, 1 bl, 3 sp
- M17: 3 sp, 1 bl, 3 sp, 1 bl, 3 sp
- M18: 3 sp, 1 bl, 3 sp, 1 bl, 3 sp
- M19: 4 sp, 3 bl, 4 sp
- M20: 11 sp
How the motif reads: In M1–M7, the stem (block 4) rises with a short leaf on each side. M8–M12 form the straight stem. In M13–M16, the bell hangs at blocks 6–10, with two petal tips in M13. M17–M18 show the stem and the bell’s short neck. M19 is the arch that joins them, and M20 is the gap before the next flower.
Block count per motif: 46 blocks, which is 322 blocks per strip.
Rows 3–142: Work M1–M20 seven times in total. M1 always falls on an odd (RS) row, because the repeat is 20 rows long.
Checkpoint after Row 142: 7 snowdrops; 71 in (180.3 cm) tall.
Rows 143–146: 11 sp in each row. (146 rows total) Do not fasten off. Turn so the RS faces you to start the border.
Strip total: 11 blocks × 146 rows = 1,606 blocks and spaces, of which 322 are filled.
Make All Pieces
Make seven strips:
- Lavender strips (4): lavender mesh with cream snowdrop blocks
- Cream strips (3): cream mesh with cream snowdrop blocks
Layout, from left to right as hung (L = lavender, C = cream):
| L | C | L | C | L | C | L |
| 1 | 2 | 3 | 4 | 5 | 6 | 7 |
Make all the strips with the same hook and in the same sessions if you can. Measure every strip after Row 22 and again at Row 146. All seven should be within 0.5 in (1.3 cm) of each other in length.
Joining
The strips are not seamed together. They are “joined” only by hanging on the same rod, which keeps the curtain easy to walk through.
Method: Slide each strip’s two tabs onto the rod in the layout order. Then space the strips evenly.
Stitch logic: Each strip has 2 tabs, placed symmetrically, so 7 strips give 14 tabs. Hang the tabs in the same order on every strip, from left tab to right tab, so no strip twists.
Tension advice: Do not pull the strips tight against each other. Let neighboring borders just touch, or overlap by up to 0.5 in (1.3 cm). This lets the mesh hang straight instead of rippling.
Size checkpoint: Laid side by side, the strips measure 42 in (106.7 cm) across. On a 36 in (91.4 cm) doorway, gather them by about 6 in (15.2 cm) in total, which is a slight overlap of under 1 in (2.5 cm) per gap.
Border (Each Strip)
Border gauge: 2 sc per row-end on the side edges (4 sc per inch, or about 1.6 sc per cm, which matches 2 rows per inch). On the top and bottom edges, 1 sc goes into each of the 34 stitch positions.
Round 1 (RS)
Continue with the strip’s main color.
- Top edge (along Row 146): Work 3 sc in the first stitch position, then 1 sc in each of the next 32 positions (1 sc in each dc and 1 sc in each ch). Work 3 sc in the last position (the turning chain). (38 sc)
- First long side: 2 sc around each of the 146 row-end posts. (292 sc)
- Bottom edge (along the foundation chain): 3 sc in the first chain, 1 sc in each of the next 32 chains, 3 sc in the last chain. (38 sc)
- Second long side: 2 sc around each row-end post. (292 sc)
- Sl st to the first sc. (660 sc total)
The side counts of 292 do not include the corners. Each corner is the middle sc of a 3-sc group, and those groups are counted only in the 38-sc top and bottom totals.
Why the math works: The top and bottom edges each have 34 stitch positions. Those take 32 single sc plus 2 corner groups of 3 sc, which is 38. Each side has 146 rows × 2 sc = 292, so 73 in (185.4 cm) of edge gets 4 sc per inch. Together: 38 + 292 + 38 + 292 = 660. The extra sc at the corners turn them without cupping.
Result: 6 in × 73.5 in (15.2 cm × 186.7 cm).
Tabs (Top Edge)
Number the 38 top-edge sc from 1 to 38, starting with the first sc of the first corner group.
- Tab 1: Sl st across to sc 4. Ch 18, sl st in sc 9. Turn, work 24 sc into the ch-18 loop, sl st in sc 4. Fasten off.
- Tab 2: Join with a sl st in sc 30. Ch 18, sl st in sc 35. Turn, work 24 sc into the loop, sl st in sc 30. Fasten off.
The tabs sit 3 stitches in from each corner, mirroring each other. Each tab loop is about 2 in (5.1 cm) high and fits a rod up to 1 in (2.5 cm) thick.
Final Blocking
- Weave in all ends along posts or inside blocks, never across open spaces.
- Soak each strip in lukewarm water for 15 minutes.
- Press out the water in a towel. Do not wring.
- Lay the strip flat and pin the corners to 6 in × 73.5 in (15.2 cm × 186.7 cm).
- Pin both long edges every 4 in (10.2 cm), keeping them straight.
- Square up the mesh with your fingertips so every space is about 0.5 in (1.3 cm).
- Let the strip dry completely, then unpin it.
- Hang the strip for a day before you judge its final length, because cotton relaxes slightly.
Final Quality-Control Checklist
- Every strip has 146 rows and 11 blocks per row.
- Each strip has 7 snowdrops facing the same way.
- Cream blocks on the lavender strips are solid, with no lavender showing through.
- No cream yarn is carried across open spaces.
- Every border has 660 sc, with flat corners.
- The tabs are at sc 4–9 and sc 30–35, matching on all strips.
- All strips are within 0.5 in (1.3 cm) of each other in length.
- The ends are secure and invisible from both sides.
Troubleshooting
- The strip is getting wider or narrower: Recount to 12 posts per row. A missed turning-chain dc is the usual cause.
- Spaces look like rectangles: Adjust your chain tension, then re-block.
- The bell faces the wrong way: You probably read a WS row as RS. Odd rows start at block 1.
- Cream strands show in the mesh: Use separate bobbins and carry them only behind cream posts.
- The border ripples: Use fewer sc on the long sides; 2 per row is the maximum.
- The border pulls tight: Go up half a hook size for the border only.
- Strips have different lengths: Steam-block the short one and pin it to match.
Care
Hand wash or machine wash on a gentle cycle in a laundry bag, in cool water. Lay the strips flat to dry, pinned to size if needed, and do not tumble dry.
Final Notes
The measurement chain is simple. Blocks are 0.5 in (1.3 cm) square, so 11 blocks make 5.5 in (14.0 cm) and 146 rows make 73 in (185.4 cm). A 660-sc border takes each strip to 6 in × 73.5 in (15.2 cm × 186.7 cm), and the tabs add 2 in (5.1 cm). Seven strips cover 42 in (106.7 cm) and gather softly across a doorway. If your gauge is right at Row 22, everything after it will fit.
Happy crocheting!