

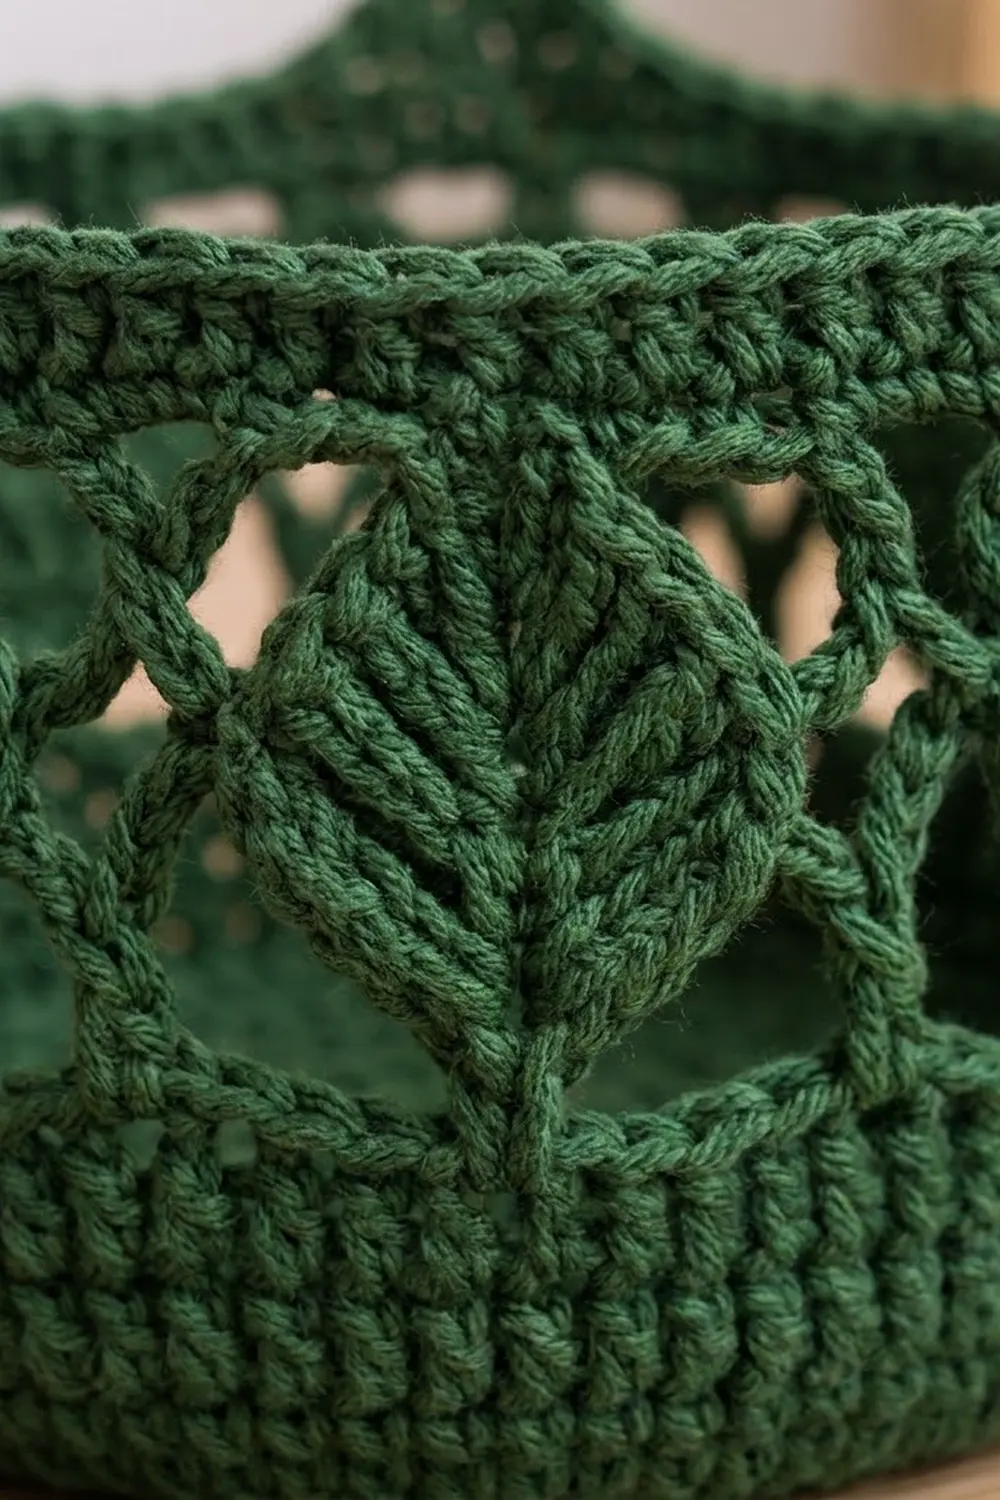
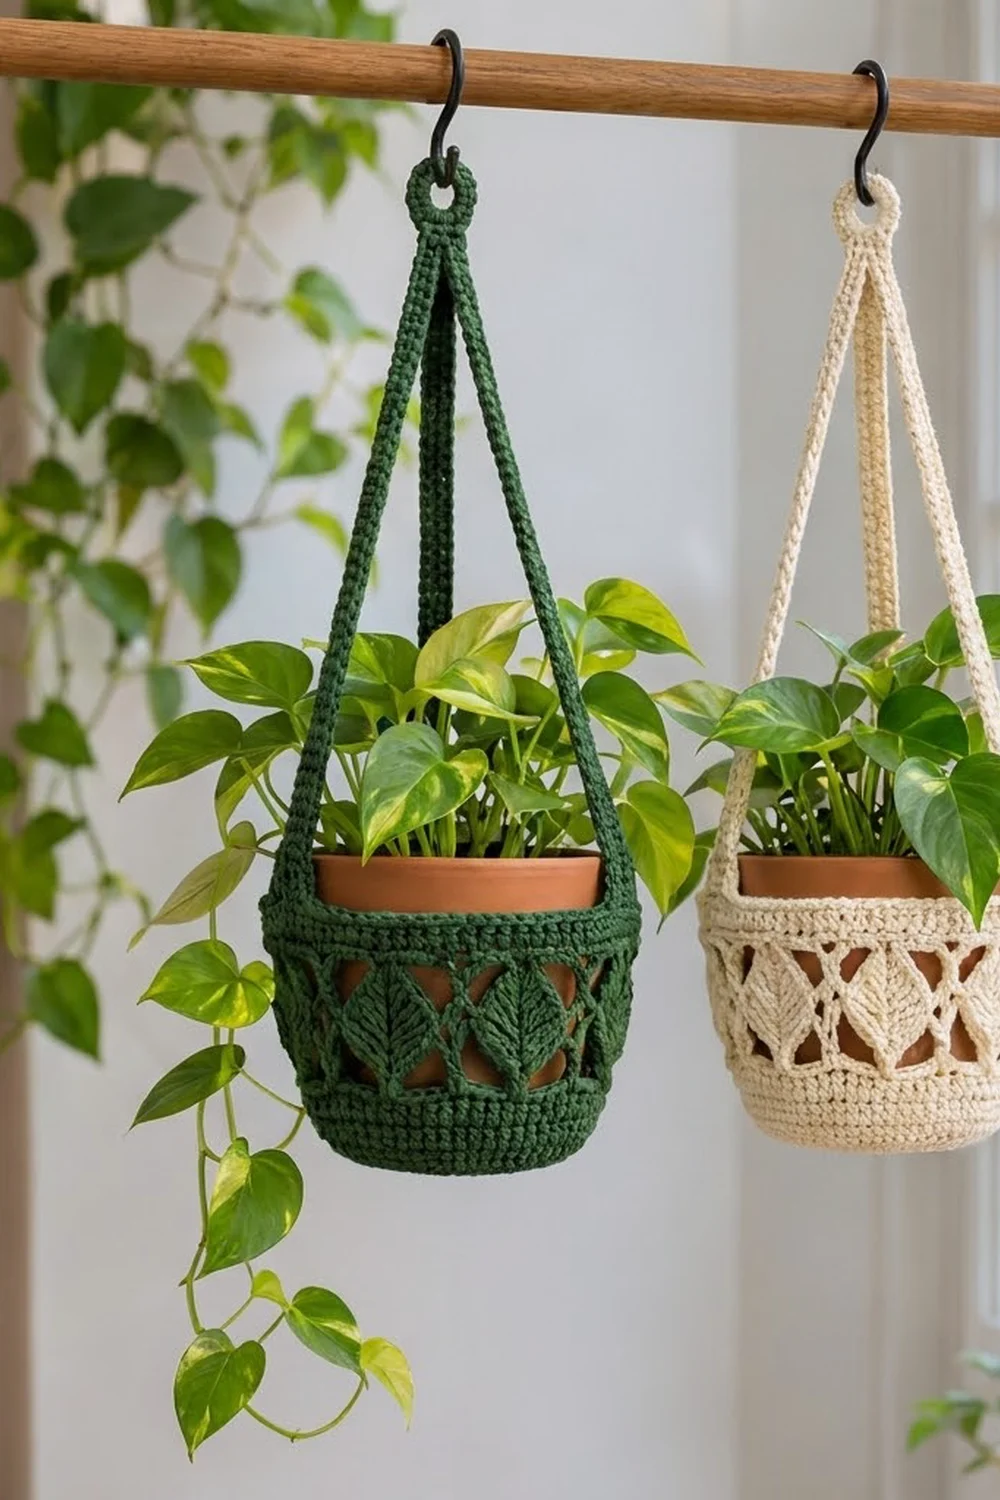
This hanging planter is a small, sturdy basket with a band of leaves around the middle. Each leaf is a solid textured shape with a raised center vein. The leaves sit inside an airy chain lattice, so the terracotta pot shows through the diamond-shaped openings.
The sample uses one color, a deep forest green that suits trailing pothos and other houseplant greens. It also looks good in natural cream, as shown in the second basket. The style is simple, useful, and a little botanical. This pattern uses US crochet terms throughout.
The finished basket is about 5.75 in (14.6 cm) across and 5.25 in (13.3 cm) tall. Each strap is 16 in (40.6 cm) long, and the total hanging length is about 22.5 in (57.2 cm). The basket holds a 4.5 in (11.4 cm) pot comfortably.
The whole planter is one piece. You crochet a flat base in rounds, turn up the wall, and work the leaf band and lattice. A solid rim stabilizes the top. Three straps are worked in rows straight off the rim, then joined at the top with a hanging ring.
Finished Size and Construction
- Finished size: 5.75 in (14.6 cm) diameter × 5.25 in (13.3 cm) tall basket; 22.5 in (57.2 cm) total hanging length
- Skill level: Intermediate (front post stitches, clusters, chain lattice)
- Terminology: US crochet terms
- Yarn weight: Worsted (#4), 100% cotton
- Hook: 4.5 mm (US 7)
- Number of pieces: 1 (basket, straps, and ring all worked continuously)
- Layout: Round basket with 8 leaf repeats and 3 straps spaced evenly around the rim
- Piece size: Base circle 5.75 in (14.6 cm) across
- Size before border: 4.4 in (11.2 cm) tall after the lattice rounds
- Border depth: 4 rounds of sc rim, 0.9 in (2.3 cm)
Materials
Use a smooth, firm cotton or cotton blend. Cotton holds the basket’s shape under a pot’s weight and doesn’t stretch out the way acrylic can. Avoid fuzzy yarns, because they hide the leaf texture and the lattice.
- Forest green worsted cotton: 100 g, about 155 m
- Optional cream colorway: Use the same amount, 100 g, about 155 m
These quantities include a margin of about 25%, so you have enough to swatch and frog without running short.
Tools:
– 4.5 mm (US 7) crochet hook
– 4 locking stitch markers
– Tapestry needle
– Scissors
– Measuring tape
– 4.5 in (11.4 cm) pot for test-fitting
– Rust-proof pins and a spray bottle for blocking
Abbreviations (US Terms)
- ch: chain
- sl st: slip stitch
- sc: single crochet
- dc: double crochet
- BLO: back loop only
- FPdc: front post double crochet. Yarn over, insert the hook from front to back to front around the post of the stitch below, then complete as a dc.
- dc2tog: double crochet 2 together (2 stitches decreased into 1)
- sk: skip
- sp: space
- st(s): stitch(es)
- RS: right side
- rep: repeat
Special stitch – dc5tog (leaf tip cluster): Make 5 partial dc, one in each of the next 5 stitches. For each one: yarn over, insert the hook, pull up a loop, yarn over, and draw through 2 loops. Work the third partial dc into the top of the FPdc. You now have 6 loops on the hook. Yarn over and draw through all 6.
Gauge and Checkpoints
Gauge: 16 sc and 18 rounds = 4 in (10.2 cm) in sc worked in joined rounds.
Use the base as your test piece. Work Rounds 1–12, then measure before continuing.
- After Round 6 (36 sts): 2.9 in (7.4 cm) across
- After Round 12 (72 sts): 5.75 in (14.6 cm) across
- After Round 16: wall is 0.9 in (2.3 cm) tall
- After Round 21: leaf band adds 2.5 in (6.4 cm)
- After Round 23: lattice adds 1 in (2.5 cm); total height is 4.4 in (11.2 cm)
- After Round 27: total height is 5.25 in (13.3 cm)
If your base is too big (over 6 in / 15.2 cm), go down to a 4 mm hook. If it is too small (under 5.5 in / 14 cm), go up to a 5 mm hook. Don’t add or remove rounds. The 72-stitch count must stay exact, because both the leaf repeats and the strap spacing depend on it.
Pattern
All rounds are joined with a sl st to the first stitch and are not turned. The beginning ch 1 never counts as a stitch. Keep a marker in the first stitch of every round.
Base
Round 1: Make a magic ring, ch 1, 6 sc in the ring, join. (6 sts)
Round 2: Ch 1, 2 sc in each st around, join. (12 sts)
Round 3: Ch 1, sc in next st, 2 sc in next st 6 times, join. (18 sts)
Round 4: Ch 1, sc in next 2 sts, 2 sc in next st 6 times, join. (24 sts)
Round 5: Ch 1, sc in next 3 sts, 2 sc in next st 6 times, join. (30 sts)
Round 6: Ch 1, sc in next 4 sts, 2 sc in next st 6 times, join. (36 sts)
Checkpoint: 2.9 in (7.4 cm) across.
Round 7: Ch 1, sc in next 5 sts, 2 sc in next st 6 times, join. (42 sts)
Round 8: Ch 1, sc in next 6 sts, 2 sc in next st 6 times, join. (48 sts)
Round 9: Ch 1, sc in next 7 sts, 2 sc in next st 6 times, join. (54 sts)
Round 10: Ch 1, sc in next 8 sts, 2 sc in next st 6 times, join. (60 sts)
Round 11: Ch 1, sc in next 9 sts, 2 sc in next st 6 times, join. (66 sts)
Round 12: Ch 1, sc in next 10 sts, 2 sc in next st 6 times, join. (72 sts)
Checkpoint: The base lies flat and measures 5.75 in (14.6 cm) across. If it ruffles, your increases are too tight. If it cups, your stitches are too loose.
Wall
Round 13 (turning round): Ch 1, sc in BLO of each st around, join. (72 sts)
This makes the clean ridge that turns the base up into a basket.
Rounds 14–16: Ch 1, sc in each st around, join. (72 sts)
Checkpoint: The wall stands 0.9 in (2.3 cm) tall above the ridge.
Leaf Band
Each of the 8 repeats is 9 stitches wide, and 8 × 9 = 72. Every leaf grows from a single base stitch, widens to 7 stitches, then closes into one cluster tip. A sc “lattice post” sits between leaves, and chain arches span the gaps on each side.
Round 17 (leaf base): Ch 1. Sc in next st, ch 3, sk 3 sts, 3 dc in next st, ch 3, sk 4 sts. Rep from * 8 times total, join.
Each repeat uses 1 + 3 + 1 + 4 = 9 stitches. (8 sc + 24 dc = 32 sts, plus 16 ch-3 sps)
Round 18: Ch 1. Sc in sc, ch 3, 2 dc in next dc, FPdc around next dc, 2 dc in next dc, ch 3. Rep from * 8 times, join.
Each leaf is now 5 stitches. (8 sc + 40 leaf sts = 48 sts, plus 16 ch-3 sps)
Round 19 (widest round): Ch 1. Sc in sc, ch 2, 2 dc in next dc, dc in next dc, FPdc around FPdc, dc in next dc, 2 dc in next dc, ch 2. Rep from * 8 times, join.
Each leaf is now 7 stitches. (8 sc + 56 leaf sts = 64 sts, plus 16 ch-2 sps)
The shorter chains pull the leaves close together at their widest point, as in the photo.
Round 20: Ch 1. Sc in sc, ch 3, dc2tog, dc in next st, FPdc around FPdc, dc in next st, dc2tog, ch 3. Rep from * 8 times, join.
Each leaf uses 2 + 1 + 1 + 1 + 2 = 7 stitches and gives 5. (8 sc + 40 leaf sts = 48 sts, plus 16 ch-3 sps)
Round 21 (leaf tips): Ch 1. Sc in sc, ch 4, dc5tog over the next 5 sts, ch 4. Rep from * 8 times, join. (8 sc + 8 clusters = 16 sts, plus 16 ch-4 sps)
The FPdc stitches stack into one raised vein running from base to tip on every leaf.
Checkpoint: The leaf band measures 2.5 in (6.4 cm) tall.
Lattice
Round 22: Ch 1. Sc in sc, ch 5, sc in cluster, ch 5. Rep from * 8 times, join. (16 sc, 16 ch-5 loops)
This round anchors the lattice on every leaf tip and every lattice post.
Round 23: Sl st in next 3 ch to reach the center of the first loop. Ch 1, sc in the same loop. Ch 5, sc in next loop. Rep from * 14 more times, then ch 5 and join to the first sc. (16 sc, 16 ch-5 loops)
Moving the anchor points to the loop centers turns the arches into the diamond openings.
Checkpoint: Total height is 4.4 in (11.2 cm). The rim circumference has naturally relaxed to match the base, about 18 in (45.7 cm).
Border: Top Rim
Border gauge: 4 sc per 1 in (2.5 cm), the same as the base. That means 72 sts × 0.25 in = 18 in (45.7 cm) of circumference, exactly matching Round 12.
Round 24 (conversion round): Sl st into the first ch-5 loop, ch 1. 4 sc in next ch-5 loop, 5 sc in next ch-5 loop. Rep from * 8 times, join. The sc posts of Round 23 are skipped.
Count: (16 loops × 4 sc = 64) + (8 extra sc) = 72 sts.
Rounds 25–27: Ch 1, sc in each st around, join. (72 sts)
At the end of Round 27, don’t fasten off yet. Place markers in sts 1, 25, and 49. That gives 3 sections of 24 sts each, and 3 × 24 = 72.
Why the Math Works
The number 72 divides evenly two ways:
- 8 leaf repeats × 9 sts = 72
- 3 strap sections × 24 sts = 72
The base, rim, and lattice all close at 18 in (45.7 cm). That means nothing flares or pulls in.
Checkpoint: Total height is 5.25 in (13.3 cm), and the rim depth is 0.9 in (2.3 cm).
Straps
Each strap is 4 sts wide. Between straps, 20 rim sts are left free, and 4 + 20 = 24 per section.
Strap 1:
– Row 1: Ch 1, sc in the marked st 1 and in the next 3 sts, turn. (4 sts)
– Rows 2–72: Ch 1, sc in each st across, turn. (4 sts)
– Fasten off, leaving a 6 in (15.2 cm) tail.
Strap 2: With the RS facing, join yarn in marked st 25. Repeat Rows 1–72, then fasten off.
Strap 3: Join yarn in marked st 49. Repeat Rows 1–72. Don’t fasten off.
Checkpoint: Each strap measures 16 in (40.6 cm) long and 1 in (2.5 cm) wide. Hang the straps side by side and compare them. They should match within 0.25 in (0.6 cm).
Hanging Ring
Lay the 3 strap ends together without twisting them, with Strap 3 on top. Then work the ring:
- Join the straps: Ch 1, then work 4 sc through all three layers. (4 sts)
- Form the loop: Ch 14, then sl st into the first sc to make a loop.
- Cover the loop: Ch 1, work 22 sc into the loop, and sl st to the first sc.
- Finish: Fasten off. Weave the tail down through the joined strap ends to reinforce them.
Checkpoint: The ring opening measures about 1.25 in (3.2 cm) across.
Final Blocking
- Weave in all ends along solid sc areas, never through the lattice.
- Lightly mist the whole planter with water until it is damp, not soaked.
- Slip a 4.5 in (11.4 cm) pot, or a jar of similar size, into the basket.
- Shape the base so it sits flat, and push each leaf outward from inside so the veins stand up.
- Use your fingers to open each diamond so all 16 lattice loops look even.
- Pin each strap flat to its full 16 in (40.6 cm) length.
- Let everything dry completely before removing the form, usually 12–24 hours.
Final Quality-Control Checklist
- Base measures 5.75 in (14.6 cm) and lies flat
- Wall and rim each have 72 sts
- All 8 leaves have a raised vein running from base to tip
- There are 16 even diamond openings in the lattice
- Straps are at sts 1, 25, and 49, with 20 free sts between them
- All 3 straps measure 16 in (40.6 cm) and are not twisted
- The ring is firmly joined through all 3 layers
- The basket hangs level with a pot inside
Troubleshooting
- The basket tilts when hung. One strap is a different length. Count the rows: there should be 72 per strap.
- The leaves look flat. Your FPdc was worked into the top of the stitch instead of around its post. Redo the round.
- The lattice sags. Your chains are too loose. Make them with a 4 mm hook.
- The rim flares. Round 24 has too many sts. Recount to 72.
- The base cups. Your tension is tight. Go up a hook size and work the base again.
- The pot slips through the lattice. Your pot is smaller than 4 in (10.2 cm). Use a larger pot.
Care
Hand wash in cool water with mild soap, press out the water in a towel, and dry the planter flat or reshaped over a pot. Empty the drip water from the pot before hanging it, so the cotton doesn’t stay wet.
Final Notes
The measurement chain runs through the whole piece:
- The base is 72 sts and 5.75 in (14.6 cm) across.
- The wall is 0.9 in (2.3 cm).
- The leaf band is 2.5 in (6.4 cm).
- The lattice is 1 in (2.5 cm).
- The rim is 0.9 in (2.3 cm), with 72 sts and 18 in (45.7 cm) around.
- The basket’s total height is 5.25 in (13.3 cm).
- Three straps of 16 in (40.6 cm) and the ring bring the total hanging length to 22.5 in (57.2 cm).
Check each stage before moving on, and the finished planter will hang straight. Happy crocheting!