

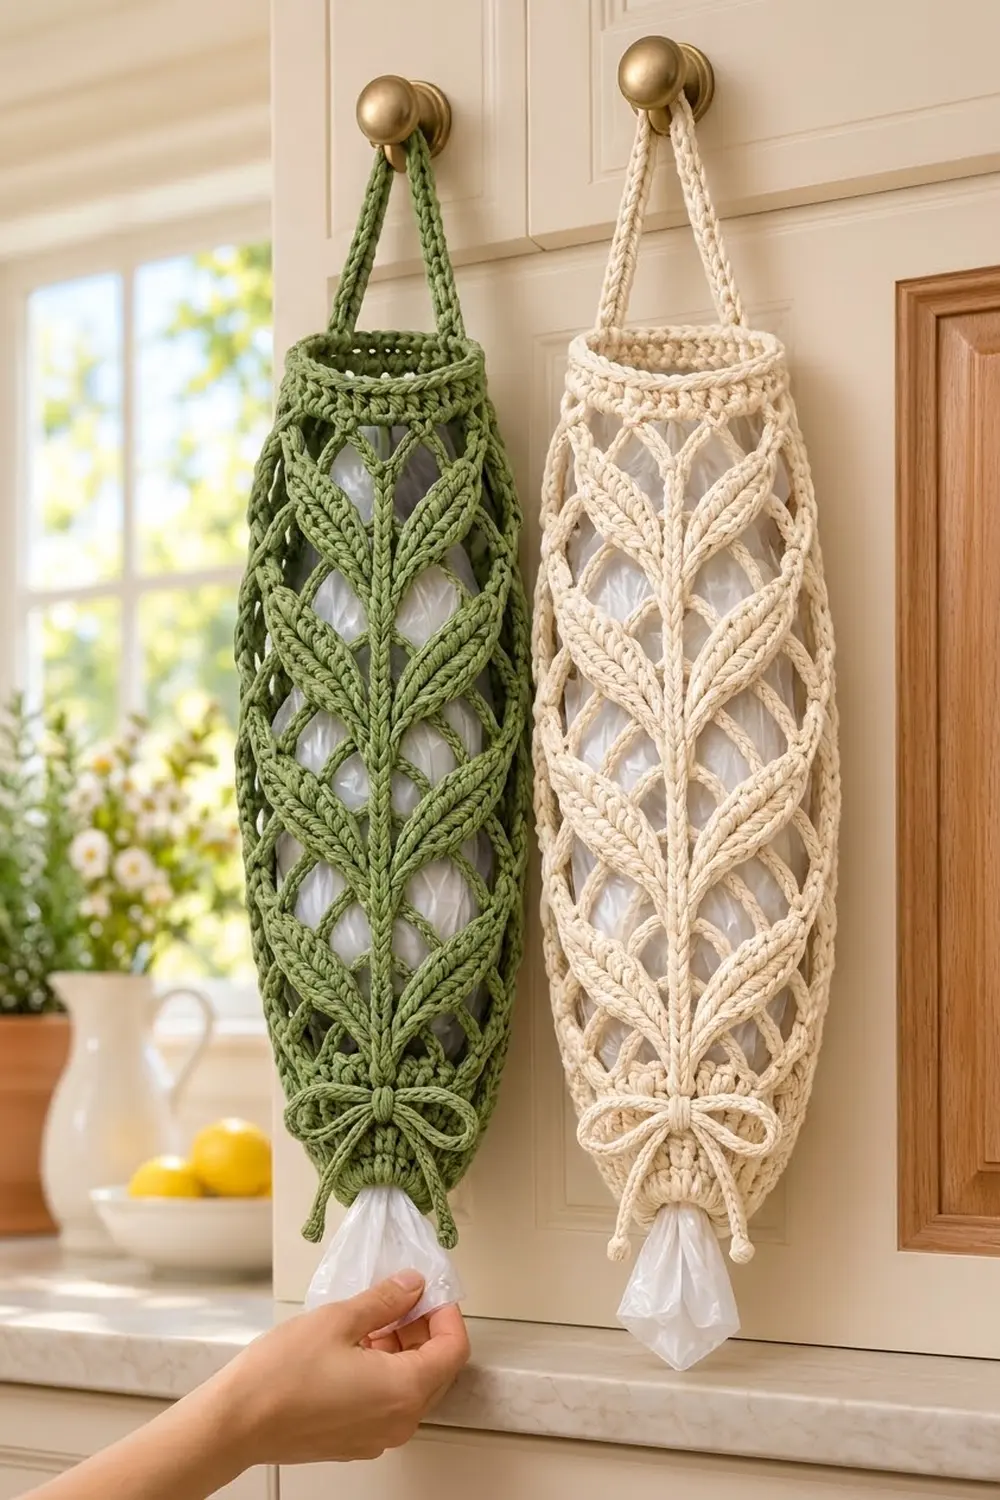
The Sage Vine Grocery Bag Holder is a slim hanging tube that holds plastic shopping bags. The bags go in at the top and come out one at a time through a small opening at the bottom. Raised vine stems run up the tube, each with pairs of plump leaves. Open diamond mesh fills the spaces between the vines, so you can see how many bags are left.
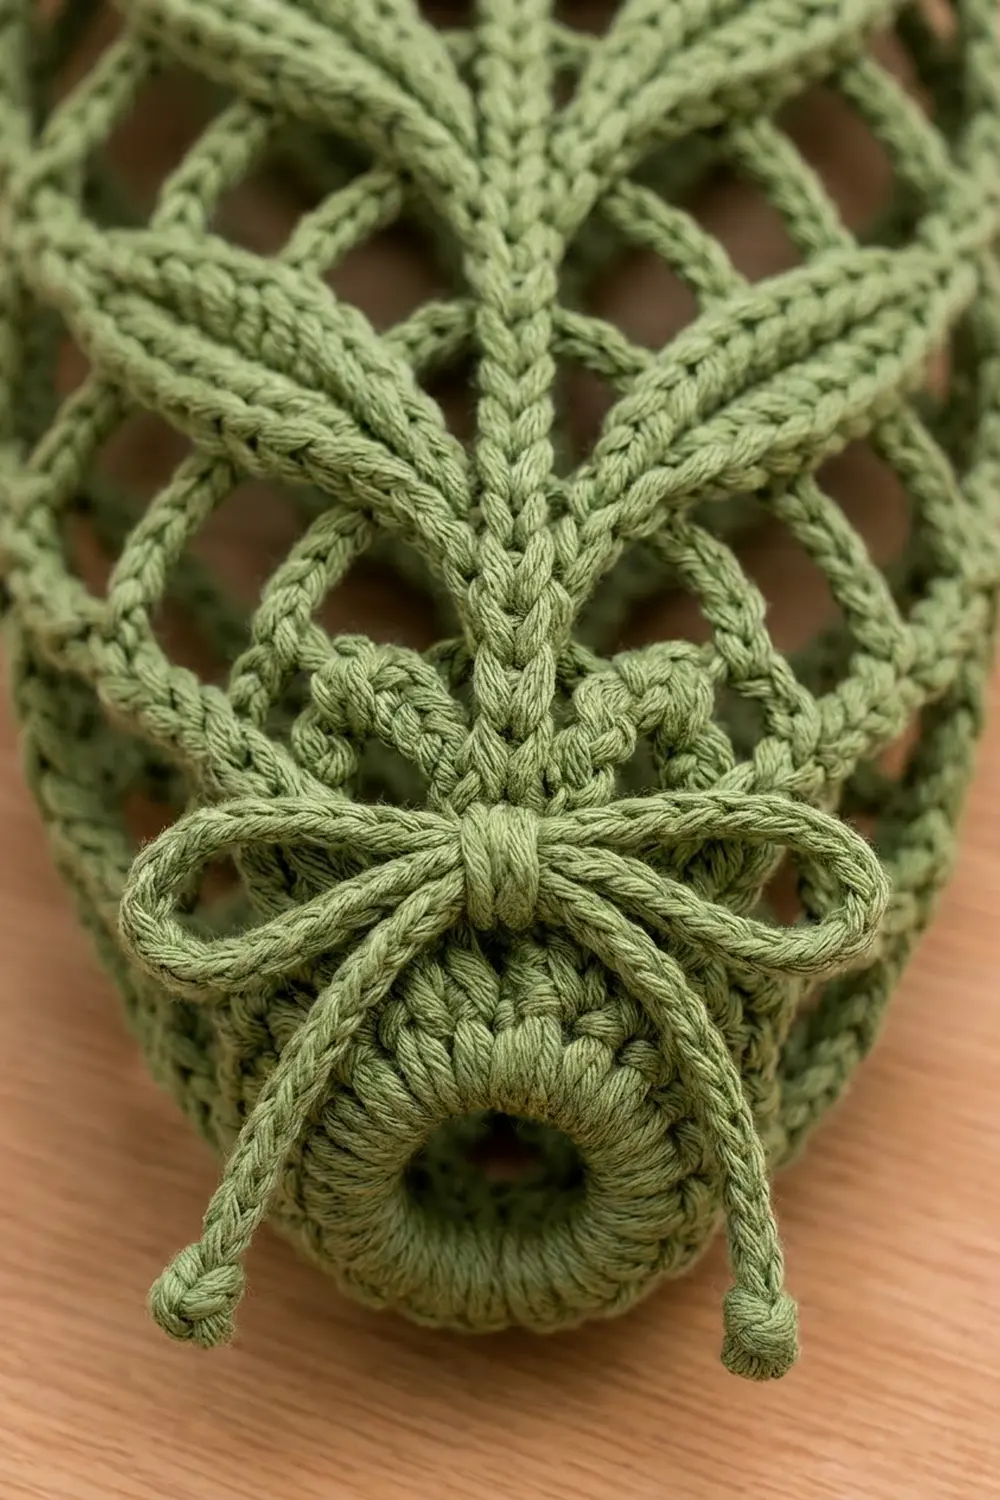
The sample is solid sage green, which looks good on cream or wood cabinets. It works just as well in natural cream for a lighter look. A chain cord tied in a bow just above the bottom ring adds a soft finishing detail and lets you adjust how tightly the opening holds the bags.
This pattern uses US crochet terms. The finished holder is about 15.5 in (39.4 cm) long and 6.5 in (16.5 cm) wide flat at its widest point. The hanging loop adds about 4 in (10.2 cm).
You work the whole piece in joined rounds, starting from the bottom ring. First comes a short base with an eyelet round, then 24 rounds of leaf-and-mesh pattern. The tube is shaped by changing the chain length, not the stitch count. You finish with a solid top band, a hanging strap, a rolled bottom edge and the drawstring.
Finished Size and Construction
- Finished size: 15.5 in (39.4 cm) long × 6.5 in (16.5 cm) wide, flat at the widest point
- Skill level: Intermediate
- Terminology: US
- Yarn weight: Worsted (#4) cotton
- Hook: 5.0 mm (H-8)
- Number of pieces: 1 body, plus 1 drawstring cord
- Layout: Tube with 4 leaf vines (front, back and two sides)
- Base size: 1 in (2.5 cm) tall, 5 in (12.7 cm) wide flat
- Size before top band: 14.5 in (36.8 cm) long
- Top band depth: 1 in (2.5 cm)
Materials
Use a smooth, firm worsted cotton or cotton blend. Cotton holds the leaf texture well and doesn’t stretch out of shape under the weight of the bags. Avoid splitty or very soft yarns, because the raised stems will look blurry.
- Sage green: 140 g, about 265 m (290 yd)
- Optional cream colorway: the same amount
These quantities include a margin of about 15% for your gauge swatch and for differences in tension.
Tools:
– 5.0 mm (H-8) crochet hook
– Tapestry needle
– 4 stitch markers
– Scissors
– Measuring tape
– Rust-proof pins and a spray bottle for blocking
Abbreviations (US Terms)
- ch – chain
- sl st – slip stitch
- sc – single crochet
- dc – double crochet
- FPdc – front post double crochet
- rsc – reverse single crochet (crab stitch)
- sk – skip
- sp – space
- st(s) – stitch(es)
- beg – beginning
Leaf (3-dc cluster): [Yarn over, insert hook in the stitch, yarn over, pull up a loop, yarn over, draw through 2 loops] 3 times in the same stitch, then yarn over and draw through all 4 loops on the hook. The cluster comes out plump and slightly elongated. Because the FPdc stem beside it pushes it outward, it leans away from the stem like a leaf.
Gauge and Checkpoints
Sc gauge: 16 sc and 20 rounds = 4 in (10.2 cm).
Pattern gauge: 4 pattern rounds (2 leaf tiers) = 2.25 in (5.7 cm) tall.
Work a swatch of 20 sc for 20 rows and measure the center 4 in (10.2 cm). Then use the base of the holder itself as your real test piece. Measure at each checkpoint below before you continue.
- After Rnd 4: 1 in (2.5 cm) tall, 5 in (12.7 cm) wide flat
- After Rnd 8: 3.25 in (8.3 cm) tall, about 5.5 in (14.0 cm) wide flat
- After Rnd 16: 7.75 in (19.7 cm) tall
- After Rnd 24: 12.25 in (31.1 cm) tall, about 6.5 in (16.5 cm) wide flat
- After Rnd 28: 14.5 in (36.8 cm) tall
- After Rnd 33: 15.5 in (39.4 cm) tall, 5.5 in (14.0 cm) wide flat
If the base measures more than 5 in (12.7 cm) wide, go down half a hook size. If it measures less than 4.5 in (11.4 cm), go up half a size. If only the mesh is too long, keep your hook and shorten the chain arches by working ch 3 instead of ch 4 through the middle section.
Pattern
Join every round with a sl st; don’t work in a spiral. Joined rounds keep the vine stems straight. The join line sits beside the first repeat, so treat repeat 1 as a side vine. Repeat 2 is the front vine and repeat 4 is the back vine. Place a marker on the front stem when you reach Rnd 5.
Base (Bottom Ring and Eyelets)
Rnd 1: Ch 20 and sl st to the first ch to form a ring, taking care not to twist it. Ch 1, sc in each ch around, join to the first sc. (20 sc)
Rnd 2 (eyelets): Ch 4 (counts as dc + ch 1), sk next sc, [dc in next sc, ch 1, sk next sc] 9 times, join to 3rd ch of beg ch-4. (10 dc, 10 ch-1 sps = 20 sts; 10 eyelets)
Rnd 3 (conversion): Ch 1, [sc in next dc, 2 sc in next ch-1 sp] 10 times, join. (30 sc: 10 worked into stitches + 20 worked into spaces)
Rnd 4 (growth): Ch 1, [sc in next 2 sc, 2 sc in next sc] 10 times, join. (40 sc)
Checkpoint: 1 in (2.5 cm) tall and 5 in (12.7 cm) wide flat. The bottom opening is about 1.6 in (4.1 cm) across.
Body: Leaf Vine Mesh
The body alternates two rounds. Round A places the leaves. Round B sets up the mesh. In both rounds, each FPdc is worked around the stem stitch directly below, so the vine runs straight up the tube.
Rnd 5 (A, ch-3): Ch 2 (does not count as a st), [Leaf in next sc, FPdc around next sc, Leaf in next sc, ch 3, sk 3 sc, sc in next sc, ch 3, sk 3 sc] 4 times, join to the top of the first Leaf.
(8 Leaves, 4 FPdc, 4 sc, 8 ch-3 sps; each repeat uses 10 sc of Rnd 4)
Rnd 6 (B, ch-3): Ch 2 (does not count), [dc in top of next Leaf, FPdc around next FPdc, dc in next Leaf, ch 3, sc in next ch-3 sp, ch 3, sc in next ch-3 sp, ch 3] 4 times, join to the first dc.
(8 dc, 4 FPdc, 8 sc, 12 ch-3 sps)
Rnd 7 (A, ch-3): Ch 2 (does not count), [Leaf in next dc, FPdc around next FPdc, Leaf in next dc, ch 3, sc in the middle ch-3 sp of the 3, ch 3] 4 times, join to the top of the first Leaf.
(8 Leaves, 4 FPdc, 4 sc, 8 ch-3 sps)
Rnd 8: Repeat Rnd 6. (8 dc, 4 FPdc, 8 sc, 12 ch-3 sps)
Rnds 9–24 (middle section, ch-4): Repeat Rnds 7 and 8 eight more times, working ch 4 everywhere in place of ch 3. The longer arches make the middle of the tube wider.
– Each A round: 8 Leaves, 4 FPdc, 4 sc, 8 ch-4 sps
– Each B round: 8 dc, 4 FPdc, 8 sc, 12 ch-4 sps
Rnds 25–28 (upper taper, ch-3): Repeat Rnds 7 and 8 twice, going back to ch 3.
– A rounds: 8 Leaves, 4 FPdc, 4 sc, 8 ch-3 sps
– B rounds: 8 dc, 4 FPdc, 8 sc, 12 ch-3 sps
You now have 12 leaf tiers on each vine. Checkpoint: 14.5 in (36.8 cm) tall.
Border: Top Band, Hanging Loop and Bottom Edge
Border gauge: 16 sc = 4 in (10.2 cm), 5 rounds = 1 in (2.5 cm).
Top Band
Rnd 29 (conversion): Ch 1, [sc in next dc, sc in next FPdc, sc in next dc, 2 sc in next ch-3 sp, sc in next sc, 2 sc in next ch-3 sp, sc in next sc, 2 sc in next ch-3 sp] 4 times, join.
(44 sc: 20 worked into stitches + 24 worked into the 12 ch-3 spaces)
Rnds 30–33: Ch 1, sc in each sc around, join. (44 sc each round)
Laid flat, each side of the band has 22 sc, so the full round is 44 sc. At 16 sc per 4 in (10.2 cm), 44 sc gives an 11 in (27.9 cm) circumference, or 5.5 in (14.0 cm) flat. That is slightly narrower than the 6.5 in (16.5 cm) middle, which gives the oval shape. Two sc per ch-3 space keeps the rim firm without ruffling. Don’t fasten off yet if you’d like to start the strap with the working yarn; otherwise fasten off.
Hanging Loop
Place a marker in the sc above the back stem. This is the 2nd sc of the 4th repeat, stitch 35 of 44.
Row 1: Join yarn in st 31 of Rnd 33. Ch 1, sc in the same st and in the next 3 sts, turn. (4 sc)
Rows 2–40: Ch 1, sc in each sc, turn. (4 sc)
The strap is 8 in (20.3 cm) long and 1 in (2.5 cm) wide. Fold it into a loop and sew Row 40 to the inside of the band over sts 35–38, so the loop sits centered over the back vine. The loop stands about 4 in (10.2 cm) above the rim.
Bottom Edge
Turn the holder upside down. Join yarn in any remaining loop of the foundation chain. Ch 1, then rsc in each of the 20 foundation chains, and join. (20 rsc; 10 per side when flat)
Working 1 rsc per chain keeps the count matched to Rnd 1, so the ring rolls into a firm, rounded edge without flaring or tightening the opening.
Drawstring
Ch 72, about 18 in (45.7 cm). Fasten off and tie an overhand knot 0.5 in (1.3 cm) from each end, then trim the tails. Starting at the front stem, weave the cord in and out through the 10 eyelets of Rnd 2 so that both ends come out at the front. Tie a bow.
Final Blocking
- Weave in all ends along stitch posts, not across the mesh.
- Mist the holder until it is damp but not soaked.
- Stuff it lightly with a rolled towel to fill out the oval shape.
- Lay it flat with the front vine centered. Pat it to 6.5 in (16.5 cm) wide in the middle and 15.5 in (39.4 cm) long.
- Pin each pair of leaves so they angle up and outward from the stem.
- Straighten each stem with your fingers.
- Let it dry completely, then remove the towel.
Final Quality-Control Checklist
- Four straight vines, each with 12 leaf tiers
- Every FPdc stacks directly on the FPdc below it
- Rnd 4 has 40 sc; Rnd 29 and the top band have 44 sc
- Mesh arches are even, with no twisted chains
- The hanging loop is centered over the back vine and sewn securely
- The bottom ring is firm and the opening is about 1.6 in (4.1 cm) across
- The bow sits centered on the front vine
Troubleshooting
Stems drift sideways: You’ve worked an FPdc around the wrong post. Check every round that it sits directly above the stem below.
Leaves look flat: Pull up the cluster loops a little taller, and keep the final yarn over snug.
Middle is too wide: Work ch 3 instead of ch 4 for 2 of the middle repeats.
Rim ruffles: Go down half a hook size for the top band only.
Bags fall out: Tighten the bow, or make the cord 4 ch shorter.
Bottom ring flares: Work the rsc with a smaller hook.
Care
Hand wash in cool water and lay flat to dry, reshaping the leaves while the piece is damp. Don’t tumble dry, because the mesh will stretch.
Final Notes
The measurement chain runs like this:
1. The 40-sc base measures 5 in (12.7 cm) wide and 1 in (2.5 cm) tall.
2. Twelve leaf tiers add 13.5 in (34.3 cm), with the ch-4 middle section widening the body to 6.5 in (16.5 cm).
3. The 44-sc top band closes the shape at 5.5 in (14.0 cm) wide.
4. The finished holder is 15.5 in (39.4 cm) long, plus the 4 in (10.2 cm) hanging loop.
If you check each of these measurements before moving on, your holder will hang straight and dispense one bag at a time.
Happy crocheting!