
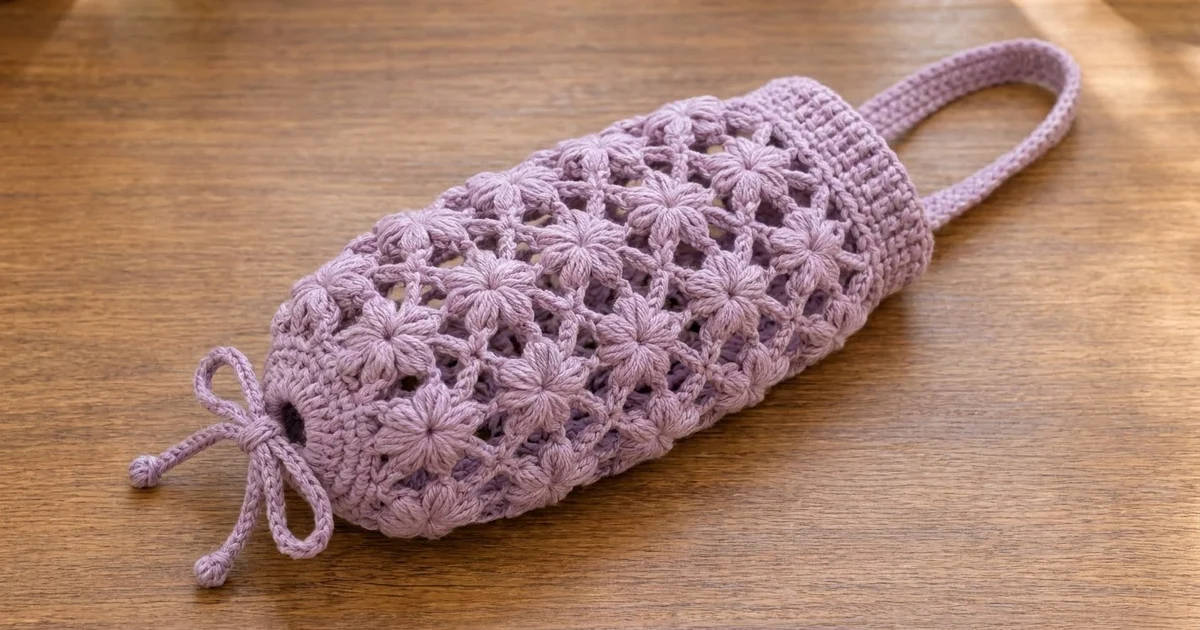
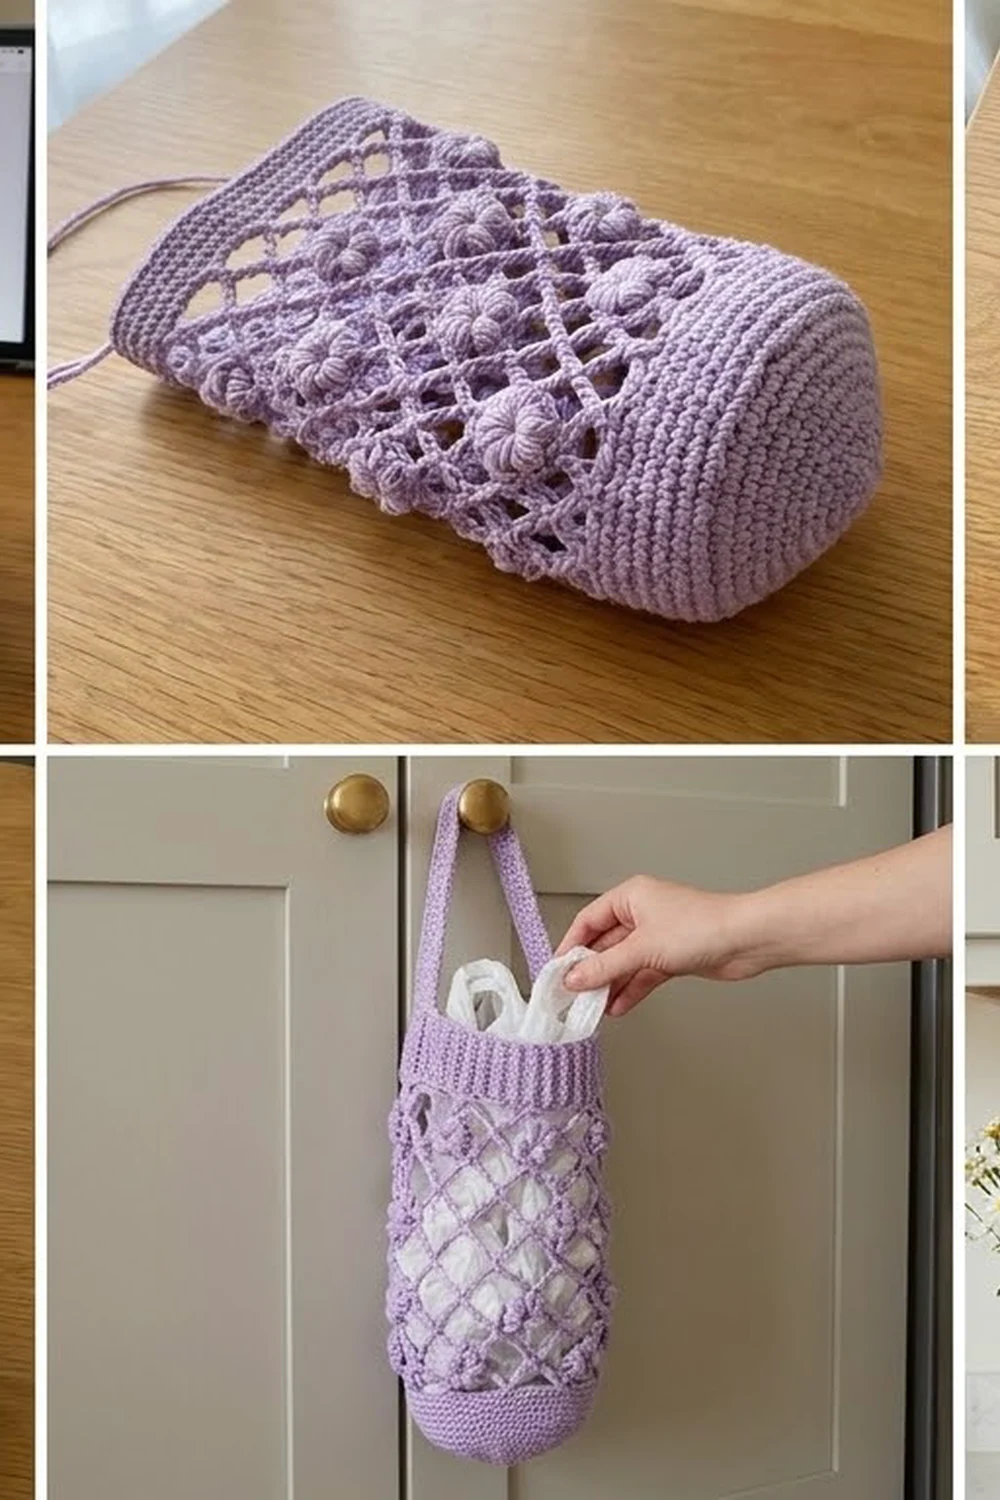
This holder turns a messy pile of plastic bags into a tidy, pretty kitchen accessory. The body is an airy chain lattice covered in raised six-petal puff flowers, set in a staggered diamond layout. A solid cone closes the bottom and a ribbed band finishes the top.
The sample is in soft lavender worsted-weight cotton, and the design works just as well in sage green or any calm pastel. The puff flowers show up best in a smooth, matte yarn that shows clear stitches.
The pattern uses US crochet terms. The finished holder is about 6 in (15.2 cm) wide across the band when laid flat, about 6.5 in (16.5 cm) wide across the flower section, and about 18 in (45.7 cm) long, not counting the strap.
The holder is worked in one piece from the bottom up. You start with a ring that leaves a dispensing hole, increase into a solid base cone, work eight tiers of puff flowers joined by chain mesh, and finish with a ribbed top band. A separate strap is sewn inside the band, and a chain drawstring is woven through the base.
Finished Size and Construction
- Finished size: 6 in (15.2 cm) flat width at the band; 6.5 in (16.5 cm) at the flowers; 18 in (45.7 cm) long
- Skill level: Intermediate
- Terminology: US
- Yarn weight: Worsted (#4)
- Hook: 5.0 mm (H-8)
- Number of pieces: 1 body, plus 1 strap and 1 drawstring
- Layout: Tube worked in joined rounds, bottom up
- Body circumference: 48 stitches, 12 in (30.5 cm)
- Size before band: 16 in (40.6 cm) long
- Band depth: 2 in (5.1 cm)
Materials
Use a smooth worsted-weight cotton or cotton blend. Cotton keeps the puffs crisp and stops the holder from stretching once it’s full of bags. Avoid fuzzy yarns, because they hide the petals.
- Lavender: 130 g / 250 m (about 273 yd)
- Optional second colorway (sage green): the same amount again
These quantities include about a 15% margin. Puff stitches use more yarn than you might expect.
Tools:
– 5.0 mm (H-8) crochet hook
– Tapestry needle
– 2 stitch markers
– Scissors
– Measuring tape
– Spray bottle and blocking pins
– An empty 2-liter bottle or a rolled towel for blocking
Abbreviations (US Terms)
- ch – chain
- sl st – slip stitch
- sc – single crochet
- hdc – half double crochet
- dc – double crochet
- FPdc – front post double crochet
- BPdc – back post double crochet
- sk – skip
- sp – space
- st(s) – stitch(es)
- rnd – round
Puff stitch (puff): (Yarn over, insert hook in the stitch or space, pull up a loop to about 0.5 in / 1.3 cm) 3 times. You now have 7 loops on the hook. Yarn over and pull through all 7 loops, then ch 1 to close.
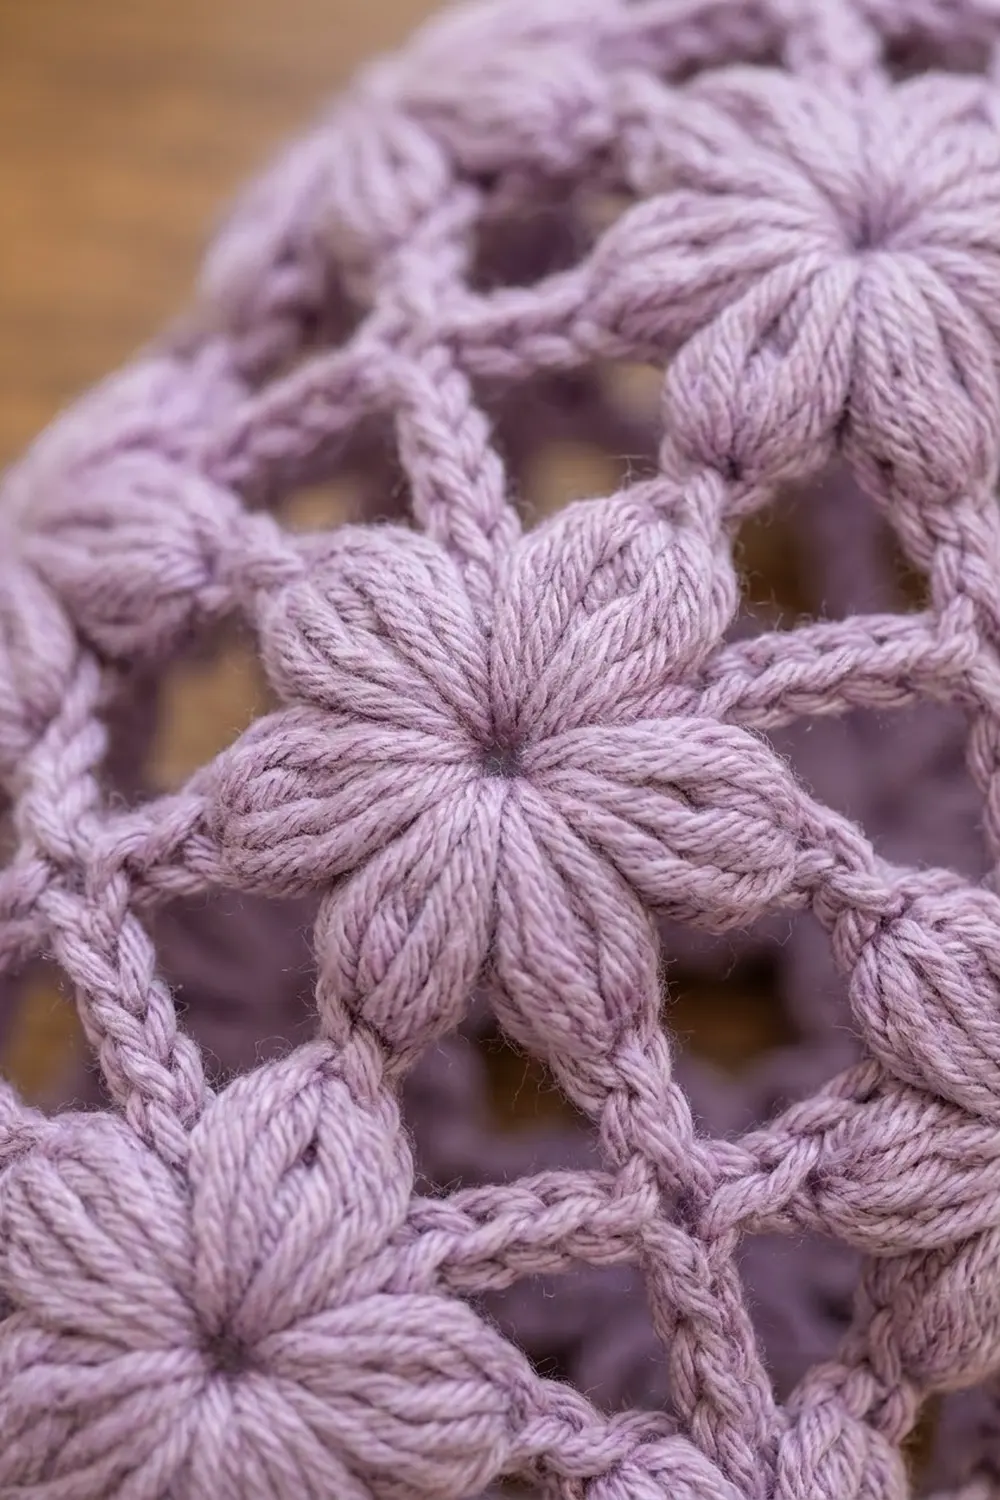
Flower: In the same stitch, work (puff, ch 1) 5 times, then 1 more puff. That gives 6 puffs and 5 ch-1 spaces. The center sp is the 3rd ch-1 space, between puffs 3 and 4. When the next round anchors there, the fan of puffs pulls into a round six-petal flower.
Gauge and Checkpoints
Gauge: 16 hdc and 12 rnds = 4 in (10.2 cm) worked in the round.
Make the base (Rnds 1–6) first and treat it as your swatch.
Checkpoints:
– After Rnd 6: The base lies as a shallow bowl. The top edge measures 6 in (15.2 cm) across when flattened, and the base is about 2 in (5.1 cm) deep along its side.
– After Rnd 15 (4 flower tiers): The body is about 9.5 in (24.1 cm) long.
– After Rnd 23 (8 flower tiers): The body is 16 in (40.6 cm) long.
– After Rnd 29: The holder is 18 in (45.7 cm) long.
If the base is too wide, go down to a 4.5 mm hook. If it’s too narrow, go up to a 5.5 mm hook. Don’t change stitch counts, because the flower repeat depends on exactly 48 stitches. If your puffs look flat or loose, pull up the loops a little shorter and keep them all the same height.
Base
Ch 16 and join with a sl st to form a ring. Don’t twist the chain. This ring becomes the dispensing hole, about 1.3 in (3.3 cm) across.
Rnd 1: Ch 1, sc in each ch around, then sl st to the first sc. (16 sc)
Rnd 2: Ch 2 (does not count as a stitch here or in later rounds). Hdc in next st, 2 hdc in next st; repeat from * 8 times. Sl st to the first hdc. (24 hdc)
Rnd 3: Ch 2. Hdc in next 2 sts, 2 hdc in next st; repeat from * 8 times. Join. (32 hdc)
Rnd 4: Ch 2. Hdc in next 3 sts, 2 hdc in next st; repeat from * 8 times. Join. (40 hdc)
Rnd 5: Ch 2. Hdc in next 4 sts, 2 hdc in next st; repeat from * 8 times. Join. (48 hdc)
Rnd 6: Ch 2, hdc in each st around. Join. (48 hdc)
Check the base against the gauge checkpoint above. The increases are spread out, so the base forms a cone rather than a flat circle.
Flower Mesh Body
Rnd 7 (mesh setup): Ch 1, sc in the first st. Ch 5, sk 2 sts, sc in next st; repeat from * 14 more times. Ch 5, sk 2, sl st to the first sc. (16 sc, 16 ch-5 loops)
Check: 16 sc + (16 × 2 skipped sts) = 48. Every base stitch is accounted for.
Rnd 8 (Flower Round A): Ch 1, sc in the first sc. Ch 3, flower in next sc, ch 3, sc in next sc; repeat from * 6 more times. Ch 3, flower in next sc, ch 3, sl st to the first sc. (8 flowers, 8 sc, 16 ch-3 sps)
The ch-5 loops from Rnd 7 sit behind the chains and form the lower points of the diamonds.
Rnd 9 (mesh): Ch 1, sc in the first sc. Ch 5, sc in center sp of next flower, ch 5, sc in next sc; repeat from * around, ending with ch 5, sl st to the first sc. (16 sc, 16 ch-5 loops)
Anchoring in each center sp closes each fan into a round flower.
Rnd 10 (Flower Round B, offset): Ch 2 (does not count). Flower in the first sc, ch 3, sc in next sc, ch 3. Flower in next sc, ch 3, sc in next sc, ch 3; repeat from * 6 more times. Sl st to the top of the first puff. (8 flowers, 8 sc, 16 ch-3 sps)
The new flowers sit above the sc that were between the Rnd 8 flowers. This shift creates the staggered diamond layout.
Rnd 11 (mesh): Sl st into each of the first 3 ch-1 sps of the first flower to reach its center sp. Ch 1, sc in the same sp. Ch 5, sc in next sc, ch 5, sc in center sp of next flower; repeat from * around, ending with ch 5, sl st to the first sc. (16 sc, 16 ch-5 loops)
Rnds 12–23: Repeat Rnds 8–11 three more times.
You now have 8 flower tiers in total. Each flower tier and the mesh round after it adds about 1.65 in (4.2 cm). The setup round adds about 0.75 in (1.9 cm). Rnd 23 ends with 16 sc and 16 ch-5 loops.
Keep your puff tension steady. If a flower tier is uneven, the lattice will spiral.
Top Band (Border)
Band gauge: 48 sts = 12 in (30.5 cm) around. That’s 24 sts per side when the holder is laid flat, with the folds at stitch 1 and stitch 25.
Rnd 24 (conversion): Ch 1, sc in each of the 16 anchor sc, and work 2 sc in each of the 16 ch-5 loops as you reach them. Sl st to the first sc. The count is 16 sc worked one per existing stitch + 32 sc added in the loops = 48 sc (24 per side).
Rnd 25: Ch 2. FPdc around next st, BPdc around next st; repeat from * 24 times. Sl st to the first FPdc. (48 sts: 24 FPdc + 24 BPdc; 24 per side)
Rnds 26–28: Ch 2. FPdc around the FPdc, BPdc around the BPdc; repeat from * around. Join. (48 sts each round)
This makes the vertical ribs shown in the photo.
Rnd 29: Ch 1, sc in each st around. Sl st to the first sc. (48 sc) Fasten off and weave in the end.
Why the math works: The base reaches 48 stitches at Rnd 5. Rnd 7 divides them into 16 loops, and every mesh round keeps exactly 16 anchors and 16 loops. Rnd 24 puts back exactly 3 stitches per anchor-and-loop pair (16 × 3 = 48), so the band matches the base’s 12 in (30.5 cm) circumference. The flower section stays slightly wider at about 6.5 in (16.5 cm) flat, because the puffs add bulk. This is what gives the gently rounded silhouette.
Strap
Ch 41.
Row 1: Sc in the 2nd ch from the hook and in each ch across. (40 sc)
Rows 2–3: Ch 1, turn, sc in each st across. (40 sc)
Fasten off and leave a 12 in (30.5 cm) tail. The strap is 10 in (25.4 cm) long and about 0.75 in (1.9 cm) wide.
Flatten the holder so the folds fall at stitch 1 and stitch 25 of Rnd 29. Sew 1 in (2.5 cm) of each strap end to the inside of the band at those folds, one end on each side. Stitch through Rnds 26–29 so the strap’s pull is spread over several rounds.
Drawstring
Ch 88, which is about 22 in (55.9 cm).
Bobble ends: At each end, work 5 dc into the last ch, pull up a loop, drop it, insert the hook in the first dc, pick up the dropped loop and pull it through. Fasten off.
Weave the drawstring over and under every 2 hdc of Rnd 3. Start and finish at the front, and tie a bow. Pull it tight to slow down how fast bags come out, or loosen it to make room for a full handful.
Final Blocking
- Weave in any loose ends along chain spaces, where they won’t show.
- Slide the holder over a 2-liter bottle or a rolled towel. The rolled towel should be about 4 in (10.2 cm) across.
- Spray it evenly until it’s damp but not soaked.
- Ease each flower into a round shape with your fingers and open each center so the petals radiate out evenly.
- Line up the diamonds vertically so the tiers run straight up the tube.
- Pin the band to 6 in (15.2 cm) flat width if it has flared.
- Let it dry completely, which takes about 24 hours, then take it off the form.
Final Quality-Control Checklist
- The base has 48 hdc and the band has 48 stitches.
- Every mesh round has 16 anchors and 16 ch-5 loops.
- Each flower round has 8 flowers, each with 6 puffs.
- The flower tiers alternate positions and form clean diamonds.
- The body is 16 in (40.6 cm) before the band and 18 in (45.7 cm) overall.
- The strap ends are sewn securely at the two folds, exactly opposite each other.
- The drawstring runs through Rnd 3 and the bow ties neatly at the front.
- No loose ends show on the outside.
Troubleshooting
The lattice spirals: Your flowers are probably landing off-center. Recount the anchors at the start of each round and use a marker at the first stitch.
The flowers look like fans, not circles: The mesh round must anchor into the 3rd ch-1 sp of each flower, not into the top of a puff.
The band flares: Work Rnd 29 with a hook 0.5 mm smaller.
The bottom hole is too large: Tighten the drawstring, or start with ch 14 and work 2 extra increases in Rnd 2 so the count still reaches 24.
The puffs are lumpy: Pull every loop up to the same 0.5 in (1.3 cm) height before closing the puff.
Care
Hand wash in cool water, roll it in a towel, and dry it flat or over a bottle form to keep its shape. Don’t tumble dry, because heat can flatten the puffs.
Final Notes
The measurement chain is simple. Hit 48 hdc and 6 in (15.2 cm) flat at the base, and keep 16 loops through all eight flower tiers to reach 16 in (40.6 cm). Then put back 48 stitches for a 2 in (5.1 cm) ribbed band, finishing at 18 in (45.7 cm). Add the strap and the bowed drawstring, and your holder is ready to hang.
Happy crocheting!