

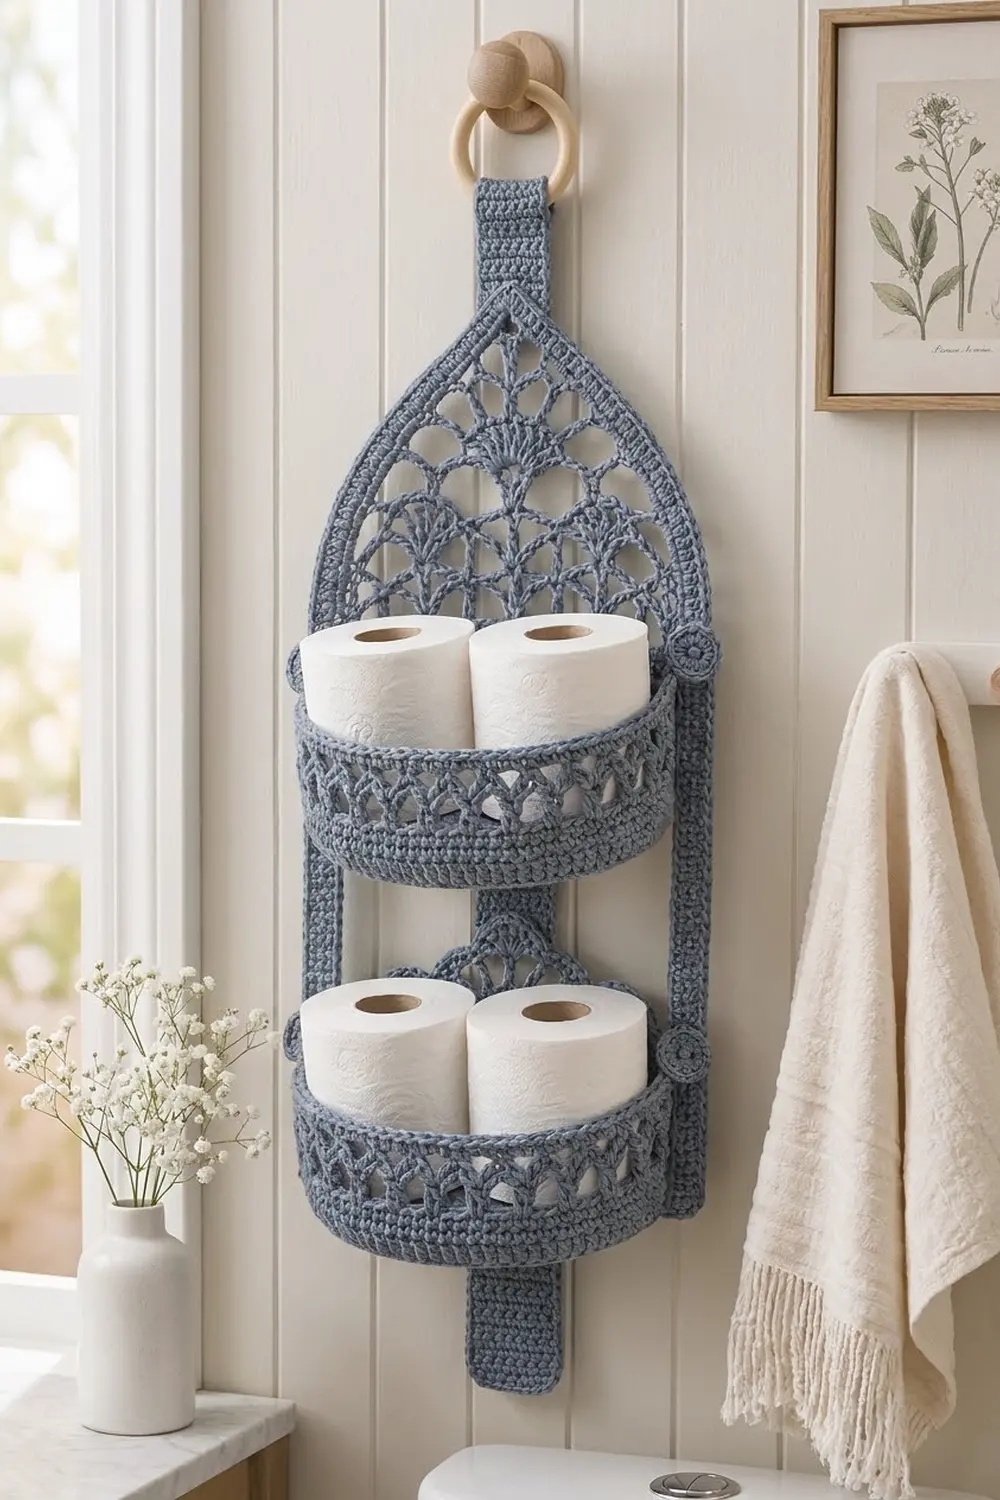
This hanging organizer has two D-shaped baskets stacked on one long back strap. Each basket has a solid single crochet base, an open mesh band around the wall, and a lace crown at the back made of stepped shell fans with a single peak. Two slim side straps form a pointed arch above the top crown and run down to button discs on the lower basket.
The whole piece is one dusty denim blue cotton, so all the interest comes from texture: dense rounds, airy lace, and a rope-like reverse single crochet edge. Each basket holds two standard toilet rolls.
The pattern uses US crochet terms. The organizer measures about 25 in (63.5 cm) tall including the ring and 11 in (27.9 cm) wide. Each basket is 10½ in (26.7 cm) wide, 5¼ in (13.3 cm) deep, 3½ in (8.9 cm) tall at the front, and 6¾ in (17.1 cm) tall at the crown peak.
Each basket starts as a flat half-circle worked in rows. An edging round turns it into a D shape, the wall is worked in rounds, and the crown is worked in rows over the back stitches only. After that you add the border, make the straps and discs, and sew everything together.
Finished Size and Construction
- Finished size: 25 in (63.5 cm) tall × 11 in (27.9 cm) wide
- Skill level: Intermediate
- Terminology: US
- Yarn weight: Worsted (#4) cotton
- Hook: 4.0 mm (G-6)
- Number of pieces: 9 (2 baskets, 1 back strap, 2 side straps, 4 button discs), plus a wooden ring
- Layout: two baskets stacked vertically on one strap
- Piece size (basket): 10½ in (26.7 cm) wide × 5¼ in (13.3 cm) deep; front wall 3½ in (8.9 cm); peak 6¾ in (17.1 cm)
- Crown height before border: 3¼ in (8.3 cm)
- Border depth: ¼ in (0.6 cm), 2 rounds
Materials
Use a smooth, tightly plied cotton. It holds its shape under load and handles bathroom humidity. Acrylic will sag.
- Denim Blue: 250 g, about 425 m
- 4.0 mm (G-6) crochet hook
- 1 wooden ring, 2 in (5.1 cm) diameter
- 4 locking stitch markers
- Tapestry needle, scissors, measuring tape
- Rust-proof pins
- Optional: spray starch
The quantities include about a 10% margin.
Abbreviations (US Terms)
- ch – chain
- sl st – slip stitch
- sc – single crochet
- dc – double crochet
- sc2tog – single crochet 2 together
- BLO – back loop only
- st(s) – stitch(es)
- sp – space
- rev sc – reverse single crochet (crab stitch): sc worked from left to right
Fan: 7 dc in the same loop.
Peak Fan: 9 dc in the same stitch.
Gauge and Checkpoints
Gauge: 16 sc and 17 rows = 4 in (10.2 cm), worked firmly.
Make one basket base first and use it as your swatch. Checkpoints:
- After Row 10: the straight edge is about 4¾ in (12.1 cm).
- After Row 21: the straight edge is 10 in (25.4 cm) and the depth is 5 in (12.7 cm).
- After Rnd 22: 10½ × 5¼ in (26.7 × 13.3 cm).
- After Wall Rnd 10: the front wall is 3¼ in (8.3 cm) tall.
- After Crown Row 7: the peak is 3¼ in (8.3 cm) above the wall.
If your base is too big, go down 0.5 mm. If it’s too small, go up 0.5 mm. A firm fabric matters more than an exact match, because a loose basket won’t stand.
Basket (Make 2)
Base
The base is worked in turned rows. The ch-1 at the start of a row does not count as a stitch.
Row 1: Make a magic ring, ch 1, work 3 sc in the ring, and turn. (3)
Row 2: Ch 1, work 2 sc in each st, turn. (6)
Row 3: Ch 1, [sc in next st, 2 sc in next st] 3 times, turn. (9)
Rows 4–21: Ch 1, [sc in each of next (row number − 2) sts, 2 sc in next st] 3 times, turn. Each row has 3 more sts than the row before. On even rows, move part of the plain sts to before the first increase so the increases don’t stack.
Counts: Row 4 (12), Row 10 (30), Row 15 (45), Row 21 (63).
Rnd 22 (conversion round): Do not turn. Ch 1 and work along the straight edge:
- Sc in each of the next 20 row ends (Rows 21 to 2).
- Sc in the center of the ring.
- Sc in each of the next 20 row ends (Rows 2 to 21). You now have 41 sts on the straight edge.
- Work 3 sc in the first st of Row 21, sc in each of the next 61 sts, then 3 sc in the last st.
- Sl st to the first sc.
Count: 41 + (63 worked 1 per st + 4 extra) = 108. Sts 1–41 are the back. Mark st 1 and st 41.
Wall
Work in joined rounds without turning. Start each round with ch 1 and join each round with a sl st.
Rnd 1: Sc in the BLO of each st. (108) This forms the fold line.
Rnds 2–5: Sc in each st. (108)
Rnd 6 (mesh): Sc in the first st, then [ch 5, skip 3 sts, sc in next st] 26 times. Finish with ch 2 and a dc in the first sc. The ch 2 and dc form the last loop and leave your hook at its center. (27 sc, 27 loops)
Rnd 7 (mesh): Sc around the dc post, [ch 5, sc in next loop] 26 times, ch 5, then sl st to the first sc. (27 loops)
Rnd 8: Sl st into the first loop, ch 1, and work 4 sc in each loop. (27 × 4 = 108)
Rnds 9–10: Sc in each st. (108)
Lay the basket back-side down. Move the markers to the 2 sts directly above the back corners, with 41 sts from marker to marker counting both. Sl st to the first marker if needed. Do not fasten off.
Checkpoint: front wall 3¼ in (8.3 cm), perimeter 27 in (68.6 cm).
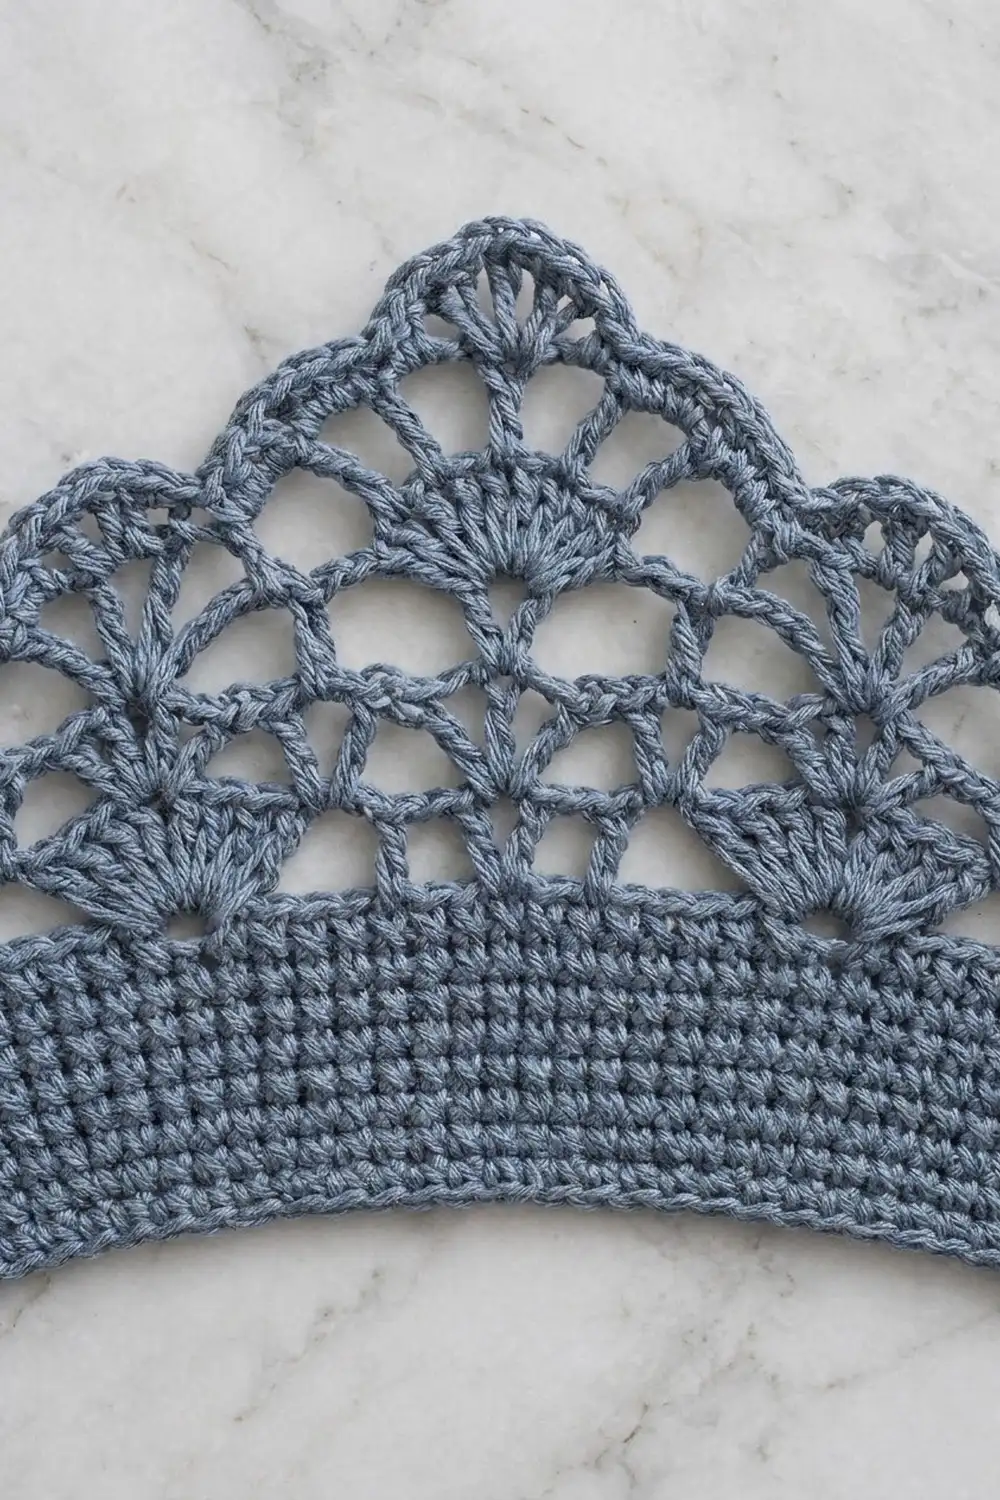
Crown
Work in turned rows over the 41 back sts only. Each tier of fans steps in toward the center, which creates the scalloped outline.
Row 1: Ch 1, sc in the marked st, then [ch 5, skip 3, sc in next st] 10 times, ending in the second marker. Turn. (11 sc, 10 loops)
Row 2: Sl st in each of the first 3 ch, ch 1, sc in the same loop, then [ch 5, sc in next loop] 9 times. Turn. (10 sc, 9 loops)
Row 3: Sl st to the center of the first loop, ch 1, sc in that loop, then [Fan in next loop, sc in next loop] 4 times. Turn. (4 Fans, 5 sc)
Row 4: Sl st in the first sc and the next 4 dc (this is the center of Fan 1). Ch 1 and sc in the same dc. Then [ch 5, sc in next sc, ch 5, sc in center dc of next Fan] 3 times. Turn. (6 loops, 7 sc)
Row 5: Sl st to the center of the first loop, ch 1, sc in that loop, then [ch 5, sc in next loop] 5 times. Turn. (5 loops)
Row 6: Sl st to the center of the first loop, ch 1, sc in that loop, then [Fan in next loop, sc in next loop] 2 times. Turn. (2 Fans, 3 sc)
Row 7: Sl st in the first sc and the next 4 dc, ch 1, and sc in the same dc. Ch 3, Peak Fan in the center sc, ch 3, then sc in the center dc of Fan 2. Fasten off. (1 Peak Fan)
Back Strap (Make 1)
Row 1: Ch 9, sc in the 2nd ch from the hook and in each ch across, turn. (8)
Rows 2–102: Ch 1, sc in each st, turn. (8) The strap now measures 24 in (61.0 cm).
Row 103: Ch 1, sc2tog, sc in next 4 sts, sc2tog, turn. (6)
Row 104: Ch 1, sc2tog, sc in next 2 sts, sc2tog, turn. (4)
Row 105: Ch 1, sc2tog twice. (2) Fasten off.
The strap is 2 in (5.1 cm) wide and 24¾ in (62.9 cm) long, including the point.
Side Straps (Make 2)
Row 1: Ch 57, sc in the 2nd ch from the hook and in each ch across, turn. (56)
Row 2: Ch 1, sc in each st. (56)
Eyelet: Ch 14 and sl st into the first ch to form a ring. Ch 1, work 20 sc in the ring, and sl st to join. Sl st into the strap’s row end to anchor it, then fasten off. Repeat at the other end.
Each strap is 14 in (35.6 cm) between the eyelets and 17¼ in (43.8 cm) overall.
Button Discs (Make 4)
Rnd 1: Magic ring, 6 sc. (6)
Rnd 2: 2 sc in each st. (12)
Rnd 3: Sl st in each st. (12)
Leave an 8 in (20.3 cm) tail. Each disc is 1 in (2.5 cm) across.
Make All Pieces
All pieces are Denim Blue:
- 2 baskets (about 90 g each)
- 1 back strap (about 30 g)
- 2 side straps (about 6 g each)
- 4 discs (about 1 g each)
           ( ring )
           | strap |
              /^\
   side    / crown \    side
   strap  [ BASKET 1 ]  strap
          (o)      (o)
           / crown  \
          [ BASKET 2 ]
          (o)      (o)
           | tail  |
              \/
Joining
Work the Border on both baskets before you join anything.
Ring: Fold the square end of the strap 1½ in (3.8 cm) over the ring. Whipstitch the 8 sts of Row 1 to the matching strap sts behind them. All the marks below are measured from this fold.
Marks: Place markers on the strap at these distances from the fold:
- Apex: 3 in (7.6 cm)
- Upper crown peak: 4 in (10.2 cm)
- Upper base: 10¾ in (27.3 cm)
- Lower crown peak: 11¼ in (28.6 cm)
- Lower base: 18 in (45.7 cm)
Baskets: Base st 21 of each basket lines up with the strap’s center, between strap sts 4 and 5. Whipstitch both strap edges to the back wall, one strap row to one sc wall round, through Rnds 1–5 and 8–10. Tack lightly across the mesh, and sew the center of the Peak Fan to the strap. Keep your tension snug but never tight enough to pucker the wall.
Discs: Sew a disc to each back rim corner of both baskets.
Side straps: Overlap the top eyelets at the apex and sew them to the strap. Ease each strap along the upper crown’s border to form the arch, tacking every 1 in (2.5 cm) through Border Rnd 1. Sew the strap under the upper disc, then button the bottom eyelet over the lower disc.
Checkpoint: 18 in (45.7 cm) from the fold to the lower base, with a 5¼ in (13.3 cm) tail below.
Border
Border gauge: 4 sts per 1 in (2.5 cm), the same as the sc fabric.
Rnd 1: Join in st 42 of Wall Rnd 10 and ch 1.
- Front rim: sc in sts 42–108. (67)
- Crown, first half: (29)
- 3 sc along the Row 1 edge
- 3 sc in the exposed half-loop of Row 2
- 1 sc in the Row 3 sc and 1 sc in each of the first 4 Fan dc (5)
- 3 sc in each exposed half-loop of Rows 4 and 5
- 1 sc in the Row 6 sc and 1 sc in each of the first 4 Fan dc (5)
- 3 sc in the ch-3 sp
- 1 sc in each of Peak Fan dc 1–4
- Peak: 3 sc in the center dc. (3)
- Crown, second half: mirror the first half. (29)
Join with a sl st. 67 + 29 + 3 + 29 = 128.
Rnd 2: Ch 1, rev sc in each st, and join. (128) Fasten off.
Why the math works: One sc per wall st keeps the rim from flaring. Three sc fit the 2½ ch that each half-loop spans, which leaves a little ease for the curves. The 3 peak sts turn the point. Rev sc adds height without adding any stitches.
Final Blocking
- Before joining, spray each basket until it’s evenly damp.
- Stuff it with a towel or a box cut to 10½ × 5¼ in (26.7 × 13.3 cm).
- Pin the crown flat and open every Fan and loop.
- Mist with starch if you want extra stiffness.
- Let it dry for 24 hours.
- Block the strap to 2 in (5.1 cm) wide.
Final Quality-Control Checklist
- Each base is 10½ × 5¼ in (26.7 × 13.3 cm) and lies flat.
- Each wall has 108 sts and is 3½ in (8.9 cm) tall at the front.
- Each crown steps 4, 2, 1 fans, and the two sides match.
- Border Rnd 1 has 128 sts.
- The strap is centered with no puckers.
- The side-strap arch is even, and the eyelets hold firmly on the discs.
- All tails are woven in at least 2 in (5.1 cm).
Troubleshooting
- Base ruffles: use a smaller hook, and check that each row adds exactly 3 sts.
- Base cups: loosen the increase stitches and stagger them.
- Wall leans outward: Rnd 1 was not worked in the BLO. Redo it.
- Floppy mesh: use ch-4 loops instead, still with 4 sc per loop on Rnd 8.
- Lopsided crown: recount the 41 back sts.
- Eyelets slip off the discs: chain 12 for the ring instead of 14.
Care
Hand wash cool, roll in a towel to remove water, and reshape while damp. Re-starch if the baskets soften.
Final Notes
The measurement chain:
- 63-st arc → 108-st D round → 108-st wall at 3¼ in (8.3 cm)
- 41-st crown → 128-st border
- 24¾ in (62.9 cm) strap → 25 in (63.5 cm) finished organizer
If every link checks out, the baskets hang straight and hold their rolls. Happy crocheting!