

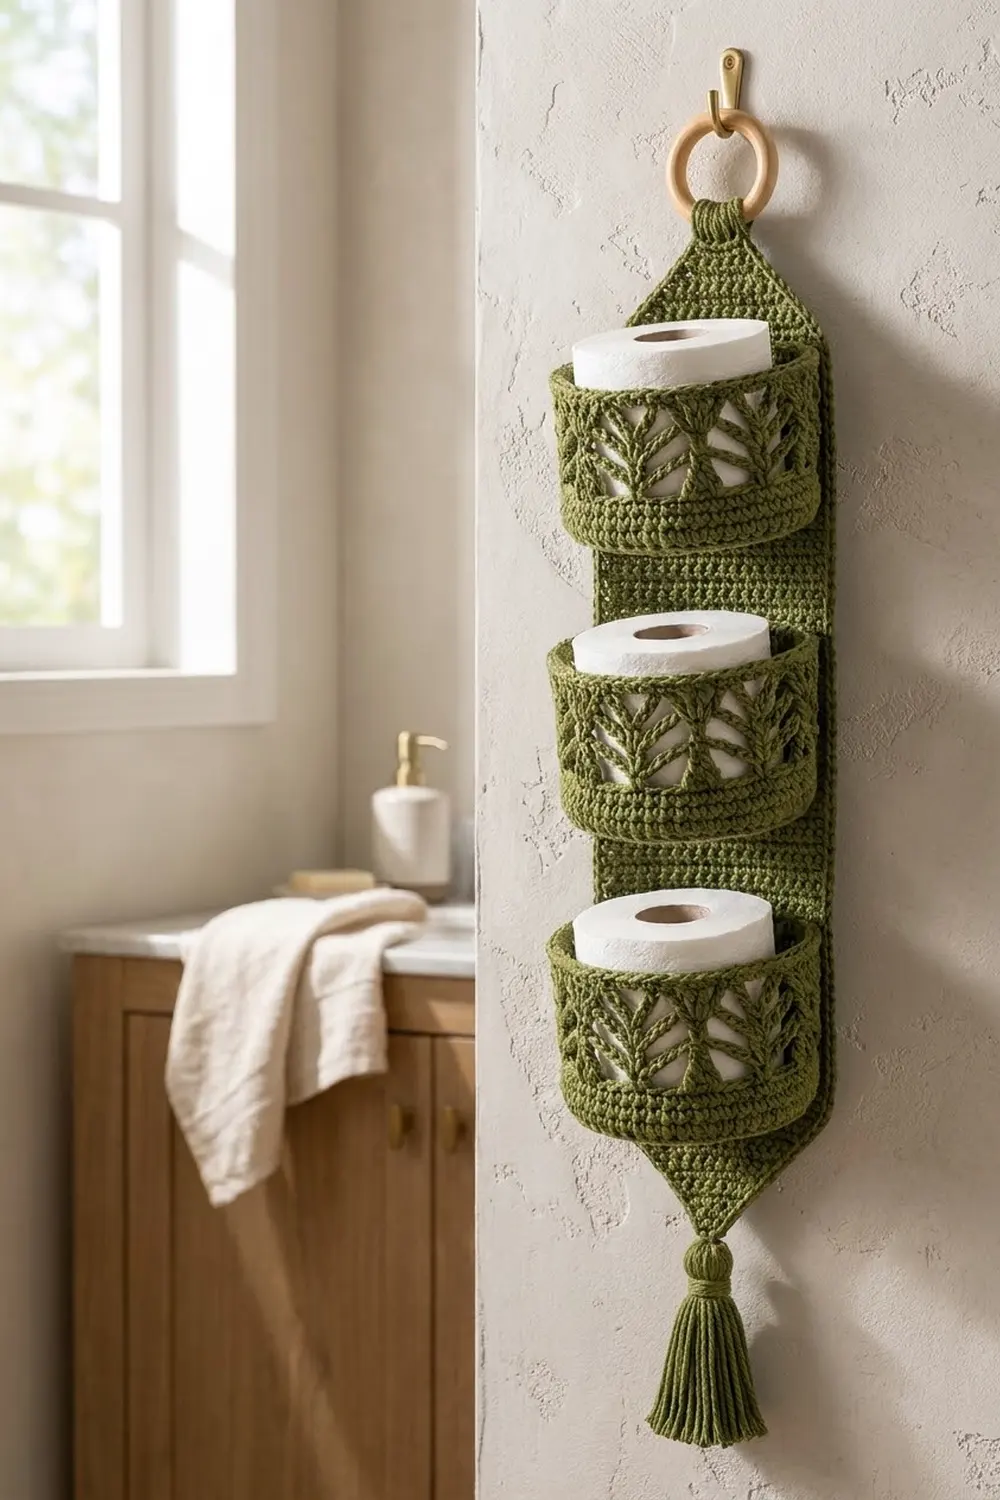
This hanging toilet paper holder keeps three spare rolls on the wall in three round lace baskets. Each basket has a solid base and rim, and the middle band is open fern lace. The baskets are stacked on a long back panel that hangs from a wooden ring, and a tassel hangs from the bottom point.
The sample uses one color, a soft olive green cotton, which looks good against marble, white tile and brass fittings. The fern lace keeps the holder light, and the solid bands keep each basket firm enough to hold a roll.
This pattern uses US crochet terms. The finished holder is about 5.25 in (13.3 cm) wide at the baskets. From the top of the ring loop to the tip of the panel it measures 20 in (50.8 cm), and the tassel adds 4.5 in (11.4 cm) more.
You will make three flat circle bases and work each basket wall straight up from its base. The back panel is worked in rows from the bottom point upward. Then you add a two-round border, sew the baskets on, loop the tab around the ring and attach the tassel.
Finished Size and Construction
- Basket size: 5.25 in (13.3 cm) diameter x 3.75 in (9.5 cm) tall
- Back panel size before border: 4.5 in (11.4 cm) wide x 21.25 in (54.0 cm) long, laid flat
- Back panel size after border: 5 in (12.7 cm) wide x 21.75 in (55.2 cm) long, laid flat
- Border depth: 0.25 in (0.6 cm) on each edge
- Hanging length: 20 in (50.8 cm) from the ring loop to the point, plus the 4.5 in (11.4 cm) tassel
- Skill level: Intermediate
- Terminology: US
- Yarn weight: Worsted (#4) cotton
- Hook: 4.5 mm (US 7)
- Number of pieces: 3 baskets, 1 back panel, 1 tassel, plus 1 wooden ring
- Layout: 1 column of 3 baskets centered on the panel
Materials
Use a smooth, firm worsted-weight cotton or cotton blend. Cotton holds its shape in a damp bathroom and shows the stitch texture clearly. Avoid fuzzy or very stretchy acrylic, because the baskets need some stiffness.
Olive green, 150 g / 235 m total:
– Baskets: 90 g / 141 m (30 g / 47 m each)
– Back panel and border: 40 g / 63 m
– Tassel and sewing: 20 g / 31 m
These quantities include a margin of about 15 percent.
Tools:
– 4.5 mm (US 7) crochet hook
– 1 wooden ring, 2.5 in (6.4 cm) outer diameter
– Tapestry needle
– 8 stitch markers
– Scissors
– Cardboard, 5 in (12.7 cm) tall, for the tassel
– Tape measure
– Spray bottle and blocking pins
Abbreviations (US Terms)
- ch – chain
- sc – single crochet
- dc – double crochet
- sl st – slip stitch
- sc2tog – single crochet 2 together
- BLO – back loop only
- st(s) – stitch(es)
- sp – space
- sk – skip
- rep – repeat
- RS – right side
Special stitches:
– V-st: (dc, ch 2, dc) in the same st or space.
– Shell: (2 dc, ch 2, 2 dc) in the same space.
Gauge and Checkpoints
Gauge: 16 sc and 16 rows = 4 in (10.2 cm), worked firmly.
Make one complete basket before you start the others. It works as your gauge swatch and lets you check the fit with a real toilet roll.
Checkpoints:
– After base Rnd 5 (30 sts): about 2.5 in (6.4 cm) across.
– After base Rnd 11 (66 sts): 5.25 in (13.3 cm) across, lying flat.
– After Rnd 15: the wall stands 1 in (2.5 cm) tall.
– After Rnd 19: the wall stands 3 in (7.6 cm) tall.
– Finished basket: 3.75 in (9.5 cm) tall. A standard 4.5 in (11.4 cm) roll should drop in easily.
– Panel after Row 9: 4.5 in (11.4 cm) wide and 2.25 in (5.7 cm) tall.
If your piece is too big, go down 0.5 mm in hook size. If it is too small, go up 0.5 mm. If only the height is off, adjust your tension rather than the stitch counts, because the joining layout depends on the 15-row basket height.
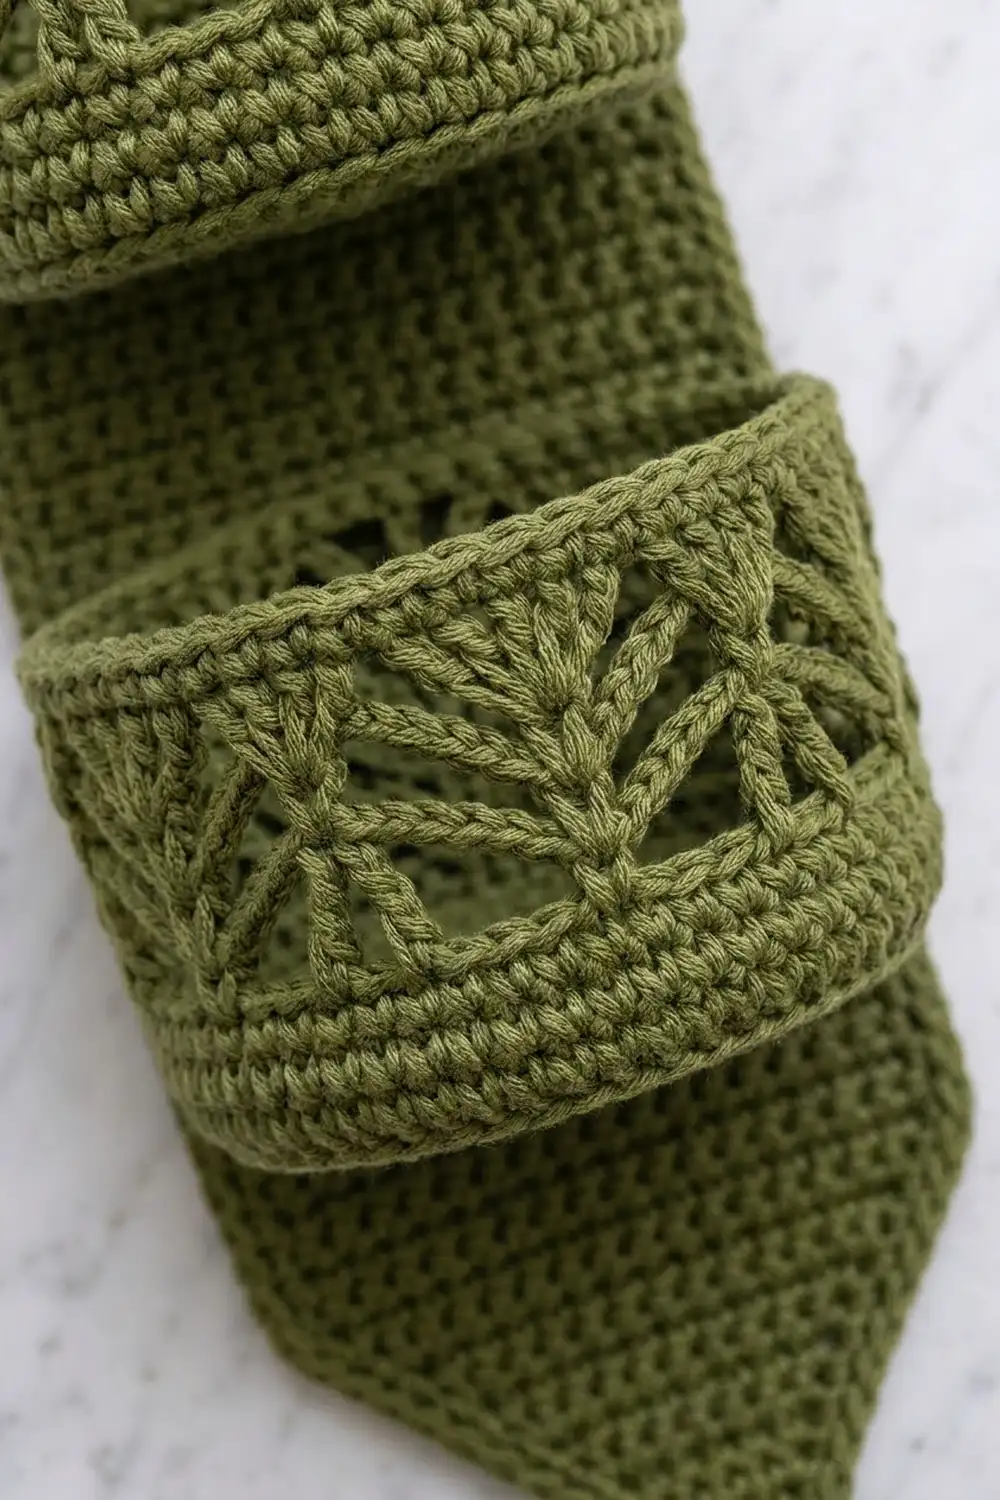
Basket (Make 3)
Work in joined rounds. Join each round with a sl st to the first st, and ch 1 at the start of each sc round (the ch 1 does not count as a st).
Base
Rnd 1: Make a magic ring and work 6 sc into it. (6 sts)
Rnd 2: 2 sc in each st around. (12 sts)
Rnd 3: *Sc in next st, 2 sc in next st; rep from * 6 times. (18 sts)
Rnd 4: *Sc in next 2 sts, 2 sc in next st; rep from * 6 times. (24 sts)
Rnds 5–11: Keep increasing 6 sts per round, with one more sc between increases in each round. Rnd 5: 30 sts. Rnd 6: 36 sts. Rnd 7: 42 sts. Rnd 8: 48 sts. Rnd 9: 54 sts. Rnd 10: 60 sts. Rnd 11: *sc in next 9 sts, 2 sc in next st; rep from * 6 times. (66 sts)
Move the increases a few stitches along in alternate rounds so the circle stays round instead of forming a hexagon.
Wall
Rnd 12 (turning ridge): Sc in BLO of each st around. (66 sts: 66 worked 1 per existing st + 0 added) The unused front loops form the raised ridge where the wall turns up.
Rnds 13–15: Sc in each st around. (66 sts)
Fern Lace Band
The lace uses 11 repeats of 6 sts each.
Rnd 16: Ch 1, *sc in next st, ch 2, sk 2 sts, V-st in next st, ch 2, sk 2 sts; rep from * 11 times. Join to first sc. (11 sc, 11 V-sts)
Rnd 17: Ch 1, *sc in sc, ch 3, shell in ch-2 sp of V-st, ch 3; rep from * 11 times. Join. (11 sc, 11 shells)
Rnd 18: Ch 1, *sc in sc, ch 3, shell in ch-2 sp of shell, ch 3; rep from * 11 times. Join. (11 sc, 11 shells)
Rnd 19: Ch 1, *sc in sc, ch 4, shell in ch-2 sp of shell, ch 4; rep from * 11 times. Join. (11 sc, 11 shells)
The stacked shells make the fern columns, and the dc pairs angle out like leaves. The sc between them pulls the chains into pointed arches.
Rim
Rnd 20 (conversion): Ch 1, *sc in sc, 2 sc in ch-4 sp, sc in ch-2 sp of shell, 2 sc in next ch-4 sp; rep from * 11 times. (66 sts: 22 worked 1 per sc or shell space + 44 added in the ch-4 spaces)
Rnds 21–22: Sc in each st around. (66 sts)
Rnd 23: Sl st in BLO of each st around, keeping the sl sts loose. (66 sl sts) This gives the braided top edge.
Fasten off and weave in the ends. Wall circumference: 66 sts = 16.5 in (41.9 cm).
Back Panel
Work in rows. Ch 1 at the start of each row does not count as a st, and you turn at the end of every row.
Bottom Point
Row 1: Ch 3, sc in 2nd ch from hook and in next ch. (2 sts)
Rows 2–9: Ch 1, 2 sc in first st, sc across to last st, 2 sc in last st, turn. Each row adds 2 sts: Row 2: 4 sts. Row 3: 6 sts. Row 4: 8 sts. Row 5: 10 sts. Row 6: 12 sts. Row 7: 14 sts. Row 8: 16 sts. Row 9: 18 sts.
Straight Section
Rows 10–66: Ch 1, sc in each st across, turn. (18 sts, 57 rows, 14.25 in / 36.2 cm)
Top Taper
Rows 67–73: Ch 1, sc2tog, sc across to last 2 sts, sc2tog, turn. Each row is 2 sts shorter: Row 67: 16 sts. Row 68: 14 sts. Row 69: 12 sts. Row 70: 10 sts. Row 71: 8 sts. Row 72: 6 sts. Row 73: 4 sts.
Ring Tab
Rows 74–85: Ch 1, sc in each st across, turn. (4 sts, 12 rows, 3 in / 7.6 cm)
Do not fasten off. Go straight on to the border.
Panel total: 85 rows = 21.25 in (54.0 cm) long, 4.5 in (11.4 cm) wide.
Make All Pieces
- Baskets: 3 in olive green, 66 sts around and 12 wall rounds each.
- Back panel: 1 in olive green, 85 rows.
- Tassel: 1 in olive green.
Layout on the panel (bottom to top):
            [ wooden ring ]
            | tab 74-85   |
           /  taper 67-73  \
          | margin 65-66    |
          |  BASKET 3       |  rows 50-64
          | gap 47-49       |
          |  BASKET 2       |  rows 32-46
          | gap 29-31       |
          |  BASKET 1       |  rows 14-28
          | margin 10-13    |
           \  point 1-9    /
               [tassel]
Check: 4 + 15 + 3 + 15 + 3 + 15 + 2 = 57 rows, which matches the straight section (Rows 10–66).
Border
Border gauge: 1 sc per row-end along the sides. The gauge is square (16 sts and 16 rows per 4 in), so one sc per row-end is the same density as the rows themselves.
Rnd 1: With RS facing, work along the top of the tab: 3 sc in first st, sc in next 2 sts, 3 sc in last st. (Top edge: 8 sc)
Down the first long side: 1 sc in each row-end from Row 85 to Row 1. (85 sc)
Across the bottom tip: 2 sc in each of the 2 foundation chains. (4 sc)
Up the second long side: 1 sc in each row-end from Row 1 to Row 85. (85 sc)
Join with a sl st to the first sc. Total: 8 + 85 + 4 + 85 = 182 sts.
Rnd 2: Sl st in BLO of each st around. (182 sl sts) Fasten off.
Why the math works: each side has exactly 85 rows, so it gets exactly 85 sts and needs no extra corner stitches. The only extra stitches are the 4 at the top corners of the tab (8 sc worked over 4 sts) and the 2 at the tip (4 sc worked over 2 chains). Those extras let the corners turn without cupping. The border adds 0.25 in (0.6 cm) on each edge, so the panel is 5 in (12.7 cm) wide.
Joining
Method: Whipstitch with the tail yarn through matched stitches.
- Lay the panel RS up. Count sts across Row 14, not counting the border, and mark sts 4–14 (11 sts). This leaves 3 free sts on each side.
- On Basket 1, mark 11 neighboring front loops on the Rnd 12 ridge. Mark the 11 sts directly above them on Rnd 22.
- Whipstitch the 11 ridge sts to panel Row 14, sts 4–14, one basket stitch to one panel stitch.
- Whipstitch the 11 marked Rnd 22 sts to panel Row 28, sts 4–14, again one to one.
- Tack the basket wall down the panel stitch 4 column and the stitch 14 column, once every 2 rows, so the back of the basket lies flat against the panel for 2.75 in (7.0 cm).
- Repeat for Basket 2 (Rows 32 and 46) and Basket 3 (Rows 50 and 64).
Tension: Pull each stitch snug but not tight. If you pull too hard the panel puckers, and if the stitches are too loose the baskets tip forward when a roll is inside.
Size checkpoint: from the base of Basket 1 to the rim of Basket 3 should measure 51 rows = 12.75 in (32.4 cm).
Ring and tassel:
– Pass the tab from front to back through the ring. Fold it down so that the last 6 rows overlap the back of Rows 68–73, and sew it in place.
– For the tassel, wrap yarn 30 times around the 5 in (12.7 cm) cardboard and tie the top. Cut the bottom loops, wrap the neck 0.5 in (1.3 cm) below the top and trim to 4.5 in (11.4 cm).
– Sew the tassel to the bottom tip.
Final Blocking
- Spray all pieces lightly with water until damp but not soaked.
- Put a toilet roll, or a rolled towel 5 in (12.7 cm) across, inside each basket.
- Pull the fern columns straight and pinch each arch to a point.
- Lay the panel flat and pin it to 5 in (12.7 cm) wide.
- Let everything dry completely, for about 24 hours.
- Steam the tassel and comb the strands straight.
Final Quality-Control Checklist
- Each base lies flat and measures 5.25 in (13.3 cm) across.
- Each basket has 11 straight fern columns.
- Each wall is 3.75 in (9.5 cm) tall.
- The panel border has 182 sts and lies flat without ruffling.
- The baskets are centered with 3 sts free on each side.
- The gaps between baskets are even, at 0.75 in (1.9 cm).
- The tab is sewn securely and the ring does not slip.
- All ends are woven in at least 2 in (5.1 cm).
Troubleshooting
- Base ruffles: you are adding too many stitches. Recount each round, or go down a hook size.
- Base cups: tension is too tight. Loosen up, or go up a hook size.
- Wall flares out: Rnd 20 has too many stitches. Recount it to 66.
- Fern columns twist: you are placing shells off center. Always work each shell into the center ch-2 sp.
- Panel edge waves: the border has extra stitches. Use 1 sc per row-end only.
- Baskets sag: add tacking stitches every row instead of every 2 rows.
Care
Hand wash in cool water with mild soap, press out the water in a towel, and dry flat with the baskets reshaped around rolls. Do not tumble dry.
Final Notes
The measurement chain is: a 66-stitch base at 5.25 in (13.3 cm), a 3.75 in (9.5 cm) wall that matches 15 panel rows, an 18-stitch panel that is 5 in (12.7 cm) wide after an 85-row-per-side border, and 3 baskets placed on 57 straight rows. If every checkpoint matches, the holder will hang straight and hold rolls easily.
Happy crocheting!