

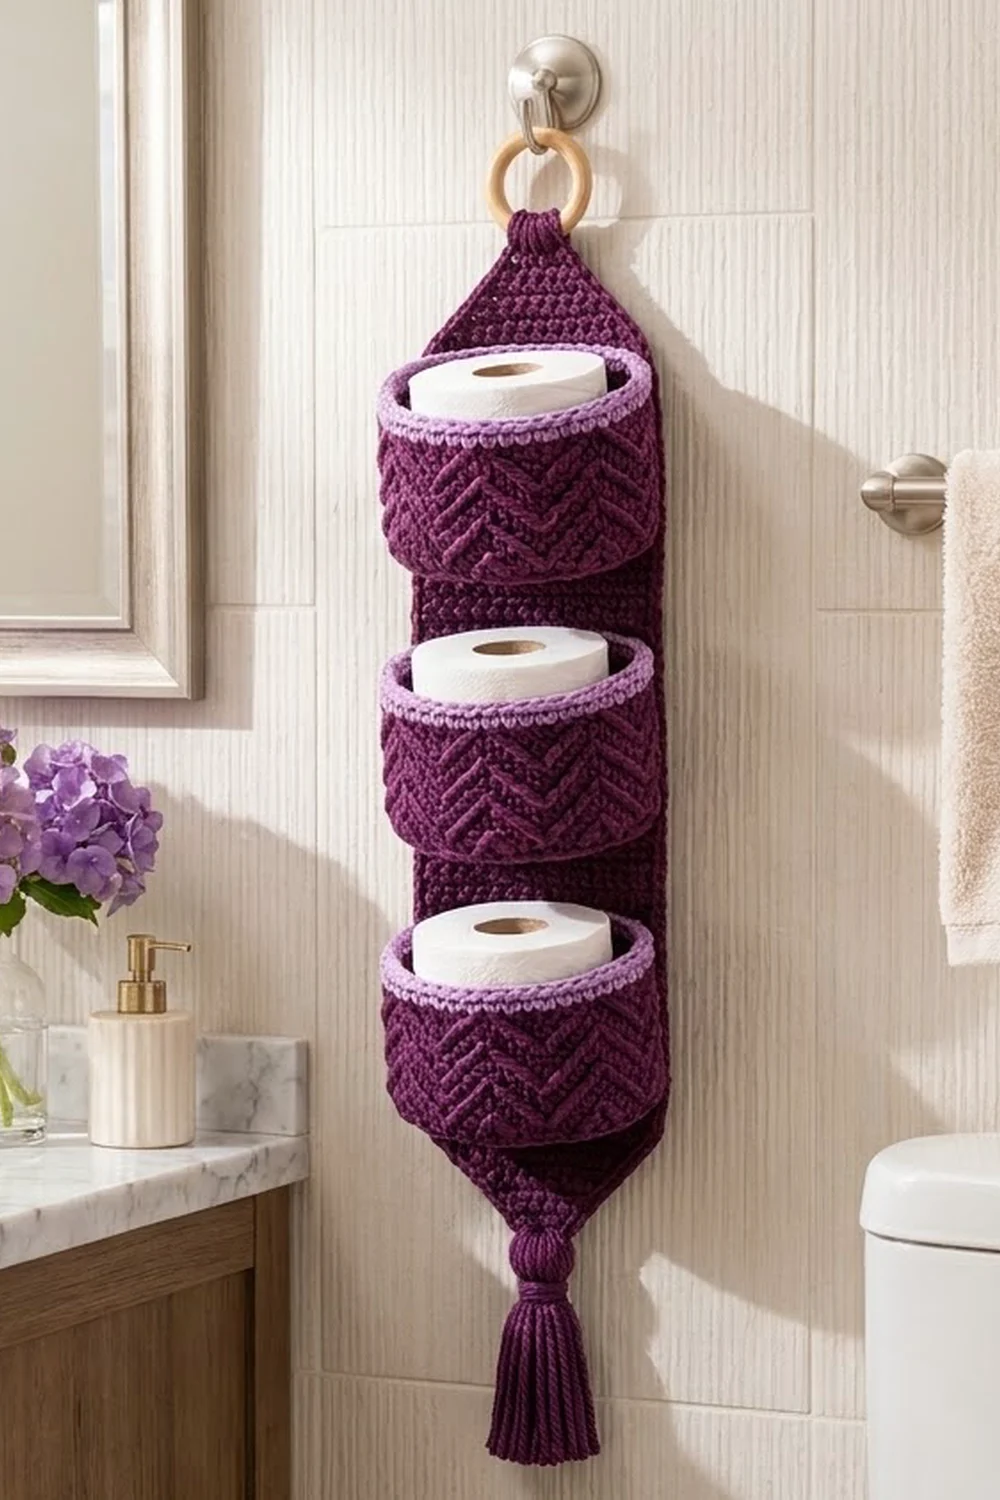
This hanging holder keeps three spare toilet paper rolls in sight and within reach. Three oval baskets are stacked on a tall back panel. A wooden ring hangs it from a hook, and a plum tassel finishes the bottom point.
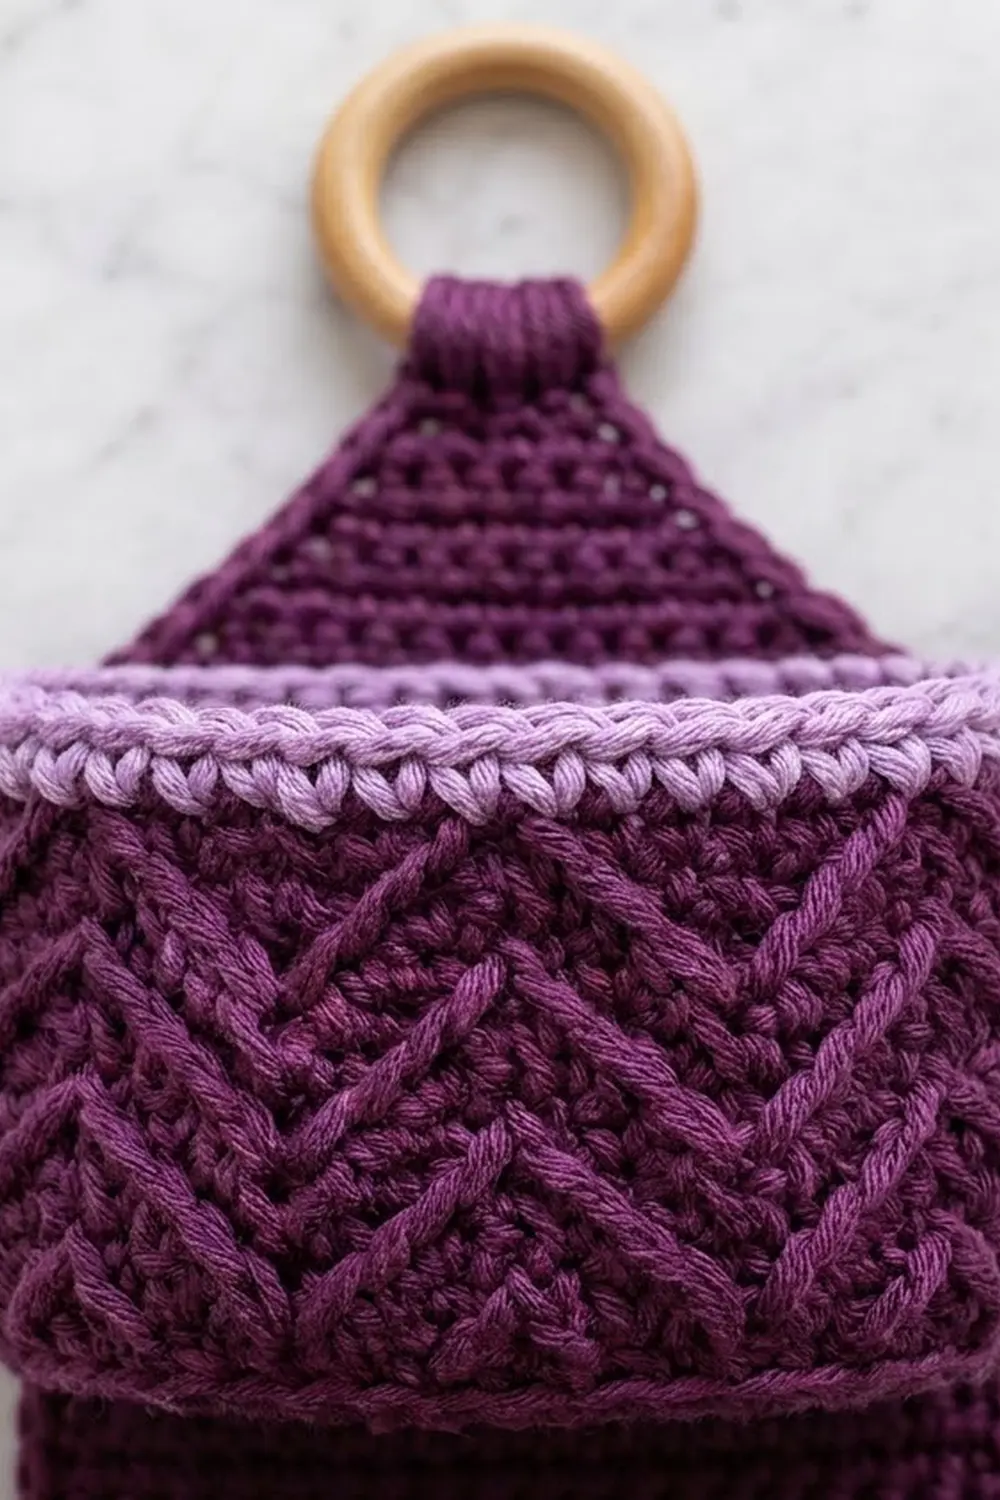
The main color is a deep plum. Each basket wall is covered in raised zigzag chevrons made with front and back post double crochet. A light lavender rope-style rim around each basket adds contrast. The look is modern boho, sturdy enough for daily use.
This pattern uses US crochet terms. The finished holder measures 6¼ in (15.9 cm) wide at the panel and about 31 in (78.7 cm) from the top of the ring to the tip of the tassel. Each basket is 8¼ in (21.0 cm) wide, 5½ in (14.0 cm) deep and 3¾ in (9.5 cm) tall.
Each basket is worked in the round from an oval base, with the walls worked straight up from it. The panel is worked in rows from the bottom point to the top tab. You sew the baskets on, edge the panel, then add the ring and the tassel.
Finished Size and Construction
- Finished size: 6¼ in (15.9 cm) wide × about 31 in (78.7 cm) hanging length
- Skill level: Intermediate
- Terminology: US crochet terms
- Yarn weight: Worsted (#4) cotton or cotton blend
- Hook: 4.5 mm (US 7)
- Number of pieces: 5 (3 baskets, 1 back panel, 1 tassel), plus a wooden ring
- Layout: 3 baskets stacked vertically on one panel, bases 5 in (12.7 cm) apart
- Piece size: Basket 8¼ in × 5½ in × 3¾ in (21.0 × 14.0 × 9.5 cm); panel body 5¾ in × 23 in (14.6 × 58.4 cm) before border
- Size before border: Panel 5¾ in (14.6 cm) wide
- Border depth: ¼ in (0.6 cm) on each side
Materials
Use a firm worsted-weight cotton or cotton blend. Cotton holds the basket shape, doesn’t stretch much under weight and copes well with bathroom humidity. Avoid soft acrylic, which may sag.
- Plum (main color): 250 g, about 385 m
- Lavender (rim): 30 g, about 45 m
These quantities include a margin of roughly 15% for gauge differences, seaming and the tassel.
Tools:
– 4.5 mm (US 7) crochet hook
– Wooden ring, 2 in (5.1 cm) diameter
– Stitch markers (at least 6)
– Tapestry needle
– Scissors
– Stiff card, 5½ in (14.0 cm) tall, for the tassel
– Measuring tape
– Rust-proof pins and a blocking surface
Abbreviations (US Terms)
- ch – chain
- sl st – slip stitch
- sc – single crochet
- inc – 2 sc in the same stitch
- sc2tog – single crochet 2 together
- BLO – back loop only
- FPdc – front post double crochet: yarn over, insert the hook from front to back to front around the post of the stitch, then complete the dc
- BPdc – back post double crochet: yarn over, insert the hook from back to front to back around the post, then complete the dc
- rev sc – reverse single crochet (crab stitch): work sc from left to right (right-handed)
- st(s) – stitch(es)
- rnd – round
Special stitch – Chevron Post Pattern: An 8-stitch repeat over 4 rounds. Raised FPdc stitches move one stitch inward each round on a BPdc background, which creates a zigzag line.
Gauge and Checkpoints
Gauge: 16 sc and 16 rows = 4 in (10.2 cm). In Chevron Post Pattern, 8 rnds = 3 in (7.6 cm) tall.
Make one complete basket before the others. It works as your gauge test.
Checkpoints:
– After Base Rnd 11: The oval measures 8¼ × 5½ in (21.0 × 14.0 cm) and lies flat.
– After Rnd 20: The wall measures 3¼ in (8.3 cm) from the base ridge.
– After Rnd 22: The total wall height is 3¾ in (9.5 cm).
– Panel after Row 10: The panel is 5¾ in (14.6 cm) wide.
– Panel after Row 92: The panel body is 23 in (58.4 cm) long.
If your piece is too big: Go down 0.5 mm in hook size. If it is too small: Go up 0.5 mm. If the base ruffles, your rounds are too short, so loosen your tension. If it cups, tighten it.
Basket (Make 3)
Oval Base
Use Plum. Ch 13.
Rnd 1: 3 sc in the 2nd ch from the hook, sc in the next 10 ch, 3 sc in the last ch. Rotate and work along the unused loops of the foundation: sc in the next 10 ch. You now have 11 straight sts per side, counting the end groups. Join with a sl st to the first sc. (26 sts)
Each end group has 3 sts and each side has 10 sts. From Rnd 2 on, each side grows to 11 sts, because the first sc of each straight section moves into the side. To keep the counts simple, Rnd 1 is restated below as 3 + 11 + 3 + 11 = 28. Here is the corrected Rnd 1 to work.
Rnd 1 (work this): Ch 14. 3 sc in the 2nd ch from the hook, sc in the next 11 ch, 3 sc in the last ch. Working along the unused loops, sc in the next 11 ch. Join. (28 sts: 3 end, 11 side, 3 end, 11 side)
All rounds start with ch 1 (doesn’t count) and end with a sl st join to the first st.
Rnd 2: [Inc in the next 3 sts, sc in the next 11] twice. (34 sts)
Rnd 3: [(Sc 1, inc) 3 times, sc in the next 11] twice. (40 sts)
Rnd 4: [(Sc 2, inc) 3 times, sc in the next 11] twice. (46 sts)
Rnd 5: [(Sc 3, inc) 3 times, sc in the next 11] twice. (52 sts)
Rnd 6: [(Sc 4, inc) 3 times, sc in the next 11] twice. (58 sts)
Rnd 7: [(Sc 5, inc) 3 times, sc in the next 11] twice. (64 sts)
Rnd 8: [(Sc 6, inc) 3 times, sc in the next 11] twice. (70 sts)
Rnd 9: [(Sc 7, inc) 3 times, sc in the next 11] twice. (76 sts)
Rnd 10: [(Sc 8, inc) 3 times, sc in the next 11] twice. (82 sts)
Rnd 11: [(Sc 9, inc) 3 times, sc in the next 11] twice. (88 sts)
Rnd n has 22 + 6n sts. At Rnd 11 there are 33 sts in each end and 11 in each side.
Base checkpoint: 8¼ × 5½ in (21.0 × 14.0 cm).
Mark the back: In Rnd 11, sts 1–33 are End 1, sts 34–44 are Side 1, sts 45–77 are End 2 and sts 78–88 are Side 2. The center back is the 23 sts made up of sts 72–88 and sts 1–6. Place a marker in st 72 and another in st 6. The round joins fall inside this hidden section.
Walls
Rnd 12 (turning round): Ch 1, sc in the BLO of each st. Join. (88 sts)
The unused front loops of Rnd 11 form the crisp base ridge, and you will use them for seaming.
Chevron rounds: Each round starts with ch 2 (doesn’t count) and ends with a sl st join to the first post st. Each bracket is one 8-st repeat, worked 11 times (11 × 8 = 88).
Rnd 13: [FPdc 1, BPdc 6, FPdc 1] 11 times. (88 sts)
Rnd 14: [BPdc 1, FPdc 1, BPdc 4, FPdc 1, BPdc 1] 11 times. (88 sts)
Rnd 15: [BPdc 2, FPdc 1, BPdc 2, FPdc 1, BPdc 2] 11 times. (88 sts)
Rnd 16: [BPdc 3, FPdc 2, BPdc 3] 11 times. (88 sts)
Rnds 17–20: Repeat Rnds 13–16. (88 sts)
The FPdc pairs meet at each repeat boundary in Rnd 13 (a valley) and at the center of each repeat in Rnd 16 (a peak). This gives two stacked zigzag bands. On the final sl st of Rnd 20, change to Lavender.
Wall checkpoint: 3¼ in (8.3 cm) from the base ridge.
Rim
Rnd 21: Ch 1, sc in each st. Join. (88 sts)
Rnd 22: Ch 1, rev sc in each st. Join. (88 sts)
Fasten off and weave in the ends.
Back Panel
Use Plum. Each row starts with ch 1 (doesn’t count). Turn at the end of each row.
Row 1: Ch 6. Sc in the 2nd ch from the hook and in each ch across. (5 sts)
Rows 2–10: 2 sc in the first st, sc across to the last st, 2 sc in the last st. Each row gains 2 sts, so Row 2 has 7 sts and Row 10 has 23 sts.
Checkpoint: 5¾ in (14.6 cm) wide, 2½ in (6.4 cm) tall.
Rows 11–74: Sc across. (23 sts per row, 64 rows)
Checkpoint: 18½ in (47.0 cm) total length.
Row 75: Sc2tog, sc across to the last 2 sts, sc2tog. (21 sts)
Row 76: Sc across. (21 sts)
Rows 77–92: Repeat Rows 75–76 eight more times. You will have 19, 17, 15, 13, 11, 9, 7 and finally 5 sts.
Checkpoint: The top taper measures 4½ in (11.4 cm), and the body is 23 in (58.4 cm) long.
Rows 93–104 (tab): Sc across. (5 sts per row, 12 rows, 3 in / 7.6 cm)
Fasten off. Mark Rows 15, 35 and 55 along one edge with stitch markers.
Tassel
Wrap Plum 30 times around the 5½ in (14.0 cm) card. Slide a 12 in (30.5 cm) strand under the loops at the top and tie it tightly. Cut the loops at the bottom.
Wrap another strand 8 times around the bundle, ¾ in (1.9 cm) below the top, to form the head. Knot it and bury the ends inside. Trim the tassel to 5 in (12.7 cm).
Make All Pieces
- Baskets: 3, each using about 70 g Plum and 8 g Lavender
- Back panel: 1, about 50 g Plum
- Tassel: 1, about 7 g Plum
Layout (front view):
        ( ring )
          /  \        tab + top taper (Rows 75–104)
     [  BASKET 3  ]   base on Row 55, rim on Row 69
     [  BASKET 2  ]   base on Row 35, rim on Row 49
     [  BASKET 1  ]   base on Row 15, rim on Row 29
          \  /        bottom taper (Rows 1–10)
        (tassel)
Joining
Use Plum and a tapestry needle, and whipstitch each basket to the panel in three seams.
1. Base seam. Lay the panel right side up. Place Basket 1 with its center back (sts 72–88 and 1–6) against Row 15. Whipstitch through the unused front loop of each Rnd 11 st and one Row 15 st, from panel st 1 to st 23. That joins 23 basket sts to 23 panel sts, with no extra stitches.
2. Rim seam. Line up the same 23 center-back sts of Rnd 21 with Row 29, which is 14 rows (3½ in / 8.9 cm) above Row 15. Whipstitch the sts one to one through the back of the rim, so the stitching doesn’t show from the front.
3. Side tacks. At each marker (sts 72 and 6), sew a vertical seam up the wall from the base ridge to the rim, along panel columns 1 and 23.
Tension: Keep each stitch snug but flat. The basket back should lie smooth against the panel, without puckering or gaps.
Repeat for Basket 2 (Rows 35 and 49) and Basket 3 (Rows 55 and 69).
Size checkpoint: The bases are 5 in (12.7 cm) apart. The gap between one rim and the next base is 1¼ in (3.2 cm). The panel still measures 5¾ in (14.6 cm) wide.
Border
The lavender Rnds 21–22 are the baskets’ own border, 88 sts each. The panel gets one plum edging round worked after joining. Fold the baskets out of the way as you go.
Border gauge: 4 sc per inch, which matches 4 rows per inch, so you work 1 sc per straight row-end.
Border Rnd: With the right side facing, join Plum in the first st of Row 104.
– Top of tab: 3 sc in the first st, sc in the next 3, 3 sc in the last st. (9 sc, including both corner groups)
– First long side: Work down the row-ends.
– Tab: 12 sc
– Top taper: 18 sc
– Straight section: 64 sc
– Bottom taper: 14 sc (1 sc in each row-end, with 2 sc in the row-ends of Rows 9, 7, 4 and 2)
– Side total: 108 sc
– Bottom: Work along the 5 foundation loops: 3 sc in the first, sc in the next 3, 3 sc in the last. (9 sc, including the corner groups)
– Second long side: Work up the row-ends with 14 + 64 + 18 + 12 sc, adding the extra sc at Rows 2, 4, 7 and 9. (108 sc)
– Join. (234 sts)
Why the math works: The corner groups are counted only in the top and bottom edges, so nothing is counted twice. The 9 + 108 + 9 + 108 = 234 sts are worked once each. The straight rows take 1 sc per row because the row gauge and stitch gauge match.
The bottom taper grows by 1 stitch per side every row, so its edge is diagonal and about 1.4 times longer than its height (10 × 1.4 ≈ 14 sc). The top taper loses only 1 stitch per side every second row, so 1 sc per row lies flat there.
The edging adds ¼ in (0.6 cm) to each side, bringing the panel from 5¾ in to 6¼ in (14.6 to 15.9 cm).
Ring: Fold the tab back over the wooden ring and sew its end to the back of Row 90. Wrap Plum 10 times around the folded tab just below the ring to make a ½ in (1.3 cm) collar, then secure it.
Tassel: Tie the tassel to the center st of the bottom edge.
Final Blocking
- Mist the whole holder lightly with water.
- Stuff each basket with a toilet roll wrapped in a towel to set the oval shape.
- Pin the panel flat, 6¼ in (15.9 cm) wide, and keep the tapers straight.
- Steam the tassel and smooth the strands straight.
- Let it dry completely, about 24 hours.
- Remove the pins and hang it.
Final Quality-Control Checklist
- Each basket has 88 sts in every wall round.
- The bases measure 8¼ × 5½ in (21.0 × 14.0 cm).
- The walls are 3¾ in (9.5 cm) tall, with two complete zigzag bands.
- The base ridge is crisp and even all the way around.
- The panel is 6¼ in (15.9 cm) wide after the border.
- The bases are evenly spaced, 5 in (12.7 cm) apart.
- No seams show from the front.
- The ring is secure and the tassel is centered.
- All ends are woven in.
Troubleshooting
- Zigzags look broken: Make sure each FPdc moves exactly one stitch per round, and count each 8-st repeat.
- Base ruffles: Your tension is tight in the rounds. Loosen up or go up a hook size.
- Base cups: Go down a hook size.
- Walls flare out: You worked a post stitch into a join. Skip the sl st.
- Basket tilts forward: Tighten the rim seam and re-tack the sides.
- Panel edge ripples at the bottom: Remove 1 of the extra sc on each bottom taper.
- Rolls don’t fit: Your base is under 5½ in (14.0 cm) deep. Check your gauge.
Care
Hand wash in cool water and lay flat to dry, reshaping the baskets while damp. Don’t tumble dry.
Final Notes
Here is the measurement chain:
– Gauge of 16 sc per 4 in (10.2 cm)
– 88-st base measuring 8¼ × 5½ in (21.0 × 14.0 cm)
– 88-st walls, 3¾ in (9.5 cm) tall
– 23-st panel, 5¾ in (14.6 cm) wide
– Baskets sewn 23 sts to 23 sts, every 20 rows (5 in / 12.7 cm)
– Border of 9 + 108 + 9 + 108 = 234 sts, finishing at 6¼ in (15.9 cm) wide
Check each stage before moving on.
Happy crocheting!