

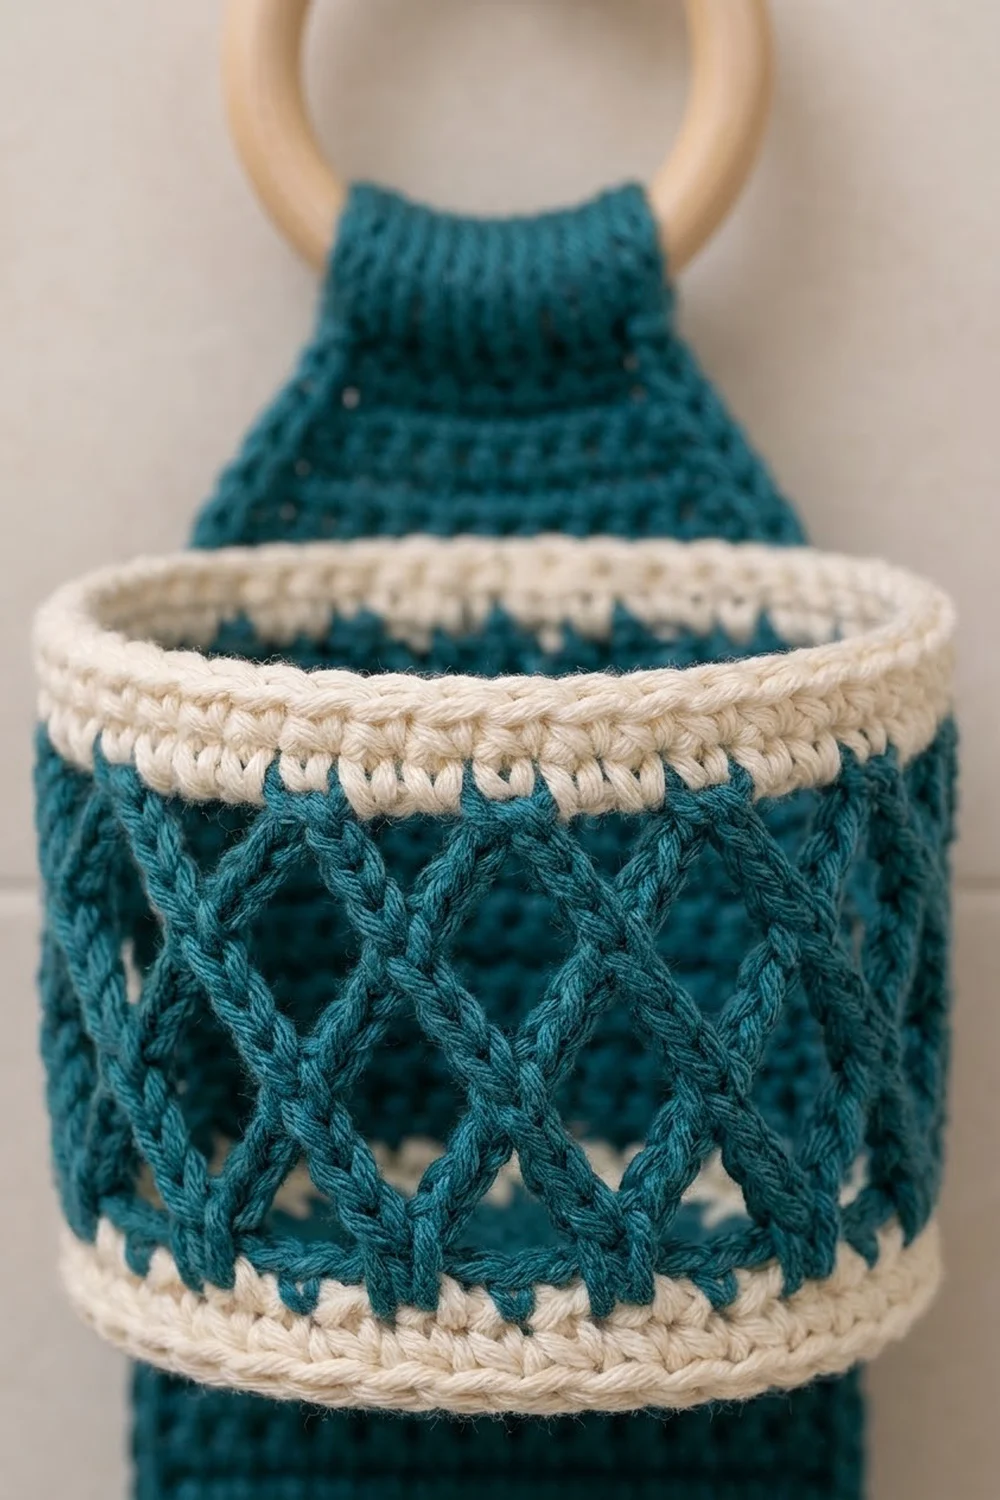
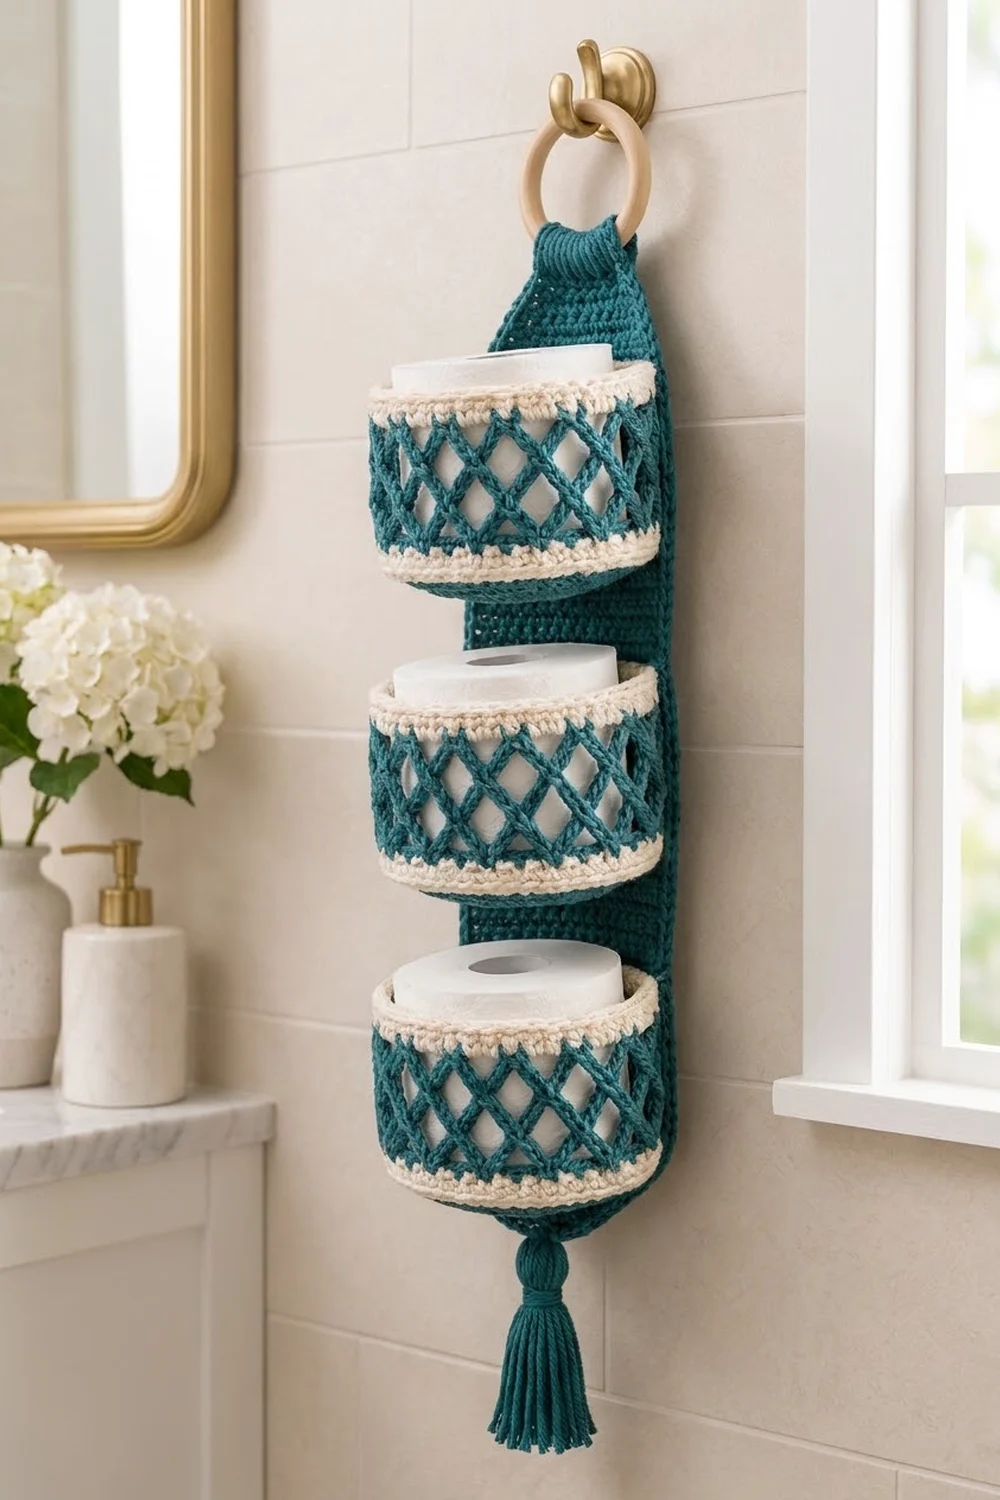
This hanging holder keeps three spare rolls tidy and in view. It’s a long teal back panel with three oval pockets stacked down the front. Each pocket has a diamond lattice wall between two chunky cream rims. A natural wooden ring at the top lets you hang it from a towel hook, and a full teal tassel finishes the bottom.
The colors are deep teal and soft cream, which suit spa-style and coastal bathrooms. Teal is the main color, and cream is used only for the pocket rims.
The pattern uses US crochet terms. The finished back panel is 4.5 x 20.5 in (11.4 x 52.1 cm), and about 18 in (45.7 cm) of it hangs below the ring. Each pocket base is 6.75 x 4.75 in (17.1 x 12.1 cm), and each pocket is 4.25 in (10.8 cm) tall. That’s big enough for a standard roll about 4.5 in (11.4 cm) across and 4 in (10.2 cm) tall.
The holder is built in parts. You crochet three flat oval bases, three lattice walls worked in the round, one single crochet back panel and one tassel. Then you sew each wall to a base, sew the pockets to the panel and fold the top of the panel over the wooden ring.
Finished Size and Construction
- Finished size: panel 4.5 x 20.5 in (11.4 x 52.1 cm); about 25 in (63.5 cm) long including the ring and tassel
- Skill level: Intermediate (oval rounds, net stitch, reverse single crochet, seaming)
- Terminology: US
- Yarn weight: worsted (#4) cotton
- Hook: 4.5 mm (US 7)
- Number of pieces: 8 crocheted pieces (3 bases, 3 pocket walls, 1 back panel, 1 tassel) plus 1 wooden ring
- Layout: a single column of 3 pockets on one panel
- Pocket size: base 6.75 x 4.75 in (17.1 x 12.1 cm); wall 19 in (48.3 cm) around and 4.25 in (10.8 cm) tall
- Panel size before border: 4 x 20 in (10.2 x 50.8 cm)
- Border depth: 0.25 in (0.6 cm) on each side
Materials
Use a smooth, firm worsted-weight cotton or cotton blend. Cotton keeps the pockets in shape, copes with bathroom humidity and washes well. Avoid very soft acrylic, because the pockets will sag.
- Teal (main color): 200 g, about 340 m
- Cream (rims): 70 g, about 120 m
Both amounts include a margin of about 20 percent.
Tools:
- 4.5 mm (US 7) crochet hook
- Wooden ring, 3 in (7.6 cm) outer diameter
- Tapestry needle
- 8 stitch markers
- Scissors
- Stiff card 4 in (10.2 cm) wide, for the tassel
- Tape measure, rust-proof pins and a blocking mat
Abbreviations (US Terms)
- ch: chain
- sc: single crochet
- dc: double crochet
- sl st: slip stitch
- sk: skip
- st(s): stitch(es)
- inc: 2 sc in the same stitch
- rev sc: reverse single crochet
- rnd: round
- FO: fasten off
Reverse single crochet (rev sc): Work from left to right (right to left if you crochet left-handed). Insert the hook into the next stitch to the right, yarn over and pull up a loop. Yarn over again and pull through both loops. This makes a twisted, corded edge.
Net loop: A ch-5 space held in place by a sc. Stacking rounds of these loops makes the diagonal diamond lattice.
Gauge and Checkpoints
Gauge: 16 sc x 16 rows = 4 in (10.2 cm) in sc rows. The fabric should feel firm and dense.
Make one base and one wall before the rest. This is the quickest way to confirm that the pockets will fit a roll.
Checkpoints:
- Base, Rnd 10 (76 sts): about 6.75 x 4.75 in (17.1 x 12.1 cm), and 19 in (48.3 cm) around the outer edge.
- Wall, Rnd 3 (76 sts): lying flat, the tube is 9.5 in (24.1 cm) wide, which means it’s 19 in (48.3 cm) around.
- Finished wall: 4.25 in (10.8 cm) tall. Each cream rim is about 0.75 in (1.9 cm), and the unstretched lattice is about 2.75 in (7.0 cm).
- Panel, Row 40: 4 in (10.2 cm) wide and 10 in (25.4 cm) long.
- Panel, Row 80: 4 x 20 in (10.2 x 50.8 cm).
If your piece is too big, go down 0.5 mm in hook size. If it’s too small, go up 0.5 mm. Don’t change the stitch counts, because the wall has to match the base stitch for stitch.
Oval Base (make 3, teal)
The base is a flat oval with straight sides and rounded ends. Each round adds 6 stitches: 3 increases at each end. The straight sides always stay at 8 stitches.
Ch 11.
Rnd 1: 3 sc in 2nd ch from hook (end A), sc in next 8 ch, 3 sc in last ch (end B). Then work along the other side of the chain: sc in next 8 ch. Don’t join. Place a marker in the first st and move it up each round. (22 sts: 3 + 8 + 3 + 8)
Rnd 2: [Inc] 3 times, sc in next 8, [inc] 3 times, sc in next 8. (28 sts)
Rnd 3: [Sc 1, inc] 3 times, sc in next 8, [sc 1, inc] 3 times, sc in next 8. (34 sts)
Rnd 4: [Sc 2, inc] 3 times, sc in next 8, [sc 2, inc] 3 times, sc in next 8. (40 sts)
Rnd 5: [Sc 3, inc] 3 times, sc in next 8, [sc 3, inc] 3 times, sc in next 8. (46 sts)
Rnd 6: [Sc 4, inc] 3 times, sc in next 8, [sc 4, inc] 3 times, sc in next 8. (52 sts)
Rnd 7: [Sc 5, inc] 3 times, sc in next 8, [sc 5, inc] 3 times, sc in next 8. (58 sts)
Rnd 8: [Sc 6, inc] 3 times, sc in next 8, [sc 6, inc] 3 times, sc in next 8. (64 sts)
Rnd 9: [Sc 7, inc] 3 times, sc in next 8, [sc 7, inc] 3 times, sc in next 8. (70 sts)
Rnd 10: [Sc 8, inc] 3 times, sc in next 8, [sc 8, inc] 3 times, sc in next 8. (76 sts: 30 at each end + 8 on each side)
Sl st in the next st to smooth out the step at the end of the round. FO, leaving a 12 in (30.5 cm) tail. Mark the start and end of each 8-st straight side.
Lattice Pocket Wall (make 3)
The wall is a tube worked in joined rounds. It has 76 sts around, the same as the base edge.
Bottom rim (cream):
Ch 76 and sl st to the first ch to join, making sure the chain isn’t twisted.
Rnd 1: Ch 1, sc in each ch around, sl st to first sc. (76 sts)
Rnds 2–3: Ch 1, sc in each st around, sl st to first sc. (76 sts)
FO cream.
Lattice (teal):
Rnd 4: Join teal in any st. Ch 1, sc in same st, ch 5, sk 3, sc in next st; repeat from * 17 more times, ch 2, sk 3, dc in first sc. The ch-2 and dc together form the last loop and leave your hook at its center. (19 loops: 18 ch-5 loops + 1 ch-2/dc loop, using all 76 sts)
Rnds 5–8: Ch 1, sc around the post of the dc just made, ch 5, sc in next ch-5 loop; repeat from * 17 more times, ch 2, dc in first sc. (19 loops)
Rnd 9: Ch 1, sc around the post of the dc, ch 5, sc in next ch-5 loop; repeat from * 17 more times, ch 5, sl st in first sc. (19 ch-5 loops and 19 sc)
FO teal. The six rounds of net loops form the diamond lattice.
Top rim (cream):
Rnd 10 (conversion round): Join cream in any sc of Rnd 9. Ch 1, sc in the sc, 3 sc in next ch-5 loop; repeat from * around, sl st to first sc. (76 sts: 19 sc worked one into each existing sc + 57 sc worked into the loops)
Rnd 11: Ch 1, sc in each st around, sl st to first sc. (76 sts)
Rnd 12: Ch 1, rev sc in each st around, sl st to first st. (76 sts)
FO and weave in the ends. The wall should be 4.25 in (10.8 cm) tall.
Back Panel (make 1, teal)
Ch 17.
Row 1: Sc in 2nd ch from hook and in each ch across, turn. (16 sts)
Rows 2–80: Ch 1 (doesn’t count as a st), sc in each st across, turn. (16 sts)
Don’t fasten off. Go straight on to the border.
Tassel (make 1, teal)
Wrap teal around the 4 in (10.2 cm) card 30 times. Slide a 12 in (30.5 cm) strand under the wraps at one edge and tie it tightly. Cut through the wraps at the opposite edge. Wrap another strand 6 times around the bundle, 1 in (2.5 cm) below the top tie. Knot it and hide the ends inside the tassel. Trim the tassel evenly to 4 in (10.2 cm), keeping the ends of the top tie for attaching it.
Make All Pieces
- Teal only: 3 oval bases, 1 back panel, 1 tassel
- Teal and cream: 3 pocket walls (cream for Rnds 1–3 and 10–12, teal for Rnds 4–9)
Layout, from the top of the panel down:
[ wooden ring ]
[ fold over ring  – 2.5 in / 6.4 cm  ]
[ top margin      – 2.5 in / 6.4 cm  ]
[ POCKET 1        – 4.25 in / 10.8 cm ]
[ gap             – 0.75 in / 1.9 cm ]
[ POCKET 2        – 4.25 in / 10.8 cm ]
[ gap             – 0.75 in / 1.9 cm ]
[ POCKET 3        – 4.25 in / 10.8 cm ]
[ bottom margin   – 1.25 in / 3.2 cm ]
[ tassel ]
2.5 + 2.5 + 4.25 + 0.75 + 4.25 + 0.75 + 4.25 + 1.25 = 20.5 in (52.1 cm), which is the length of the panel after the border.
Joining
Wall to base: Hold the base and the bottom rim of a wall wrong sides together, lining up the last round of the base with the foundation chain of the wall. Using the base tail, whipstitch through the back loop of each base stitch and the matching foundation loop. It’s one stitch to one stitch, 76 to 76, with no easing. Keep your tension snug but not tight, or the rim will cup inward. The finished pocket should sit flat on a 6.75 x 4.75 in (17.1 x 12.1 cm) base.
Pocket to panel: Pin the pockets to the bordered panel following the layout. Each pocket sits with one straight side against the panel. Center the back 18 sts of the pocket across the panel width: that’s the 8 straight-side sts plus 5 more on each side, about 4.5 in (11.4 cm). Whipstitch those 18 base-edge sts along one panel row. Sew the same 18 sts of Rnd 11 to the panel directly above, then tack the sides of the bottom rim. Leave the lattice free so it can stretch around a roll.
Ring: Run teal through the top border stitches and pull them in to about 1.5 in (3.8 cm). Fold the top 2.5 in (6.4 cm) of the panel back around the ring and whipstitch it to the back of the panel.
Tassel: Gather the bottom border stitches to a point in the same way. Tie the tassel to the point with its top strands, then weave in the ends.
Border (back panel)
Border gauge: the same as the body, 4 sc = 1 in (2.5 cm). Work 1 sc into each row end along the long sides. The fabric has 16 rows and 16 sc per 4 in, so the edge lies flat.
Rnd 1 (teal): After Row 80, ch 1 and turn the work so you can crochet along the edges. Work 3 sc in each corner st.
- Top edge: 3 sc in first st, sc in next 14 sts, 3 sc in last st.
- Long side 1: sc in each of the 78 row ends between the corner rows.
- Bottom edge (foundation chain): 3 sc in first ch, sc in next 14 ch, 3 sc in last ch.
- Long side 2: sc in each of the 78 row ends.
Sl st to the first sc. (196 sts)
Each side’s count includes the center stitch of both its corners: 16 on each short side and 80 on each long side. Counting the 4 corners only once gives (2 x 16) + (2 x 80) − 4 = 188. Adding 2 extra sc at each corner gives 188 + 8 = 196.
Rnd 2: Ch 1, sl st loosely in each st around. (196 sts)
FO. Why the math works: Rnd 1 adds 0.25 in (0.6 cm) on every edge. The width goes from 4 to 4.5 in (10.2 to 11.4 cm), and the length goes from 20 to 20.5 in (50.8 to 52.1 cm). The slip stitch round firms up the edge without adding size.
Final Blocking
- Soak all the pieces in cool water, then press out the water in a towel.
- Pin the panel out to 4.5 x 20.5 in (11.4 x 52.1 cm) with straight long edges.
- Fill each pocket with a roll or a towel rolled to 4.5 in (11.4 cm) across, so the lattice opens evenly.
- Shape the cream rims by hand so they’re round and level.
- Comb out the tassel and let everything dry completely, about 24 hours.
Final Quality-Control Checklist
- Each base has 76 sts and measures 6.75 x 4.75 in (17.1 x 12.1 cm).
- Each wall has 19 loops on every round from Rnd 4 to Rnd 9.
- Each rim has 76 sts, and the reverse sc edge is even.
- The wall-to-base seams join 1 stitch to 1 stitch, with no puckers.
- The bordered panel measures 4.5 x 20.5 in (11.4 x 52.1 cm).
- The pockets are centered, with 0.75 in (1.9 cm) gaps between them.
- The ring tab and the tassel are both secure.
Troubleshooting
- Rim flares: You probably worked more than 3 sc into a loop on Rnd 10. Count again; you need 76.
- Base curls into a bowl: Increases were missed. Each round must add exactly 6.
- Uneven diamonds: Keep every chain the same size, and work into the loop rather than into a chain.
- Roll doesn’t fit: Check that the wall is 19 in (48.3 cm) around. Fix your gauge, not the stitch count.
- Panel bows forward: Sew each top rim across all 18 sts, not just at the center.
Care
Hand-wash in cool water with mild soap, then reshape and dry flat. Take the wooden ring off before washing, or keep it dry.
Final Notes
All the measurements build on the gauge of 16 sc = 4 in (10.2 cm). At that gauge, the 76-st base edge is 19 in (48.3 cm) around. The wall matches the base 1 stitch to 1 stitch, and its 19 lattice loops use exactly 76 sts. The 16-st panel is 4 in (10.2 cm) wide and becomes 4.5 in (11.4 cm) with the border, which is the width covered by the 18 attached pocket sts.
Happy crocheting!