

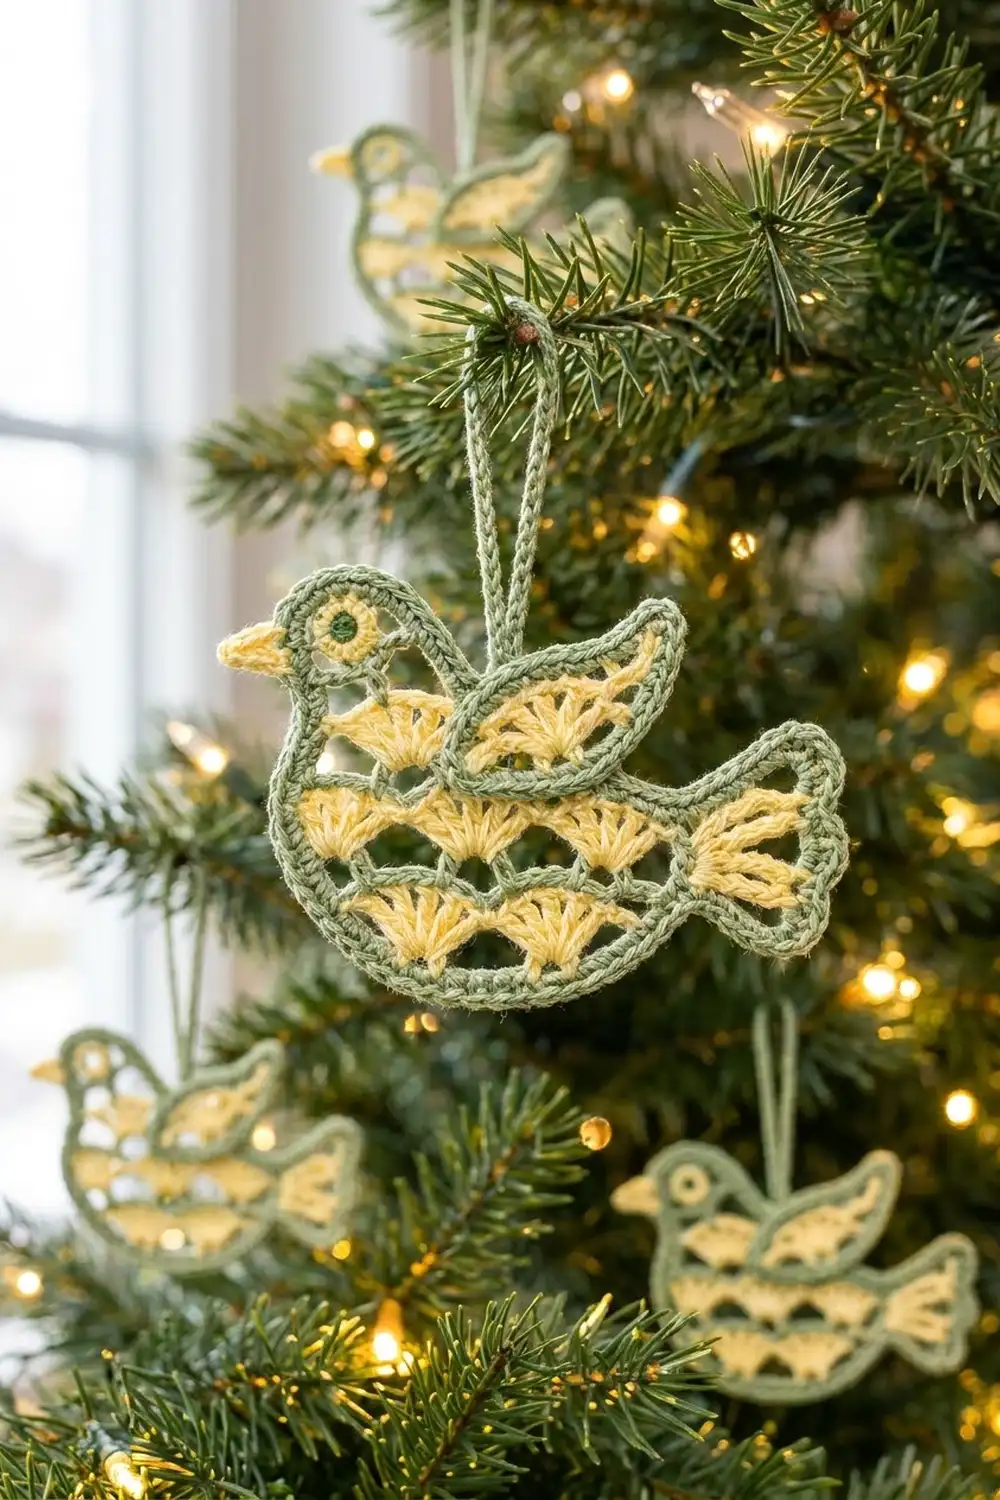
This little songbird is a lace ornament made from soft yellow fan shells framed by a bold sage green outline. A separate wing sits on top of the body. The open head holds a ring eye, and a tiny yellow beak points forward. It looks lovely on a tree and just as nice in a window or tied to a gift.
The colors are quiet and fresh. Sage green is used for the outline, wing frame, eye, and hanging loop. Pale butter yellow is used for the fans, tail spokes, and beak. The style mixes vintage lace with simple Scandinavian folk birds.
This pattern uses US crochet terms. The finished ornament measures about 6 in (15.2 cm) wide and 4.5 in (11.4 cm) tall, not counting the 3 in (7.6 cm) hanging loop.
You build the bird in layers. First you crochet a three-row lace body in yellow and make a small fan-shaped tail. Sew the tail on, then work two rounds of green single crochet around everything, making the head loop as you go. Last, make the wing, eye, and beak, sew them in place, and add the loop.
Finished Size and Construction
- Finished size: 6 in (15.2 cm) wide x 4.5 in (11.4 cm) tall, plus a 3 in (7.6 cm) loop
- Skill level: Intermediate (fan shells, working into foundation chain loops, appliqué)
- Terminology: US
- Yarn weight: Sport (#2) mercerized cotton
- Hook: 3.25 mm (US D/3)
- Number of pieces: 1 ornament, made of 5 parts (body, tail, wing, eye, beak)
- Layout: A single ornament, so there’s no grid and no joining of repeated pieces
- Body panel size (yellow lace only): 4.5 in (11.4 cm) wide x 2.25 in (5.7 cm) tall
- Size before border (body plus tail): 5.25 in (13.3 cm) wide x 2.25 in (5.7 cm) tall
- Border depth: 2 rounds of sc, about 0.4 in (1.0 cm)
Materials
Choose a smooth mercerized cotton in sport weight. Cotton holds the fan shapes crisply and blocks flat. A softer acrylic will also work, but the fans will be rounder and less defined.
- Color A, sage green: 10 g, about 30 m (33 yd)
- Color B, pale butter yellow: 6 g, about 18 m (20 yd)
These amounts include extra yarn for a gauge test, sewing tails, and one restart.
Tools:
- 3.25 mm (US D/3) crochet hook
- Tapestry needle
- Scissors
- Rustproof pins and a foam blocking mat
- Spray bottle with water
- Optional: fabric stiffener for a firmer hanging ornament
Abbreviations (US Terms)
- ch – chain
- sl st – slip stitch
- sc – single crochet
- hdc – half double crochet
- dc – double crochet
- sk – skip
- sp(s) – space(s)
- st(s) – stitch(es)
- RS – right side
- MR – magic ring
Special stitch – Fan: Work the stated number of dc (7 dc on the body, 5 dc on the wing) into one stitch. The center dc of a 7-dc fan is the 4th dc. The center dc of a 5-dc fan is the 3rd dc.
Gauge and Checkpoints
Gauge isn’t critical for an ornament, but it decides how well the border fits. Make Row 1 of the body first and measure it before you go on.
- Body Row 1: 2 fans measure 3 in (7.6 cm) wide and 0.75 in (1.9 cm) tall.
- Body after Row 3: 4.5 in (11.4 cm) wide x 2.25 in (5.7 cm) tall, measured across the widest tier.
- Tail fan: about 1.5 in (3.8 cm) across the arc.
- Border gauge: 11 sc = 2 in (5.1 cm).
- Finished ornament: 6 in (15.2 cm) x 4.5 in (11.4 cm).
If Row 1 is wider than 3 in (7.6 cm), go down half a hook size. If it is narrower, go up half a size. Change the hook, not the stitch counts, because every border count below is tied to the body’s stitches.
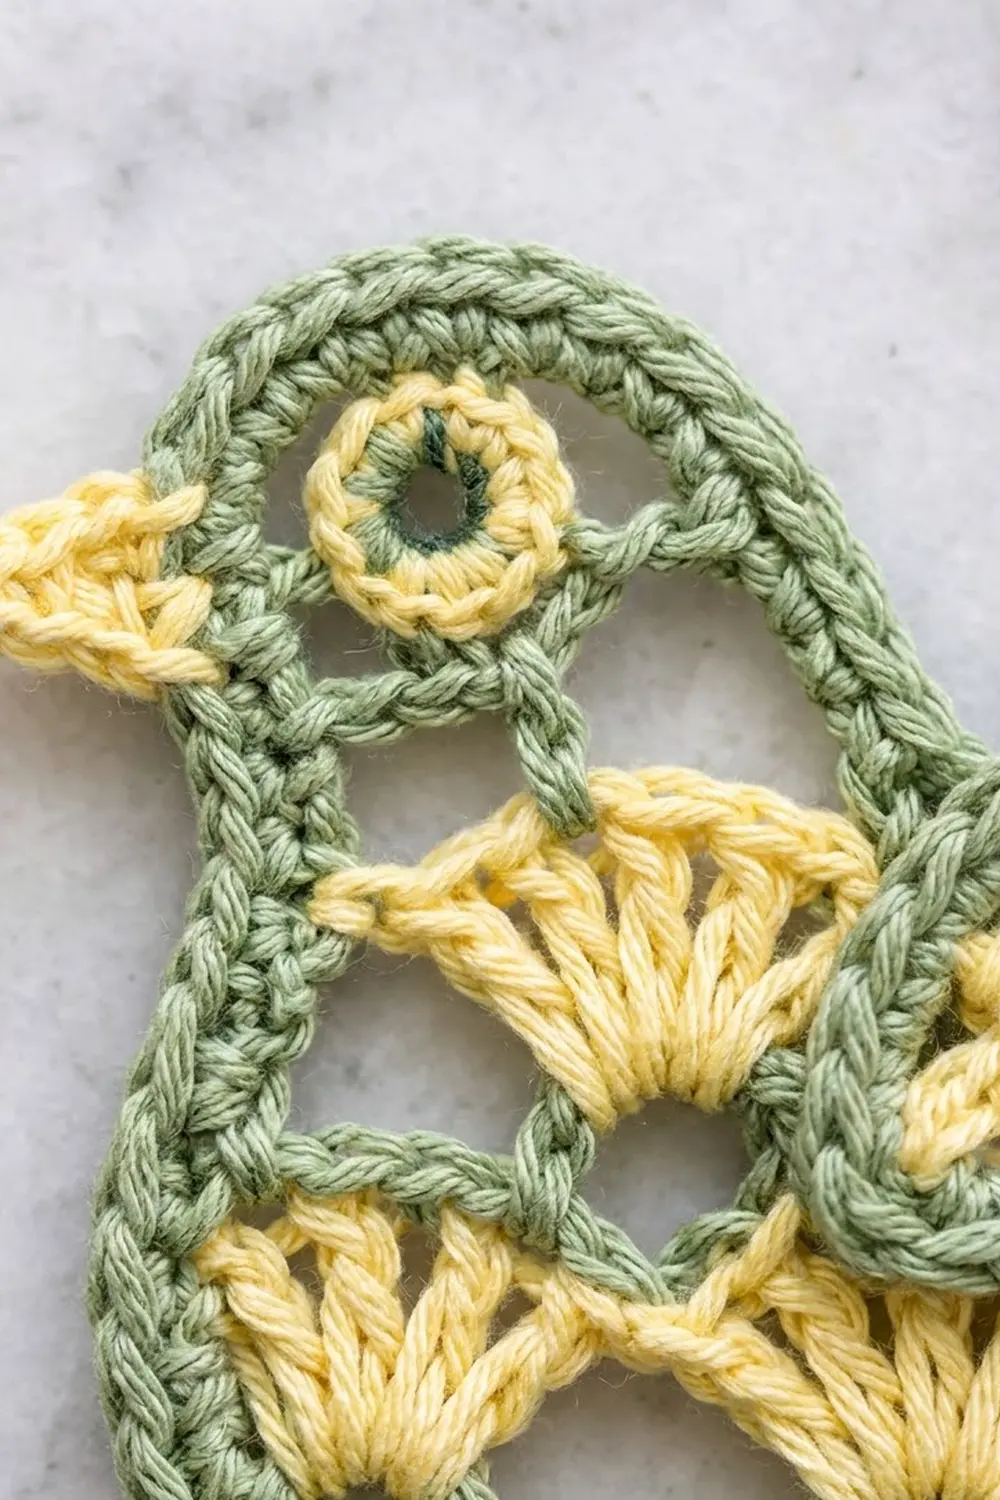
Body (Color B, Yellow)
The body has three tiers of fans. Each tier sits in the gaps of the tier below, so you get 2 fans, then 3 fans, then 2 fans.
Foundation: With B, ch 18.
Row 1 (RS): Sc in 2nd ch from hook, [sk 3 ch, 7 dc in next ch, sk 3 ch, sc in next ch] 2 times. Turn.
Count: 2 fans + 3 sc = 17 sts.
Row 2: Ch 3 (counts as first dc), 6 dc in first sc (edge fan made), ch 2, sk 3 dc, sc in 4th dc of fan, ch 2, 7 dc in next sc (middle fan), ch 2, sc in 4th dc of next fan, ch 2, 7 dc in last sc (edge fan). Turn.
Count: 3 fans (21 dc) + 2 sc = 23 sts, plus 4 ch-2 sps.
The two edge fans of Row 2 flare outward. On the left, the flare gives the bird its rounded chest. On the right, it gives the tail something to sit on.
Row 3: Sl st in each of first 4 dc (you end in the center dc of the edge fan), ch 1, sc in same dc, ch 2, 7 dc in next sc, ch 2, sc in 4th dc of middle fan, ch 2, 7 dc in next sc, ch 2, sc in 4th dc of last fan. Leave the remaining 3 dc of that fan unworked.
Count: 2 fans (14 dc) + 3 sc = 17 sts, plus 4 ch-2 sps.
Fasten off and weave in ends. Checkpoint: 4.5 in (11.4 cm) x 2.25 in (5.7 cm). Hold the panel with Row 3 at the top and the edge fan with the slip stitches on the right. The right side is the tail end. The left side is the chest and head end.
Tail (Color B, Yellow)
Rnd 1: Make a MR. Ch 3 (counts as dc), [ch 1, dc in ring] 6 times. Pull the ring closed tightly. Do not join.
Count: 7 dc spokes + 6 ch-1 sps, forming a half-circle fan.
Fasten off, leaving an 8 in (20.3 cm) tail. Checkpoint: about 1.5 in (3.8 cm) across the arc.
Attach: Place the closed ring against the outer post of the last dc of the right Row 2 fan, at mid-height. The spokes should point right and slightly up. Sew the ring and the bases of the first and last spokes in place with 4–5 small stitches. Weave in the end.
Border (Color A, Green)
The green outline is the bird’s border. Work it in one continuous order, counterclockwise with RS facing. The head loop is built as part of this border.
Rnd 1: Join A in the first foundation ch at the bottom left corner. Ch 1, then work:
- Bottom edge: Sc in each foundation ch across = 17 sc.
- Right lower side: 2 sc in the side of Row 1’s end sc = 2 sc.
- Tail: 2 sc along the post of the lowest tail spoke, sc in each dc and each ch-1 sp across the arc (13 sc), 2 sc along the post of the highest spoke = 17 sc.
- Right upper side: Sc in each of the 3 outer dc of the right Row 2 fan, working into the slip stitches = 3 sc.
- Top edge: Sc in the right Row 3 sc, 2 sc in ch-2 sp, sc in each of 7 dc, 2 sc in ch-2 sp, sc in middle sc, 2 sc in ch-2 sp, sc in 7th, 6th, and 5th dc of left fan, sc in 4th dc of left fan = 19 sc.
- Head arch: Ch 16, sk the remaining 3 dc of the left fan and the ch-2 sp, sc in Row 3’s left end sc = ch-16 arch + 1 sc.
- Left side: Sc in each of the 3 unworked outer dc of the left Row 2 fan, 3 sc down the post of the beginning ch-3, 2 sc in the side of Row 1’s first sc = 8 sc.
Join with sl st to first sc.
Count: 17 + 2 + 17 + 3 + 19 + 1 + 8 = 67 sc, plus one ch-16 arch.
The dc you skip under the arch are meant to stay unworked. Their yellow tips show inside the head, as in the finished bird.
Rnd 2: Ch 1, sc in each sc around, working 20 sc over the ch-16 arch. Join with sl st to first sc.
Count: 67 + 20 = 87 sc.
Fasten off and weave in ends. Checkpoint: 6 in (15.2 cm) wide x about 3.3 in (8.4 cm) tall at the head, before the wing goes on.
Why the math works: Rnd 1 puts exactly 1 sc in each existing stitch and a fixed number in each chain space and along each side. That keeps it at 67 sc however you hold the panel. At 11 sc = 2 in (5.1 cm), 67 sc plus the arch covers the outline evenly. Working 20 sc over the 16-ch arch adds 4 stitches, so the head curves outward instead of cupping. Rnd 2 adds stitches nowhere else, so the outline stays flat.
Wing (Colors B and A)
Foundation: With B, ch 14.
Row 1: Sc in 2nd ch from hook, [sk 2 ch, 5 dc in next ch, sk 2 ch, sc in next ch] 2 times.
Count: 2 fans (10 dc) + 3 sc = 13 sts. Fasten off B.
Rnd 1: Join A in the first foundation ch at the bottom left. Ch 1, sc in each foundation ch across (13 sc), ch 7 for the wing tip, sc in each of 13 sts across the top of Row 1, 2 sc in the side of the end sc. Join with sl st to first sc.
Count: 13 + 13 + 2 = 28 sc, plus one ch-7 sp.
Rnd 2: Ch 1, sc in each sc to the ch-7 sp, (5 sc, ch 1, 5 sc) in ch-7 sp, sc in each remaining sc. Join.
Count: 28 + 10 = 38 sc, plus a ch-1 point.
Fasten off, leaving a 12 in (30.5 cm) tail. Checkpoint: 3 in (7.6 cm) long x 1.5 in (3.8 cm) tall.
Eye (Color A, Green)
Rnd 1: Make a MR, 8 sc in ring. Pull the ring nearly closed, leaving a tiny hole in the center. Join with sl st.
Count: 8 sc. Diameter about 0.5 in (1.3 cm).
Fasten off with an 8 in (20.3 cm) tail. Work one French knot in the center with A so it reads as a darker pupil.
Beak (Color B, Yellow)
Row 1: Ch 4. Sc in 2nd ch from hook, hdc in next ch, dc in last ch.
Count: 3 sts, forming a small wedge about 0.5 in (1.3 cm) long.
Fasten off with an 8 in (20.3 cm) tail.
Assembly and Hanging Loop
- Wing: Lay the wing over the upper back. Its lower edge should cover the middle of Row 3, with the tip pointing up and to the right toward the tail. Sew along the lower edge and the left end through Rnd 1 of the wing. Leave the tip free so it lifts above the body line.
- Eye: Center the eye inside the head opening, touching the inner edge of the arch. Tack it down at 3 points.
- Beak: Sew the wide end of the beak to the front of the head arch, pointing left.
- Loop: Join A in the middle sc of the top edge, behind the wing. Ch 34, sl st in 2nd ch from hook and each ch across (33 sl st cord), sl st in the join st. The loop measures about 3 in (7.6 cm).
Final Blocking
- Lightly mist the ornament until it is damp, not soaked.
- Lay it RS up on the blocking mat.
- Pin the bottom edge straight first. Then pin the tail spokes into an even fan.
- Shape the head into a round loop and put one pin inside it.
- Open each body fan so the dc spread evenly and the ch-2 openings show clearly.
- Check the size: 6 in (15.2 cm) x 4.5 in (11.4 cm), within 0.25 in (0.6 cm).
- Let it dry completely. If you want, apply stiffener now, then let it dry again.
Final Quality-Control Checklist
- The body tiers read 2, 3, 2 fans, and each fan has 7 dc.
- Border Rnd 2 counts 87 sc.
- The head loop is round, not twisted.
- The wing has 38 sc and a sharp ch-1 point that sits above the top line.
- The eye sits inside the head, and the beak points forward.
- The ornament hangs level from its loop.
- All ends are woven in and trimmed.
Troubleshooting
- Fans look crowded or cupped: Your tension is tight. Go up half a hook size and check Row 1 again.
- Body ripples after the border: You probably added extra sc on the sides. Recount each part against the Rnd 1 list.
- Head loop flops over: Work all 20 sc snugly in Rnd 2, or use a little stiffener.
- Ornament tips forward when hung: Move the loop one stitch toward the tail to balance the wing.
- Tail spokes bunch together: Pin them wider when blocking. You may also need to pull the ring more tightly closed.
Care
Hand wash in cool water with mild soap, press the water out in a towel, then reshape and dry flat. Store it flat or hanging so the head and tail keep their shape.
Final Notes
There are only a few measurements to check. Row 1 should be 3 in (7.6 cm) wide. The finished body should be 4.5 in (11.4 cm) x 2.25 in (5.7 cm), or 5.25 in (13.3 cm) wide with the tail. Border Rnd 1 has 67 sc and Rnd 2 has 87 sc. The finished bird is 6 in (15.2 cm) x 4.5 in (11.4 cm). If each checkpoint matches, the wing, eye, and beak will sit just right. Make one for every branch, or tuck a single bird into a holiday card.
Happy crocheting!