

This lace mitten is a small, flat ornament with a lot of texture. Seven-stitch shell fans sit in staggered rows inside fine blue chain arches, so the hand looks almost like frosted glass. A solid white cuff, a clean white outline and a ring of tiny picots give it a classic Christmas look.
There are two colors: royal blue for the lace hand and bright white for the cuff, edging and hanging loop. Mercerized cotton thread keeps the fans sharp and the picots firm, and that matters on a piece this small.
The pattern uses US crochet terms. The finished ornament is about 3.5 in (8.9 cm) wide across the hand, 4 in (10.2 cm) wide including the thumb and 4 in (10.2 cm) tall. The hanging loop adds 1.5 in (3.8 cm).
Here’s the construction. You crochet the blue hand in turned rows from the bottom up and add the thumb as a small fan on the right edge. Then you work the white cuff straight across the top and carry on into a two-round border around the whole mitten. Last, you add a hanging loop at the center of the cuff.
Finished Size and Construction
- Finished size: 3.5 in (8.9 cm) wide across the hand, 4 in (10.2 cm) wide including the thumb, 4 in (10.2 cm) tall, plus a 1.5 in (3.8 cm) loop
- Skill level: Intermediate
- Terminology: US crochet terms
- Yarn weight: Size 3 mercerized cotton crochet thread (fine/fingering)
- Hook: 2.0 mm
- Number of pieces: 1 (the thumb and cuff are worked directly onto the hand)
- Layout: Single ornament, no assembly
- Piece size (hand only, Rows 1–8): 3 in (7.6 cm) wide at the widest point, 3 in (7.6 cm) tall
- Size before border (hand + thumb + cuff): 3.5 in (8.9 cm) wide including the thumb, 3.5 in (8.9 cm) tall
- Border depth: 0.25 in (0.6 cm) on every edge
Materials
Use a smooth mercerized cotton thread. It shows every stitch clearly, holds the fans open after blocking and won’t fuzz on the tree. Choose a strong royal or cobalt blue so it stands out clearly against the white.
- Color A, Royal Blue: 6 g, about 30 m
- Color B, White: 5 g, about 25 m
These quantities include a margin of about 25% for your test piece and for weaving in ends.
Tools:
– 2.0 mm crochet hook
– Fine tapestry needle
– Small scissors
– Rust-proof pins and a foam blocking mat
– Spray bottle with water
– Ruler or tape measure
Abbreviations (US Terms)
- ch – chain
- sl st – slip stitch
- sc – single crochet
- dc – double crochet
- sk – skip
- sp – space
- st(s) – stitch(es)
- rep – repeat
- RS / WS – right side / wrong side
Special stitches:
- Fan: 7 dc in the same stitch or space. The 4th (center) dc is the top of the fan.
- Half fan: 4 dc in the same stitch (or ch 3 + 3 dc at the start of a row).
- V-stitch: (dc, ch 2, dc) in the same stitch.
- Picot: sc in next st, ch 3, sl st into the front loop and left vertical bar of the sc you just made.
Gauge and Checkpoints
Make one test mitten before you start a batch. On a piece this small, gauge controls the shape as much as the size.
- Fan gauge: 1 fan repeat (sc to next sc) = 1 in (2.5 cm) wide.
- Row gauge: 1 fan row + 1 loop row = 0.75 in (1.9 cm) tall.
- Sc gauge: 13 sc = 2 in (5.1 cm); 8 sc rows = 1 in (2.5 cm).
Checkpoints:
- After Row 1: 2 in (5.1 cm) wide.
- After Row 4: 3 in (7.6 cm) wide and 1.5 in (3.8 cm) tall.
- After Row 8: 3 in (7.6 cm) wide and 3 in (7.6 cm) tall.
- After Cuff Row 4: 3.5 in (8.9 cm) tall.
- After Border Round 2: 3.5 in (8.9 cm) across the hand and 4 in (10.2 cm) tall.
If your piece is more than 0.25 in (0.6 cm) too big, change to a 1.75 mm hook. If it is more than 0.25 in (0.6 cm) too small, change to a 2.25 mm hook. Measure with the piece lightly pinned flat, because the mesh stretches.
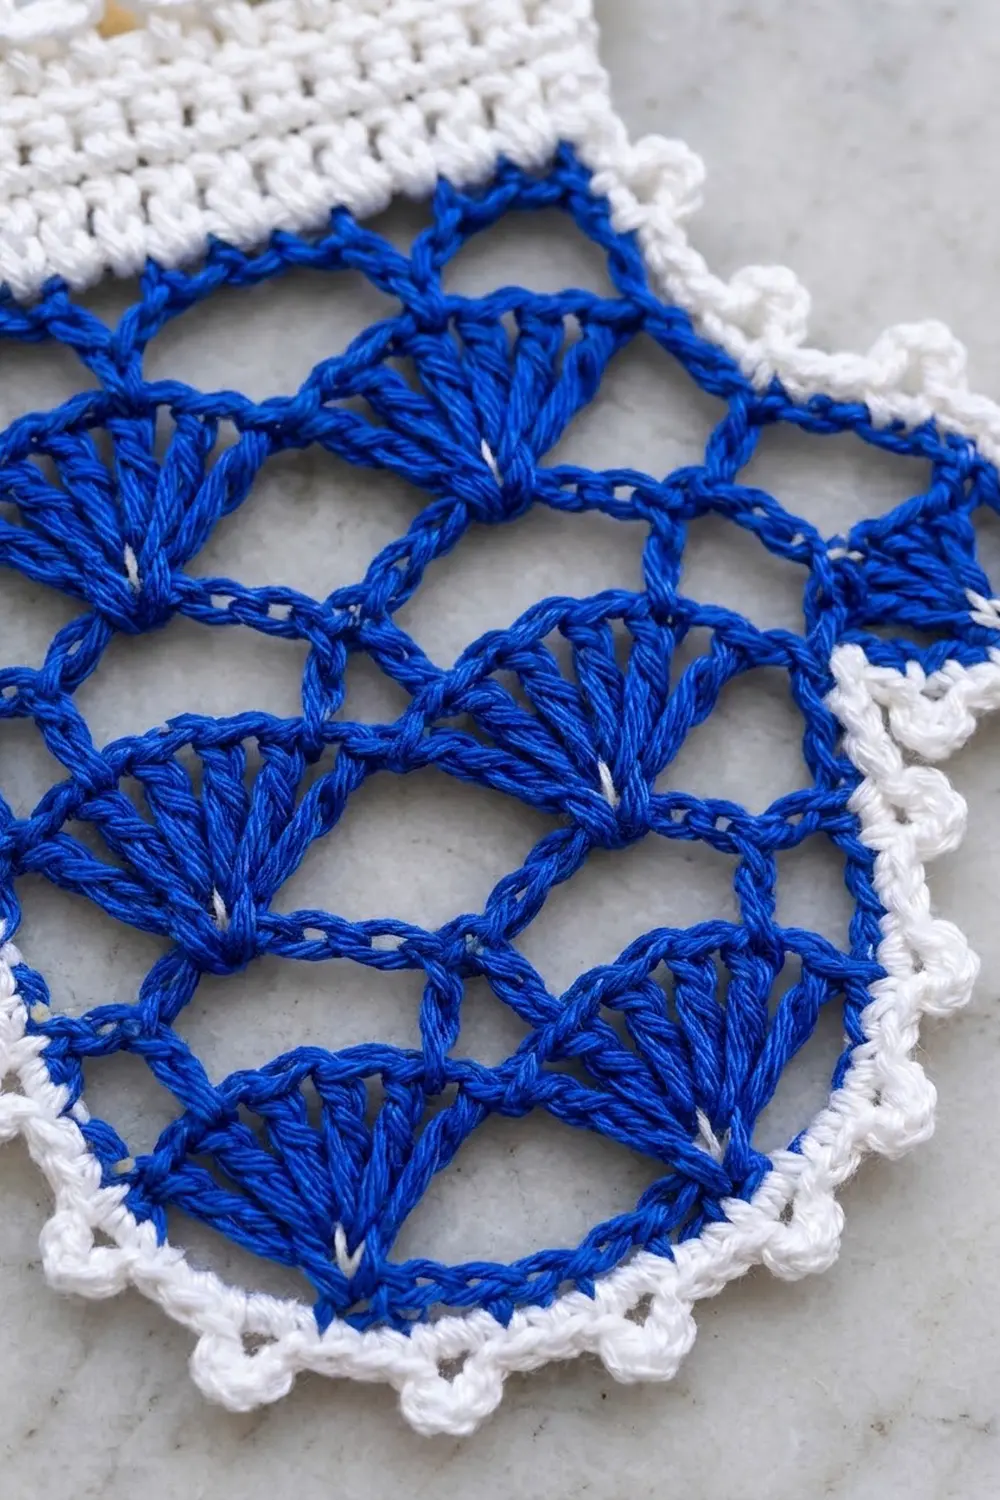
Hand (Color A, Blue)
Work in turned rows from the bottom up. Row 1 is the RS. Chain-2 spaces are listed separately and don’t count as stitches.
Foundation: With A, ch 18.
Row 1 (RS, fan row): Sc in 2nd ch from hook, sk 3 ch, fan in next ch, sk 3 ch, sc in next ch; rep from * once more. Turn.
(2 fans + 3 sc = 17 sts)*
Row 2 (WS, increase loop row): Ch 5 (counts as dc + ch 2), dc in first sc (beginning V made), ch 2, sc in 4th dc of next fan, ch 2, dc in next sc, ch 2, sc in 4th dc of next fan, ch 2, V-stitch in last sc. Turn.
(5 dc + 2 sc = 7 sts; 6 ch-2 sps)
The two edge V-stitches are the increases. They give the bottom its rounded, widening shape.
Row 3 (RS, fan row): Ch 1, sc in first dc, fan in ch-2 sp of next V, sc in next sc, fan in next dc, sc in next sc, fan in ch-2 sp of beginning V, sc in 3rd ch of beginning ch-5. Skip all ch-2 sps between stitches. Turn.
(3 fans + 4 sc = 25 sts)
Row 4 (WS, loop row): Ch 5 (counts as dc + ch 2), sc in 4th dc of next fan, ch 2, dc in next sc, ch 2, sc in 4th dc of next fan; rep from * once more, ch 2, dc in last sc. Turn.
(4 dc + 3 sc = 7 sts; 6 ch-2 sps)*
Row 5 (RS, offset fan row): Ch 3 (counts as dc), 3 dc in first dc (half fan made), sc in next sc, fan in next dc, sc in next sc, fan in next dc, sc in next sc, half fan (4 dc) in 3rd ch of turning ch-5. Turn.
(8 dc in half fans + 14 dc in full fans + 3 sc = 25 sts)
The fans in this row sit between the fans of Row 3, which gives the staggered, scale-like look.
Row 6 (WS, loop row): Ch 1, sc in first dc, ch 2, dc in next sc, ch 2, sc in 4th dc of next fan; rep from * once more, ch 2, dc in next sc, ch 2, sc in top of turning ch-3. Turn.
(4 sc + 3 dc = 7 sts; 6 ch-2 sps)*
Row 7 (RS, fan row): Ch 1, sc in first sc, fan in next dc, sc in next sc; rep from * 2 more times. Turn.
(3 fans + 4 sc = 25 sts)*
Row 8 (WS, top loop row): Work as Row 4. Fasten off A.
(4 dc + 3 sc = 7 sts; 6 ch-2 sps)
Checkpoint: the hand should measure 3 in (7.6 cm) wide and 3 in (7.6 cm) tall.
Thumb (Color A, Blue)
The thumb is a chain arch filled with a fan. It attaches to the right-hand edge of Rows 5–7 with the RS facing you. That is the edge where Rows 5 and 7 begin.
Thumb Row 1: With RS facing, join A with a sl st at the base of the beginning ch-3 of Row 5. Ch 7, sl st in the first sc of Row 7. Turn.
Thumb Row 2: Work (sc, 9 dc, sc) in the ch-7 loop. Sl st at the base of the beginning ch-3 of Row 5 again. Fasten off.
(1 sc + 9 dc + 1 sc = 11 sts)
The thumb fan points outward and adds about 0.5 in (1.3 cm), so the piece is 3.5 in (8.9 cm) wide including the thumb.
Cuff (Color B, White)
Cuff Row 1 (RS): With RS facing, join B with a sl st in the first st of Row 8 (the last dc you made). Ch 1, sc in same st, 2 sc in next ch-2 sp, sc in next st; rep from * 5 more times. Turn.
(7 sts worked 1-per-stitch + 6 ch-2 sps × 2 sc = 7 + 12 = 19 sc)*
Cuff Rows 2–4: Ch 1, sc in each sc across. Turn.
(19 sc per row)
Don’t fasten off. The cuff is 0.5 in (1.3 cm) tall and about 3 in (7.6 cm) wide. The whole piece should now measure 3.5 in (8.9 cm) tall.
Border (Color B, White)
Border gauge: Rounds 1 and 2 together add 0.25 in (0.6 cm) to every edge.
Keep working with B. After Cuff Row 4, turn so the RS faces you. Your hook is now at the top right corner of the cuff.
Round 1 (RS): Ch 1, then work around the mitten in this order:
- Cuff top: 2 sc in first sc, sc in next 17 sc, 2 sc in last sc. (19 sts + 2 extra = 21 sc)
- Left cuff side: 1 sc in the end of each cuff row. (4 sc)
- Left hand side: 3 sc in the end of each fan row (Rows 7, 5, 3, 1) and 2 sc in the end of each loop row (Rows 8, 6, 4, 2). (4 × 3 + 4 × 2 = 20 sc)
- Bottom: Working in the free loops of the foundation chain: 2 sc in first ch, sc in next 15 ch, 2 sc in last ch. (17 ch + 2 extra = 19 sc)
- Right hand side: 3 sc in the end of Rows 1 and 3, and 2 sc in the end of Rows 2 and 4 (10 sc). Then 1 sc in the side of Row 5 below the thumb, 1 sc in each of the 11 thumb sts, and 1 sc in the side of Row 7 above the thumb (13 sc). Then 2 sc in the end of Row 8 (2 sc). (10 + 13 + 2 = 25 sc)
- Right cuff side: 1 sc in the end of each cuff row. (4 sc)
Join with a sl st in the first sc.
(21 + 4 + 20 + 19 + 25 + 4 = 93 sc)
Round 2 (RS, picot round): Ch 1, sc in next 2 sc, picot in next sc; rep from * 30 more times. Sl st in first sc. Fasten off.
(93 sc, including 31 picots)*
Why the math works: Round 2 repeats over 3 stitches, so Round 1 has to be a multiple of 3. Since 93 ÷ 3 = 31, the picots close evenly with no partial repeat at the join. The cuff top has 21 sc (19 cuff stitches + 2 corner increases), which is also a multiple of 3. That puts exactly 7 picots along the top, with the last one on the top left corner.
Hanging Loop (Color B, White)
On Round 2, count 11 stitches from the top right corner along the cuff top. The 11th stitch is a plain sc between picots, right at the center. Join B with a sl st in that stitch.
Ch 30, sl st in the same stitch. Ch 1, work 40 sc into the ch-30 loop, then sl st in the first sc. Fasten off. This gives a firm, covered loop about 1.5 in (3.8 cm) tall.
Final Blocking
- Weave in all ends through stitches of the same color: blue tails into the fans, white tails into the cuff or border.
- Mist the ornament until it is damp but not soaked.
- Lay it RS up on the blocking mat.
- Pin the cuff into a straight rectangle 3 in (7.6 cm) wide.
- Pin the hand to 3.5 in (8.9 cm) wide including the border, and the whole piece to 4 in (10.2 cm) tall.
- Open each fan with a pin at its top, and pin each picot outward into a neat ring.
- Pin the thumb so it points out and slightly up, for a total width of 4 in (10.2 cm).
- Let it dry completely, at least 6 hours. For extra stiffness, mist with light spray starch before unpinning.
Final Quality-Control Checklist
- Rows 3, 5 and 7 have 25 sts each; each loop row has 7 sts and 6 ch-2 sps.
- Fans in alternate fan rows are staggered, not stacked.
- The thumb has 11 sts and sits on the right edge of Rows 5–7.
- Every cuff row has 19 sc, and the cuff sides are straight.
- Border Round 1 has 93 sc; Round 2 has 31 evenly spaced picots.
- The hanging loop is centered on the cuff.
- The finished ornament is 3.5 in (8.9 cm) by 4 in (10.2 cm), and 4 in (10.2 cm) wide at the thumb.
- No knots or tails show on the RS.
Troubleshooting
- Fans ruffle or cup: Your dc are too loose. Go down a hook size, and check that each fan is worked into a single stitch.
- Fans look squashed: The foundation chain is too tight. Make the chain with a hook one size larger.
- Bottom looks square: Check the Row 2 V-stitches, then pin the curve more firmly when blocking.
- Cuff flares: Work 1 sc instead of 2 in two of the ch-2 sps of Cuff Row 1. Then work 3 sc instead of 2 in each top corner of Border Round 1 so the round still totals 93.
- Picots come out uneven: Recount Round 1 edge by edge. It must total 93.
- Thumb flops: Shorten the arch to ch 6 and pin the thumb firmly while blocking.
Care
Hand wash in cool water with mild soap, roll in a towel, and reblock flat to dry. Store flat between sheets of tissue paper so the picots and loop keep their shape.
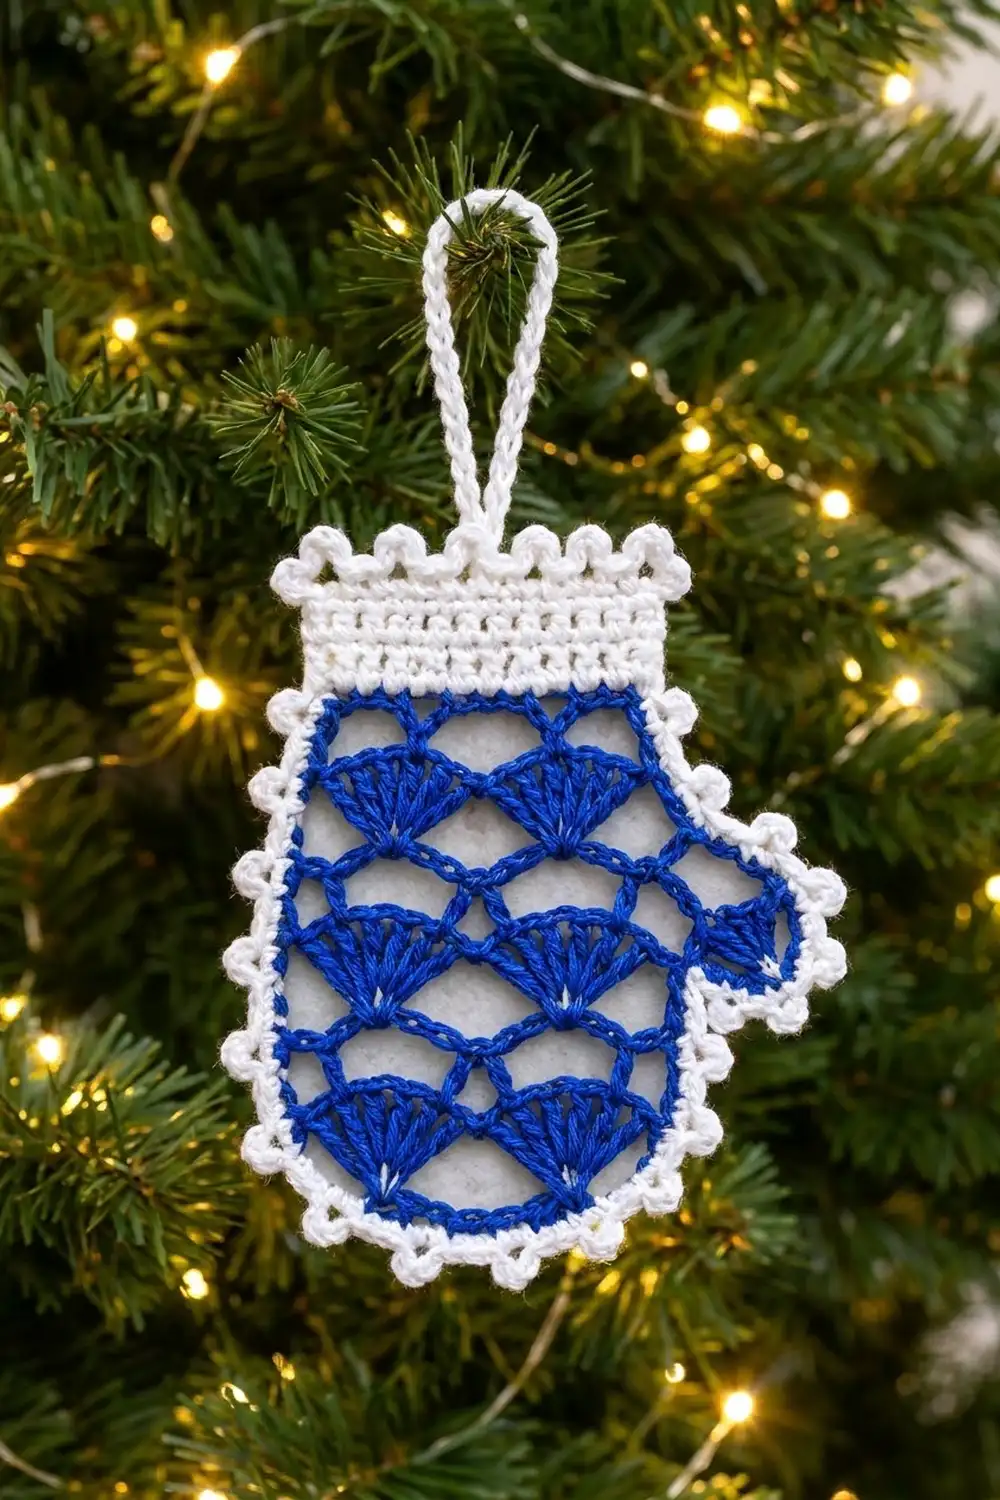
Final Notes
Here’s the measurement chain:
- Row 1 is 2 in (5.1 cm) wide.
- Rows 1–8 grow to 3 in (7.6 cm) wide and 3 in (7.6 cm) tall.
- The thumb takes the width to 3.5 in (8.9 cm), and the 0.5 in (1.3 cm) cuff takes the height to 3.5 in (8.9 cm).
- The 0.25 in (0.6 cm) border finishes the ornament at 3.5 in (8.9 cm) across the hand, 4 in (10.2 cm) across the thumb and 4 in (10.2 cm) tall.
Check each stage as you go, and every mitten will block into a crisp blue and white ornament. Hang one on your tree, slip one into a card, or tie one onto a gift.
Happy crocheting!