

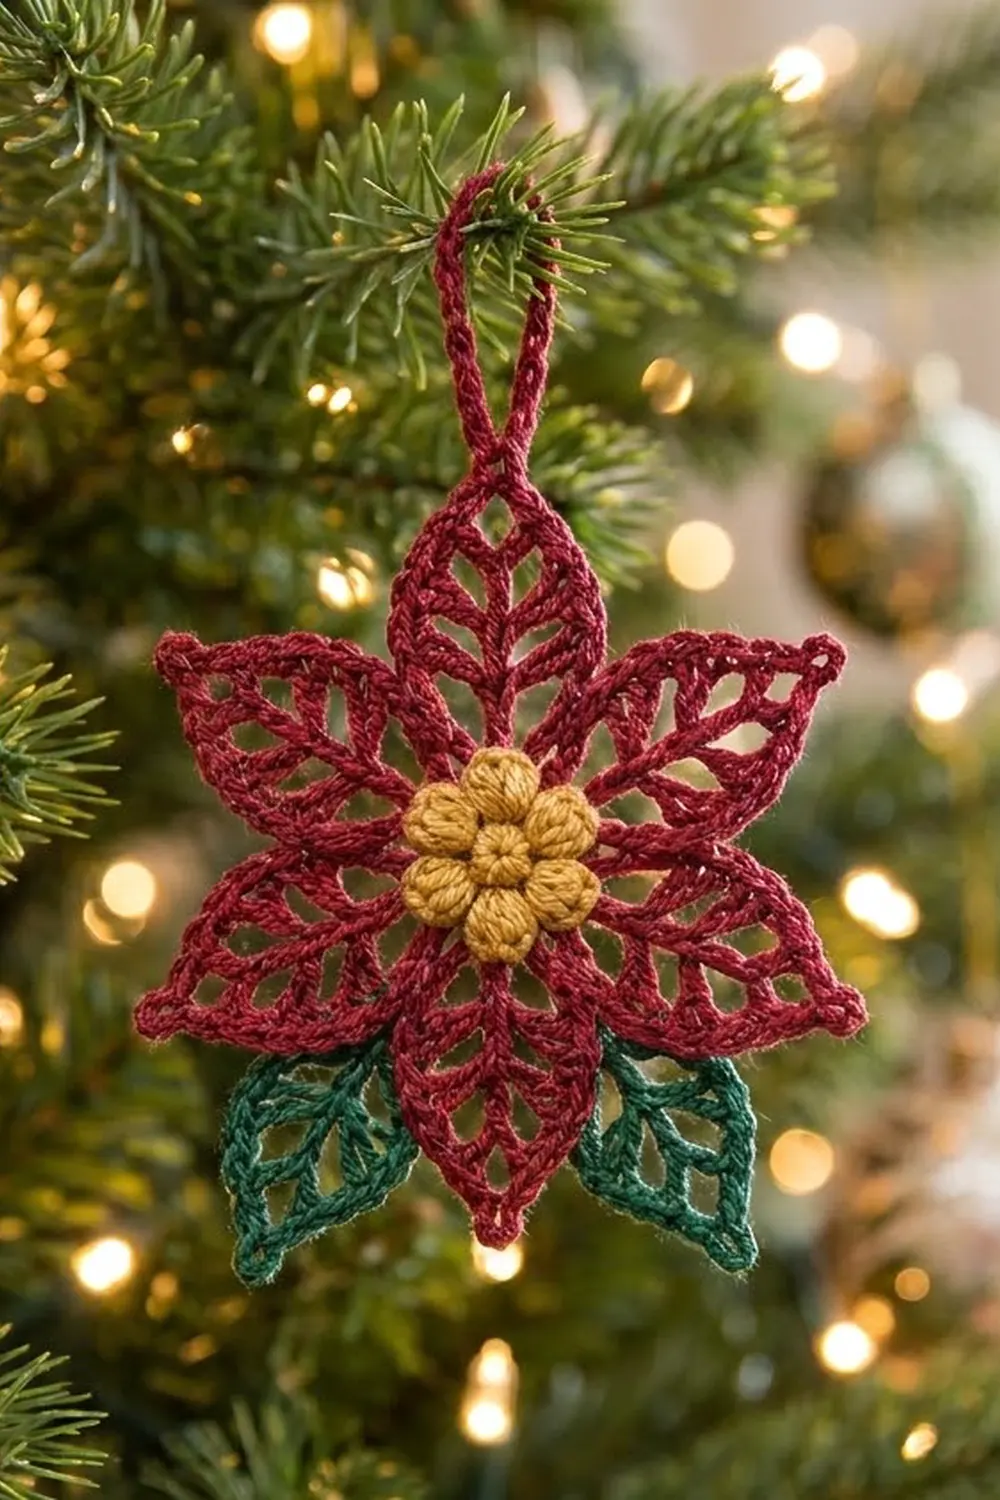
The Starlit Lace Poinsettia is a small, airy Christmas ornament with a golden puff-stitch center. Six openwork red petals spread out from the middle like a star. Each petal has a slip-stitch center vein and angled stitch posts that look like the veins of a real poinsettia. Two green lace leaves show from behind the lower petals, and a sturdy red loop at the top lets the ornament hang straight on a branch.
The colors are classic holiday ones: deep cranberry red for the petals and loop, warm mustard gold for the center, and forest green for the leaves. Fine mercerized cotton gives clear stitch definition and a slightly stiff, lacy look that holds its shape on the tree.
This pattern uses US crochet terms. The finished ornament measures 4.7 in (11.9 cm) from the top petal tip to the bottom petal tip and 4.1 in (10.4 cm) across. With the hanging loop it hangs 6.0 in (15.2 cm) tall.
The whole ornament is one continuous piece. First you make a puff-stitch flower center and add two red base rounds. Then you build each petal straight off the base: a slip-stitch spine, one lacy side going out, one lacy side coming back, and a single-crochet edging before you move to the next petal. Last, you work the green leaves onto the back of the base round. There is no sewing and no separate joining.
Finished Size and Construction
- Finished size: 4.7 in (11.9 cm) tall tip to tip x 4.1 in (10.4 cm) wide; 6.0 in (15.2 cm) tall including the hanging loop
- Skill level: Intermediate
- Terminology: US crochet terms
- Yarn weight: Sport weight (#2 fine) mercerized cotton
- Hook: 2.5 mm (between US B/1 and C/2)
- Number of pieces: 1 (a single ornament, worked continuously)
- Layout: 6 red petals around a yellow center, 2 green leaves behind the lower petals, hanging loop on the top petal
- Center size: 1.5 in (3.8 cm) across after Rnd 4
- Petal length: 1.6 in (4.1 cm) from base round to tip
- Size before border (petal edging): 4.5 in (11.4 cm) tall x 3.9 in (9.9 cm) wide
- Border depth: about 0.1 in (0.3 cm) per edge
Materials
Choose a smooth, mercerized sport-weight cotton with about 155 m per 50 g. Cotton holds the lace open and blocks crisply. Acrylic also works, but the petals will curl more and need firmer blocking.
- Red (petals, base rounds, loop): 12 g, about 37 m
- Yellow/gold (center): 3 g, about 9 m
- Green (leaves): 3 g, about 9 m
These amounts include about 25% extra for a gauge test and for weaving in ends.
Tools:
- 2.5 mm crochet hook
- Tapestry needle
- Scissors
- Stitch marker
- Blocking mat and rustproof pins
- Light fabric stiffener (optional)
Abbreviations (US Terms)
- ch – chain
- sl st – slip stitch
- sc – single crochet
- hdc – half double crochet
- dc – double crochet
- tr – treble crochet
- sk – skip
- sp(s) – space(s)
- st(s) – stitch(es)
- Rnd – round
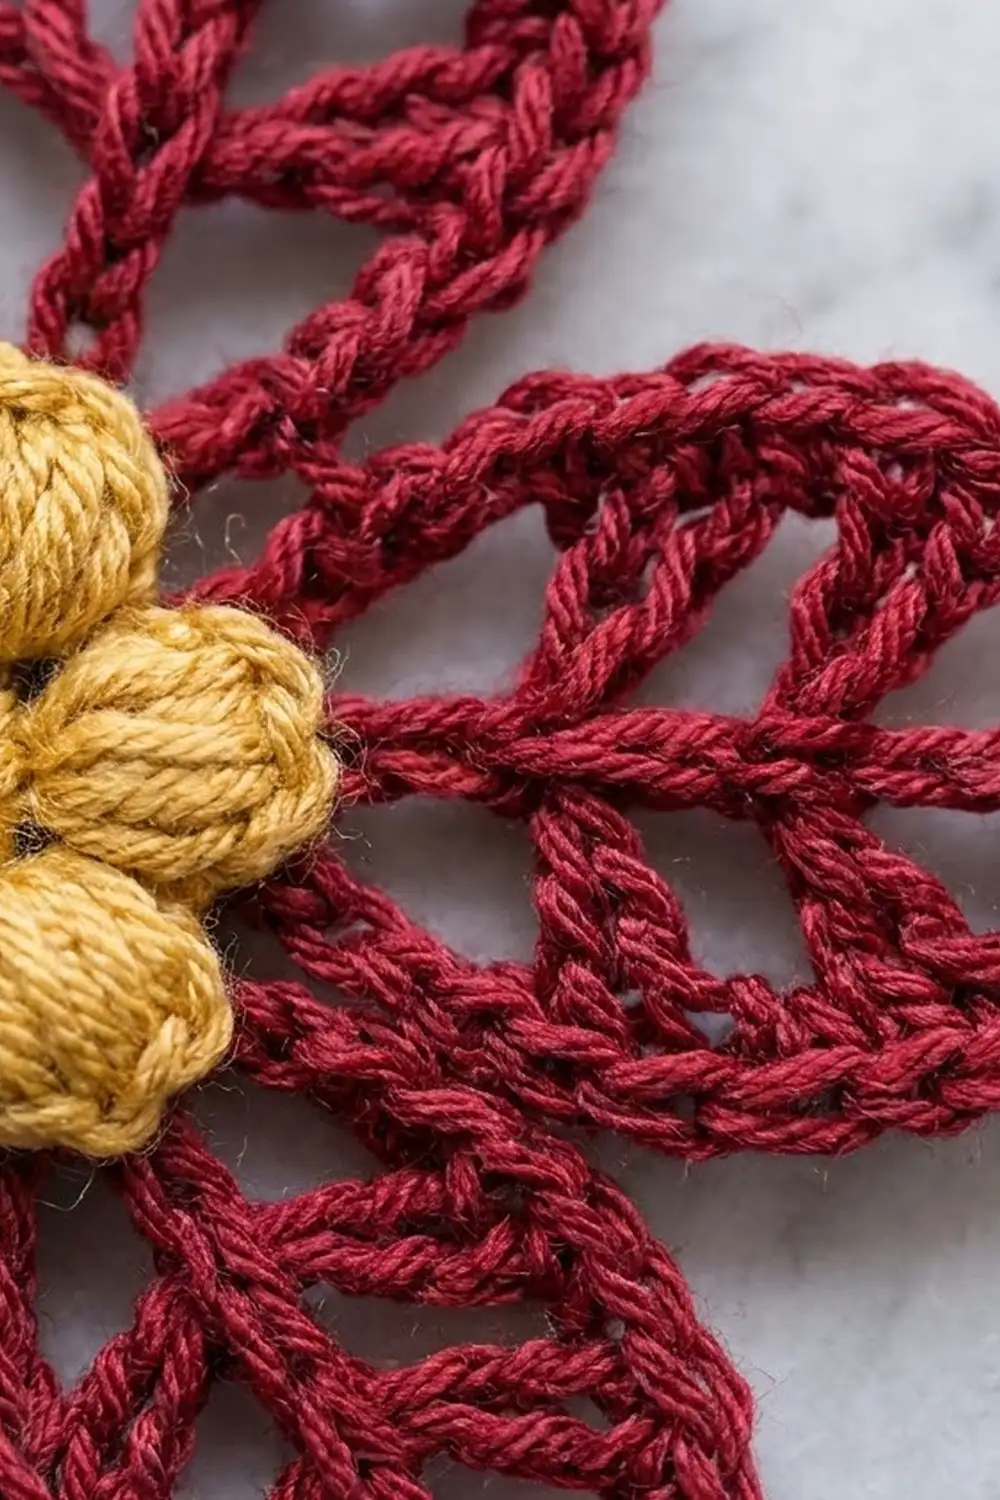
Puff stitch (puff): (Yo, insert hook in st, yo and pull up a loop to 0.25 in [0.6 cm]) 4 times, yo and pull through all 9 loops on hook, ch 1 to lock. The locking ch does not count as a stitch. On the next round, work into the top of this ch.
Picot tip: A ch 4 between two sc at a petal or leaf tip. It makes the small eyelet at each point.
Gauge and Checkpoints
Gauge: 6 sc = 1 in (2.5 cm) worked in rounds; 9 ch = 1 in (2.5 cm).
Make the center (Rnds 1–4) first and use it as your gauge test. It only takes a few minutes and shows whether the petals will come out the right size.
Checkpoints:
- After Rnd 2 (yellow puffs): 1 in (2.5 cm) across
- After Rnd 3: 1.25 in (3.2 cm) across
- After Rnd 4: 1.5 in (3.8 cm) across
- First petal before edging: 1.5 in (3.8 cm) long from base to tip
- First petal after edging: 1.6 in (4.1 cm) long and about 1 in (2.5 cm) wide at the widest point
If your center is too big: switch to a 2.25 mm hook and remake it.
If it is too small: switch to a 2.75 mm hook.
Small errors in the center get bigger as you go. A center that is 0.25 in (0.6 cm) too wide pushes every petal outward, and the ornament ends up about 0.5 in (1.3 cm) larger. Fix gauge at the center stage.
Center (Yellow)
Rnd 1: With yellow, make a magic ring, ch 1, 12 sc in ring, pull ring closed, sl st to first sc. (12 sc)
Rnd 2: Ch 2 (does not count as st), puff in first sc, ch 2, sk next sc, puff in next sc, ch 2, sk next sc; repeat from * 4 more times, sl st to top of first puff. (6 puffs, 6 ch-2 sps)*
Fasten off yellow. Gently push each puff toward the front so the six bumps form a raised flower around the small Rnd 1 circle.
Base Rounds (Red)
Rnd 3: Join red with a sl st in any ch-2 sp. Ch 1, 3 sc in ch-2 sp, sc in top of next puff; repeat from * 5 more times, sl st to first sc. (24 sc: 18 in sps + 6 in puffs)*
Checkpoint: 1.25 in (3.2 cm) across.
Rnd 4: Ch 1, sc in same st as join, ch 5, sk next 3 sc, sc in next sc, ch 5, sk next 3 sc; repeat from * 4 more times, sl st to first sc. (6 sc, 6 ch-5 sps)*
Checkpoint: 1.5 in (3.8 cm) across. Each repeat uses 4 sts (1 sc + 3 skipped), and 6 repeats x 4 sts = 24 sts, which matches the Rnd 3 count exactly.
Choose one ch-5 sp to be the top of the ornament and mark it. This is where Petal 1 goes. Petals are numbered in the direction you work, so Petal 4 sits directly opposite, at the bottom.
Sl st in the marked ch-5 sp. Do not fasten off.
Petals (Red, Make 6 Continuously)
Each petal has four steps: spine, Side 1, Side 2, then the edging from the Border section. Finish all four steps on one petal before starting the next.
Spine: Ch 15. Sl st in 2nd ch from hook and in each of next 13 ch back toward the base. (14 sl sts)
Number the spine sts 1 to 14, starting at the base. The skipped ch at the far end is the tip ch (#15). The sl sts form the raised center vein.
Side 1 (base to tip, worked into the sl sts): Ch 1, sc in #1, ch 1, sk #2, hdc in #3, ch 2, sk #4, dc in #5, ch 2, sk #6, tr in #7, ch 2, sk #8, tr in #9, ch 2, sk #10, dc in #11, ch 2, sk #12, hdc in #13, ch 1, sc in #14.
(8 sts: 2 sc, 2 hdc, 2 dc, 2 tr; 7 ch-sps)
As you work each taller stitch, lean it slightly toward the tip. This angle makes the diagonal veins between the open spaces.
Tip: (Sc, ch 3, sc) in tip ch #15. (2 sc, 1 ch-3 sp)
Side 2 (tip to base, worked into the free loops of the foundation ch): Sc in #14, ch 1, hdc in #13, ch 2, dc in #11, ch 2, tr in #9, ch 2, tr in #7, ch 2, dc in #5, ch 2, hdc in #3, ch 1, sc in #1. Sl st in the ch-5 sp of Rnd 4.
(8 sts, 7 ch-sps; this side mirrors Side 1)
The petal now measures 1.5 in (3.8 cm) from base to tip. Go straight to the Petal Edging in the Border section.
Moving to the next petal: The edging ends with a sl st in the ch-5 sp. Then sl st in the next sc of Rnd 4, and sl st in the next ch-5 sp. Repeat the spine, sides and edging there.
Make Petals 2 through 6 the same way. Petal 1 is the only one that gets the hanging-loop tip (see the Border section). After Petal 6, sl st in the next sc of Rnd 4 and fasten off red.
Leaves (Green, Make 2 on the Back)
Turn the ornament face down. Find the Rnd 4 sc between Petal 3 and Petal 4, and the Rnd 4 sc between Petal 4 and Petal 5. One leaf grows from each of these.
Join: With green, join with a sl st around the post of the Rnd 4 sc, working from the back.
Spine: Ch 12. Sl st in 2nd ch from hook and in each of next 10 ch. (11 sl sts, numbered 1 to 11 from the base; tip ch is #12)
Side 1: Ch 1, sc in #1, ch 1, sk #2, hdc in #3, ch 2, sk #4, dc in #5, ch 2, sk #6, dc in #7, ch 2, sk #8, hdc in #9, ch 1, sk #10, sc in #11. (6 sts, 5 ch-sps)
Tip: (Sc, ch 3, sc) in tip ch #12.
Side 2: Sc in #11, ch 1, hdc in #9, ch 2, dc in #7, ch 2, dc in #5, ch 2, hdc in #3, ch 1, sc in #1. Sl st around the same post. (6 sts, 5 ch-sps)
Work the Leaf Edging from the Border section, then fasten off. Repeat for the second leaf. Each leaf is 1.3 in (3.3 cm) long and 0.75 in (1.9 cm) wide, so its tip shows between the lower petals without reaching past them.
Border (Petal and Leaf Edging)
The border is one round of sc worked around each petal and each leaf right after its sides are done. It firms up the lace, outlines the shape and adds the eyelet at each tip.
Border gauge: 7 sc = 1 in (2.5 cm) along the curved edge. This is a little denser than the body gauge on purpose, so the outline stays firm and flat.
Petal Edging (start at the base of Side 2):
- Up Side 2: Ch 1, sc in ch-1 sp, sc in hdc, sc in ch-2 sp, sc in dc, sc in ch-2 sp, sc in tr, sc in ch-2 sp, sc in tr, sc in ch-2 sp, sc in dc, sc in ch-2 sp, sc in hdc, sc in ch-1 sp, sc in last sc. (14 sc)
- Tip: Sc in tip sc, (sc, ch 4, sc) in ch-3 sp, sc in next tip sc. (4 sc, 1 ch-4 picot)
- Down Side 1: Sc in sc at #14, sc in ch-1 sp, sc in hdc, sc in ch-2 sp, sc in dc, sc in ch-2 sp, sc in tr, sc in ch-2 sp, sc in tr, sc in ch-2 sp, sc in dc, sc in ch-2 sp, sc in hdc, sc in ch-1 sp. (14 sc)
- Sl st in the ch-5 sp of Rnd 4.
Total per petal: 14 + 4 + 14 = 32 sc, plus 1 ch-4 picot.
Hanging loop (Petal 1 only): Replace the tip step with: sc in tip sc, sc in ch-3 sp, ch 22, sl st in same ch-3 sp, work 30 sc over the ch-22 loop, sl st in same ch-3 sp, sc in ch-3 sp, sc in next tip sc. (Still 4 sc at the tip, plus a 30-sc loop.) Petal 1 still has 32 edging sc. The finished loop is 1.3 in (3.3 cm) tall.
Leaf Edging (start at the base of Side 2):
- Up Side 2: Ch 1, sc in ch-1 sp, sc in hdc, sc in ch-2 sp, sc in dc, sc in ch-2 sp, sc in dc, sc in ch-2 sp, sc in hdc, sc in ch-1 sp, sc in last sc. (10 sc)
- Tip: Sc in tip sc, (sc, ch 4, sc) in ch-3 sp, sc in next tip sc. (4 sc, 1 ch-4 picot)
- Down Side 1: Work the Side 2 edging in reverse order. (10 sc)
- Sl st around the post at the base.
Total per leaf: 10 + 4 + 10 = 24 sc, plus 1 ch-4 picot.
Why the math works: Each petal side curves about 2 in (5.1 cm) from base to tip. At 7 sc per inch, that takes 14 sc. That is exactly one sc in each stitch and each space along the side (7 sts + 7 sps, skipping the base sc). Each leaf side curves about 1.4 in (3.6 cm), and 10 sc at 7 per inch fits it. Both sides of every petal and leaf have the same count, so the tip picot stays centered on the spine and the shape stays even. The edging adds about 0.1 in (0.3 cm) to each petal, taking it from 1.5 in (3.8 cm) to 1.6 in (4.1 cm). It takes the full ornament from 4.5 in (11.4 cm) to 4.7 in (11.9 cm) tall.
Final Blocking
- Weave in all ends along the back of the spines, where they hide in the sl sts.
- Soak the ornament in cool water for a few minutes, then roll it in a towel to remove extra water.
- Lay it face up on a blocking mat. Pin the center flat, keeping the puffs raised.
- Pin each petal tip through its picot, spacing the six tips evenly at 60-degree intervals. The top tip to the bottom tip should measure 4.7 in (11.9 cm).
- Pin the side tips so the width measures 4.1 in (10.4 cm).
- Pin the two leaf tips so they angle outward between Petals 3–4 and Petals 4–5.
- Open each lace space with a pin tip so the diagonal veins look even.
- Pin the hanging loop straight up. Add light stiffener if you want a firmer ornament. Let it dry completely before unpinning.
Final Quality-Control Checklist
- The center shows 6 even puffs around a small Rnd 1 circle
- Rnd 3 has 24 sc; Rnd 4 has 6 sc and 6 ch-5 sps
- There are 6 petals, each with a 14-sl-st spine and matching sides
- Each petal edging has 32 sc and a centered tip eyelet
- There are 2 green leaves, each with 24 edging sc, showing only between the lower petals
- The hanging loop sits on the top petal and is 1.3 in (3.3 cm) tall
- The ornament measures 4.7 in (11.9 cm) x 4.1 in (10.4 cm), or 6.0 in (15.2 cm) tall with the loop
- All ends are woven in and can’t be seen from the front
Troubleshooting
Petals curl toward the front: The spine sl sts are too tight. Work them more loosely, or use a hook 0.25 mm larger for the spine only.
Petal edges ruffle: The edging is too loose for 14 sc. Tighten your tension instead of skipping stitches, so both sides keep the same count.
Petals look lopsided: One side probably skipped a spine st. Count Side 1 and Side 2; each needs 8 sts and 7 ch-sps.
Puffs sink behind the red round: Push them forward before Rnd 3, and work the Rnd 3 sc behind the puffs, not over them.
Leaves show too much: Anchor them on the Rnd 4 sc between petals, not on the ch-5 sps.
Ornament hangs crooked: The loop is not centered on the top petal. Re-pin it while damp and make sure the loop starts from the ch-3 tip sp.
Care
Hand wash in cool water with mild soap, press the water out in a towel, and dry it flat, pinned to shape. Store it flat or hanging so it doesn’t get crushed in an ornament box.
Final Notes
The measurements build on each other in a short chain that is easy to check. A center gauge of 6 sc per 1 in (2.5 cm) makes Rnd 4 measure 1.5 in (3.8 cm). The petals add 1.5 in (3.8 cm) on each side before edging, for 4.5 in (11.4 cm) tall. The 7-sc-per-inch edging brings that to a finished 4.7 in (11.9 cm) tall and 4.1 in (10.4 cm) wide. The loop brings the hanging height to 6.0 in (15.2 cm). If your center matches, the rest of the ornament will too.
Hang one on your own tree, tie one onto a gift, or make several for a matching set.
Happy crocheting!