

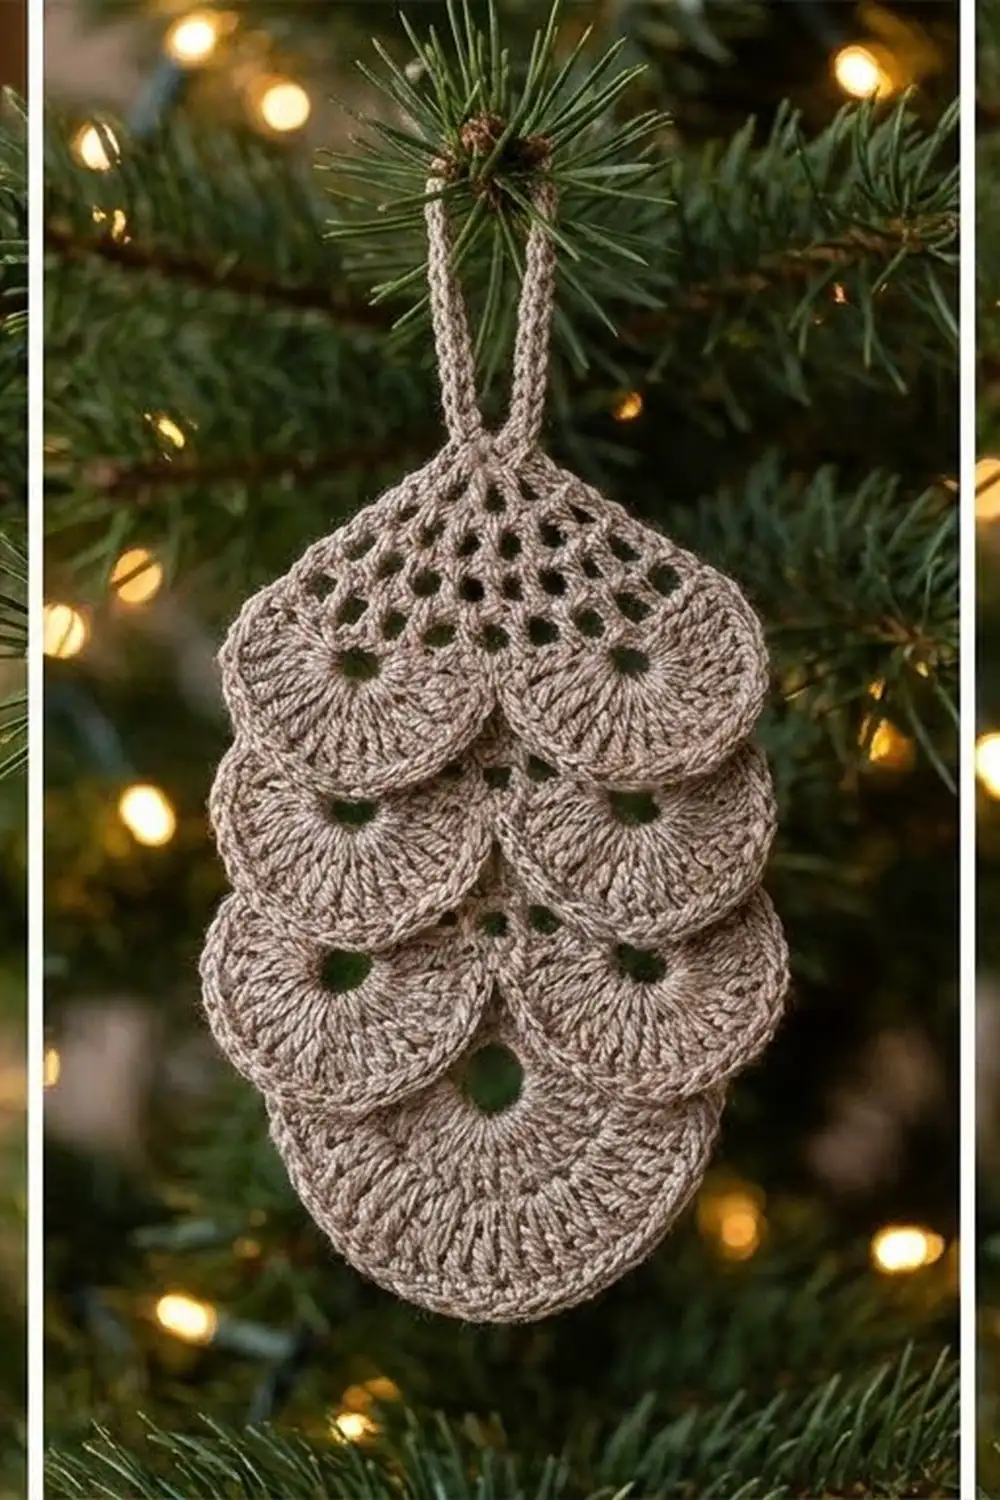
The Woodland Scales Pinecone is a flat, lacy ornament that looks like a real pinecone. Rows of fan-shaped scales sit on top of each other: two fans per tier for three tiers, then one rounded fan at the tip. An open chain mesh at the top narrows to a point and ends in a sturdy hanging loop.
The sample uses one color, a soft taupe cotton that looks like natural wood and paper. It suits Scandinavian, rustic or neutral Christmas trees, and it also looks good on gift wrap or in a garland of dried orange slices.
This pattern uses US crochet terms. The finished ornament measures 3 in (7.6 cm) wide and 4.5 in (11.4 cm) tall, not counting the hanging loop, which adds about 1.5 in (3.8 cm).
You work it in one piece and in rows, starting at the top point and growing downward. Each fan goes into a small ch-3 ring, so the stitches spread down from an eyelet. A “net” row then anchors the next ring to the center stitch of the fan above. A single round of sc edging finishes the shape and builds the hanging loop into the edge.
Finished Size and Construction
- Finished size: 3 in (7.6 cm) wide x 4.5 in (11.4 cm) tall, plus a 1.5 in (3.8 cm) loop
- Skill level: Easy+ (basic stitches; you need to count carefully)
- Terminology: US
- Yarn weight: DK / light worsted (#3) cotton
- Hook: 3.5 mm (E-4)
- Number of pieces: 1
- Layout: single flat motif, worked top to bottom
- Piece size before border: 2.75 in (7.0 cm) wide x 4.25 in (10.8 cm) tall
- Border depth: 0.125 in (0.3 cm) per edge (1 round of sc)
Materials
Yarn: Use a smooth, mercerized or combed cotton in DK weight. Cotton gives the fans crisp, defined stitches, and it holds its shape on a branch. Fuzzy or very soft acrylic will hide the eyelets and make the scales droop.
- Taupe (mushroom beige): 10 g / 25 m (27 yd) per ornament
That amount includes a margin of about 25% for your swatch, the weaving-in tails and differences in tension. One ornament uses about 8 g / 20 m.
Tools:
– 3.5 mm (E-4) crochet hook
– Tapestry needle
– Scissors
– Blocking mat and rust-proof pins
– Spray bottle with water
– Optional: diluted fabric stiffener or spray starch
Abbreviations (US Terms)
- ch – chain
- sl st – slip stitch
- sc – single crochet
- dc – double crochet
- sp(s) – space(s)
- sk – skip
- st(s) – stitch(es)
- tch – turning chain
Special terms:
– Ring: a ch-3 sp worked as (sc, ch 3, sc) into one stitch. It forms the eyelet that a fan hangs from.
– Connector: a plain ch-3 sp that links anchor points in a net row. Connectors are always skipped on the following fan row.
– Fan: 9 dc worked into one ring (11 dc for the bottom fan).
Gauge and Checkpoints
Because this is a small ornament, the first full ornament is your gauge swatch. Exact gauge is not critical for an ornament, but staying consistent makes every pinecone in a set match.
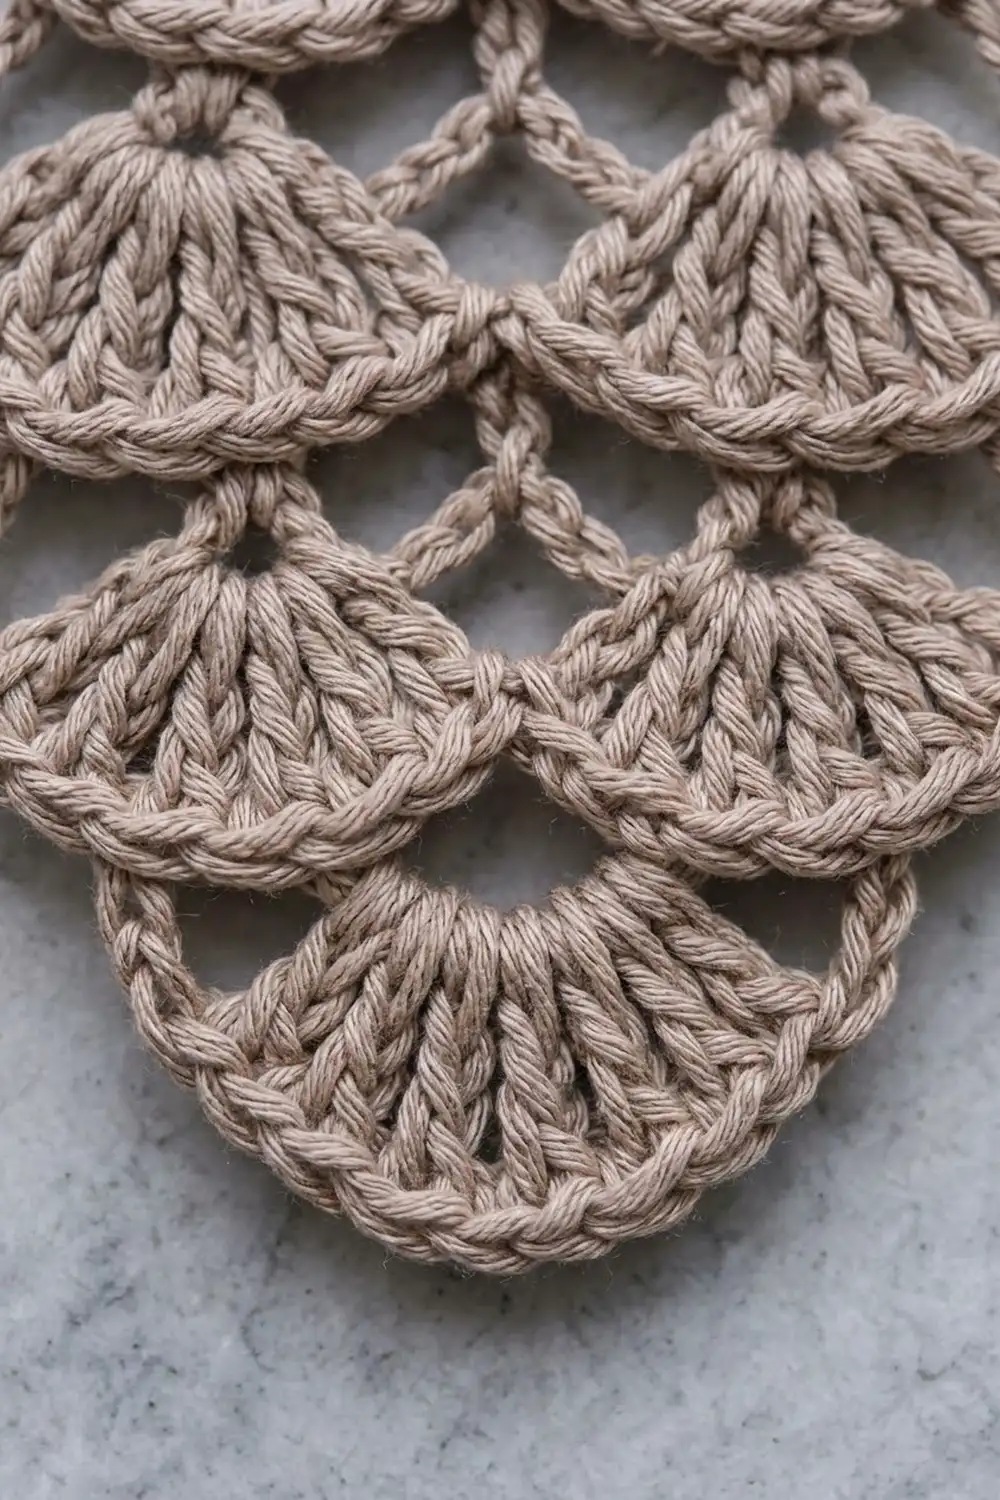
Base gauge: one 9-dc fan from Row 4 measures 1.25 in (3.2 cm) across and about 0.6 in (1.5 cm) from the ring down to the edge of the arc.
Checkpoints (measure flat, without stretching):
– After Row 2: about 1.75 in (4.4 cm) wide and 0.75 in (1.9 cm) tall
– After Row 4: 2.75 in (7.0 cm) wide and 1.5 in (3.8 cm) tall
– After Row 8: 2.75 in (7.0 cm) wide and 3.25 in (8.3 cm) tall
– After Row 10: 2.75 in (7.0 cm) wide and 4.25 in (10.8 cm) tall
– After the border: 3 in (7.6 cm) wide and 4.5 in (11.4 cm) tall
If it’s too big: go down to a 3.25 mm (D-3) hook, or check whether your connector chains are loose. Loose chains make the mesh longer.
If it’s too small: go up to a 3.75 mm (F-5) hook. If the fans cup instead of lying flat, the ring chains are probably too tight. Work the ch 3 of each ring a little more loosely.
Pattern
Row 1 is the top point of the pinecone. You work downward from it, turning at the end of every row.
Top Mesh
Foundation: Ch 4, sl st in the first ch to form a small ring.
Row 1: Ch 1, (sc, ch 5, sc, ch 5, sc) in the ring, turn. (3 sc, 2 ch-5 sps)
Row 2: Ch 1, sc in the first sc, ch 5, sc in the next ch-5 sp, ch 5, sc in the center sc, ch 5, sc in the next ch-5 sp, ch 5, sc in the last sc, turn. (5 sc, 4 ch-5 sps)
This row opens the mesh into a widening triangle of diamonds. Counting from the edge, sc 2 and sc 4 are the anchor points for the first two fans.
Row 3 (net row): Ch 1, sc in the first sc, ch 3, sk the ch-5 sp, (sc, ch 3, sc) in the next sc to make a ring, ch 3, sk the ch-5 sp, sc in the center sc, ch 3, sk the ch-5 sp, (sc, ch 3, sc) in the next sc to make a ring, ch 3, sk the ch-5 sp, sc in the last sc, turn. (7 sc, 6 ch-3 sps: 4 connectors + 2 rings)
Tier 1 – Two Fans
Row 4 (fan row): Ch 3 (counts as dc), sk the next connector and sc, 9 dc in the next ring, sk the next sc and connector, sc in the center sc, sk the next connector and sc, 9 dc in the next ring, sk the next sc and connector, dc in the last sc, turn. (21 sts: 2 edge dc including tch + 18 fan dc + 1 sc)
Each fan opens downward from its ring. The center sc pulls the two fans together into the V-shaped dip between them. Check the width now: 2.75 in (7.0 cm).
Tier 2 – Two Fans
Row 5 (net row): Ch 1, sc in the first dc, ch 3, sk 4 dc, (sc, ch 3, sc) in the next dc (the 5th, center dc of the fan), ch 3, sk 4 dc, sc in the center sc, ch 3, sk 4 dc, (sc, ch 3, sc) in the next dc (center of the second fan), ch 3, sk 4 dc, sc in the top of the tch, turn. (7 sc, 6 ch-3 sps: 4 connectors + 2 rings)
Fan math check: skip 4, work 1, skip 4 = 9 dc, so each new ring sits exactly on the center dc of its fan. That keeps the scales in straight columns.
Row 6: Repeat Row 4. (21 sts)
Tier 3 – Two Fans
Row 7: Repeat Row 5. (7 sc, 6 ch-3 sps)
Row 8: Repeat Row 4. (21 sts)
The piece should now measure 3.25 in (8.3 cm) tall.
Tier 4 – Bottom Fan
Row 9 (net row): Ch 1, sc in the first dc, ch 3, sk 4 dc, sc in the next dc (center of the fan), ch 3, sk 4 dc, (sc, ch 3, sc) in the center sc to make a ring, ch 3, sk 4 dc, sc in the next dc (center of the fan), ch 3, sk 4 dc, sc in the top of the tch, turn. (6 sc, 5 ch-3 sps: 4 connectors + 1 ring)
This time the only ring sits between the two Tier 3 fans, so the last fan is centered below them.
Row 10 (bottom fan): Ch 1, sc in the first sc, ch 3, sk the connector, sc in the next sc, ch 3, sk the connector and next sc, 11 dc in the ring, ch 3, sk the next sc and connector, sc in the next sc, ch 3, sk the connector, sc in the last sc. Do not turn and do not fasten off. (4 sc, 11 dc, 4 ch-3 sps)
The bottom fan has 11 dc instead of 9, which gives the tip a fuller, rounder shape. The open ch-3 loops on each side keep the lacy look and let the outline taper into the tip. The piece should now measure 2.75 in (7.0 cm) x 4.25 in (10.8 cm).
Border
Border gauge: 1 sc for each sc row-end, 2 sc for each dc row-end, 3 sc in each ch-3 sp and 1 sc in each stitch. One round of sc adds 0.125 in (0.3 cm) on every edge.
Border Round: Ch 1. Turn the piece so you can work down the side edge of Row 10, then work up the first side toward the top point:
- Side 1: working into the row-ends, 1 sc in Row 10, 1 sc in Row 9, 2 sc in Row 8, 1 sc in Row 7, 2 sc in Row 6, 1 sc in Row 5, 2 sc in Row 4, 1 sc in Row 3, 1 sc in Row 2, 1 sc in Row 1. (13 sc)
- Top point and hanging loop: in the foundation ring, work sc, ch 24, then 32 sc over the ch-24 loop (working around the chain, not into it), then sc in the foundation ring again. (2 sc + a loop covered with 32 sc)
- Side 2: working into the row-ends from Row 1 down to Row 10, 1, 1, 1, 2, 1, 2, 1, 2, 1, 1 sc. (13 sc)
- Bottom edge (across the tops of Row 10): sc in the sc, 3 sc in the ch-3 sp, sc in the sc, 3 sc in the ch-3 sp, sc in each of the next 5 dc, 3 sc in the 6th (center) dc, sc in each of the next 5 dc, 3 sc in the ch-3 sp, sc in the sc, 3 sc in the ch-3 sp, sc in the last sc. (29 sc)
Sl st to the first sc of the round and fasten off. Total: 57 sc around the body + 32 sc covering the loop.
Why the math works: each side has 10 row-ends, made of 7 sc rows and 3 dc rows. The 7 sc row-ends take 7 sc, and the 3 dc row-ends take 2 sc each (6 sc), so each side gets 13 sc. A dc row is about twice as tall as an sc row, so this ratio keeps the edge flat without frills or puckers. Both sides are worked the same way, so the pinecone stays symmetrical.
Along the bottom, 11 dc tops plus 2 extra sc at the center dc give 13 sc around the curve of the tip. The 2 extras give the curve enough ease and make a soft point. The 4 ch-3 loops take 3 sc each (12 sc) and the 4 sc take 1 each, for a total of 13 + 12 + 4 = 29.
The 32 sc packed over 24 chains make the loop firm and rounded, and it won’t twist. At about 10 ch per inch in DK cotton, the ch-24 loop folds to a hanging loop of about 1.5 in (3.8 cm).
Final Blocking
- Weave in all ends along the back of the dc fans, where they disappear into the stitches. Trim them close.
- Spray the ornament with water until it is evenly damp, or dip it and gently squeeze it in a towel.
- Lay it face up on the blocking mat. Pin the top point and the bottom tip first, 4.5 in (11.4 cm) apart.
- Pin the widest point of each side to make the width 3 in (7.6 cm).
- Shape each fan into a smooth semicircle with your fingertips. Make sure every ring opens as a visible eyelet.
- Open the diamonds in the top mesh and pin them if needed so they form a clean triangle.
- Pin the hanging loop straight up from the top point.
- For a stiffer ornament, brush a little diluted fabric stiffener or spray starch over it while it is pinned.
- Let it dry completely, at least 12 hours, before unpinning.
Final Quality-Control Checklist
- [ ] There are exactly 7 fans: 2 + 2 + 2 + 1.
- [ ] Each tier fan has 9 dc, and the bottom fan has 11 dc.
- [ ] Each fan has an open eyelet at its top center.
- [ ] Each lower fan hangs from the center dc of the fan above, so the columns are straight.
- [ ] The sides are symmetrical, with 13 border sc on each side.
- [ ] The bottom edge has 29 sc, and the tip is rounded.
- [ ] The finished size is 3 in (7.6 cm) x 4.5 in (11.4 cm).
- [ ] The hanging loop is firm, fully covered and about 1.5 in (3.8 cm) tall.
- [ ] All ends are hidden and nothing pokes through the lace.
Troubleshooting
The fans cup or ruffle. The ring chains are too tight for 9 dc. Work the ch 3 more loosely, or make a ring with ch 4 instead.
The scales lean to one side. You probably skipped 3 or 5 dc instead of 4 in a net row. Count the dc on each side of the anchor: there should be 4 on each side.
The edges wave after the border. You worked too many sc into the dc row-ends. Use exactly 2 per dc row and 1 per sc row.
The edges pull inward. Your border tension is tight. Loosen up, or use a hook one size larger for the border round only.
The top mesh sags. The ch-5 loops are loose. Try ch 4 in Rows 1–2 and block the diamonds open.
The hanging loop twists. Pack the sc more tightly over the chain, or add 2–4 more sc.
Care
Hand wash in cool water with mild soap, roll it in a towel and dry it flat, re-pinning if needed. If you used stiffener, you’ll need to apply it again after washing.
Final Notes
The size of this ornament depends on one measurement: a 9-dc fan that is 1.25 in (3.2 cm) wide. Two fans plus the edge stitches give a 2.75 in (7.0 cm) body. Ten rows give a height of 4.25 in (10.8 cm). A single round of sc border, with 13 sc per side and 29 across the bottom, brings it to 3 in (7.6 cm) x 4.5 in (11.4 cm). Check your first fan, follow the checkpoints and every pinecone in your set will match.
Happy crocheting!