
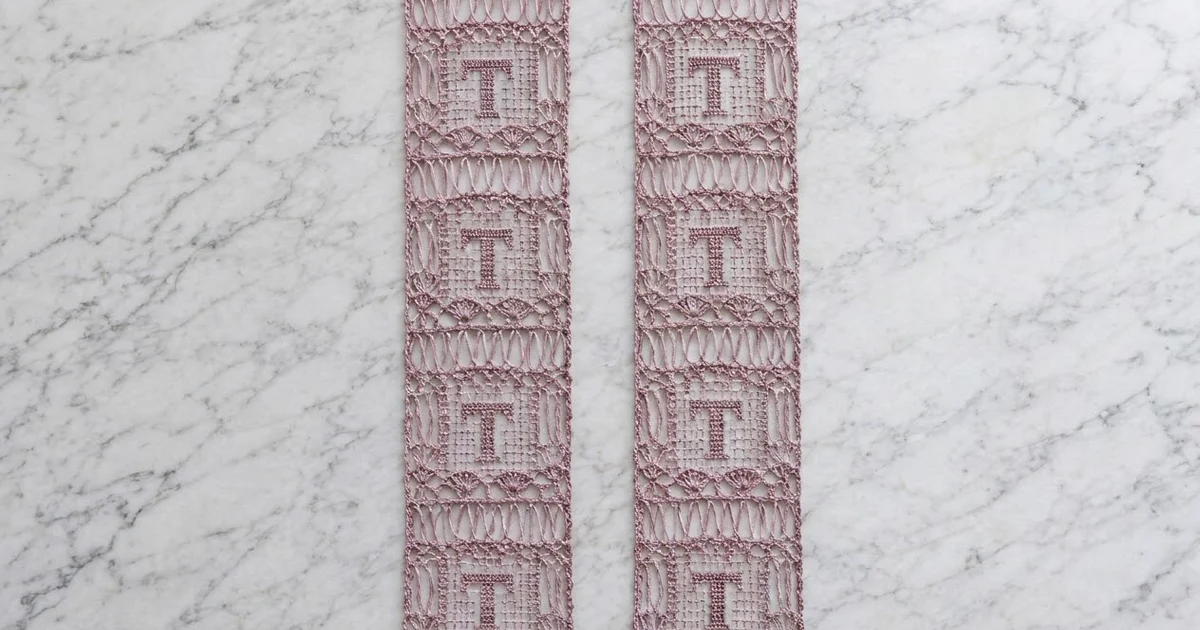
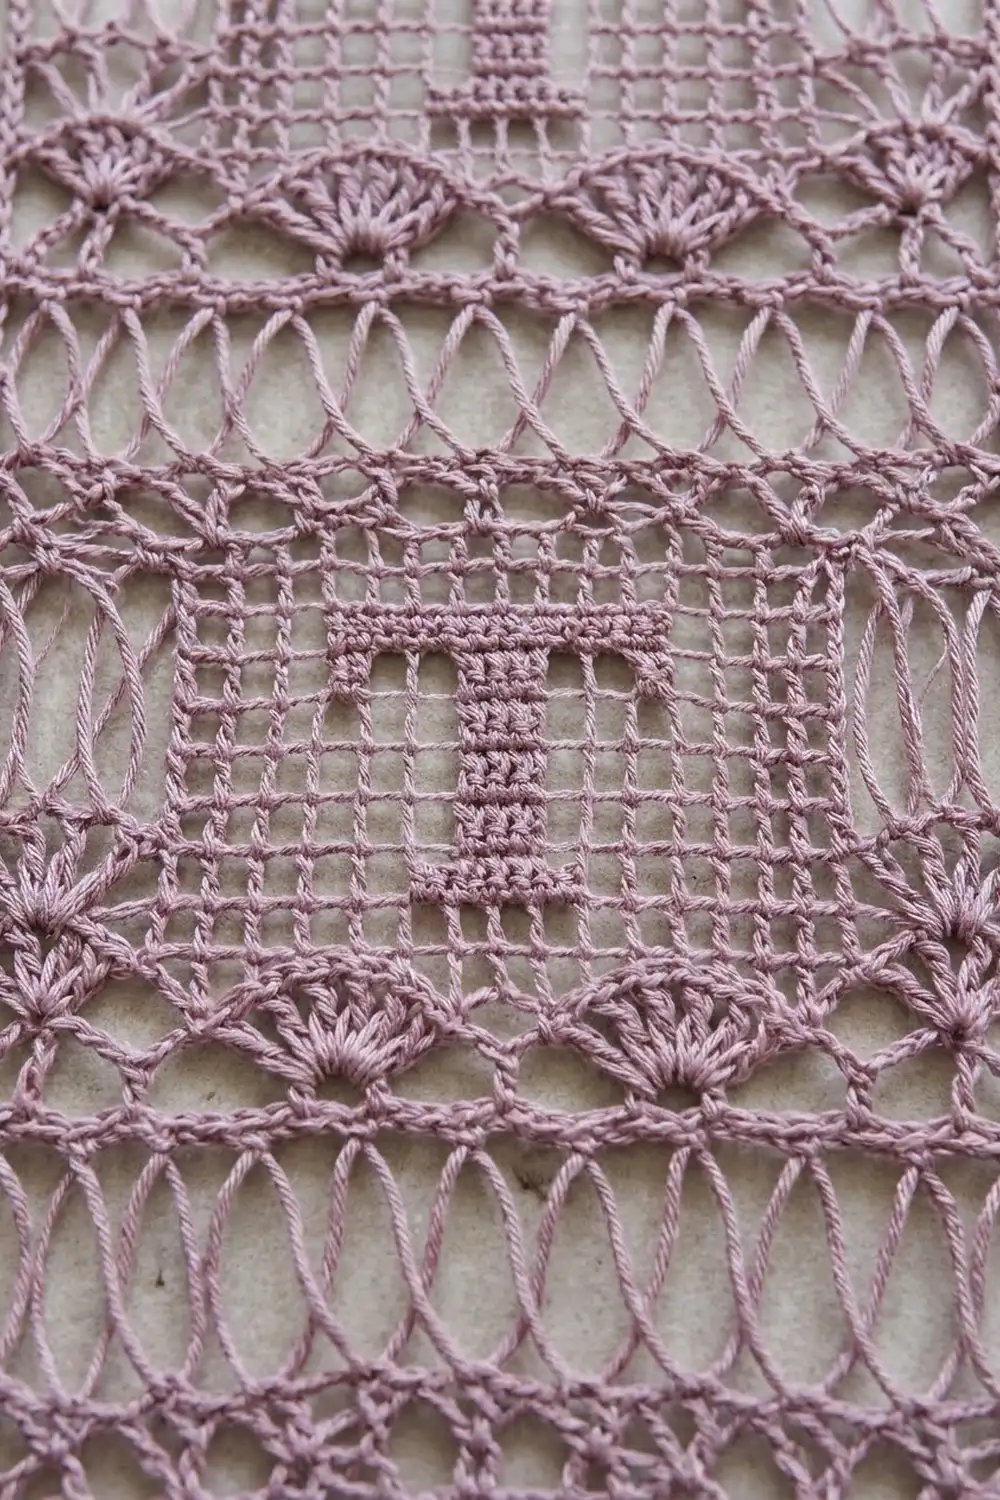
These lacy curtain panels mix three classic textures: filet mesh, upright oval chain loops and rows of open fans. Each panel stacks four filet squares, and each square has a solid serif “T” in the center. Bands of fans and slim oval loops separate the squares, and large shells form a scalloped edge along the bottom.
The sample uses one soft lilac cotton throughout. A single light color keeps the lace airy and lets daylight show through the mesh, so the letters read clearly from across a room. The style is vintage cottage: delicate but structured, with neat solid bars down each side.
The pattern is written in US crochet terms. Each finished panel measures 12.2 in (31.0 cm) wide by 52.6 in (133.6 cm) long, plus hanging loops of 1.5 in (3.8 cm).
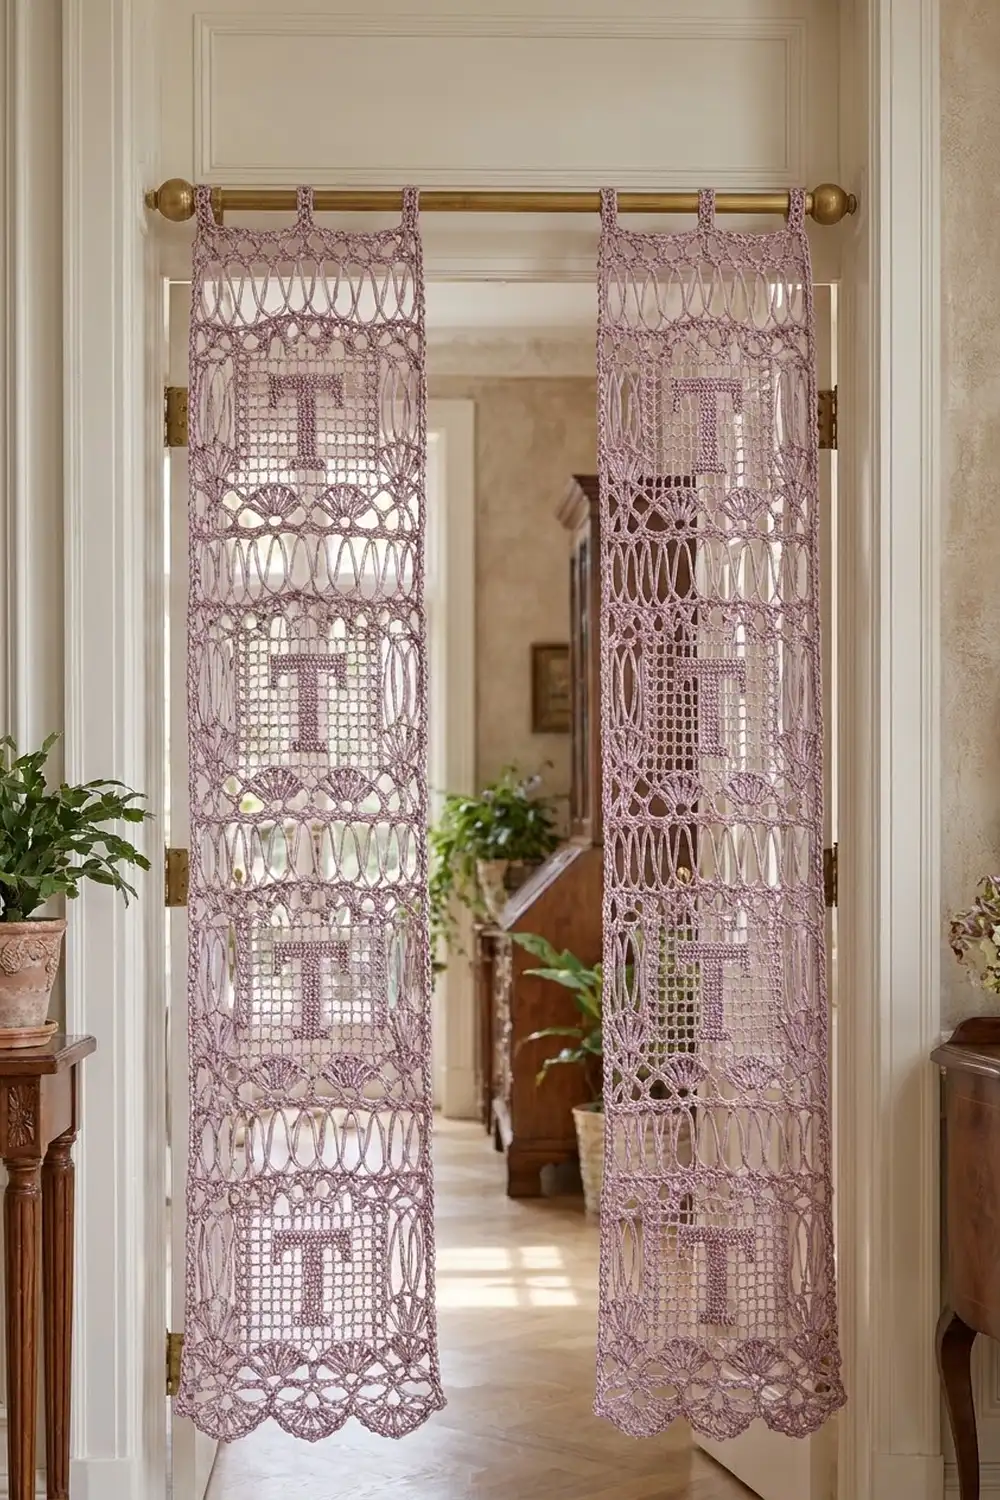
Each panel is one rectangle worked bottom to top in rows, with no seams. A two-round border goes around the edges and adds the scallops along the bottom. A last pass adds three hanging loops along the top. You make two identical panels and hang them side by side.
Finished Size and Construction
- Finished size (each panel): 12.2 in x 52.6 in (31.0 cm x 133.6 cm), plus 1.5 in (3.8 cm) loops
- Skill level: Intermediate
- Terminology: US
- Yarn weight: Sport (#2 Fine) cotton
- Hook: 3.5 mm (US E-4)
- Number of pieces: 2 identical panels, not joined
- Layout: each panel has 4 lettered blocks stacked vertically
- Body size before border: 11.4 in x 51.2 in (29.0 cm x 130.0 cm)
- Border depth: 0.4 in (1.0 cm) at the top and sides; 1.0 in (2.5 cm) at the bottom, including the scallops
Materials
Yarn: Use a smooth mercerized sport-weight cotton. Mercerized cotton gives crisp stitch definition and stays put when blocked, both of which filet work needs. Avoid fuzzy or very stretchy fibers, because a long panel will sag under its own weight.
- Lilac: 640 g / about 1,920 m total (320 g / 960 m per panel). That is thirteen 50 g balls of about 150 m each.
The quantities include a margin of about 10% for gauge swatches and differences in tension.
Tools:
– 3.5 mm (US E-4) crochet hook
– Tapestry needle
– Stitch markers
– Rust-proof pins and a blocking surface at least 14 in x 56 in (35.6 cm x 142.2 cm)
– Spray bottle
– Tape measure
Abbreviations (US Terms)
- ch – chain
- sl st – slip stitch
- sc – single crochet
- dc – double crochet
- tr – treble crochet (yo twice)
- trtr – triple treble (yo 4 times, then pull through 2 loops 5 times)
- sk – skip
- sp – space
- st(s) – stitch(es)
- RS – right side
Special stitches
- Fan: (dc, ch 1) 6 times in the same st, then dc in that same st. One Fan has 7 dc and 6 ch-1 sps, which counts as 13 sts.
- Oval: (sc, ch 13, sc) in the same st. The ch-13 loop stands up and folds into a slim oval. It counts as 1 st position, and its 7th ch is the tip of the oval.
- Open mesh (O): ch 1, sk next st, dc in next st. Each mesh covers 2 sts.
- Block (B): dc in each of the next 2 sts. Each block covers 2 sts.
Gauge and Checkpoints
Gauge: 20 dc and 10 dc rows = 4 in (10.2 cm), blocked.
Test first: Work a swatch of Rows 1–6 (the foundation row, fan band and oval band) before starting a full panel. Block the swatch, then measure it:
- Width after Row 1: 11.4 in (29.0 cm)
- Height after fan band (Rows 1–3): 1.2 in (3.0 cm)
- Height after oval band (Rows 1–6): 2.8 in (7.1 cm)
- Height after the first lettered block (Row 30): 12.4 in (31.5 cm)
- Height after the fourth lettered block (Row 117): 48.4 in (122.9 cm)
- Height of the finished body (Row 123): 51.2 in (130.0 cm)
Too big? Go down a hook size, or tighten your dc rows. Too small? Go up a hook size. Width is the most important number because the side border count depends on it. If the panel is wider or narrower but the row gauge is right, the pattern still works, but your finished width will change.
The parts of the panel have these heights:
– Each dc row: 0.4 in (1.0 cm)
– The sc row in the oval band: 0.2 in (0.5 cm)
– The trtr row: 1.0 in (2.5 cm)
Panel Pattern
Every row is 57 sts wide. Turning chains count as sts unless stated otherwise.
Foundation
Ch 59.
Row 1 (RS): Dc in 4th ch from hook (the skipped 3 ch count as a dc), dc in each ch across. Turn. (57 sts)
Repeating Block (worked 4 times)
The first block is Rows 2–30, the second is Rows 31–59, the third is Rows 60–88 and the fourth is Rows 89–117. Each block has 29 rows.
Fan band
Block row 1 (Fan row): Ch 3 (counts as dc), sk 6 sts, Fan in next st, sk 6 sts, dc in next st; rep from * 3 more times. Turn. (57 sts: 5 dc + 4 Fans of 13 sts)*
The single dc stitches land on sts 1, 15, 29, 43 and 57, and the Fans land on sts 8, 22, 36 and 50. Each Fan opens upward, and V-shaped gaps open between the Fans and the single dc.
Block row 2: Ch 3, dc in each dc and each ch-1 sp across. Turn. (57 dc)
Oval band
Block row 3: Ch 1 (does not count), sc in first st, ch 1, sk 1, Oval in next st, ch 1, sk 1, sc in next st; rep from * 13 more times. Turn. (57 sts: 15 sc + 14 Ovals + 28 ch)*
Block row 4: Ch 6 (counts as trtr), ch 1, sc in the 7th ch (tip) of next Oval loop, ch 1, trtr in next single sc; rep from * 13 more times. Turn. (57 sts: 15 trtr + 14 sc + 28 ch)*
Pull each loop straight up before you anchor it. Each loop should now stand as a slim upright oval between two trtr posts.
Block row 5: Ch 3, dc in each st and each ch-1 sp across. Turn. (57 dc)
Checkpoint: After Row 6, the first time through the block, the piece should measure 2.8 in (7.1 cm).
Filet Square with the Letter T
Each filet row is built like this:
- Ch 3 (counts as dc), then dc in the next 4 sts. This makes a solid side bar of 5 dc.
- Work 24 meshes following the row sequence below.
- Dc in the last 4 sts, with the last dc in the top of the turning ch.
- Turn.
Every filet row has 5 + 48 + 4 = 57 sts. The T is symmetrical, so the instructions read the same on RS and WS rows.
- Block rows 6–9: 24 O.
- Block rows 10–11 (foot serif): 8 O, 8 B, 8 O.
- Block rows 12–19 (stem): 10 O, 4 B, 10 O.
- Block rows 20–21 (top serifs): 4 O, 2 B, 4 O, 4 B, 4 O, 2 B, 4 O.
- Block rows 22–25 (crossbar): 4 O, 16 B, 4 O.
- Block rows 26–29: 24 O.
Square size: The mesh area is 49 sts wide (9.8 in / 24.9 cm) and 24 rows tall (9.6 in / 24.4 cm), so it looks nearly square.
Repeat Block rows 1–29 three more times, ending after Row 117.
Checkpoint: 48.4 in (122.9 cm).
Top Band
- Rows 118–119: Work Block rows 1–2 (fan band).
- Rows 120–122: Work Block rows 3–5 (oval band).
- Row 123: Ch 3, dc in each st across. (57 dc) Do not fasten off.
Body checkpoint: 11.4 in x 51.2 in (29.0 cm x 130.0 cm).
Row Count Summary
| Row type | Rows per panel | Sc per row end on the sides |
|---|---|---|
| Dc rows | 113 | 2 each |
| Sc rows | 5 | 1 each |
| Trtr rows | 5 | 5 each |
The dc rows are Row 1, 27 dc rows per block (x 4) and 4 dc rows in the top band. The 113 + 5 + 5 rows add up to all 123 rows.
Make All Pieces
Make 2 panels in lilac, about 320 g / 960 m each. Both panels are identical, so either one can hang on the left.
Layout of one panel (top to bottom):
[ o   o   o ]   3 hanging loops
[ border    ]
[ ovals     ]   top band
[ fans      ]
[    T      ]   block 4
[ ovals     ]
[ fans      ]
[    T      ]   block 3
[ ovals     ]
[ fans      ]
[    T      ]   block 2
[ ovals     ]
[ fans      ]
[    T      ]   block 1
[ ovals     ]
[ fans      ]
[ dc row    ]   Row 1
[ scallops  ]
Joining
The panels are not joined. They hang separately on the rod, side by side, so each one can be pulled aside on its own, as shown in the doorway.
Check before hanging: Both panels should match within 0.4 in (1.0 cm) in length after blocking. If they don’t, re-block the shorter one with gentle downward tension.
Border
Border gauge: 5 sc = 1 in (2.5 cm) along every edge. This matches the dc gauge of 20 sts per 4 in (10.2 cm).
Corners are worked as ch-2 spaces. The corner spaces are not counted in the per-side numbers below.
Round 1 (RS): Continue from Row 123 without fastening off. Ch 1, then work around the panel:
- Top edge: sc in each st across (57 sc), then ch 2 for the corner.
- Side: work down the row ends. Put 2 sc around each dc row end, 1 sc in each sc row end and 5 sc around each trtr row end (256 sc). Ch 2 for the corner.
- Bottom edge: sc in the base of each foundation ch (57 sc), then ch 2 for the corner.
- Second side: work as for the first side (256 sc), then ch 2.
- Join with a sl st to the first sc.
Round 1 totals: 57 + 256 + 57 + 256 = 626 sc and 4 ch-2 corners.
Why the math works:
– Sides: 113 x 2 + 5 x 1 + 5 x 5 = 256 sc. At 5 sc per inch that is 51.2 in, the exact body length.
– Top and bottom: 57 sc is 1 sc per existing st. At 5 sc per inch that is 11.4 in, the exact body width.
The edges stay flat with no stretching or rippling.
Round 2: Ch 1, then:
- Top edge: sc in each sc (57 sc). In each top corner sp, work (sc, ch 2, sc) for 2 sc per corner.
- Each side: sc in each sc (256 sc).
- Bottom corners: work 1 sc in each bottom corner sp.
- Bottom edge, scallops: sc in first sc, *sk 6 sc, 13 tr in next sc, sk 6 sc, sc in next sc; rep from * 3 more times.
- Join with a sl st to the first sc.
Bottom edge count: 5 sc + 4 shells of 13 tr worked over the 57 existing sc (1 + 4 x 14 = 57). This gives 4 scallops centered under the 4 Fans of Row 2.
Round 2 totals: 57 + 256 + 256 = 569 sc on the top and sides, 4 sc at the top corners, 2 sc at the bottom corners, and 5 sc + 52 tr along the bottom.
After Round 2:
– Width: 12.2 in (31.0 cm)
– Length: 52.6 in (133.6 cm). That is 51.2 in body + 0.4 in border at the top + 0.2 in sc round + 0.8 in (2.0 cm) scallops at the bottom.
Hanging loops (along the top): Sl st into the top-right corner sp, then sl st in each sc along the top edge. When you reach sts 3, 29 and 55 of the 57 top sc, make a loop:
- Ch 24, sl st in the same st.
- Work 30 sc into the ch-24 ring.
- Sl st in the same base st and continue along the top.
Fasten off and weave in the ends. Each loop stands about 1.5 in (3.8 cm) tall and fits a rod up to 1 in (2.5 cm) thick.
Final Blocking
- Soak the panel in cool water for 15 minutes, then press the water out gently. Do not wring it.
- Roll the panel in a towel to remove extra moisture.
- Lay it flat on the blocking surface, RS up.
- Pin the four corners to 12.2 in x 52.6 in (31.0 cm x 133.6 cm).
- Pin along both sides every 2 in (5.1 cm) so the edges are dead straight.
- Pin the tip of each scallop so the curves are even.
- Ease the oval loops into straight, upright ovals. Square each filet mesh with your fingertips.
- Let the panel dry completely, then unpin it. Block the second panel to the same pin marks.
Final Quality-Control Checklist
- Every row has 57 sts. Check the Fan rows and trtr rows especially.
- Each T is centered, with 4 open meshes at each end of the crossbar.
- All 14 Ovals in each band stand upright, with no twisted loops.
- Each side has 256 sc and the top and bottom each have 57 sc.
- There are 4 even scallops along the bottom.
- The 3 hanging loops are evenly spaced and the same size.
- Both panels measure 12.2 in x 52.6 in (31.0 cm x 133.6 cm).
- All ends are woven into solid areas, not into the mesh.
Troubleshooting
- Panel pulls narrower at the oval bands: The ch-1 sps are too tight. Make them looser, or use the next hook size up for Block rows 3–4 only.
- Ovals twist or lean: Straighten each loop before you work into its 7th ch in Block row 4.
- Fans cup instead of spreading: The ch-1 sps are too tight. Loosen them a little.
- Filet meshes look tall, not square: Pull up each dc a little less, or try a dc with a shorter top loop.
- Side edges ripple: Too many sc in the border. Check the row-end counts. Edges pucker: too few.
- Panels differ in length: Block the shorter one with gentle pinned tension, or remove a dc row from the top band before you add the border.
Care
Hand wash in cool water with a mild detergent and dry flat, re-pinning if needed. Iron on a low setting through a pressing cloth to refresh the filet mesh.
Final Notes
The measurement chain is simple. At 20 dc per 4 in (10.2 cm), the 57-st width gives 11.4 in (29.0 cm). Each lettered block adds 12.0 in (30.5 cm), and the top band brings the body to 51.2 in (130.0 cm). A 5-sc-per-inch border turns that into 12.2 in x 52.6 in (31.0 cm x 133.6 cm). Check the gauge, count to 57 on every row, and the two panels will match.
Happy crocheting!