

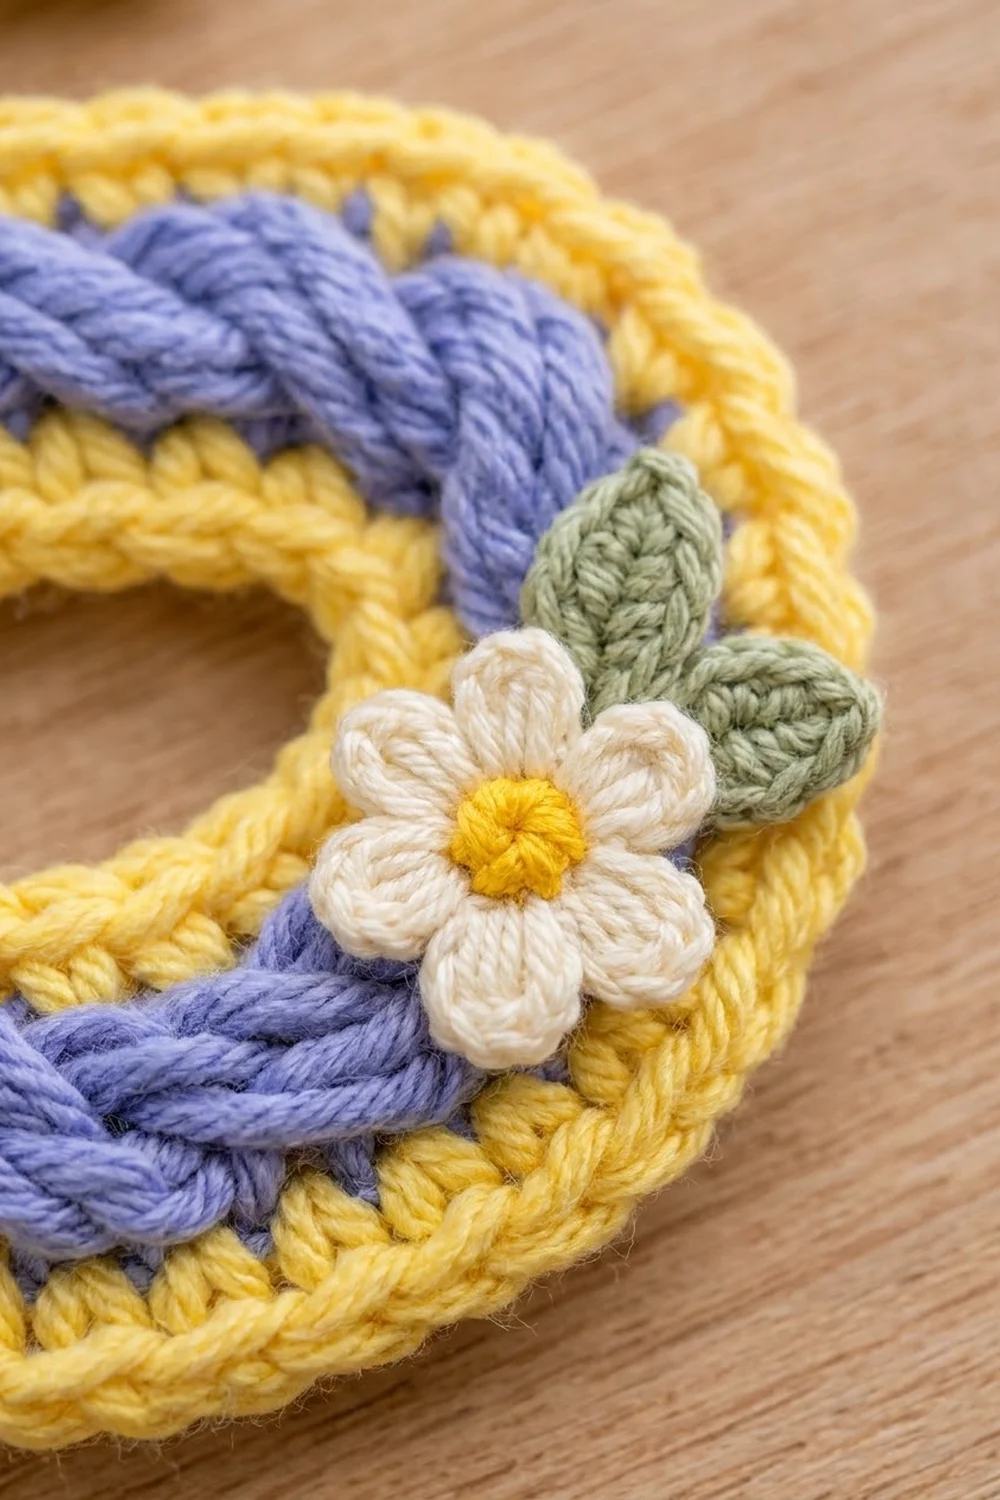
This little keychain is a crocheted letter S with a chunky periwinkle braid down the middle and a sunny yellow outline around it. Three tiny cream daisies with yellow centers and sage green leaves sit along the curves. A gold split ring on a short chain lets you clip it onto a bag, your keys, or a zipper pull.
The colors are soft and springlike: periwinkle blue, butter yellow, cream, and sage. The piece has a lot of texture and depth. The braid stands up from the base like a rope, and the slip-stitch edge keeps the outline crisp.
This pattern uses US crochet terms. The finished letter measures about 3.7 in (9.4 cm) tall and 2.7 in (6.9 cm) wide, and the strip is 1 in (2.5 cm) wide.
Construction is simple. You work a yellow strip in rounds around a foundation chain. Increases on the outer edges and decreases on the inner edges shape the S curves. Then you braid three periwinkle chain cords and sew the braid down the center. Last, you add the daisies and leaves and attach the hardware.
Finished Size and Construction
- Finished size: 3.7 in (9.4 cm) tall x 2.7 in (6.9 cm) wide
- Skill level: Advanced beginner
- Terminology: US crochet terms
- Yarn weight: DK (light #3) cotton
- Hook: 3.0 mm for the base and flowers; 3.5 mm for the braid cords
- Number of pieces: 1 letter base, plus appliqués (1 braid, 3 daisies, 6 leaves)
- Layout: One single letter S, worn as a keychain
- Strip width before border: 0.6 in (1.5 cm)
- Letter size before border: 3.3 in (8.4 cm) x 2.3 in (5.8 cm)
- Border depth: 0.2 in (0.5 cm) on every edge
Materials
Choose a smooth mercerized or combed cotton in DK weight. Cotton holds its shape, shows the stitches clearly, and stands up to daily handling on a bag. Avoid fuzzy or very splitty yarn, because the braid needs clean, round cords.
- Yellow: 6 g / 15 m (base, border, daisy centers)
- Periwinkle: 5 g / 12 m (braid, worked with yarn held double)
- Cream: 2 g / 5 m (daisy petals)
- Sage green: 2 g / 5 m (leaves)
All quantities include about 25% extra for swatching, tails, and sewing.
Tools:
- 3.0 mm and 3.5 mm crochet hooks
- Tapestry needle
- Stitch markers (2)
- Gold split key ring, 1 in (2.5 cm)
- Gold chain, 1.2 in (3.0 cm), with an 8 mm jump ring at each end
- Flat-nose pliers
- Rustproof pins, foam blocking mat, spray starch (optional)
- Scissors and a ruler
Abbreviations (US Terms)
- ch: chain
- sl st: slip stitch
- sc: single crochet
- hdc: half double crochet
- dc: double crochet
- sc2tog: single crochet 2 together
- inc: 2 sc in the same stitch
- MR: magic ring
- st(s): stitch(es)
- rnd: round
Special stitch (sc2tog): Insert hook in next st, yarn over, pull up a loop (2 loops on hook). Insert hook in following st, yarn over, pull up a loop (3 loops on hook). Yarn over and pull through all 3 loops. This decreases 1 stitch.
Gauge and Checkpoints
Gauge with the 3.0 mm hook in sc: 22 sts and 24 rnds = 4 in (10.2 cm). That equals 5.5 sts and 6 rnds per inch.
Because the item is so small, test the base itself instead of making a separate swatch. Work Rnds 1 and 2, then check:
- After Rnd 1: The straight strip measures 6.3 in (16.0 cm) long and 0.3 in (0.8 cm) wide.
- After Rnd 2: The strip is 0.6 in (1.5 cm) wide and starts to curve into an S. Pinned flat, it measures about 3.3 in (8.4 cm) x 2.3 in (5.8 cm).
- After Rnd 3: The strip is 0.9 in (2.3 cm) wide.
- After Rnd 4: The strip is 1 in (2.5 cm) wide and the letter is 3.7 in (9.4 cm) x 2.7 in (6.9 cm).
Too big? Go down to a 2.75 mm hook. Too small? Go up to a 3.25 mm hook. Stitch counts stay the same; only the size changes. If you change the base hook, change the braid hook by the same amount so the braid still fits the strip.
Letter Base (Yellow)
The base is worked in joined rounds around both sides of a foundation chain. Each long side of the strip has 33 stitches. Each rounded end grows by 3 stitches per round, like half of a flat circle.
Each side has two shaping zones. The first zone is the outer edge of one curve, where you increase. The second zone is the inner edge of the other curve, where you decrease. An S looks the same when turned upside down, so both sides use exactly the same sequence.
With yellow and the 3.0 mm hook, ch 36.
Rnd 1: Sc in 2nd ch from hook (this st belongs to End A), sc in next 33 ch (Side 1), 3 sc in last ch (End B). Rotate and work along the bottom loops of the chain: sc in next 33 ch (Side 2), 2 sc in last ch (same ch as first sc, completing End A). Join with sl st to first sc. (72 sts: End A 3, Side 1 33, End B 3, Side 2 33)
Place a marker in the first st of the round and move it up each round.
Side shaping, Rnd 2 (worked over 33 sts): Sc in next 3 sts, [inc in next st, sc in next 2 sts] 4 times, sc in next 3 sts, [sc2tog, sc in next st] 4 times, sc in next 3 sts. This works into 3 + 12 + 3 + 12 + 3 = 33 sts and makes 3 + 16 + 3 + 8 + 3 = 33 sts.
Rnd 2: Ch 1, inc in first st (End A). Work Side shaping Rnd 2 across Side 1. Inc in each of next 3 sts (End B). Work Side shaping Rnd 2 across Side 2. Inc in each of last 2 sts (End A). Join with sl st to first sc. (78 sts: End A 6, Side 1 33, End B 6, Side 2 33)
Lay the strip flat. Near End A, the increase zone on Side 1 should start bending the strip toward Side 2. If your letter looks like a backward S, turn it over and use the other face as the right side.
Checkpoint: The strip should be 0.6 in (1.5 cm) wide. Pin it into an S shape. It should measure about 3.3 in (8.4 cm) tall and 2.3 in (5.8 cm) wide.
Braid (Periwinkle)
The braid is three chain cords plaited together, which gives the raised rope texture.
With periwinkle held double and the 3.5 mm hook, ch about 44, until the cord measures 7.4 in (18.8 cm). Fasten off, leaving 4 in (10.2 cm) tails. Make 3 cords.
Knot the three cords together at one end with their tails. Pin the knot to your blocking mat and braid firmly and evenly. Tie off the other end. The finished braid measures about 6 in (15.2 cm) long and 0.4 in (1.0 cm) wide. If it comes out the wrong length, add or remove a few chains on each cord.
Don’t trim the tails yet. You will use them to tuck in and secure the ends.
Border (Yellow)
The border has two rounds. The sc round finishes the curve shaping, and the slip-stitch round firms the edge.
Border gauge: Rnd 3 adds 0.15 in (0.4 cm) to each edge, and Rnd 4 adds about 0.05 in (0.1 cm). Together they make a border 0.2 in (0.5 cm) deep.
Side shaping, Rnd 3 (worked over 33 sts): Sc in next 3 sts, [inc in next st, sc in next 3 sts] 4 times, sc in next 3 sts, [sc2tog] 4 times, sc in next 3 sts. This works into 3 + 16 + 3 + 8 + 3 = 33 sts and makes 3 + 20 + 3 + 4 + 3 = 33 sts.
Rnd 3: Ch 1, sc in first st, inc in next st (End A). Work Side shaping Rnd 3 across Side 1. [Sc in next st, inc in next st] 3 times (End B). Work Side shaping Rnd 3 across Side 2. [Sc in next st, inc in next st] 2 times (End A). Join with sl st to first sc. (84 sts: End A 9, Side 1 33, End B 9, Side 2 33)
Rnd 4: Sl st loosely in each st around. Join to first sl st. (84 sl sts: End A 9, Side 1 33, End B 9, Side 2 33)
Fasten off and weave in the ends on the wrong side.
Why the math works: Each side starts with 33 sts in Rnd 1. In Rnd 2, the outer zone gains 4 sts and the inner zone loses 4 sts, so the side stays at 33. Rnd 3 does the same (+4, −4). Because the side count never changes, the long edges don’t ruffle. The extra length just moves to the outside of each curve, and that bends the strip.
The ends grow 3, 6, 9. That is the half-circle rate of 3 sts per round, so the tips lie flat and round. The totals check out: 33 + 33 + 3 + 3 = 72, then 33 + 33 + 6 + 6 = 78, then 33 + 33 + 9 + 9 = 84.
Checkpoint: The strip should be 1 in (2.5 cm) wide and the letter about 3.7 in (9.4 cm) x 2.7 in (6.9 cm). That is 3.3 in + 0.2 in + 0.2 in = 3.7 in tall, and 2.3 in + 0.2 in + 0.2 in = 2.7 in wide.
Daisies (Make 3)
Rnd 1 (yellow): With the 3.0 mm hook, 6 sc in MR. Pull the ring closed and join with sl st to first sc. Fasten off. (6 sts)
Rnd 2 (cream): Join cream in any st. (Sl st, ch 2, 2 dc, ch 2, sl st) in same st, move to next st; repeat from * 5 more times. (6 petals)*
Fasten off, leaving a 6 in (15.2 cm) tail for sewing. Each daisy measures about 0.9 in (2.3 cm) across.
Leaves (Make 6)
With sage and the 3.0 mm hook, ch 5.
Rnd 1: Sc in 2nd ch from hook, hdc in next 2 ch, (sc, ch 2, sc) in last ch for the tip. Working along the other side of the chain: hdc in next 2 ch, sc in next ch. Join with sl st to first sc. (8 sts plus 1 ch-2 tip)
Fasten off, leaving a 6 in (15.2 cm) tail. Each leaf is about 0.6 in (1.5 cm) long.
Assembly
- Position the braid. Lay the base right side up. Place the braid along the center of the strip so it covers Rnd 1 and the inner half of Rnd 2. Stop the braid about 0.2 in (0.5 cm) short of each tip so a yellow rim shows all the way around.
- Tuck in the ends. Thread the braid tails onto the needle, pass them to the wrong side, and knot them together under each end of the braid.
- Sew the braid. With periwinkle, sew small hidden stitches through the side of the braid and into Rnd 2 every 0.25 in (0.6 cm). Ease the braid around the curves without stretching it.
- Add the leaves. Sew 2 leaves at each daisy position, angled outward in a V so they peek out from behind the daisy.
- Add the daisies. Place one daisy on the top-right tip, one on the left side where the upper curve turns, and one on the lower-right curve. Sew through the yellow centers so the petals stay free.
- Attach the hardware. Open a jump ring with pliers and push it through Rnds 3 and 4 at the top of the upper curve, 2 sts in from the edge. Hook on the chain and close the ring. Then attach the split ring to the other end of the chain.
Final Blocking
- Mist the finished letter lightly with water, or dampen it and press out the extra water in a towel.
- Lay it right side up on the blocking mat.
- Pin the outer edge of each curve first, then the inner edges, to make a smooth S.
- Measure: it should be 3.7 in (9.4 cm) tall and 2.7 in (6.9 cm) wide, with a 1 in (2.5 cm) strip.
- Lift the daisy petals with your fingertip so they sit open.
- For extra firmness, spray on a light coat of starch.
- Let it dry completely before you unpin it, usually 6 to 8 hours.
Final Quality-Control Checklist
- Rnd 4 has 84 sl sts: 33 on each long side and 9 at each end.
- The letter reads as an S from the right side.
- The strip is an even 1 in (2.5 cm) wide all the way along.
- Yellow shows on both sides of the braid and around both tips.
- The braid tension is even, with no loose loops or gaps.
- All three daisies have 6 open petals and 2 leaves each.
- The jump rings are fully closed, with no gap to snag yarn.
- All tails are woven in on the back.
Troubleshooting
The strip twists or cups: Your tension is tighter on one side. Block firmly with starch, and work the inner zones a little looser next time.
The curves are too shallow: Check that the increase and decrease zones are in the right order on each side. When blocking, pin the outer curves tightly.
The outer edges ruffle: Rnd 4 is too loose. Rework it with a smaller hook or firmer tension.
The braid is too short: Add 2 to 4 chains to each cord. Too long: Remove the same number of chains from every cord, not just one.
The braid hides all the yellow: Your cords are too thick. Use a 3.25 mm hook or braid more tightly.
The jump ring pulls through: Move it 1 st deeper so it goes through both Rnds 3 and 4.
Care
Hand wash in cool water with mild soap, press out the water in a towel, and dry flat. If the letter softens over time, reshape it and starch it again.

Final Notes
At a gauge of 5.5 sts per inch, Rnd 1 gives a strip 6.3 in (16.0 cm) long. Rnd 2 widens it to 0.6 in (1.5 cm) and bends it into an S that measures 3.3 in (8.4 cm) x 2.3 in (5.8 cm). The border rounds add 0.2 in (0.5 cm) to every edge. That gives a 1 in (2.5 cm) strip and a finished letter of 3.7 in (9.4 cm) x 2.7 in (6.9 cm). The 6 in (15.2 cm) braid then fits down the center with yellow showing all the way around.
Once you’ve made one S, you can use the same strip method for other curved letters. Clip it onto your favorite tote and enjoy a little burst of spring.
Happy crocheting!