
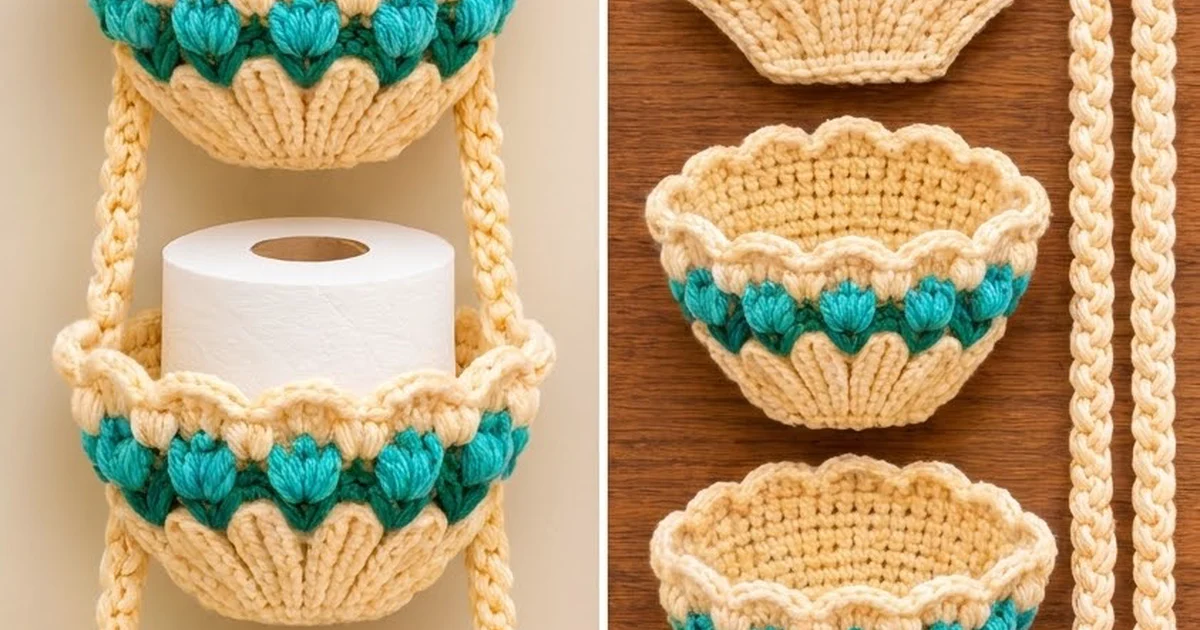
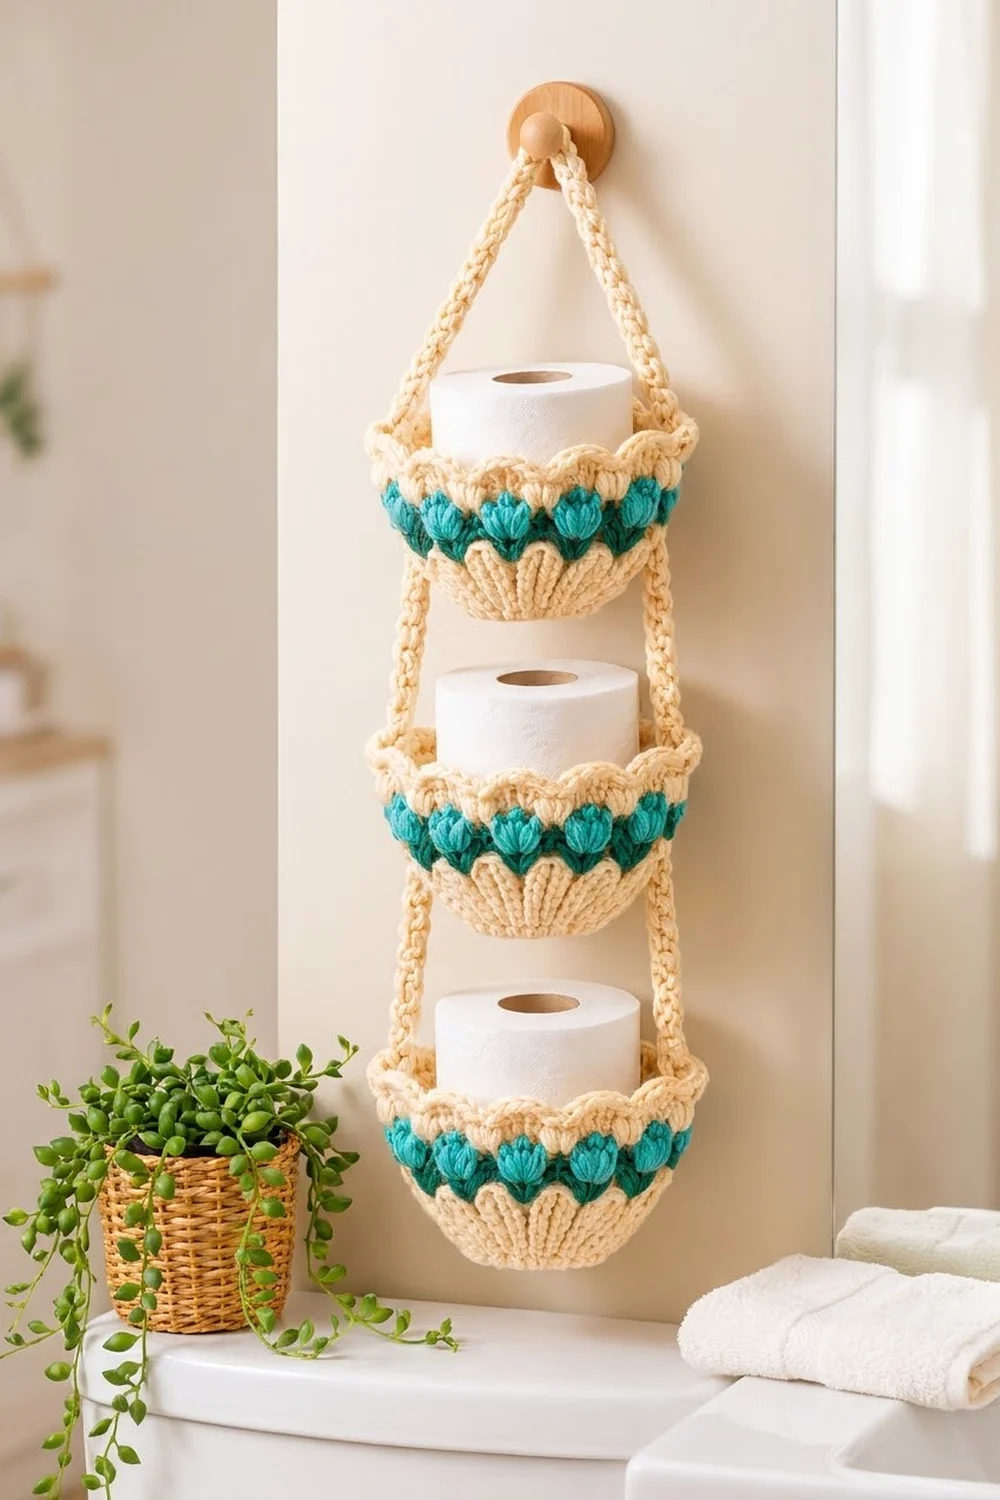
This hanging organizer has three cream bowls joined by two braided straps. It hangs from one wall peg and holds three spare toilet rolls, though it works just as well for hand towels, soaps or small plants.
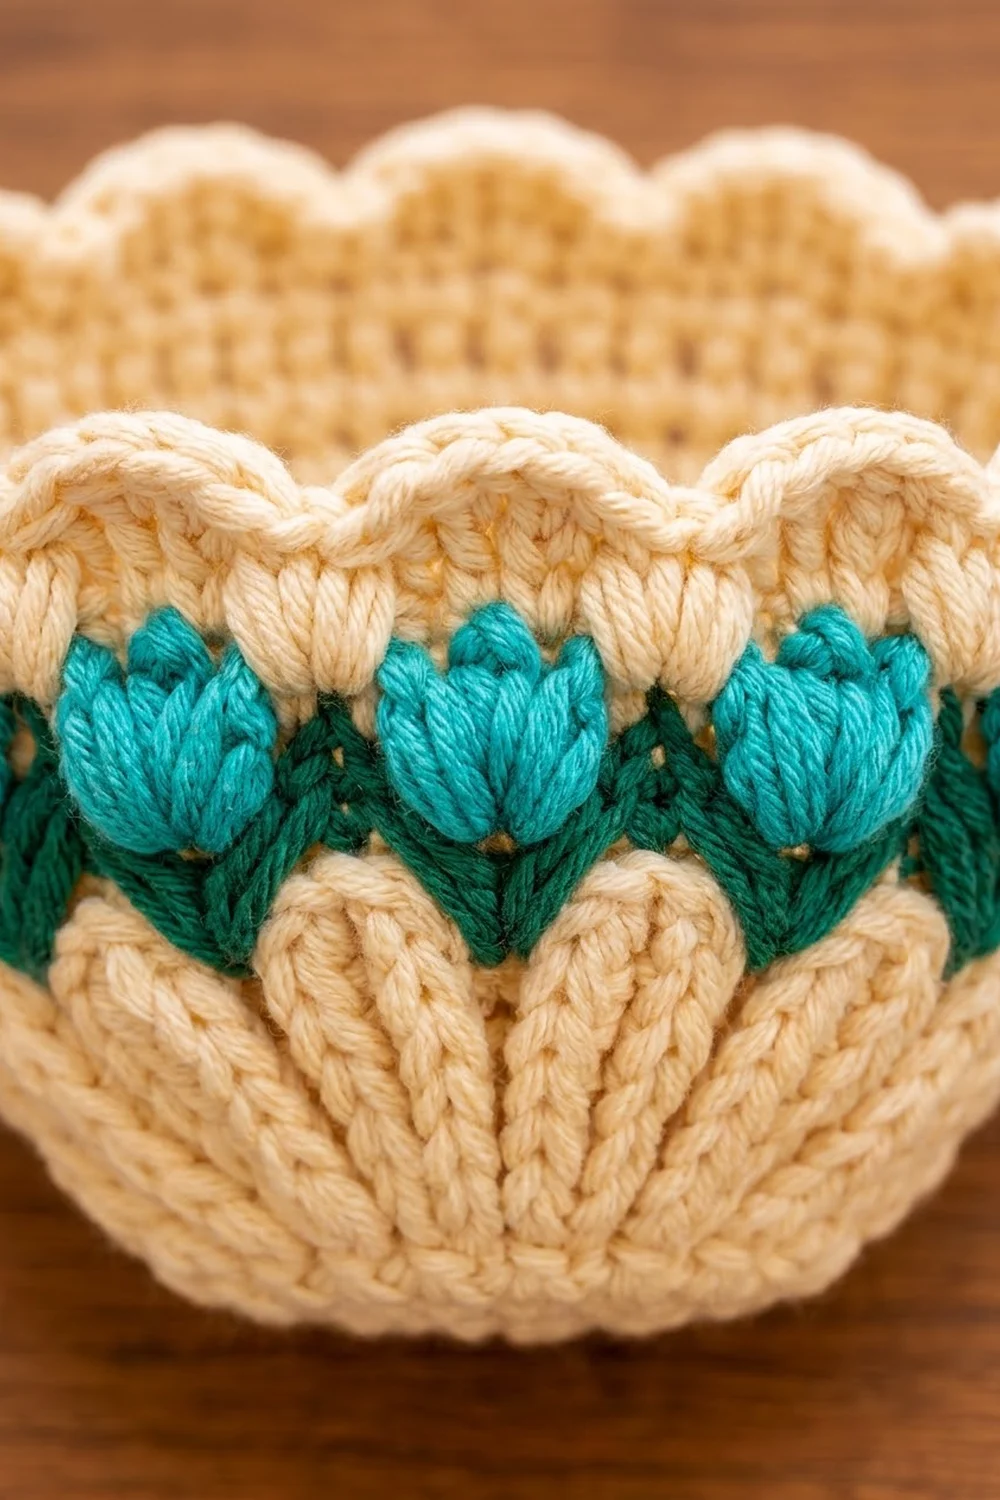
Each basket has three textures stacked on top of each other. Fan-shaped shells with raised ribs make up the lower wall. Above them is a band of turquoise-teal puff buds cradled in dark emerald leaves, and a scalloped rim with a rolled, cord-like edge sits on top. The palette is calm and fresh, with soft cream, bright teal and deep green.
The pattern uses US crochet terms. Each finished basket is about 7.5 in (19.1 cm) across at the opening and 3.5 in (8.9 cm) tall. The full organizer hangs about 25 in (63.5 cm) from the peg to the bottom of the lowest basket.
Each basket is worked in joined rounds from a flat base up through the walls, the band and the rim. The straps are three chain cords braided together, then sewn down the outer walls of all three baskets.
Finished Size and Construction
- Finished size: 25 in (63.5 cm) total hanging length
- Skill level: Intermediate (front post stitches, puff stitches, two-color round)
- Terminology: US
- Yarn weight: Worsted (#4) cotton
- Hook: 5.0 mm (H-8)
- Number of pieces: 3 baskets, 6 cords braided into 2 straps
- Layout: 3 baskets stacked vertically, 2.5 in (6.4 cm) apart
- Piece size (one basket): 7.5 in (19.1 cm) across the opening, 3.5 in (8.9 cm) tall, 5 in (12.7 cm) base
- Size before rim border: 7.5 in (19.1 cm) across, 2.75 in (7.0 cm) tall
- Rim border depth: 0.75 in (1.9 cm)
Materials
Choose a firm, smooth cotton or cotton blend. Soft acrylic will sag under the weight of the rolls, while cotton keeps the bowls round and the shell ribs crisp.
- Cream: 200 g / 360 m
- Turquoise-teal: 25 g / 45 m
- Dark emerald green: 25 g / 45 m
These quantities include a safety margin of about 30 percent. One basket uses roughly 45 g cream, 5 g teal and 6 g green, and the two straps together use about 15 g cream.
Tools:
– 5.0 mm (H-8) crochet hook
– Tapestry needle
– 8 locking stitch markers
– Scissors and a tape measure
– 1 wooden wall peg or hook
– Spray bottle and rustproof pins for blocking
Abbreviations (US Terms)
- ch – chain
- sl st – slip stitch
- sc – single crochet
- hdc – half double crochet
- dc – double crochet
- FPdc – front post double crochet
- BLO – back loop only
- rev sc – reverse single crochet (crab stitch)
- MR – magic ring
- st(s) – stitch(es)
- sp – space
- rnd – round
Special stitches:
- Puff st: (Yarn over, insert hook in the indicated space, pull up a loop to 0.5 in (1.3 cm) tall) 4 times, yarn over and pull through all 9 loops, then ch 1 to close. The puff counts as 1 st, and the closing ch is not counted.
- V-st: (Dc, ch 1, dc) all in the same st. This counts as 3 positions: dc, ch-1 sp, dc.
- Shell: 5 dc in the same st.
Gauge and Checkpoints
Gauge: 15 sc and 16 rnds = 4 in (10.2 cm) in a flat sc circle.
Make one complete basket before you start the others. Measure it at each checkpoint:
- After Rnd 5 (30 sts): base diameter 2.5 in (6.4 cm)
- After Rnd 10 (60 sts): base diameter 5 in (12.7 cm)
- After Rnd 18 (90 sts): opening 7.5 in (19.1 cm) across, wall height 2.75 in (7.0 cm)
- After the rim border: 8 in (20.3 cm) across the shell tips, total height 3.5 in (8.9 cm)
If the base is too big, drop to a 4.5 mm hook. If it is too small, or a standard roll (about 4.5 in / 11.4 cm wide) won’t sit flat on the base, go up to a 5.5 mm hook. If the base cups instead of lying flat, check that you increase exactly 6 sts per round. If it ruffles, you may have added extra increases.
Basket (make 3)
Join every round with a sl st to the first st. The turning ch 1 or ch 2 does not count as a st.
Base
Work the base in Cream.
Rnd 1: Make a MR, ch 1, work 6 sc in the ring, then join. (6 sts)
Rnd 2: Ch 1, 2 sc in each st, then join. (12 sts)
Rnd 3: Ch 1, sc in next st, 2 sc in next st, repeat around, then join. (18 sts)
Rnd 4: Ch 1, sc in next 2 sts, 2 sc in next st, repeat around, then join. (24 sts)
Rnd 5: Ch 1, sc in next 3 sts, 2 sc in next st, repeat around, then join. (30 sts)
Rnd 6: Ch 1, sc in next 4 sts, 2 sc in next st, repeat around, then join. (36 sts)
Rnd 7: Ch 1, sc in next 5 sts, 2 sc in next st, repeat around, then join. (42 sts)
Rnd 8: Ch 1, sc in next 6 sts, 2 sc in next st, repeat around, then join. (48 sts)
Rnd 9: Ch 1, sc in next 7 sts, 2 sc in next st, repeat around, then join. (54 sts)
Rnd 10: Ch 1, sc in next 8 sts, 2 sc in next st, repeat around, then join. (60 sts)
Check that the base measures 5 in (12.7 cm) across.
Shell-Rib Wall
Rnd 11: Ch 1, sc in BLO of each st, then join. (60 sts) The unused front loops form a ridge, and the wall turns upward here.
Rnd 12: Ch 1, sc in next st, skip next st, shell in next st, skip next st, repeat 15 times, then join. (90 sts: 15 sc + 75 dc)
This is the growth round that makes the bowl flare. Each 4-st repeat becomes 6 sts.
Rnd 13: Ch 1, sc in next sc, FPdc around each of next 5 dc, repeat 15 times, then join. (90 sts: 15 sc + 75 FPdc)
Rnd 14: Ch 1, sc in next sc, FPdc around each of next 5 FPdc, repeat 15 times, then join. (90 sts)
The stacked FPdc columns create the raised, fan-shaped ribs. Each fan is narrow at the base and widens toward the band. The tops of the fans form a soft cream scallop line under the tulips.
Each 6-st repeat now reads: sc (position 1), then FPdc (positions 2 to 6). The center rib is at position 4, and every motif above lines up over it.
Tulip Band
Rnd 15 (Dark Green): Join Dark Green and fasten off Cream. Ch 1, sc in next st, skip next st, V-st in next st, skip next st, sc in next 2 sts, repeat 15 times, then join.
That gives 90 positions: 45 sc, 30 dc and 15 ch-1 sps. Each V-st lands on the center rib, at position 4, so the leaves spread out above each fan.
Rnd 16 (Dark Green + Teal): Hold both colors and carry the unused color inside the sts. Ch 1 with Dark Green, then work this repeat 15 times:
– With Dark Green, sc in the next sc, sc in the next st, then hdc in the next dc. Change to Teal on the last yarn over.
– With Teal, make a puff st in the ch-1 sp. Change back to Dark Green.
– With Dark Green, hdc in the next dc and sc in the next sc.
Join to finish the round. (90 sts: 15 puffs + 75 green sts) Fasten off both colors.
The teal puff sits inside the green V, which makes the tulip bud and leaves.
Upper Wall
Rnd 17 (Cream): Join Cream. Ch 1, sc in each st, working into the top of each puff and not its closing ch, then join. (90 sts)
Rnd 18: Ch 1, sc in each st, then join. (90 sts)
Checkpoint: the opening should measure 7.5 in (19.1 cm) across and the wall 2.75 in (7.0 cm) tall.
Border: Scalloped Rolled Rim
Border gauge: One shell repeat (sc + shell) spans 6 sts, or 1.6 in (4.1 cm) of rim. Fifteen repeats fit exactly on the 90-st edge.
Border Rnd 1: Ch 1, sc in next st, skip next 2 sts, shell in next st, skip next 2 sts, repeat 15 times, then join to the first sc. (90 sts: 15 sc + 75 dc)
Each repeat uses 6 sts and makes 6 sts, so the count stays at 90. Each shell lands on position 4, right above a tulip.
Border Rnd 2: Ch 1, rev sc in each st around, then join. (90 sts) Fasten off.
The rev sc twists into a thick, rolled cord that firms up the scallops and keeps the rim from stretching.
Why the math works: 90 is divisible by 6, so the rim takes exactly 15 repeats with no leftover sts. Rnds 12 to 18 all use the same 6-st repeat, so each shell, tulip and fan stays in one straight column. Between the two strap points there are exactly 45 rim sts on each half, or 7.5 repeats.
Make All Pieces
Baskets: Make 3 baskets. Each one uses Cream for the base, wall, Rnds 17 to 18 and the border, Dark Green for Rnds 15 to 16, and Teal for the Rnd 16 puffs.
Cords (make 6, Cream): Ch 121, then sl st in the back bump of the 2nd ch from the hook and of each ch across. (120 sl sts) Each cord should measure 32 in (81.3 cm). Fasten off and leave a 6 in (15.2 cm) tail.
Straps (make 2): Hold 3 cords together and secure one end with a tail. Braid them firmly and evenly, then secure the other end. Each finished strap should measure 28 in (71.1 cm).
Text layout (front view):
          [ apex on peg ]
         /               \
   strap A               strap B      10 in (25.4 cm)
        |  [ Basket 1 ]  |            3.5 in (8.9 cm)
        |   gap 2.5 in   |
        |  [ Basket 2 ]  |            3.5 in (8.9 cm)
        |   gap 2.5 in   |
        |  [ Basket 3 ]  |            3.5 in (8.9 cm)
Joining
Method: Whipstitch the straps to the outside of the walls using Cream and a tapestry needle.
Stitch-to-stitch logic: On each basket, mark rim st 4 (the center of the first shell) and rim st 49. These two points are exactly 45 sts apart, which is half of 90. Because the rim has an odd number of repeats (15), one strap sits on a shell center and the other on the sc between two shells. Once the baskets are filled, you can’t see the difference.
Line up the markers on all three baskets so the straps hang straight.
Strap path: Each strap measures 28 in (71.1 cm) and is divided like this:
– 1 in (2.5 cm) overlap at the apex
– 10 in (25.4 cm) from the apex to the top rim
– 4 in (10.2 cm) along the wall of Basket 1, from the rim down to the Rnd 11 ridge
– 2.5 in (6.4 cm) gap
– 4 in (10.2 cm) along Basket 2
– 2.5 in (6.4 cm) gap
– 4 in (10.2 cm) along Basket 3
Total: 1 + 10 + 4 + 2.5 + 4 + 2.5 + 4 = 28 in (71.1 cm).
Steps:
1. Lay Basket 3 at the bottom. Line up the end of Strap A with the Rnd 11 ridge under marker 1, then run the strap straight up the wall to the rim.
2. Whipstitch both edges of the braid to the wall, catching 1 st of each round, from Rnd 11 through Border Rnd 2.
3. Leave 2.5 in (6.4 cm) of strap free, then sew it to Basket 2 the same way, then Basket 1.
4. Repeat steps 1 to 3 with Strap B at marker 2.
5. Overlap the two strap tops by 1 in (2.5 cm) and sew them together securely through all layers.
Tension: Sew snugly but don’t pull the stitches tight. If the stitches pucker the wall, the bowl will dent.
Size checkpoint: Hold the organizer up by the apex. It should measure 25 in (63.5 cm) from top to bottom, with the gaps between baskets matching within 0.25 in (0.6 cm).
Final Blocking
- Spray each basket until it is evenly damp, but not soaked.
- Stuff each basket firmly with a toilet roll wrapped in a small towel to round out the bowl.
- Pin the 15 rim shells so they flare evenly to 8 in (20.3 cm) across.
- Use your fingers to lift each teal puff and straighten the FPdc ribs.
- Lay the straps flat, pat the braids even, and pin them straight.
- Let everything dry completely, which takes about 24 hours, before hanging.
Final Quality-Control Checklist
- Each base lies flat and measures 5 in (12.7 cm).
- Each basket has 90 sts in Rnds 12 to 18 and in both border rounds.
- There are 15 fans, 15 tulips and 15 rim shells, all lined up in columns.
- No green or teal shows through where the colors were carried.
- The straps are 28 in (71.1 cm) each, sewn at matching markers.
- The gaps between baskets are 2.5 in (6.4 cm) each.
- The total hanging length is 25 in (63.5 cm).
- All tails are woven in at least 2 in (5.1 cm).
Troubleshooting
Bowl too shallow or too wide: Your dc are tall compared with your sc. Go down a hook size for Rnds 12 to 14 only.
Fans lean sideways: Make sure the round starts at the sc, not at an FPdc. Recount each round to 15 repeats.
Tulips sit off-center: The V-st must land on the 3rd FPdc of each fan, which is position 4 of the repeat.
Puffs look flat: Pull the loops taller and close them with a firm ch 1.
Rim ruffles: You have more than 90 sts. Count Border Rnd 1 before you work the rev sc.
Baskets tilt: One strap was sewn longer. Unpick it and re-measure the 2.5 in (6.4 cm) gaps.
Straps stretch: Braid more firmly, or make the cords with a 4.5 mm hook.
Care
Hand wash in cool water, gently press out the water, and dry flat while the bowls are reshaped over rolls. Don’t tumble dry.
Final Notes
The measurements build on each other in this order:
– A flat 60-st base measures 5 in (12.7 cm).
– One growth round takes the count to 90 sts, for a 7.5 in (19.1 cm) opening.
– A 6-st repeat lines up 15 fans, 15 tulips and 15 rim shells.
– The two-round rim adds 0.75 in (1.9 cm), so each basket stands 3.5 in (8.9 cm) tall.
– Two 28 in (71.1 cm) straps with 2.5 in (6.4 cm) gaps give a 25 in (63.5 cm) organizer.
If you check your gauge at each stage, all three baskets will match and hang level.
Happy crocheting!