
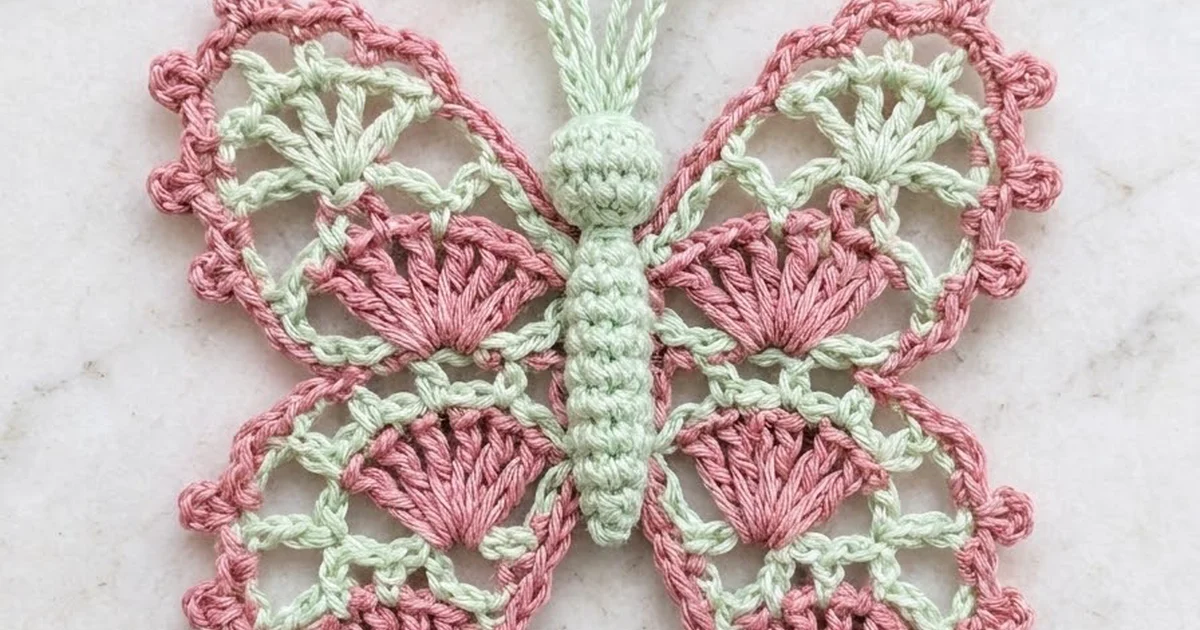
This lace butterfly ornament uses two soft colors: dusty rose pink and pale mint green. Each of the four wings has a solid pink fan at its base, open mint chain mesh and a pink scalloped edge with tiny picots. A ridged mint body with a round head runs down the center. Two thin antennae with little pink ring tips and a long mint hanging loop finish it off.
The style is vintage thread lace, but the ornament is sturdy enough to hang on a tree, a window latch or a gift bag. It works up quickly, and you can make several from two small balls of thread.
This pattern uses US crochet terms. The finished butterfly is about 4.5 in (11.4 cm) wide and 4 in (10.2 cm) tall, not counting the antennae and loop. The antennae add about 1 in (2.5 cm) above the head, and the hanging loop rises about 2 in (5.1 cm).
First you make four wings in rows, working outward from a pink fan, and edge each wing in pink. Then you make a small stuffed body in the round, join the wings at their base points, sew the body over the join, and add the antennae and loop.
Finished Size and Construction
- Finished size: 4.5 in (11.4 cm) wide x 4 in (10.2 cm) tall, plus 1 in (2.5 cm) antennae and a 2 in (5.1 cm) hanging loop
- Skill level: Intermediate (thread work, one color change mid-row)
- Terminology: US
- Yarn weight: Size 3 crochet cotton thread
- Hook: 2.25 mm (US B-1)
- Number of pieces: 4 wings (2 upper, 2 lower), 1 body, 2 antennae, 1 hanging loop
- Layout: 2 wings on each side of a central body, upper wings above lower wings
- Wing size after border: about 2 in (5.1 cm) long x 2.25 in (5.7 cm) wide
- Wing size before border: about 1.5 in (3.8 cm) long x 1.75 in (4.4 cm) wide
- Border depth: about 0.25 in (0.6 cm)
Materials
Use a smooth mercerized cotton in size 3. Mercerized thread shows the lace clearly, holds a crisp edge after blocking and does not fuzz on the tree. A thread of about 280 m per 100 g (306 yd per 3.5 oz) matches the gauge below.
- Color A, dusty rose pink: 8 g (about 22 m / 24 yd)
- Color B, pale mint green: 6 g (about 17 m / 19 yd)
Tools:
- 2.25 mm (US B-1) crochet hook
- Tapestry needle with a small eye
- Stitch marker
- A pinch of fiberfill for the body
- Rust-proof pins and a foam blocking board
- Spray bottle with water
- Small scissors
These amounts are for one ornament. They include a margin of about 20 percent for a test wing and weaving in ends.
Abbreviations (US Terms)
- ch: chain
- sl st: slip stitch
- sc: single crochet
- hdc: half double crochet
- dc: double crochet
- sc2tog: single crochet 2 together
- BLO: back loop only
- sp: space
- st(s): stitch(es)
- RS: right side
Special stitches:
- Picot: ch 3, sl st in 3rd ch from hook.
- Scallop: (sc, hdc, dc, picot, dc, hdc, sc) all in the same ch-5 sp. One scallop counts as 7 sts plus 1 picot.
Gauge and Checkpoints
Gauge: 8 sc and 9 sc rows = 1 in (2.5 cm) with size 3 thread and a 2.25 mm hook.
Make one upper wing first and use it as your test piece. Measure at each checkpoint:
- After Row 1: the pink fan is about 0.75 in (1.9 cm) across its straight edge.
- After Row 4: the wing without its border is about 1.5 in (3.8 cm) long x 1.75 in (4.4 cm) wide.
- After the border: the wing is about 2 in (5.1 cm) long x 2.25 in (5.7 cm) wide.
- Body: about 2 in (5.1 cm) long, with a head about 0.5 in (1.3 cm) across.
If your wing is too big, go down to a 2 mm hook or tighten your chains. If it is too small, go up to a 2.5 mm hook. Chain tension is the most common problem in lace. Check that each ch-5 arc lies smooth and doesn’t pull the row into a cup.
Upper Wing (Make 2)
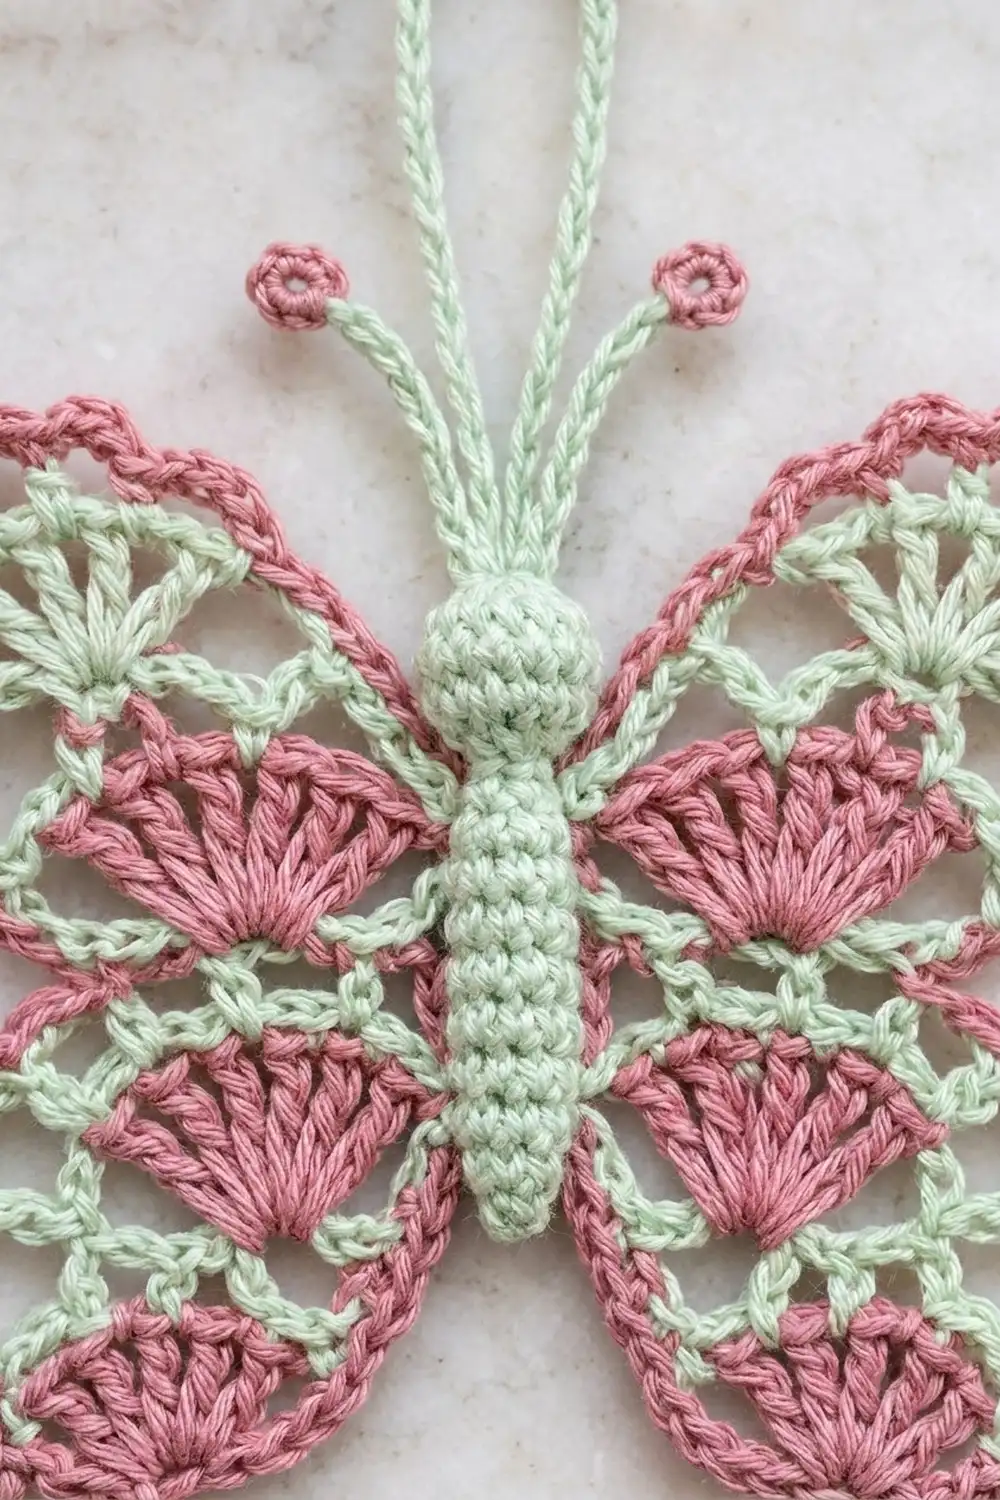
The upper wing has a pink base fan, mint mesh, a mint fan near the outer edge and a pink picot border.
Row 1 (Color A): Ch 4, 10 dc in 4th ch from hook (the skipped 3 ch count as the first dc). (11 dc) Fasten off Color A. Turn.
The fan should open into a half circle. The base of this fan is the point that will meet the body.
Row 2 (Color B): Join Color B in the first dc, ch 1, sc in same dc, [ch 4, sk next dc, sc in next dc] 5 times. (6 sc, 5 ch-4 sps) Turn.
You place an sc in dc 1, 3, 5, 7, 9 and 11, so the mesh is spaced evenly across the fan.
Row 3 (Color B): Ch 1, sc in first sc, ch 4, sc in next ch-4 sp, ch 4, sc in next ch-4 sp, 7 dc in next ch-4 sp (the center sp), sc in next ch-4 sp, ch 4, sc in next ch-4 sp, ch 4, sc in last sc. Turn. (6 sc, 4 ch-4 sps, 1 fan of 7 dc)
Row 4 (Color B): Ch 1, sc in first sc, [ch 5, sc in next ch-4 sp] 2 times, ch 5, sk next sc and 3 dc, sc in 4th (center) dc of fan, ch 5, sk 3 dc and next sc, [sc in next ch-4 sp, ch 5] 2 times, sc in last sc. (7 sc, 6 ch-5 sps) Fasten off Color B.
Check the size now, before the border: 1.5 in (3.8 cm) long x 1.75 in (4.4 cm) wide.
Lower Wing (Make 2)
Work the lower wing exactly like the upper wing, except make the Row 3 fan pink. This gives the lower wing two stacked pink fans with mint mesh between them.
Rows 1–2: Work as for Upper Wing. (Row 1: 11 dc; Row 2: 6 sc, 5 ch-4 sps)
Row 3 (Color B with Color A fan): Ch 1, sc in first sc, ch 4, sc in next ch-4 sp, ch 4, sc in next ch-4 sp, changing to Color A in the last yarn over. With Color A, 7 dc in next ch-4 sp, changing to Color B in the last yarn over of the 7th dc. With Color B, sc in next ch-4 sp, ch 4, sc in next ch-4 sp, ch 4, sc in last sc. Turn. (6 sc, 4 ch-4 sps, 1 fan of 7 dc)
Carry the unused color loosely inside the fan stitches so no strand shows on either side. If you prefer, cut Color A after the fan, leaving a 4 in (10.2 cm) tail, and weave it in later.
Row 4 (Color B): Work as for Upper Wing Row 4. (7 sc, 6 ch-5 sps) Fasten off.
Wing Border (All 4 Wings)
Border gauge: each scallop covers one ch-5 arc and is about 0.3 in (0.8 cm) wide at its base. The border adds about 0.25 in (0.6 cm) all around.
The wing has three kinds of edge: the curved top edge (Row 4), two side edges (the row ends) and the narrow base point (the bottom of Row 1).
Border Round (Color A): With the Row 4 side facing, join Color A in the first sc of Row 4.
- Top edge: Ch 1, sc in same sc, work 1 scallop in each of the next 6 ch-5 sps, sc in last sc of Row 4. (44 sts + 6 picots)
- First side edge: Working along the row ends, work 2 sc in end of Row 4, 2 sc in end of Row 3, picot, 2 sc in end of Row 2, 2 sc in side of Row 1 dc. (8 sc + 1 picot)
- Base point: 3 sc in the bottom of the Row 1 ring (the base of the fan). (3 sc)
- Second side edge: 2 sc in side of Row 1 dc, 2 sc in end of Row 2, picot, 2 sc in end of Row 3, 2 sc in end of Row 4. (8 sc + 1 picot)
- Sl st to first sc to join. Fasten off.
Round total: 44 + 8 + 3 + 8 = 63 sts plus 8 picots.
Why the math works: Row 4 has exactly 6 ch-5 sps. That gives 6 scallops of 7 sts each, or 42 sts. The 2 corner sc on the top edge go in the first and last sc of Row 4, so the top edge has 42 + 2 = 44 sts. Those corner sc count only on the top edge, not again on the sides. Each side has 4 row ends with 2 sc in each, for 8 sc, which keeps the side flat without ruffling. The 3 sc at the base turn the narrow point neatly.
Check one bordered wing: 2 in (5.1 cm) long x 2.25 in (5.7 cm) wide.
Body (Make 1)
Work in continuous rounds with Color B. Use a stitch marker to mark the first st of each round.
Rnd 1: 6 sc in a magic ring. (6 sc)
Rnd 2: 2 sc in each st around. (12 sc)
Rnds 3–4: Sc in each st around. (12 sc)
Rnd 5: [Sc2tog] 6 times. (6 sc) Stuff the head lightly.
Rnd 6: [Sc in next st, 2 sc in next st] 3 times. (9 sc)
Rnds 7–16: Sc in BLO of each st around. (9 sc)
Each BLO round leaves a ridge of unused front loops, which gives the body its segmented look.
Rnd 17: [Sc in next st, sc2tog] 3 times. (6 sc) Stuff the body lightly.
Rnd 18: [Sc2tog] 3 times. (3 sc)
Fasten off, leaving a 12 in (30.5 cm) tail for sewing. Check: the body is about 2 in (5.1 cm) long and the head about 0.5 in (1.3 cm) across.
Antennae (Make 2)
Tip: With Color A, ch 4, sl st in first ch to form a small ring. Fasten off Color A.
Stem: Join Color B in any ch of the ring, ch 10, sl st in 2nd ch from hook and in each ch across. (9 sl sts) Fasten off, leaving a 6 in (15.2 cm) tail.
Each antenna is about 1 in (2.5 cm) long with a pink ring tip.
Hanging Loop (Make 1)
With Color B, ch 40, sl st in 2nd ch from hook and in each ch across. (39 sl sts) Fasten off, leaving a 6 in (15.2 cm) tail at each end.
The sl st cord is about 4 in (10.2 cm) long. Folded in half, it makes a loop about 2 in (5.1 cm) tall.
Make All Pieces
Before joining, you should have:
- Upper wings: 2 (Color A fan and border, Color B mesh and fan)
- Lower wings: 2 (Color A fans and border, Color B mesh)
- Body: 1 (Color B)
- Antennae: 2 (Color A tips, Color B stems)
- Hanging loop: 1 (Color B)
Layout grid (RS facing up):
              [loop]
        [antenna] [antenna]
[Upper L]     [head]     [Upper R]
              [body]
[Lower L]     [body]     [Lower R]
Each wing’s base point faces the center. The upper wings point up and out, and the lower wings point down and out.
Joining
Block all four wings lightly before joining (see Final Blocking) so the edges lie flat and are easy to match.
Method: Whipstitch with Color A and a tapestry needle, working through the back loops of the border sts only.
- Upper wing to lower wing (each side): Lay the upper wing above the lower wing so their side edges touch near the base. Match the 3 sc nearest the base on the upper wing’s lower side edge with the 3 sc nearest the base on the lower wing’s upper side edge, stitch to stitch. Whipstitch these 3 pairs together. Leave the picots and the rest of the sides free.
- Center join: Bring the four base points together. Whipstitch the 3 base sc of each wing to the base sc of the wing beside it, forming a tight X at the center.
- Keep the tension firm but not tight. Pull each stitch just snug enough to close the gap. If the wings pucker, loosen the stitches.
Size checkpoint: Lay the joined wings flat. They should measure about 4.5 in (11.4 cm) across the upper wing tips and 4 in (10.2 cm) from top to bottom.
Attach the body: Place the body over the center join, with the head level with the tops of the upper wing bases. Use the body tail to sew down both sides of the body through the wing bases. Hide the stitches under the ridges.
Attach the antennae and loop: Sew the antenna stems to the top of the head, angled out in a V. Fold the hanging loop in half and sew both ends to the back of the head. Weave in all ends.
Final Blocking
- Spray the ornament until it is damp but not dripping.
- Lay it RS up on the blocking board.
- Pin the body straight down the center first.
- Pin each wing out to its size, 2 in (5.1 cm) long x 2.25 in (5.7 cm) wide.
- Pin each picot open, one pin per picot.
- Shape each ch-5 arc into an even curve with your fingers.
- Pin the antennae in a V and lay the loop straight up.
- Let it dry completely, then remove the pins.
For extra stiffness, mist with a light fabric starch before drying.
Final Quality-Control Checklist
- Each wing has 6 scallops on the top edge and 1 picot on each side.
- Each border round has 63 sts plus 8 picots.
- The upper wings have a mint outer fan and the lower wings a pink one.
- The body has 10 ridged rounds and a smooth, round head.
- The ornament measures 4.5 in (11.4 cm) x 4 in (10.2 cm).
- The antennae match and are about 1 in (2.5 cm) long.
- The loop is secure and about 2 in (5.1 cm) tall.
- No carried strands show on either side of the lower wings.
- All ends are woven in and trimmed.
Troubleshooting
- Wing cups instead of lying flat: Your ch-5 arcs are too tight. Add 1 ch to each arc or go up a hook size.
- Wing ruffles: Your chains are too loose. Use a smaller hook for the chains only.
- Border pulls the sides in: Work the side sc a little looser, and check that you placed exactly 2 sc per row end.
- Fan looks crowded: Make sure Row 1 has 11 dc and the Row 3 fan has 7 dc, not more.
- Body leans or bends: Stuff evenly and don’t overfill. A pinch is enough.
- Pink shows through the mint on the lower wing: Carry the strand more loosely, or cut it and weave it in instead.
- Wings flop at the center: Add one more whipstitch through the base sc.
Care
Hand wash in cool water with mild soap, roll in a towel to press out the water, and reshape to dry flat. Store flat or hanging, out of direct sun to protect the colors.
Final Notes
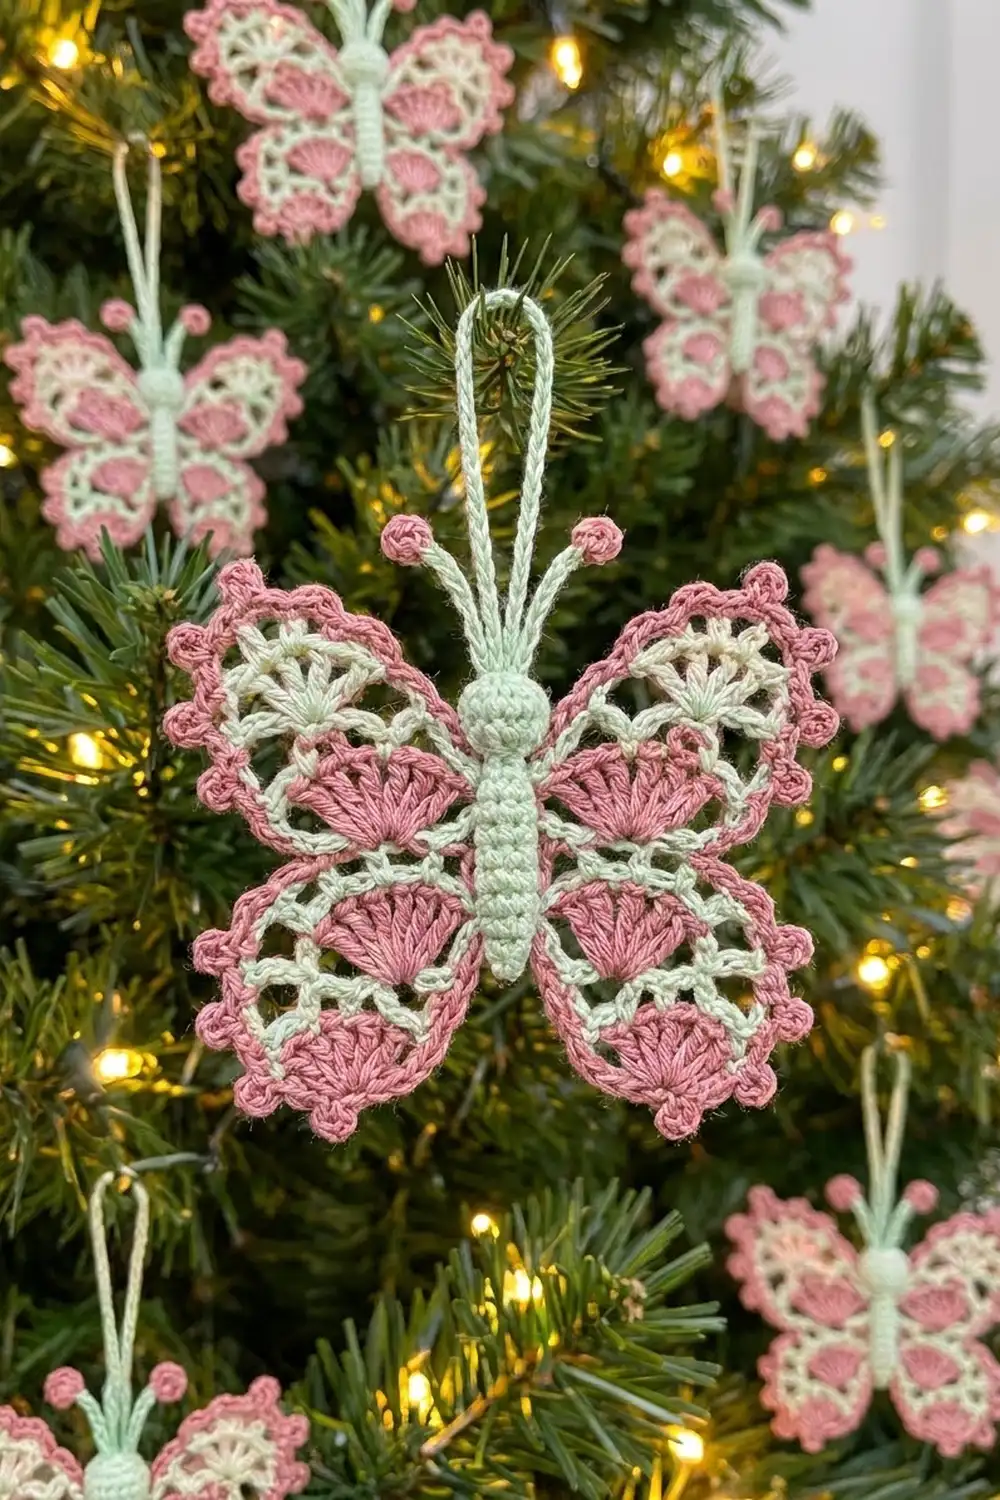
Here is the full measurement chain. A 0.75 in (1.9 cm) pink fan grows into a 1.5 in (3.8 cm) x 1.75 in (4.4 cm) wing. The border brings each wing to 2 in (5.1 cm) x 2.25 in (5.7 cm). Four wings and a 2 in (5.1 cm) body make a 4.5 in (11.4 cm) x 4 in (10.2 cm) butterfly, with 1 in (2.5 cm) antennae and a 2 in (5.1 cm) loop on top.
Check your gauge on the first wing and the rest will follow. Make one for the tree, or a whole group in different pinks and greens.
Happy crocheting!