

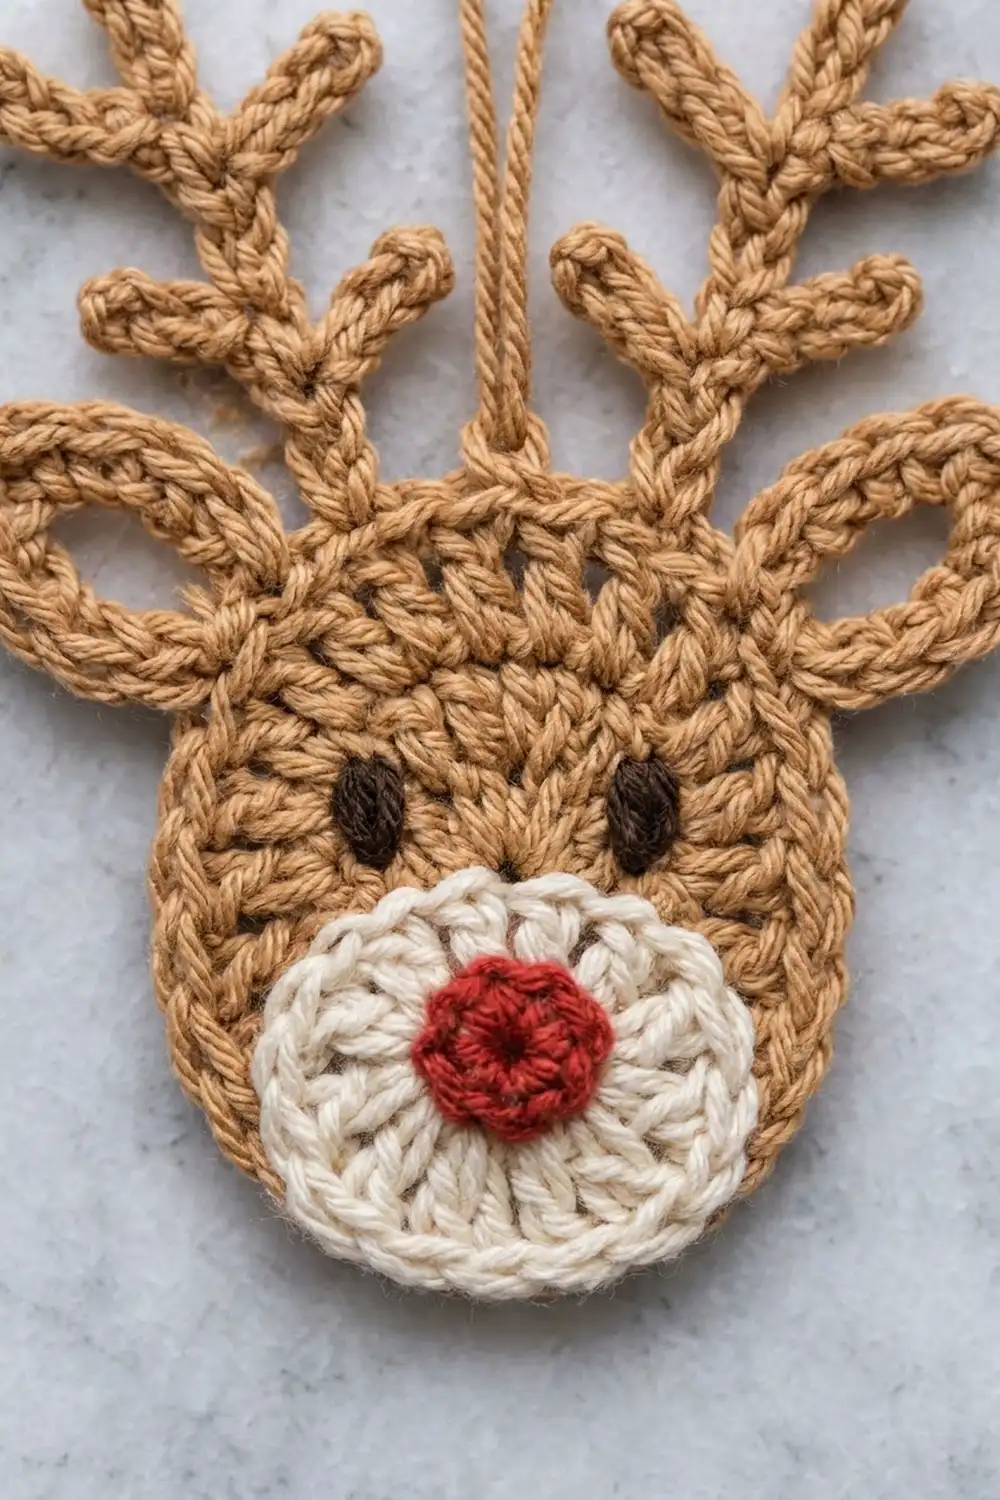
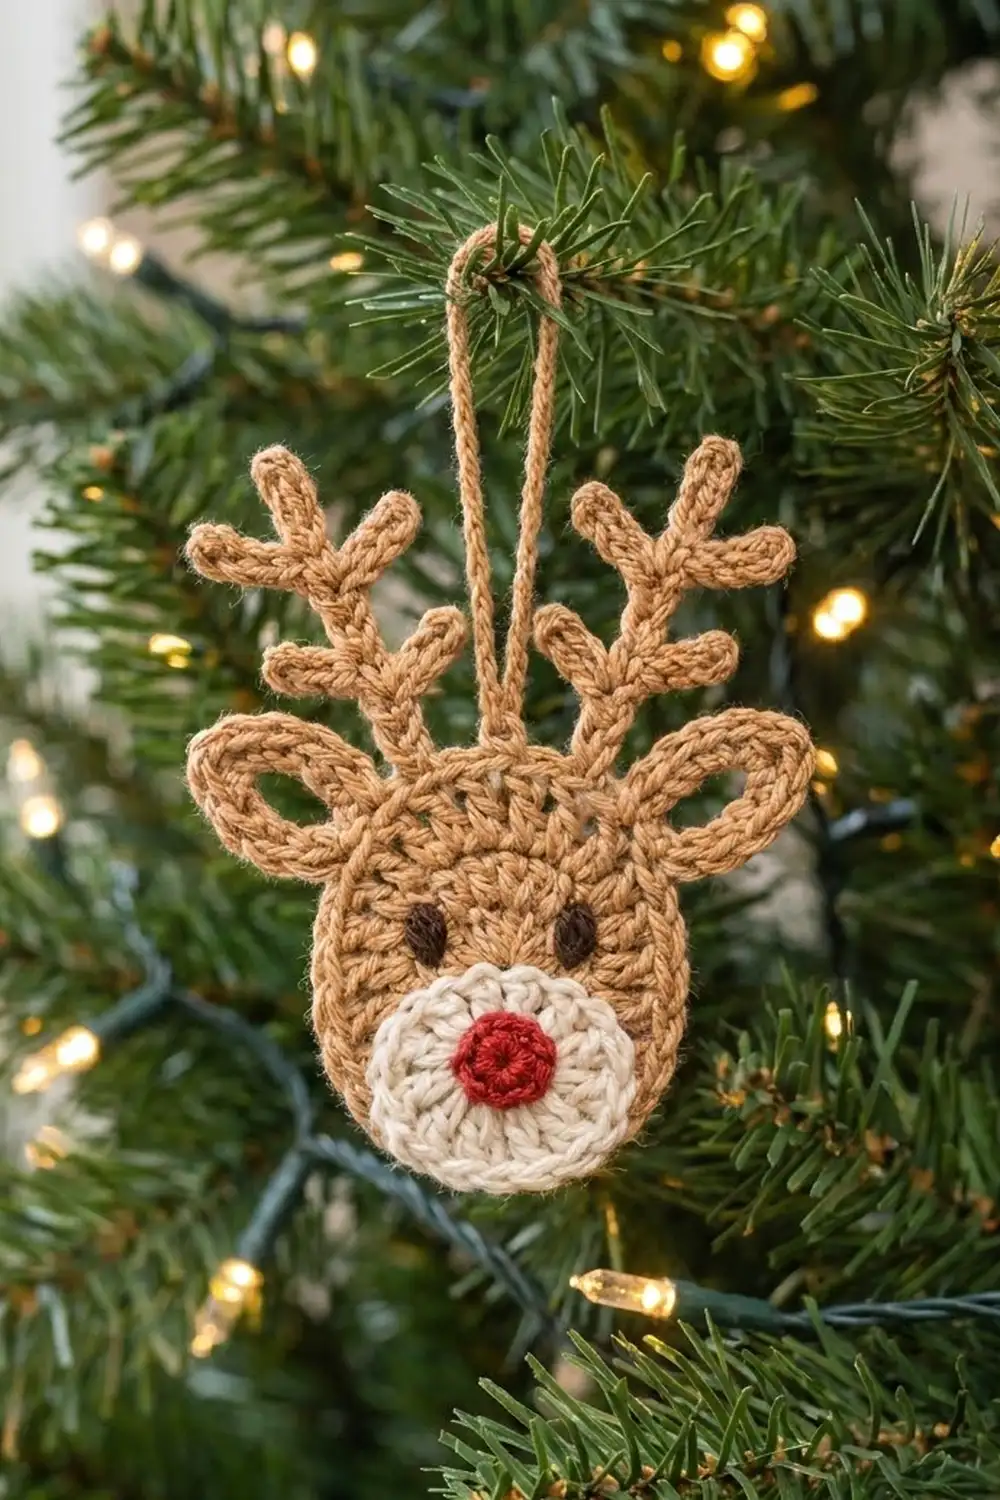
Little Rudy is a flat reindeer head ornament with a warm caramel-tan face, a cream muzzle and a round red nose. Two branched antlers, two pointed ears and small dark brown embroidered eyes finish the look. A tan chain loop at the top lets him hang from a tree branch, a gift tag or a wreath.
The style is simple and classic. He’s made from basic stitches in four colors: tan, cream, red and a little dark brown for the eyes. This pattern uses US crochet terms throughout.
The finished ornament is 4 3/4″ (12.1 cm) wide from ear tip to ear tip. It is also 4 3/4″ (12.1 cm) tall from the bottom of the head to the antler tips, not counting the hanging loop. The head alone is 3″ (7.6 cm) tall and 2 3/4″ (7.0 cm) wide.
You work the head as an oval in rounds on a short foundation chain, then finish it with a single crochet edging round. The muzzle starts with a red nose at the center and continues in cream. You make the ears and antlers separately, then sew everything onto the head.
Finished Size and Construction
- Finished ornament: 4 3/4″ x 4 3/4″ (12.1 x 12.1 cm), not counting the loop
- Skill level: Easy
- Terminology: US crochet terms
- Yarn weight: Worsted weight (#4), cotton or cotton blend
- Hook: 3.5 mm (E-4)
- Number of pieces: 1 finished ornament, made from 6 parts (head, muzzle with nose, 2 ears, 2 antlers) plus a chain loop
- Layout: One ornament. The ears sit at the upper sides of the head, the antlers at the top, and the muzzle is centered at the bottom.
- Head size: 3″ x 2 3/4″ (7.6 x 7.0 cm)
- Head size before border: 2 3/4″ x 2 1/2″ (7.0 x 6.4 cm)
- Border depth: 1/8″ (0.3 cm) on every edge
Materials
A smooth worsted-weight cotton shows the stitches clearly and makes a firm ornament that won’t stretch out of shape. Acrylic also works, but it doesn’t hold a sharp shape as well after blocking.
- Tan (caramel): 8 g / 16 m (head, ears, antlers, loop)
- Cream: 3 g / 6 m (muzzle)
- Red: 2 g / 4 m (nose)
- Dark brown: 1 g / 2 m (eyes)
All amounts include a margin for weaving in ends and sewing.
Tools:
- 3.5 mm (E-4) crochet hook
- Tapestry needle
- Scissors
- Stitch marker
- Rust-proof pins and a blocking mat
- Spray bottle with water (optional: light spray starch)
Abbreviations (US Terms)
- ch – chain
- sl st – slip stitch
- sc – single crochet
- hdc – half double crochet
- dc – double crochet
- st(s) – stitch(es)
- sp – space
- beg – beginning
- Rnd – round
Special technique – magic ring: Wrap the yarn around two fingers to form a loop, insert your hook, pull up a loop and ch 1 to secure. Work the first round into the ring, then pull the tail to close the center.
Working the opposite side of the chain: After you work along one side of a foundation chain, turn the piece and work into the free bottom loops of the same chains.
Gauge and Checkpoints
Make the head first and use it as your test piece. All the other parts are sized to match it.
Edging gauge: 5 sc = 1″ (2.5 cm), measured along the edge.
Head checkpoints (measured flat, without stretching):
- After Rnd 1: 1 1/4″ tall x 3/4″ wide (3.2 x 1.9 cm)
- After Rnd 2: 2″ tall x 1 3/4″ wide (5.1 x 4.4 cm)
- After Rnd 3: 2 3/4″ tall x 2 1/2″ wide (7.0 x 6.4 cm)
- After Rnd 4 (border): 3″ tall x 2 3/4″ wide (7.6 x 7.0 cm)
Muzzle checkpoint: 1 3/4″ (4.4 cm) across after Rnd 3.
If the head is too big by more than 1/8″ (0.3 cm), go down to a 3.25 mm (D-3) hook. If it’s too small, go up to a 3.75 mm (F-5) hook. Use the same hook for every part so the proportions stay correct.
Head (Tan)
The head is an upright oval. One 6-dc fan becomes the top of the head and the other becomes the chin.
Foundation: Ch 6.
Rnd 1: Work 5 dc in the 4th ch from hook. The 3 skipped chs count as the first dc, so this end has 6 dc. Dc in next ch, then 6 dc in last ch. Turn the piece and work along the opposite side of the chain: dc in next ch. Join with sl st to top of the skipped chs. (14 sts: 6 top fan, 1 side, 6 bottom fan, 1 side)
Rnd 2: Ch 3 (counts as dc), dc in same st, 2 dc in each of next 5 sts (12 sts at top), dc in next st (side), 2 dc in each of next 6 sts (12 sts at bottom), dc in next st (side). Join with sl st to top of beg ch-3. (26 sts)
Rnd 3: Ch 2 (does not count as a st). [Hdc in next st, 2 hdc in next st] 6 times (18 sts at top), hdc in side st, [hdc in next st, 2 hdc in next st] 6 times (18 sts at bottom), hdc in side st. Join with sl st to first hdc. (38 sts)
Check the size now: 2 3/4″ x 2 1/2″ (7.0 x 6.4 cm). The piece should lie flat without cupping or waving. Don’t fasten off. The border comes next (see the Border section).
Muzzle with Nose (Red and Cream)
The red nose is the center of the muzzle, so the muzzle and nose are one piece.
Rnd 1 (red): Make a magic ring. Ch 1, 8 sc in ring. Pull the ring closed. Join with sl st to first sc, switching to cream on the last yarn-over of the sl st. Fasten off red. (8 sc)
Rnd 2 (cream): Ch 3 (counts as dc), dc in same st, 2 dc in each st around. Join with sl st to top of beg ch-3. (16 dc)
Rnd 3 (cream): Ch 1, [sc in next st, 2 sc in next st] 8 times. Join with sl st to first sc. (24 sc)
Fasten off, leaving a 12″ (30.5 cm) tail for sewing. The muzzle is 1 3/4″ (4.4 cm) across.
Ears (Tan, Make 2)
Each ear is a pointed teardrop worked around both sides of a short chain. A slip-stitch round outlines the edge.
Foundation: Ch 7.
Rnd 1: Sc in 2nd ch from hook, hdc in next ch, dc in next 2 ch, hdc in next ch, then (sc, ch 2, sc) in last ch for the tip. Turn the piece and work along the opposite side of the chain: hdc in next ch, dc in next 2 ch, hdc in next ch, sc in next ch. Join with sl st to first sc. (12 sts and 1 ch-2 sp at the tip)
Rnd 2 (outline): Sl st loosely in each st up to the tip, (sl st, ch 1, sl st) in ch-2 sp, then sl st loosely in each st to the end. (14 sl st and 1 ch-1 at the tip)
Fasten off, leaving an 8″ (20.3 cm) tail. Each ear is 1 1/4″ (3.2 cm) long and 3/4″ (1.9 cm) wide.
Antlers (Tan, Make 2)
Each antler is a chain stem with three short branches. You work sc back along every chain, which gives each antler 4 tips.
Foundation: Ch 14.
Row 1:
- Sc in 2nd ch from hook and in next 2 ch (3 stem sts; this is the top tip).
- Branch: Ch 5, sc in 2nd ch from hook and in next 3 ch (4 branch sts). Sc in next 3 ch of the stem.
- Branch: Ch 5, sc in 2nd ch from hook and in next 3 ch. Sc in next 3 ch of the stem.
- Branch: Ch 5, sc in 2nd ch from hook and in next 3 ch. Sc in last 4 ch of the stem.
(25 sc: 13 on the stem + 3 branches x 4 sc)
Stem check: 3 + 3 + 3 + 4 = 13 sc, one in each of the 13 working chains. Fasten off, leaving an 8″ (20.3 cm) tail. Each antler stem is about 2″ (5.1 cm) long and each branch is about 3/4″ (1.9 cm).
All the branches will lean to one side as you work. That’s expected. You’ll pin them alternately left and right when you block.
Hanging Loop (Tan)
Leave a 6″ (15.2 cm) tail, ch 30, then cut the yarn, leaving another 6″ (15.2 cm) tail. The chain is about 5″ (12.7 cm) long and folds into a loop 2 1/2″ (6.4 cm) tall.
Border (Head Edging)
The border is one round of sc worked right after Rnd 3 of the head. It firms up the edge and gives the head a smooth, rounded outline.
Border gauge: 5 sc = 1″ (2.5 cm) along the edge.
Rnd 4: Ch 1. [Sc in next 5 sts, 2 sc in next st] 3 times (21 sts at top), sc in side st, [sc in next 5 sts, 2 sc in next st] 3 times (21 sts at bottom), sc in side st. Join with sl st to first sc. (44 sc = 38 worked 1-per-stitch + 6 increases)
Counts per section: top curve 21, right side 1, bottom curve 21, left side 1. 21 + 1 + 21 + 1 = 44.
Why the math works: The border adds 1/8″ (0.3 cm) on every edge. That takes the head from 2 3/4″ x 2 1/2″ (7.0 x 6.4 cm) to 3″ x 2 3/4″ (7.6 x 7.0 cm). Measured through the middle of this round, the edge is about 8 3/4″ (22.2 cm) long. At 5 sc per inch (2.5 cm), that comes to 44 stitches. All 6 increases are on the curved ends, where the outline grows the most. That keeps the sides smooth and the head flat.
Fasten off and weave in the end.
Assembly
- Muzzle: Center the muzzle on the lower part of the head with its bottom edge just above the border at the chin. Whipstitch around the outside of Rnd 3 with the cream tail.
- Eyes: With dark brown, embroider two small upright ovals in satin stitch, each 1/4″ (0.6 cm) tall. Place them just above the muzzle, 3/4″ (1.9 cm) apart, center to center.
- Ears: Tuck the base of each ear 1/4″ (0.6 cm) behind the head at the 10 o’clock and 2 o’clock positions. Angle the tips outward and slightly up. Each ear should stick out 1″ (2.5 cm) past the side of the head. Sew in place from the back.
- Antlers: Tuck the base of each stem 1/4″ (0.6 cm) behind the top of the head at the 11 o’clock and 1 o’clock positions, 1″ (2.5 cm) apart. Sew in place from the back. Each antler should rise 1 3/4″ (4.4 cm) above the head.
- Loop: Fold the chain in half and sew both ends to the back of the head at top center, between the antlers.
Final Blocking
- Weave in all remaining ends on the back.
- Mist the ornament with water until it’s damp but not soaked.
- Lay it face up on the blocking mat.
- Pin the head into a smooth oval, 3″ x 2 3/4″ (7.6 x 7.0 cm).
- Pin each ear tip into a sharp point.
- Spread the antler branches alternately left and right and pin every tip.
- Check that the ornament measures 4 3/4″ x 4 3/4″ (12.1 x 12.1 cm).
- Optional: mist with light spray starch to keep the antlers crisp.
- Let it dry completely before you unpin it.
Final Quality-Control Checklist
- The head border round has 44 sc and the head measures 3″ x 2 3/4″ (7.6 x 7.0 cm)
- The head lies flat with no cupping or ruffling
- The muzzle is 1 3/4″ (4.4 cm) across, centered, and sewn flat with no puckers
- The red nose is in the center of the muzzle
- The eyes are level and 3/4″ (1.9 cm) apart
- The ears are placed symmetrically and each has a sharp tip
- Each antler has 25 sc and 4 tips, and both antlers are the same height
- The hanging loop is centered and the ornament hangs straight
- All ends are woven in securely on the back
Troubleshooting
The head cups like a bowl: Your tension is too tight or you missed an increase. Recount Rnd 2 (26) and Rnd 3 (38).
The head ruffles: There are too many increases. Check that each end of Rnd 3 has exactly 18 sts.
The head comes out round instead of oval: Make sure Rnd 1 has one dc on each side between the two 6-dc fans.
The muzzle puckers when you sew it: Pin it in place first, and keep your sewing stitches loose and evenly spaced.
The antlers curl: This is common with chain-based pieces. Dampen them, pin them firmly and let them dry flat.
The ornament hangs crooked: Move the loop so it sits exactly at the top center of the head.
Care
Hand wash in cool water with mild soap. Press out the water in a towel, reshape, and dry flat, pinning the antlers if needed.
Final Notes
The measurements build in a short, easy-to-check chain. The head grows from 14 to 26 to 38 sts and measures 2 3/4″ x 2 1/2″ (7.0 x 6.4 cm). The 44-st border brings it to 3″ x 2 3/4″ (7.6 x 7.0 cm). Add the 1 3/4″ (4.4 cm) muzzle, the 1 1/4″ (3.2 cm) ears and the 2″ (5.1 cm) antlers, and the finished ornament measures 4 3/4″ x 4 3/4″ (12.1 x 12.1 cm). If every checkpoint matches, your Little Rudy will look just like the one shown.
Happy crocheting!