

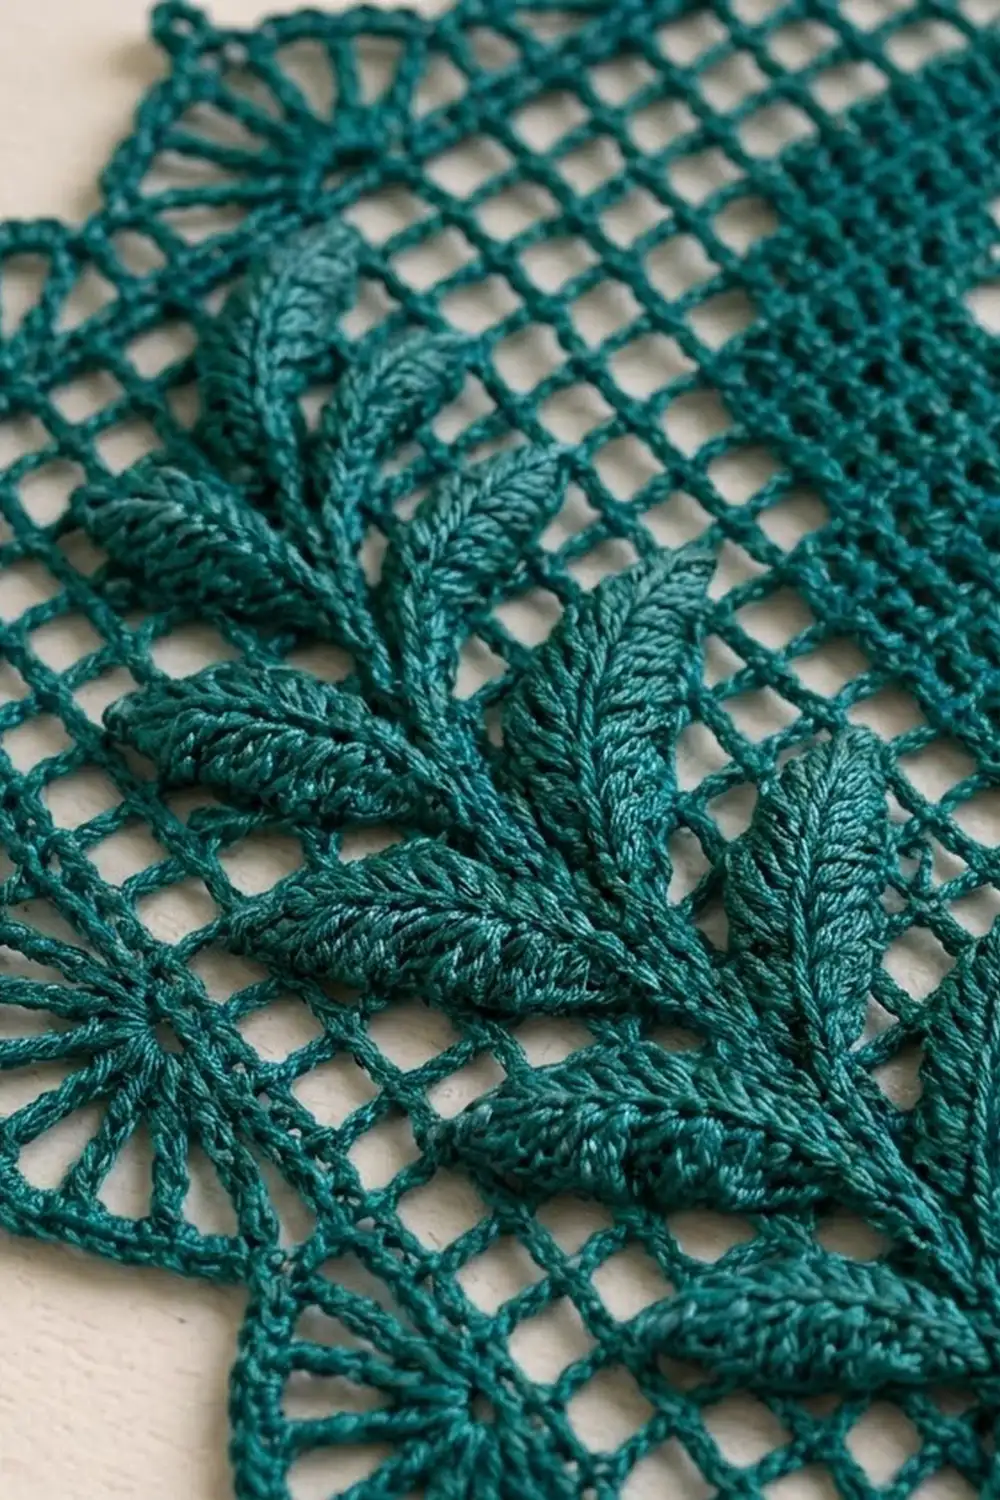
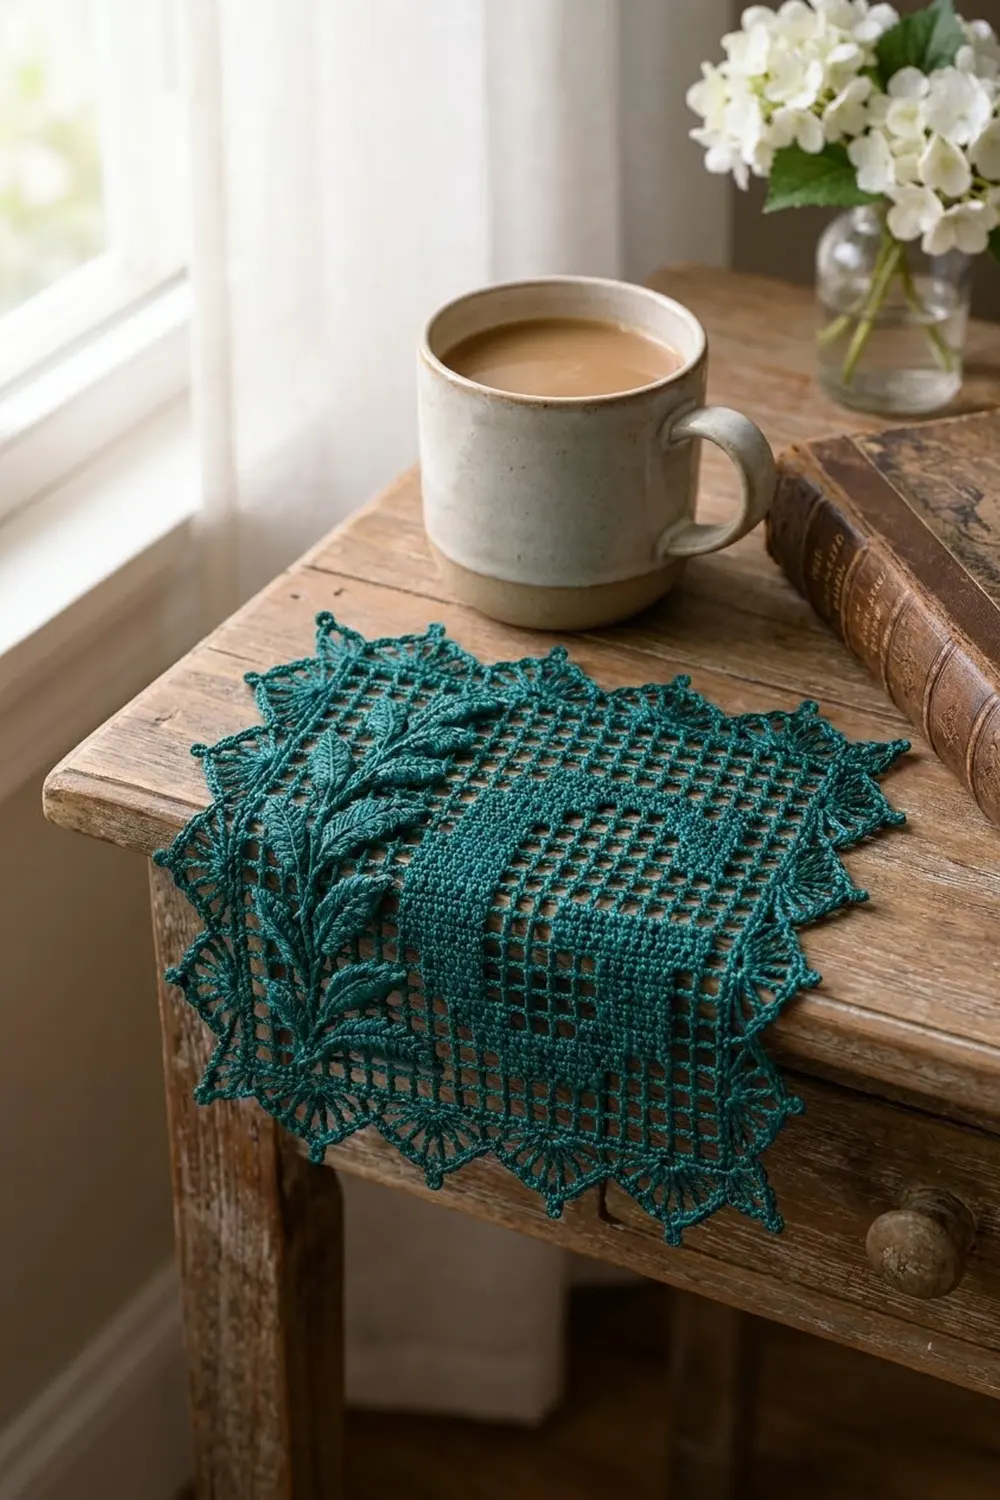
The Evergreen Initial Filet Square is a single lace panel in deep teal thread. It has an open filet grid with a bold, solid capital “G” worked in filled blocks. A raised leafy sprig is sewn up the left side, and a pointed fan-and-picot border runs along all four edges.
The look is classic filet lace with a modern twist. The letter is flat and graphic, while the sprig adds real dimension: nine small leaves stacked along a slip-stitch stem so their tips overlap like a fern frond. You can use it as a doily, a framed monogram, a gift-box topper or a dresser mat.
This pattern uses US crochet terms. The finished square measures 9.5 in (24.1 cm) across after blocking, including the border.
Construction is simple. Work the filet panel flat from the bottom up, following the row-by-row text chart. Then add the three-round border in the round. Make the stem and leaves separately, sew them on and block.
Finished Size and Construction
- Finished size: 9.5 x 9.5 in (24.1 x 24.1 cm)
- Skill level: Intermediate
- Terminology: US crochet terms
- Yarn weight: Size 3 mercerized cotton crochet thread
- Hook: 2.25 mm (US B-1)
- Number of pieces: 1 filet panel, plus 1 stem and 9 leaves for the appliqué
- Layout: Single square; no joining
- Panel size: 25 x 25 meshes
- Size before border: 7.5 x 7.5 in (19.1 x 19.1 cm)
- Border depth: 1 in (2.5 cm) on each side
Materials
Use a smooth, tightly twisted mercerized cotton thread. It gives crisp mesh lines, firm blocks and sharp picots. Avoid fuzzy or loosely plied threads, which make the open grid look blurry.
- Teal (main color, also used for the appliqué): 40 g, about 100 m (109 yd) of size 3 cotton thread
This amount includes a margin of about 20 percent for your gauge swatch and small differences in tension.
Tools:
- 2.25 mm (US B-1) crochet hook
- Tapestry needle with a sharp tip
- Stitch markers (2)
- Rustproof pins and a blocking board
- Spray bottle, plus optional fabric stiffener
- Ruler or tape measure
Abbreviations (US Terms)
- ch – chain
- sl st – slip stitch
- sc – single crochet
- hdc – half double crochet
- dc – double crochet
- sp(s) – space(s)
- st(s) – stitch(es)
- RS / WS – right side / wrong side
- O – open mesh
- B – block
Special stitches:
- Open mesh (O): ch 2, skip the next 2 sts (or the ch-2 sp), dc in the next dc.
- Block (B): over an open mesh, 2 dc in the ch-2 sp, dc in the next dc; over a block, dc in each of the next 3 dc.
- Fan: (dc, ch 2) 6 times in the same sp, dc in the same sp. That makes 7 dc and 6 ch-2 sps.
- Corner fan: (dc, ch 2) 8 times in the same sp, dc in the same sp. That makes 9 dc and 8 ch-2 sps.
- Picot: ch 3, sl st in the 3rd ch from the hook.
Gauge and Checkpoints
Gauge: 10 meshes and 10 rows = 3 in (7.6 cm) in filet mesh. One mesh is 0.3 in (0.8 cm) square.
Make a test swatch before you start the main panel. Ch 35, dc in the 8th ch from the hook, then [ch 2, skip 2 ch, dc in the next ch] 9 times, for 10 open meshes. Work 9 more rows of open mesh. Pin it flat, mist it lightly and measure.
- Too big: go down to a 2 mm hook, or make your turning chains slightly shorter.
- Too small: go up to a 2.5 mm hook.
- Meshes taller than they are wide: pull each dc up less before you finish it.
Checkpoints:
- After Row 1: panel width is 7.5 in (19.1 cm).
- After Row 10: panel height is 3 in (7.6 cm).
- After Row 20: panel height is 6 in (15.2 cm).
- After Row 25: panel is 7.5 x 7.5 in (19.1 x 19.1 cm).
- After border Rnd 1: about 7.75 in (19.7 cm).
- After border Rnd 2: about 8.75 in (22.2 cm).
- After border Rnd 3 and blocking: 9.5 in (24.1 cm).
Filet Panel
Every row has 25 meshes, or 76 sts. That is 26 dc posts (the turning ch counts as the first one) plus 50 sts in the spaces or blocks between them.
Every row begins and ends with an open mesh. From Row 2 on, start each row with ch 5 (counts as dc + ch 2), skip the first ch-2 sp and dc in the next dc. Work the last dc of each row in the 3rd ch of the turning ch-5.
Row 1 is a RS row. Each row below is written in the order you work it, so you never need to read a row backward.
Foundation: Ch 80.
Row 1 (RS): Dc in the 8th ch from the hook, [ch 2, skip 2 ch, dc in the next ch] 24 times. Turn. (25 O; 76 sts)
Rows 2–3: 25 O. Turn. (76 sts)
Row 4 (WS): 12 O, 9 B, 4 O. (76 sts)
Row 5: 3 O, 11 B, 11 O.
Row 6: 11 O, 11 B, 3 O.
Rows 7, 9 and 11: 3 O, 3 B, 6 O, 3 B, 10 O.
Rows 8, 10 and 12: 10 O, 3 B, 6 O, 3 B, 3 O.
Checkpoint: the panel is now 3.6 in (9.1 cm) tall. The bottom curve of the G and the start of its right leg are done.
Row 13: 3 O, 6 B, 3 O, 3 B, 10 O. This is the inner crossbar of the G.
Row 14: 10 O, 3 B, 3 O, 6 B, 3 O.
Rows 15 and 17: 12 O, 3 B, 10 O.
Rows 16 and 18: 10 O, 3 B, 12 O.
Row 19: 3 O, 3 B, 6 O, 3 B, 10 O. This is the top serif of the G.
Row 20: 11 O, 11 B, 3 O.
Row 21: 3 O, 11 B, 11 O.
Row 22: 12 O, 9 B, 4 O.
Rows 23–25: 25 O. Do not fasten off.
Every row adds up to 25 meshes. For example, Row 13 is 3 + 6 + 3 + 3 + 10 = 25. Seen from the RS, the letter fills chart columns 11–22. Columns 1–10 stay open for the sprig, and an open frame three meshes wide runs along the top, bottom and right.
Border
Border gauge: each side of Rnd 1 has 25 ch-2 sps, exactly 1 per mesh or row. All fan spacing is counted in these sps.
Rnd 1 (RS): Ch 1. Work (sc, ch 3, sc) in the top of the last dc of Row 25 (corner). Then continue around:
- Down the side: [ch 2, sc around the top of the end dc of the next row] 24 times, working into Rows 24 to 1. Ch 2, then work (sc, ch 3, sc) at the base of Row 1 (corner).
- Along the bottom: [ch 2, sc in the foundation ch at the base of the next dc] 24 times, ch 2, then (sc, ch 3, sc) in the corner.
- Up the second side: work as for the first side, ending at the top corner.
- Along the top: [ch 2, sc in the next dc] 24 times, ch 2. Join with a sl st to the first sc.
Count: each side has 25 ch-2 sps between the corner ch-3 sps. The round has 104 sc: 2 at each of the 4 corners plus 24 along each side.
Rnd 2: Sl st into the corner ch-3 sp. Work a corner fan in the same sp.
*Number the 25 ch-2 sps along the side from 1 to 25. Sc in sp 1, [skip 2 sps, fan in the next sp, skip 2 sps, sc in the next sp] 4 times. The last sc lands in sp 25. Work a corner fan in the next corner ch-3 sp. Repeat from * around, leaving out the last corner fan, and join to the top of the first dc.
Count per side: 5 sc and 4 fans, plus the corner fans. The round has 20 sc, 148 dc (4 x 28 side-fan dc + 4 x 9 corner-fan dc) and 128 ch-2 sps.
Why the math works: the fans sit in sps 4, 10, 16 and 22, and the sc sit in sps 1, 7, 13, 19 and 25. The pattern repeats every 6 sps (1 + 6 x 4 = 25). Each side starts and ends with a sc next to a corner fan, so all four sides match.
Rnd 3: Sl st into the first ch-2 sp of the corner fan.
*For the corner fan: sc in the first ch-2 sp, [ch 3, sc in the next ch-2 sp] 7 times. Then work a peak: ch 3, picot, ch 3. Skip the Rnd 2 sc.
For each side fan: sc in the first ch-2 sp, [ch 3, sc in the next ch-2 sp] 5 times. Then work a peak (ch 3, picot, ch 3) over the next Rnd 2 sc. Do this for all 4 side fans. Repeat from * around and join with a sl st to the first sc. Fasten off.
Count: 128 sc (1 per Rnd 2 ch-2 sp), 108 ch-3 loops and 20 picot peaks (5 per side). Each peak sits above a sc between fans, so the edge zigzags with a picot at every point.
Sprig Appliqué
Stem: Ch 31. Sl st in the back bump of the 2nd ch from the hook and in each ch across. (30 sl sts) Fasten off, leaving an 8 in (20.3 cm) tail. The stem should measure 5 in (12.7 cm). Add or remove chains if needed.
Leaf (make 9): Ch 10.
- Side 1: Sl st in the 2nd ch from the hook. Work sc, hdc, 3 dc and hdc across the next 6 chs, sc in the next ch, then 3 sc in the last ch (base). (11 sts)
- Side 2: Working in the free loops on the other side of the chain: sc, hdc, 3 dc, hdc, sc, then sl st in the last ch. (8 sts)
- Tip: Ch 2, sl st in the first sl st.
Count: 19 sts plus the ch-2 tip. Fasten off, leaving an 8 in (20.3 cm) tail.
Each leaf is 1.25 in (3.2 cm) long and 0.6 in (1.5 cm) wide.
Vein: thread the tail on the needle and backstitch along the center chain line from base to tip, then bring the tail back to the base. This makes the raised center ridge.
Assembly of the Appliqué
- Lay the panel RS up so the letter reads correctly.
- Pin the stem along the vertical dc line between chart columns 5 and 6. Its base sits at the top of Row 3, 0.9 in (2.3 cm) above the panel’s bottom edge. Whipstitch it in place.
- Pin the leaves in 4 pairs, one leaf on each side of the stem. Center the pairs 0.75, 1.75, 2.75 and 3.75 in (1.9, 4.4, 7.0 and 9.5 cm) above the stem base. Angle each leaf upward at about 45 degrees.
- Layer the leaves so the tips of each pair overlap the bases of the pair above. This gives the stacked frond look.
- Pin the ninth leaf upright at the top of the stem so it covers the stem end.
- Tack each leaf only at its base and along its center vein, so the edges stay raised. The finished sprig is about 2 in (5.1 cm) wide and 6 in (15.2 cm) tall.
Final Blocking
- Weave in all ends along solid blocks or dc posts.
- Soak the piece in cool water for 10 minutes. Press the water out in a towel without wringing.
- Pin the panel corners to a 7.5 in (19.1 cm) square, then straighten every mesh line.
- Pin out each picot peak so the outer edge measures 9.5 in (24.1 cm) on all sides.
- Lift the leaves with your fingertips so they dry raised.
- For a crisp doily, mist only the border with fabric stiffener.
- Let it dry completely before you unpin it.
Final Quality-Control Checklist
- Every filet row has 25 meshes.
- The G reads correctly from the RS.
- Mesh lines are straight, with no leaning columns.
- Each side has 5 picot peaks and 4 side fans, with a 9-dc fan at each corner.
- The panel measures 7.5 in (19.1 cm), and the finished square measures 9.5 in (24.1 cm).
- All 9 leaves are secure, with their tips free and overlapping.
- No ends show on the RS.
Troubleshooting
- Edges slant or wave: you skipped or doubled the dc at a turning chain. Recount to 76 sts.
- The letter is reversed: you worked the rows backward. Check that Row 5 starts with 3 O.
- Blocks bulge: your dc are taller than your ch-2 spaces are wide. Make each dc slightly shorter.
- Border ruffles: your fans are too loose. Use the 2 mm hook for Rnd 2 only.
- Border cups: you skipped too many sps. Recount to 25 sps per side in Rnd 1.
- Leaves lie flat instead of standing up: re-block them with a little stiffener, shaping each one over a fingertip.
Care
Hand wash in cool water with mild soap and dry flat, re-pinning if needed. If you used stiffener, apply it again after washing.
Final Notes
The measurements build on each other simply. Each mesh is 0.3 in (0.8 cm), so 25 meshes make 7.5 in (19.1 cm). Rnd 1 has 25 ch-2 sps per side, one for each mesh. The 6-sp fan repeat fits each side as 1 + 6 x 4 = 25. The three border rounds add 1 in (2.5 cm) on each side, for a finished square of 9.5 in (24.1 cm). Check your gauge first, count every row and enjoy watching your evergreen initial take shape.
Happy crocheting!