
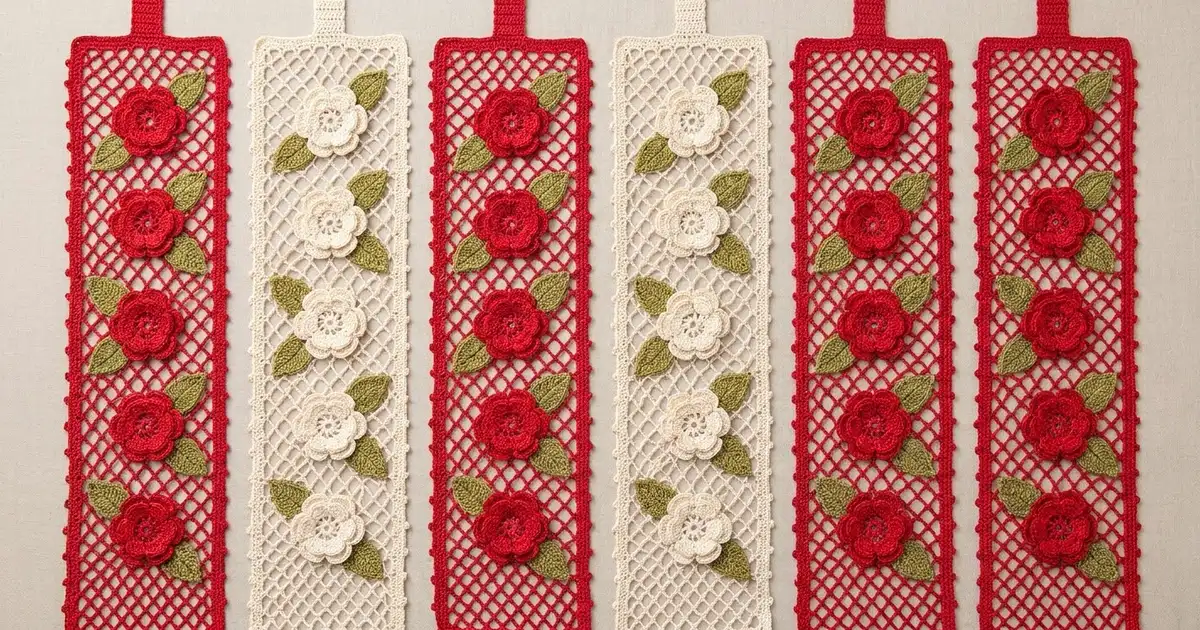
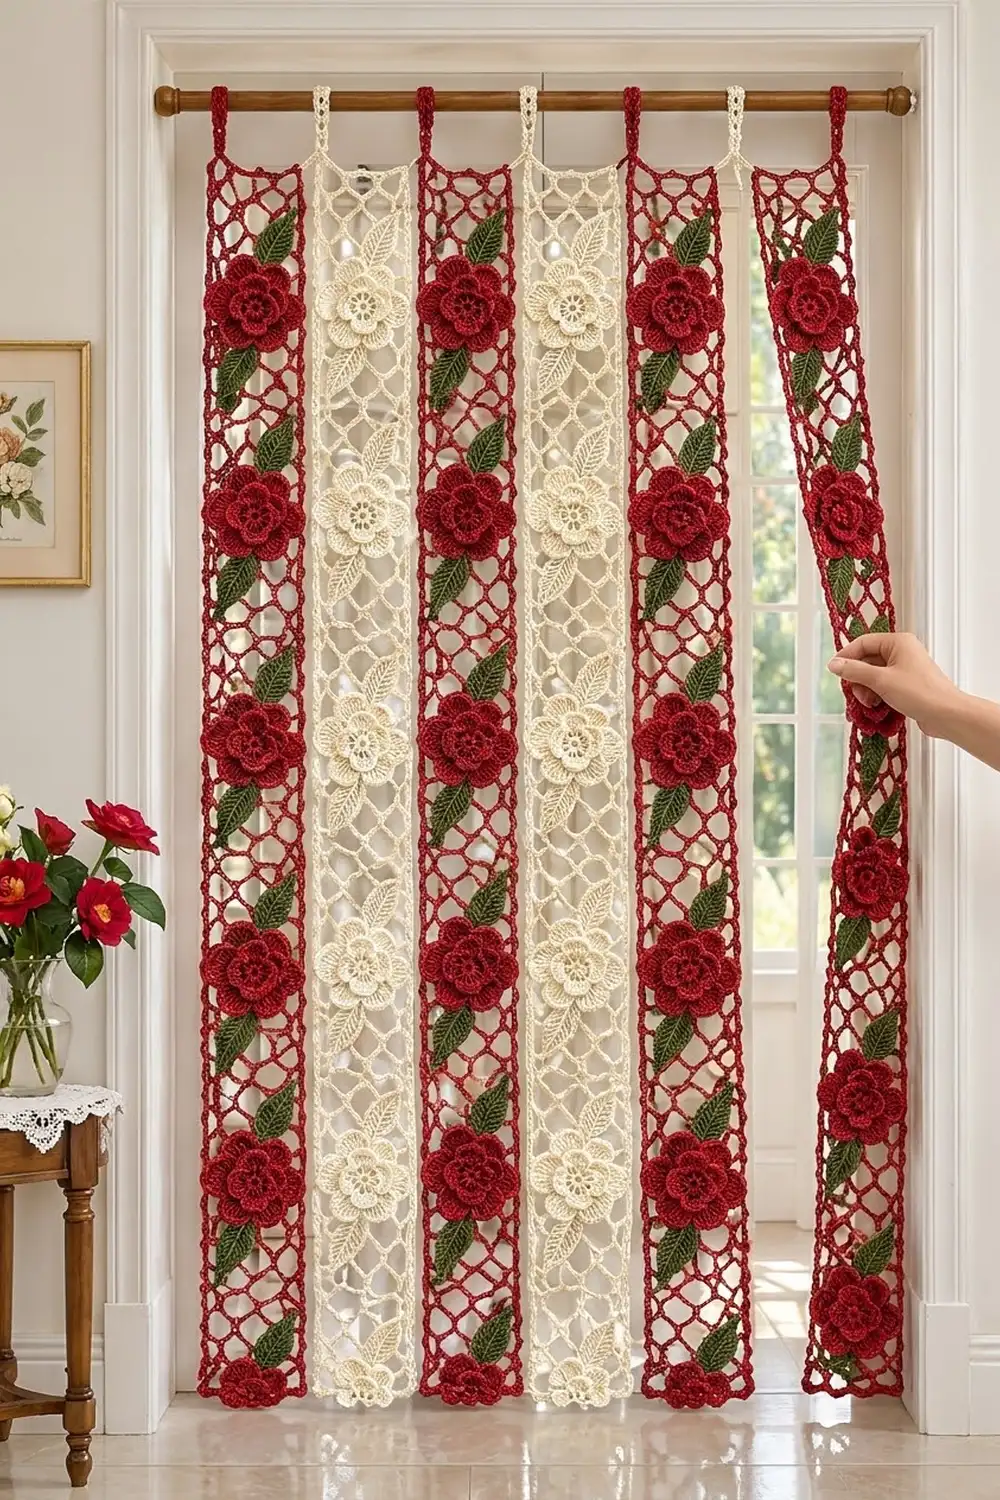
The Rosa Lattice Door Curtain is made of six airy mesh strips that hang from a rod. Each strip has seven layered roses, and each rose sits between two ribbed leaves. Light passes through the diamond net, and the roses give the strips weight and color.
The palette is classic: four strips in deep red with olive-green leaves, and two strips in cream from top to bottom. Hung in the order red, cream, red, cream, red, red, the curtain looks cottage-style and slightly vintage, close to Irish crochet in spirit but much simpler to make.
This pattern uses US crochet terms. Each finished strip measures 5.25 in (13.3 cm) wide by 75.5 in (191.8 cm) long. Two hanging tabs at the top of each strip form 3 in (7.6 cm) loops.
You make each strip in rows of chain mesh, add a two-round border, and then work the tabs. The roses and leaves are made separately and sewn onto the mesh. The strips are never joined to each other. They hang side by side on the rod.
Finished Size and Construction
- Finished strip size: 5.25 in x 75.5 in (13.3 cm x 191.8 cm), plus the tab loops
- Skill level: Intermediate
- Terminology: US crochet terms
- Yarn weight: DK / light (#3) cotton
- Hook: 3.5 mm (E-4)
- Number of pieces: 6 strips, 42 roses, 84 leaves
- Layout: 6 strips hung side by side, not joined
- Mesh size before border: 4.75 in x 75 in (12.1 cm x 190.5 cm)
- Border depth: 0.25 in (0.6 cm) per side, not counting the picots
- Rose: 4 in (10.2 cm) across
- Leaf: 3 in x 1.25 in (7.6 cm x 3.2 cm)
Materials
Use a smooth mercerized cotton or cotton blend in DK weight. Cotton shows the petal shapes clearly and hangs straight. The amounts below assume about 120 m per 50 g.
- Red: 500 g / 1,200 m (4 strips and 28 roses)
- Olive green: 150 g / 360 m (56 leaves)
- Cream: 350 g / 840 m (2 strips, 14 roses and 28 leaves)
These quantities include a margin of about 10 to 15 percent for swatching and tension differences.
Tools:
– 3.5 mm (E-4) crochet hook
– Tapestry needle
– Locking stitch markers
– Rustproof pins and a blocking surface at least 76 in (193.0 cm) long, or a surface you can block on in sections
– Tape measure
– Curtain rod, up to 1.5 in (3.8 cm) in diameter
Abbreviations (US Terms)
- ch – chain
- sl st – slip stitch
- sc – single crochet
- hdc – half double crochet
- dc – double crochet
- tr – treble crochet
- BLO – back loop only
- sk – skip
- sp – space
- st(s) – stitch(es)
- RS – right side
Picot: Ch 3, then sl st in the 3rd ch from the hook. A picot is never counted as a stitch.
Gauge and Checkpoints
Mesh gauge: A foundation of 19 working chains measures 4.75 in (12.1 cm). 8 mesh rows measure 5 in (12.7 cm) when lightly stretched.
Border gauge: 16 sc = 4 in (10.2 cm).
Before you start a full strip, test one piece. Work Rows 1–16 of the mesh, block the swatch, and measure it. It should be 4.75 in (12.1 cm) wide and 10 in (25.4 cm) long. Then make one rose and one leaf and check them against the sizes above.
Checkpoints:
– After Row 40: 25 in (63.5 cm) long
– After Row 80: 50 in (127.0 cm) long
– After Row 120: 75 in (190.5 cm) long
– After the border: 5.25 in x 75.5 in (13.3 cm x 191.8 cm)
– Rose after Rnd 1: 1.25 in (3.2 cm). After Rnd 2: 2.75 in (7.0 cm). Finished: 4 in (10.2 cm).
If your swatch is too big, go down 0.25 mm in hook size. If it is too small, go up 0.25 mm. If only the length is off, change the length of the ch-7 loops by one chain and keep the width as written. Change the row count only as a last resort. If you do, keep it an even number so the strip still ends on a Row-2 type row.
Mesh Strip (make 6: 4 red, 2 cream)
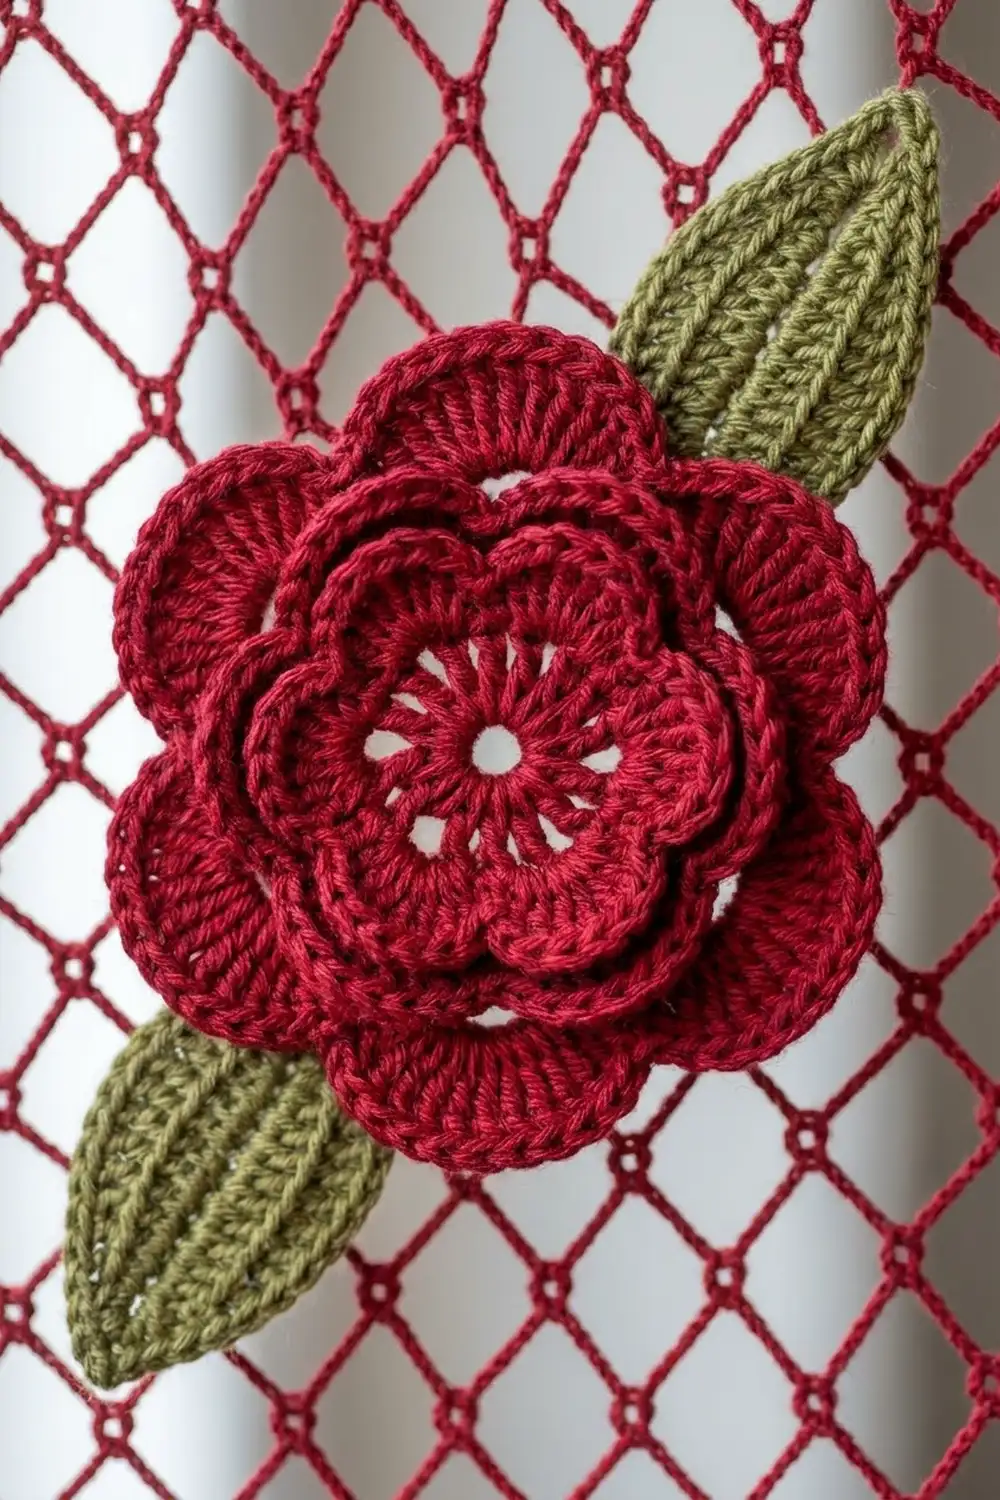
The strip is worked from the bottom up. Odd rows have 3 full ch-7 loops. Even rows have 2 full loops with a half space (ch 2 + dc) at each edge, which keeps the side edges straight.
Foundation: Ch 20.
Row 1 (RS): Sc in 2nd ch from hook, ch 7, sk 5 ch, sc in next ch; rep from * 2 more times, turn. (4 sc, 3 ch-7 loops; all 19 working chains used)*
Row 2: Ch 5 (counts as dc + ch 2), sc in first ch-7 loop, picot, ch 7, sc in next ch-7 loop, picot, ch 7, sc in last ch-7 loop, picot, ch 2, dc in last sc, turn. (3 sc anchors with picots, 2 ch-7 loops, 2 ch-2 half spaces)
Row 3: Ch 1, sc in first dc, ch 7, sk ch-2 sp, sc in next ch-7 loop, picot, ch 7, sc in next ch-7 loop, picot, ch 7, sc in 3rd ch of turning ch-5, turn. (4 sc, 3 ch-7 loops)
Rows 4–119: Repeat Rows 2–3 fifty-eight more times, ending with a Row-3 type row on Row 119.
Row 120: Work as Row 2, but leave out the picots. Do not fasten off.
Stitch check: Rows 1, 3, 5, and so on through 119 are sc-edged rows (60 rows). Rows 2, 4, 6, and so on through 120 are dc-edged rows (60 rows). The mesh measures 4.75 in x 75 in (12.1 cm x 190.5 cm).
Rose (make 42: 28 red, 14 cream)
Ring: Ch 6, sl st in first ch to form a ring.
Rnd 1: Ch 3 (counts as dc), 14 dc in ring, sl st in top of ch-3. (15 dc) The rose measures 1.25 in (3.2 cm) across. These dc form the spoked eyelet center.
Rnd 2 (inner petals): Sc in next dc, 5 dc in next dc, sc in next dc; rep from * 4 more times, sl st in first sc. (5 petals, 7 sts each, 35 sts total)* The rose measures 2.75 in (7.0 cm) across.
Rnd 3 (petal frame): Working behind Rnd 2, ch 5, sc around the post of the Rnd-1 dc that sits under the next pair of sc between petals; rep from * 4 more times, placing the last sc at the start of the round. (5 ch-5 loops)*
Rnd 4 (outer petals): In each ch-5 loop work (sc, hdc, 2 dc, 3 tr, 2 dc, hdc, sc), sl st in first sc. (5 petals, 11 sts each, 55 sts total) Fasten off, leaving a 12 in (30.5 cm) tail for sewing.
The outer petals sit behind the inner ones and peek out between them, which gives the rose its two-layer, cupped look. The finished rose is 4 in (10.2 cm) across.
Leaf (make 84: 56 olive green, 28 cream)
Foundation: Ch 12.
Rnd 1: Sc in 2nd ch from hook, hdc in next ch, dc in next 6 ch, hdc in next ch, sc in next ch, 3 sc in last ch (tip). Then work along the other side of the foundation: sc in next ch, hdc in next ch, dc in next 6 ch, hdc in next ch, sc in next ch, sl st in first sc. (23 sts: 10 per side + 3 at the tip)
Rnd 2 (ribbed): Working in BLO, sc in next 11 sts, 3 sc in center sc of the tip, sc in next 11 sts. (25 sc)
Stem: Ch 4, sl st in 2nd, 3rd and 4th ch from hook, sl st in first sc of Rnd 2. Fasten off, leaving a 10 in (25.4 cm) tail.
Working Rnd 2 in the back loops leaves a raised ridge on each side of the center, and that ridge reads as a vein. The pointed tip comes from the 3-sc increases. The finished leaf is 3 in x 1.25 in (7.6 cm x 3.2 cm).
Make All Pieces
Red strips (make 4):
– 4 red mesh strips
– 28 red roses (7 per strip)
– 56 olive-green leaves (14 per strip)
Cream strips (make 2):
– 2 cream mesh strips
– 14 cream roses (7 per strip)
– 28 cream leaves (14 per strip)
Curtain layout (left to right, seen from the room):
[ R ] [ C ] [ R ] [ C ] [ R ] [ R ]
R = red strip, red roses, olive leaves
C = cream strip, cream roses, cream leaves
Rose placement on each strip (row numbers):
Row 108  rose   (leaf up-right, leaf down-left)
Row  92  rose
Row  76  rose
Row  60  rose
Row  44  rose
Row  28  rose
Row  12  rose
The roses are centered on Rows 12, 28, 44, 60, 76, 92 and 108, so there are 16 rows (10 in / 25.4 cm) from one rose center to the next. Below the first rose and above the last there are 12 rows each, so the spacing is the same at both ends of the strip.
Joining: Appliqués and Hanging
The strips are never seamed to one another. Joining in this pattern means sewing the roses and leaves onto the mesh, then hanging each strip from its tabs.
Method: Center each rose over its row, at the middle of the strip. Using the tail, whipstitch through the Rnd-3 ch-5 loops on the back of the rose and into the nearest mesh sc anchor or picot node. Each of the 5 loops gets 2 to 3 small stitches, so every rose has at least 5 anchor points.
Place one leaf with its stem tucked under the outer petals at the upper right, angled at about 45 degrees toward the top corner. Place the second leaf at the lower left, angled toward the bottom corner. Sew each leaf along its center ridge and at its tip, catching only the mesh chains that lie under it.
Tension: Sew with the strip lying flat and relaxed. Don’t pull the mesh together toward the rose. The diamond loops around the rose should keep the same shape as the loops in an empty area of the strip.
Size checkpoint: After all 7 roses are attached, the strip should still measure 4.75 in (12.1 cm) across the mesh. If it measures less, the sewing stitches are too tight. Take them out and resew more loosely.
Border
Border gauge: 16 sc = 4 in (10.2 cm), so each side gets 4 sc per inch. With the RS facing, join the yarn in the first foundation chain at the bottom right.
Rnd 1: Ch 1. Work as follows:
– Bottom: Sc in each of the 19 foundation ch. (19 sc)
– Corner: Ch 2.
– Long side: 2 sc in each sc-row end and 3 sc around each dc-row end. (60 x 2 + 60 x 3 = 300 sc)
– Corner: Ch 2.
– Top, working into Row 120: Sc in the top of the turning ch, 2 sc in the ch-2 sp, sc in the sc, 5 sc in the ch-7 loop, sc in the sc, 5 sc in the ch-7 loop, sc in the sc, 2 sc in the ch-2 sp, sc in the dc. (1 + 2 + 1 + 5 + 1 + 5 + 1 + 2 + 1 = 19 sc)
– Corner: Ch 2.
– Long side: Work as the first long side. (300 sc)
– Corner: Ch 2. Sl st in first sc.
Rnd 1 total: 19 + 300 + 19 + 300 = 638 sc. The 4 corner ch-2 spaces are not counted as stitches.
Rnd 2: Ch 1. Work as follows:
– Bottom: Sc in each of the 19 sc, making a picot after the 2nd, 6th, 10th, 14th and 18th sc. (5 picots)
– Each corner: (Sc, ch 2, sc) in the corner sp.
– Each long side: Sc in next 3 sc, sc in next sc, picot; rep from * 74 more times. (300 sc, 75 picots)
– Top: Sc in each of the 19 sc, with no picots.
– Finish:* Sl st in first sc.
Rnd 2 is a trim round, so count it as stitches worked 1 per existing stitch plus the corner extras. That gives 638 + 8 corner sc = 646 sc. Each corner adds one sc to each of its two sides, so the short sides now have 19 + 2 = 21 sc and the long sides have 300 + 2 = 302 sc.
Why the math works: Each pair of rows is 1.25 in (3.2 cm) long and gets 2 + 3 = 5 sc, which is 4 sc per inch. The 60 row pairs give 300 sc over 75 in (190.5 cm). Each short side has 19 sc over 4.75 in (12.1 cm), which is also exactly 4 sc per inch. Because the gauge is the same on all four sides, the border lies flat without ruffling or pulling in.
Tabs: With the RS facing, join the yarn in the first sc of the top side (the 21 sc of Rnd 2).
– Row 1: Ch 1, sc in the same st and in the next 4 sc. (5 sc)
– Rows 2–24: Ch 1, turn, sc in each sc. (5 sc)
Fasten off. The tab is 6 in (15.2 cm) long and 1.25 in (3.2 cm) wide. Make a second tab over sts 17–21 of the top side. Fold each tab to the back and sew its last row to the base of Rnd 2, forming a 3 in (7.6 cm) loop.
Final Blocking
- Weave in all the ends, keeping them inside the solid areas: roses, leaves, border and tabs.
- Soak each strip in cool water for 15 minutes. Press the water out in a towel. Do not wring.
- Pin the strip flat to 5.25 in x 75.5 in (13.3 cm x 191.8 cm), placing pins at the border corners first.
- Pin along both long edges every 5 in (12.7 cm), checking that the edges are straight.
- Open each diamond with your fingers so that every node and picot sits evenly.
- Shape the rose petals into soft cups and press each leaf flat along its ridge.
- Let the strip dry completely before you unpin it. If your surface is short, block one section at a time and let it dry before moving on.
Final Quality-Control Checklist
- 6 strips: 4 red and 2 cream
- Each strip is 5.25 in x 75.5 in (13.3 cm x 191.8 cm)
- 120 mesh rows, ending on a Row-2 type row
- Border Rnd 1 has 638 sc; Rnd 2 has 646 sc
- 7 roses on each strip, centered on Rows 12, 28, 44, 60, 76, 92 and 108
- 2 leaves per rose, one angled up to the right and one down to the left
- 2 tabs per strip, each forming a 3 in (7.6 cm) loop
- All strips hang to the same length
Troubleshooting
- The strip is slanting: Check that every even row begins with ch 5 and ends with a dc in the last sc.
- The side edges are wavy: Rnd 1 has too many sc. Recount it: there should be 300 sc per long side.
- The rose is cupping too much: Loosen the Rnd-3 ch-5 loops, or use a ch-6 frame instead.
- The leaf curls: Steam-block it and pin it flat along the ridge.
- The strips hang at different lengths: Block them together and pin them all to the same length.
- The mesh puckers around a rose: The sewing stitches are too tight. Resew them more loosely.
Care
Hand wash in cool water with a mild detergent, press the water out in a towel, and dry the strips flat before rehanging. Avoid tumble drying, because it stretches the long mesh strips out of shape.
Final Notes
Here is the measurement chain from start to finish. The foundation of 19 working chains measures 4.75 in (12.1 cm), and 120 rows bring the mesh to 75 in (190.5 cm). The 4 sc per inch border adds 0.25 in (0.6 cm) on each side, so each strip finishes at 5.25 in x 75.5 in (13.3 cm x 191.8 cm). Seven 4 in (10.2 cm) roses sit 10 in (25.4 cm) apart, and each strip hangs from two 3 in (7.6 cm) tabs.
The six strips together measure 31.5 in (80.0 cm) across. With 1 in (2.5 cm) gaps between them, they fill a 36.5 in (92.7 cm) rod span.
Happy crocheting!