

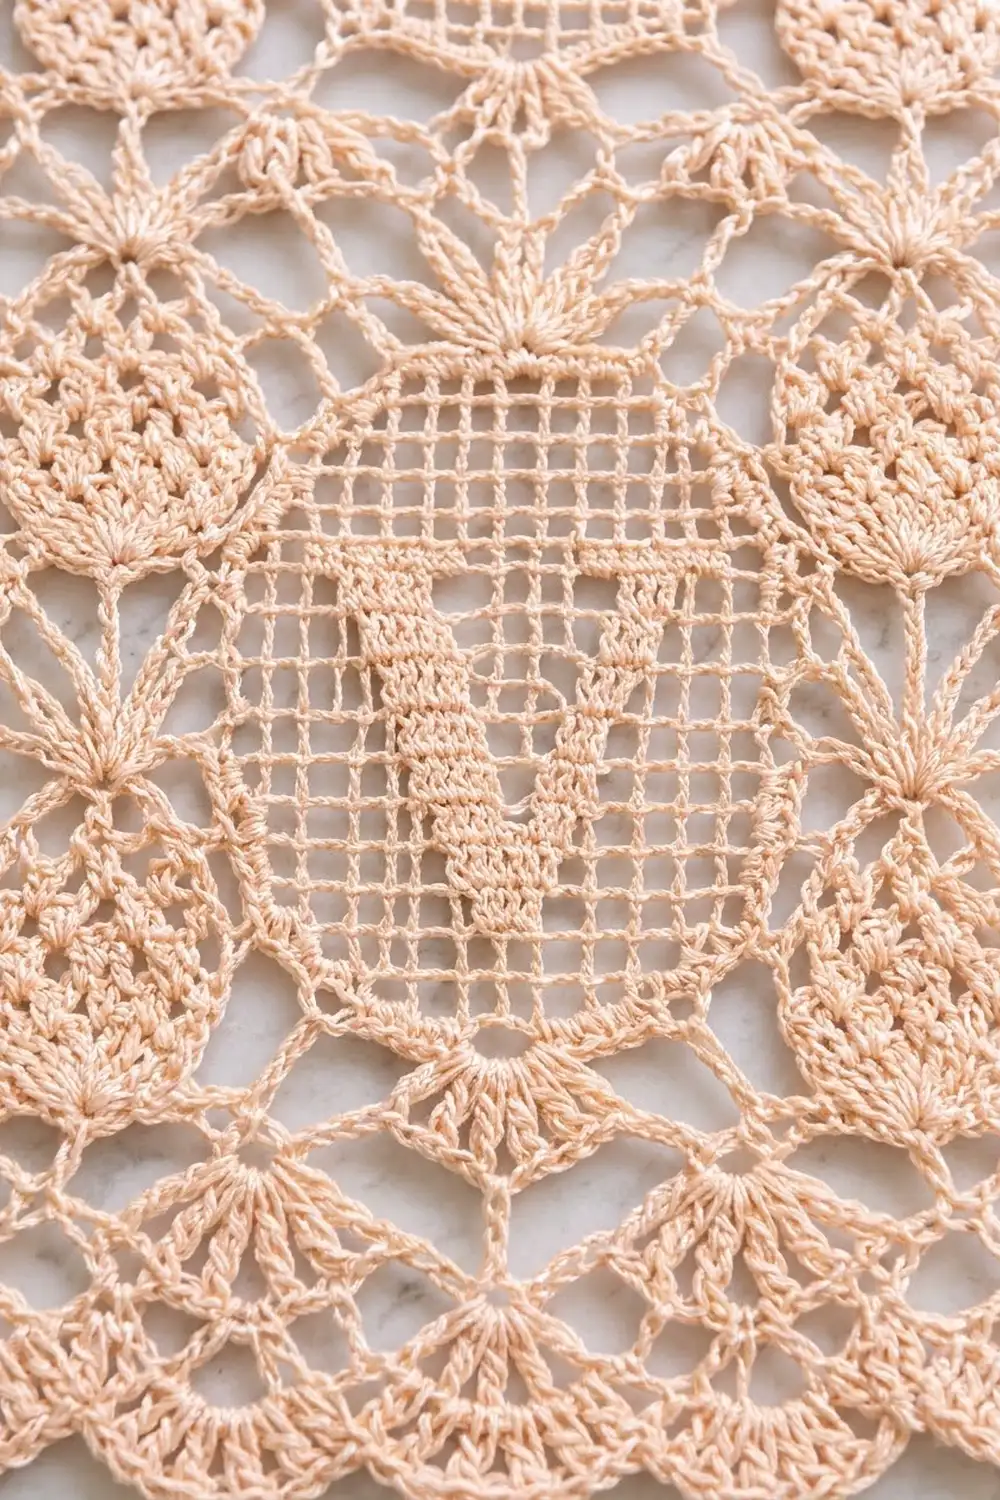
Valencia is a pair of romantic lace curtain panels. Each one has a column of round filet medallions down the center, and each medallion holds a bold serif “V” worked in solid filet blocks. Pineapples climb both side edges, and a scalloped fan border finishes the bottom.
The sample uses one soft peach cotton, which looks warm and vintage in daylight and lamplight. Mercerized cotton keeps the stitches crisp, so you can read the filet letter from across a room.
This pattern uses US crochet terms. Each finished panel is 18 in (45.7 cm) wide and 44 in (111.8 cm) long, or 45.5 in (115.6 cm) including the hanging tabs.
You work each panel flat, from the bottom up, in rows. Every row has three sections: a pineapple column, a filet center 15 mesh wide, and a second pineapple column. Then you add a border round, a scallop edge and a tab band. Make two panels for a pair.
Finished Size and Construction
- Finished size (each panel): 18 in × 44 in (45.7 cm × 111.8 cm), plus 1.5 in (3.8 cm) tabs
- Skill level: Intermediate
- Terminology: US
- Yarn weight: Super Fine (#1) fingering-weight mercerized cotton
- Hook: 2.75 mm (C-2)
- Number of pieces: 2 identical panels, each worked as one piece; the panels are not joined
- Layout: two panels hung side by side on one rod
- Size before border: 17.5 in × 42 in (44.5 cm × 106.7 cm)
- Border depth: 0.25 in (0.6 cm) on the sides, 0.5 in (1.3 cm) at the top, 1.5 in (3.8 cm) at the bottom
Materials
Choose a smooth, mercerized fingering-weight cotton with about 170 m per 50 g. Avoid fuzzy yarns, because they blur the filet letter.
- Peach: 350 g (about 1,190 m) for two panels, which is 175 g (about 595 m) per panel
These quantities include a margin of about 10% for your gauge swatch and small differences in tension.
Tools:
– 2.75 mm (C-2) hook
– Tapestry needle
– Locking stitch markers
– Rustproof pins and a blocking surface at least 20 in × 46 in (50.8 cm × 116.8 cm)
– Spray bottle and tape measure
Abbreviations (US Terms)
- ch – chain
- sc – single crochet
- dc – double crochet
- sl st – slip stitch
- sk – skip
- st(s) – stitch(es)
- RS / WS – right side / wrong side
Special stitches and terms:
– Shell: (2 dc, ch 2, 2 dc) in the same st or space. Makes 6 sts.
– Fan: 8 dc in the same st.
– Sp (filet space): ch 2, sk 2 sts (or the ch-2 space), dc in the next dc. Makes 3 sts.
– Bl (filet block): Over a space: 2 dc in the ch-2 space, then dc in the next dc. Over a block: dc in each of the next 3 dc. Makes 3 sts.
– Boundary dc: the dc at each edge of a section. The ch 3 at the start of each row counts as the first boundary dc.
Gauge and Checkpoints
Gauge: 4 filet mesh and 4 mesh rows = 2 in (5.1 cm), blocked.
Test first: Make a swatch before you start.
1. Ch 33.
2. Dc in the 4th ch from the hook and in each ch across (31 sts).
3. Work 10 mesh rows: ch 3, then 10 Sp across.
4. Block the swatch. It should be a 5 in (12.7 cm) square.
Checkpoints (unblocked, lightly stretched):
– After Row 2: 17.5 in (44.5 cm) wide
– After Row 22: 11 in (27.9 cm) tall
– After Row 42: 21 in (53.3 cm) tall
– After Row 62: 31 in (78.7 cm) tall
– After Row 84: 42 in (106.7 cm) tall
If your swatch is too big, use a 2.5 mm hook. If it’s too small, use a 3 mm hook. If the pineapple columns grow longer than the center, tighten your ch-2 loops a little.
The Panel
Every row is worked as three sections: Side, Center, Side. Start every row with ch 3, which counts as the first boundary dc. End every section with a dc in the next boundary dc. Every Side row is symmetrical, so you work RS and WS rows the same way.
Foundation: Ch 108.
Row 1 (solid): Dc in the 4th ch from the hook and in each ch across. Turn. (106 sts)
Row 2 (mesh): Ch 3, then work 35 Sp across. Turn. (106 sts = 35 mesh)
Each Side covers 10 mesh (30 sts), and the Center covers 15 mesh (45 sts).
Side Section: Pineapple Column (10-row cycle)
Side 1, Fan row (first repeat only):
– Ch 2, dc in the 1st dc.
– Ch 3, sc in the 3rd dc.
– Ch 3, Fan in the 5th dc.
– Ch 3, sc in the 7th dc.
– Ch 3, dc in the 9th dc.
– Ch 2, dc in the 10th (boundary) dc. (29 sts)
Side 1, Fan row (all later cycles):
– Ch 2, dc in the edge dc.
– Ch 3, sc in the ch-2 space of the shell.
– Ch 3, Fan in the tip sc.
– Ch 3, sc in the ch-2 space of the next shell.
– Ch 3, dc in the edge dc.
– Ch 2, dc in the boundary dc. (29 sts)
Side 2:
– Ch 2, dc in the edge dc.
– Ch 1, Shell in the sc.
– Ch 1, dc in the 1st Fan dc, then (ch 1, dc in the next dc) 7 times.
– Ch 1, Shell in the sc.
– Ch 1, dc in the edge dc.
– Ch 2, dc in the boundary dc. (38 sts)
Side 3: Work as Side 2, with 2 changes: put each Shell in the shell’s ch-2 space, and put the 8 spaced dc in the 8 pineapple dc. (38 sts)
Side 4:
– Ch 2, dc in the edge dc.
– Ch 1, Shell in the shell’s ch-2 space.
– Ch 1, sc in the 1st ch-1 space, then (ch 2, sc in the next ch-1 space) 6 times.
– Ch 1, Shell in the shell’s ch-2 space.
– Ch 1, dc in the edge dc.
– Ch 2, dc in the boundary dc. (42 sts: 7 sc, 6 loops)
Sides 5–9: Work as Side 4, but work the pineapple part as: sc in the 1st ch-2 loop, then (ch 2, sc in the next loop) to the end. Each row has 1 loop fewer:
– Side 5: 5 loops (39 sts)
– Side 6: 4 loops (36 sts)
– Side 7: 3 loops (33 sts)
– Side 8: 2 loops (30 sts)
– Side 9: 1 loop (27 sts)
The count for each row is 3 × (loops) + 24.
Side 10 (close):
– Ch 2, dc in the edge dc.
– Ch 1, Shell in the shell’s ch-2 space.
– Ch 2, sc in the last ch-2 loop. This is the tip sc.
– Ch 2, Shell in the shell’s ch-2 space.
– Ch 1, dc in the edge dc.
– Ch 2, dc in the boundary dc. (26 sts)
Each 20-row repeat runs this cycle twice: Sides 1–10, then Sides 1–10 again.
Center Section: Filet Medallion (20-row repeat)
The Center is always 15 mesh, or 45 sts. Every row is symmetrical.
- Rows 1–2: 15 Sp
- Row 3: 5 Sp, 5 Bl, 5 Sp
- Row 4: 3 Sp, 2 Bl, 5 Sp, 2 Bl, 3 Sp
- Row 5: 2 Sp, 1 Bl, 9 Sp, 1 Bl, 2 Sp
- Rows 6–7: 1 Sp, 1 Bl, 4 Sp, 3 Bl, 4 Sp, 1 Bl, 1 Sp (point of the V)
- Rows 8–9: 1 Bl, 4 Sp, 2 Bl, 1 Sp, 2 Bl, 4 Sp, 1 Bl
- Rows 10–11: 1 Bl, 3 Sp, 2 Bl, 3 Sp, 2 Bl, 3 Sp, 1 Bl
- Row 12: 1 Bl, 2 Sp, 2 Bl, 5 Sp, 2 Bl, 2 Sp, 1 Bl
- Row 13: 1 Sp, 1 Bl, 1 Sp, 2 Bl, 5 Sp, 2 Bl, 1 Sp, 1 Bl, 1 Sp
- Row 14: 1 Sp, 1 Bl, 1 Sp, 3 Bl, 3 Sp, 3 Bl, 1 Sp, 1 Bl, 1 Sp (serifs)
- Row 15: as Row 5
- Row 16: as Row 4
- Row 17: as Row 3
- Rows 18–20: 15 Sp
The ring is 15 mesh wide and 15 rows tall, about 7.5 in (19.1 cm) across.
Working the Repeats
Rows 3–82: Work the 20-row repeat 4 times. For each row: ch 3, work Side, Center, Side, then turn.
Full-row counts (turning ch + Side + 45 + Side):
| Side row | Full-row count |
|---|---|
| 1 | 104 |
| 2–3 | 122 |
| 4 | 130 |
| 5 | 124 |
| 6 | 118 |
| 7 | 112 |
| 8 | 106 |
| 9 | 100 |
| 10 | 98 |
Every 10 rows, put a marker in each boundary dc. This lets you check that the section edges are stacking straight.
Row 83 (transition mesh): Ch 3. Work each Side as follows:
– Ch 2, dc in the edge dc.
– Ch 2, dc in the 1st dc of the shell.
– Ch 2, dc in the shell’s ch-2 space.
– Ch 2, dc in the last dc of the shell.
– Ch 2, dc in the tip sc.
– Repeat the 3 shell steps on the second shell.
– Ch 2, dc in the edge dc.
– Ch 2, dc in the boundary dc.
This gives 10 mesh per Side. Work the Center as 15 Sp. (106 sts = 35 mesh)
Row 84 (solid): Ch 3, then dc in each dc and 2 dc in each ch-2 space. (106 sts) Fasten off.
Make All Pieces
Make 2 panels in Peach, using 175 g (about 595 m) each.
| Panel A | Panel B |
(side by side on one rod, not joined)
Border
Border gauge: 6 sc = 1 in (2.5 cm).
Rnd 1 (all edges): Join the yarn at the top right corner st. Ch 1, then work around the panel:
– Top: 3 sc in the corner st, sc in the next 104 sts, 3 sc in the corner st.
– Side: 3 sc in each row-end. That’s 84 rows × 3 = 252 sc.
– Bottom: 3 sc in the corner foundation st, sc in the next 104 foundation sts, 3 sc in the corner foundation st.
– Side: 252 sc.
Join with a sl st. Fasten off. (724 sc: 104 + 104 + 252 + 252 between the corners, plus 4 corners × 3 = 12)
Why the math works: The top and bottom each span 106 sts, counting from the center sc of one corner to the center sc of the next (1 + 104 + 1). That’s about 6.06 sc per inch across 17.5 in (44.5 cm). Each side has 252 sc over 42 in (106.7 cm), which is exactly 6 per inch. Because both match the border gauge, the edges lie flat without flaring or pulling in.
Bottom scallop: With the RS facing, join at the bottom corner’s center sc. You’ll work across 106 sts.
– Row A: Ch 1, sc in the same st, then (ch 4, sk 4, sc in the next st) 21 times. Turn. (22 sc, 21 loops)
– Row B: Ch 1, sc in the first sc, 9 dc in the next loop, then (sc in the next loop, 9 dc in the next loop) 10 times, sc in the last sc. Turn. (111 sts: 11 fans)
– Row C: Ch 1, sl st in the first sc, then (sc in the next 4 dc, [sc, ch 3, sc] in the next dc, sc in the next 4 dc, sl st in the next sc) 11 times. Fasten off. (155 sts)
Top band and tabs: With the RS facing, join at the top corner’s center sc. You’ll work across 106 sts.
– Row T: Ch 1, sc in the first 3 sts. [Sc in the next st, ch 20, sk 2, sc in the next st, sc in the next 28 sts] 3 times. Sc in the next st, ch 20, sk 2, sc in the next st, sc in the last 3 sts. Turn. (98 sc + 4 ch-20 loops)
– Row T2: Ch 1, sc in each sc and 28 sc in each ch-20 loop. Fasten off. (210 sc)
Row T uses all 106 base sts: 3 + (3 × 32) + 4 + 3 = 106. There are 28 sts between tabs and 3 sts at each end, so the tabs are evenly spaced. Each tab is about 1.5 in (3.8 cm) tall and fits a rod up to 1 in (2.5 cm) thick.
Final Blocking
- Weave in the ends through solid dc or sc, never through open mesh.
- Soak the panel in cool water for 15 minutes. Roll it in a towel to press out the water. Don’t wring it.
- Pin the panel to 18 in × 44 in (45.7 cm × 111.8 cm). Leave the tabs unpinned.
- Pin the boundary dc columns straight first.
- Pin each medallion ring into a round shape. Then pin each scallop point and picot.
- Open each pineapple by pinning its tip loop and shells.
- Mist lightly and let it dry completely, about 24 hours.
Final Quality-Control Checklist
- Both panels measure 18 in × 44 in (45.7 cm × 111.8 cm).
- The boundary dc columns run straight from Row 2 to Row 83.
- Each panel has 4 matching V medallions and 8 pineapples on each side.
- Every Center row has 15 mesh.
- The bottom edge has 11 fans, each with a centered picot.
- The 4 tabs are evenly spaced and the same height.
- All ends are hidden and secure.
Troubleshooting
- Pineapple columns ripple: Your ch-2 loops are too loose. Snug up the chains and block firmly.
- Panel narrows partway up: Your filet blocks are too tight. Relax your pull-through on the Bl dc.
- The V looks blurred: Check your Bl and Sp counts against the list, and use a firm, smooth cotton.
- A section edge drifts: You missed a boundary dc. Count back to the last marker and rework from there.
- Tabs stretch: Pack each loop in Row T2 more tightly, with up to 30 sc.
Care
Hand wash in cool water with mild soap. Reshape and dry flat on towels, and hang only when completely dry.

Final Notes
Each measurement builds on the one before:
– Gauge of 4 mesh = 2 in (5.1 cm) makes 35 mesh = 17.5 in (44.5 cm) of width.
– 84 rows make 42 in (106.7 cm) of length.
– The border adds 0.5 in (1.3 cm) to the width and 2 in (5.1 cm) to the length.
– That gives 18 in × 44 in (45.7 cm × 111.8 cm), plus the tabs.
Check each step as you go and your panels will hang evenly. Happy crocheting!