

This door curtain is made from seven long, narrow lace strips. Each one hangs on its own from a rod by a folded tab loop. The strips alternate orchid purple and soft cream, so the doorway gets a striped look that still lets light and air through.
Every strip repeats one motif. A fan of four treble crochet stitches sits inside a frame of chain arches: two arches cap each fan and a row of three arches sits below the next one. A plain double crochet post runs along both long edges, so each strip looks like a column of seashells stacked inside a ladder.
The pattern uses US crochet terms. Each finished strip is 4.5 in (11.4 cm) wide and 72 in (182.9 cm) long, plus a 3 in (7.6 cm) hanging loop. Seven strips with 0.5 in (1.3 cm) gaps between them fill 34.5 in (87.6 cm) of rod.
You work each strip bottom-up in rows from a short foundation chain. Then you add a single crochet border all the way around and crochet a narrow tab off the top edge. The strips are never sewn together, so the curtain parts easily when someone walks through it.
Finished Size and Construction
- Finished strip size: 4.5 in x 72 in (11.4 cm x 182.9 cm), not counting the tab
- Skill level: Easy intermediate
- Terminology: US crochet terms
- Yarn weight: Worsted (#4) cotton
- Hook: 5.0 mm (H-8)
- Number of pieces: 7 separate strips (4 purple, 3 cream)
- Layout: 7 strips side by side in one row, alternating colors, purple on both outer edges
- Strip size before border: 4 in x 71.5 in (10.2 cm x 181.6 cm)
- Border depth: 0.25 in (0.6 cm) on every side
- Hanging loop: 1.25 in (3.2 cm) wide, 3 in (7.6 cm) tall once folded
- Total width on rod: 34.5 in (87.6 cm)
Materials
Use a smooth, mercerized or combed worsted-weight cotton. Cotton keeps the arches crisp, hangs straight and stops the strips from twisting. Avoid acrylic here, because it curls at the edges and stretches unevenly when hung.
- Color A, orchid purple: 550 g / 935 m (4 strips, about 120 g / 204 m each)
- Color B, cream: 400 g / 680 m (3 strips, about 120 g / 204 m each)
These quantities include roughly a 10% margin for the swatch and for small differences in tension. Buy each color from a single dye lot.
Tools:
- 5.0 mm (H-8) crochet hook
- Tapestry needle
- Stitch markers (at least 4)
- Rustproof pins and a blocking surface at least 72 in (182.9 cm) long
- Measuring tape
- Curtain rod up to 1.5 in (3.8 cm) in diameter, at least 36 in (91.4 cm) long
Abbreviations (US Terms)
- ch – chain
- sl st – slip stitch
- sc – single crochet
- dc – double crochet
- tr – treble crochet (yarn over twice, insert hook, pull up a loop, [yarn over, pull through 2 loops] 3 times)
- sk – skip
- sp – space
- tch – turning chain
- RS / WS – right side / wrong side
Special stitch: Fan. Work [tr, (ch 1, tr) 3 times] into the same space. That makes 4 tr with 3 ch-1 spaces between them.
Gauge and Checkpoints
Gauge: 15 dc = 4 in (10.2 cm). One 3-row repeat (fan row, cap row, arch row) = 1.75 in (4.4 cm) tall after blocking.
Test one swatch first. Work Rows 1–8 (two repeats), then work Row 123 as a closing row. Block the swatch. It should measure 4 in (10.2 cm) wide and 5 in (12.7 cm) tall.
- Too wide or too tall: go down 0.5 mm in hook size.
- Too narrow or too short: go up 0.5 mm in hook size.
- Width correct but repeats too tall: snug each tr before you finish it, and keep the ch-7 arches firm.
Checkpoints (measured flat and relaxed):
- After Row 2: 4 in (10.2 cm) wide, 1 in (2.5 cm) tall
- After Row 5 (1 repeat): 2.75 in (7.0 cm) tall
- After Row 32 (10 repeats): 18.5 in (47.0 cm) tall
- After Row 62 (20 repeats): 36 in (91.4 cm) tall
- After Row 122 (40 repeats): 71 in (180.3 cm) tall
- After Row 123: 71.5 in (181.6 cm) tall
Adjusting length: each repeat you add or remove changes the length by 1.75 in (4.4 cm). If you change it, use the same number of repeats on all seven strips.
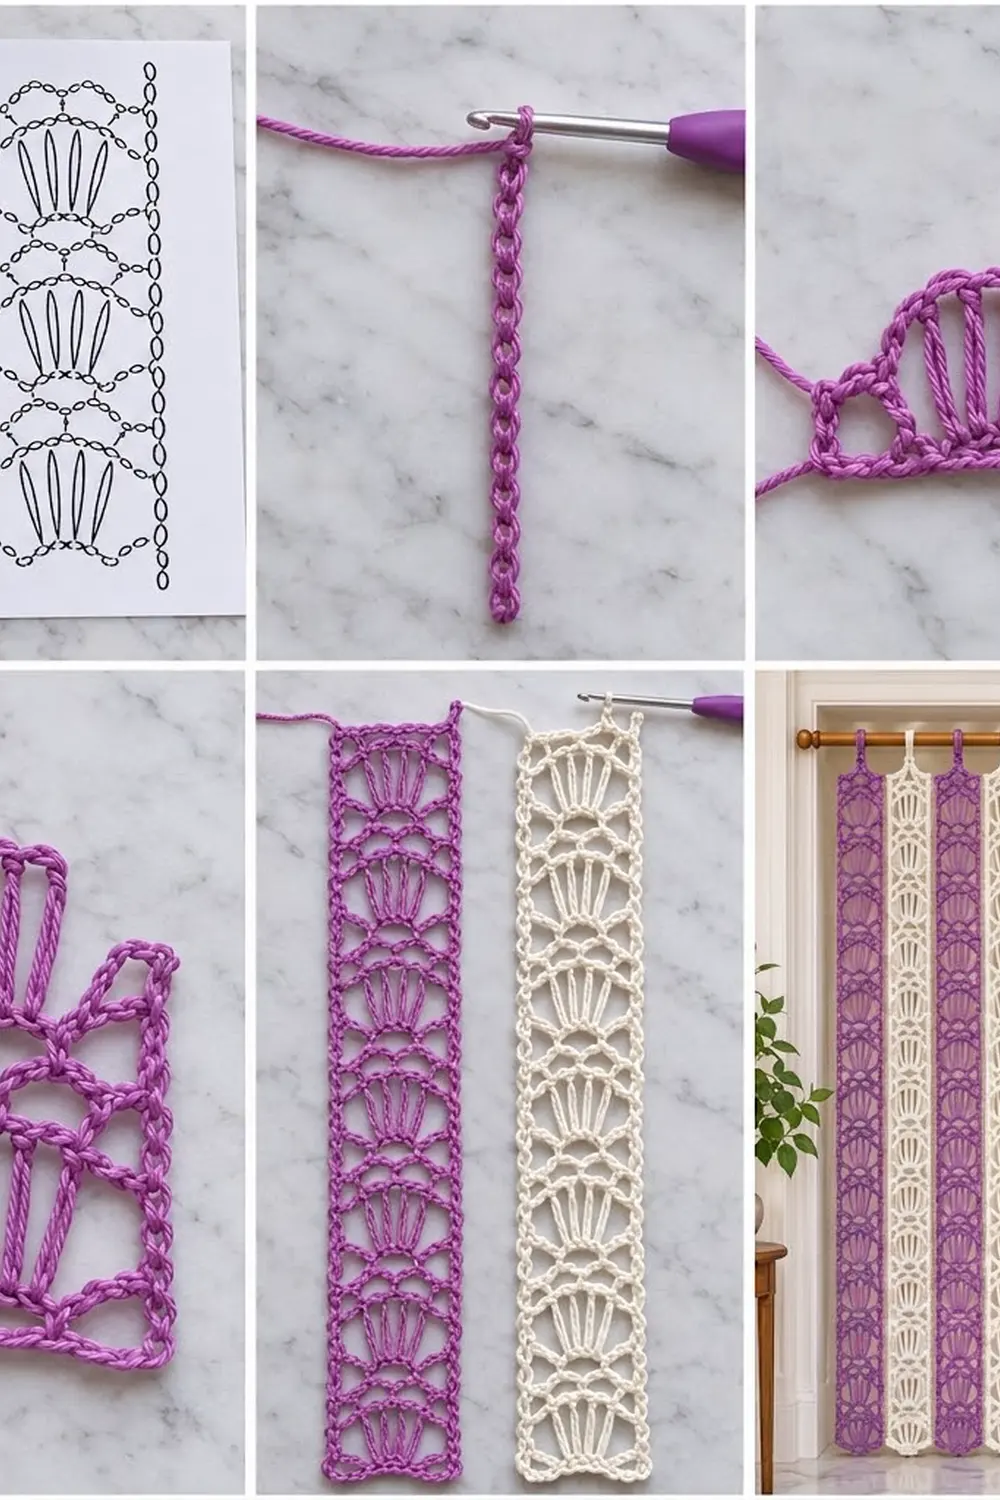
Strip Pattern
Make 4 strips in Color A and 3 in Color B. Every strip is worked the same way.
Foundation: Ch 17.
Row 1 (RS): Dc in 4th ch from hook and in each ch across. Turn. (15 sts; the skipped ch-3 counts as the first dc.)
For the next row, number the Row 1 stitches 1 to 15. Stitch 1 is the turning chain.
Row 2 (arch row): Ch 3 (counts as dc throughout), ch 3, sk sts 2–4, sc in st 5, ch 5, sk sts 6–10, sc in st 11, ch 3, sk sts 12–14, dc in top of tch (st 15). Turn. (4 sts: 2 dc, 2 sc; plus ch-3 sp, ch-5 sp, ch-3 sp.)
Each chain spans exactly as many stitches as it skips: 3 + 1 + 5 + 1 + 3 = 13, plus 2 edge dc = 15. That keeps the row 4 in (10.2 cm) wide.
Row 3 (fan row): Ch 4 (counts as tr), ch 2, sc in next sc, ch 1, Fan in center ch-5 sp, ch 1, sc in next sc, ch 2, tr in top of tch. Turn. (8 sts: 2 edge tr, 2 sc, 4 fan tr; 7 ch-sps.)
The edge tr match the height of the fan, which keeps the long edges straight.
Row 4 (cap row): Ch 3, ch 7, sc in center ch-1 sp of Fan (between 2nd and 3rd tr), ch 7, dc in 4th ch of tch. Turn. (3 sts: 2 dc, 1 sc; 2 ch-7 arches.)
These two arches form the curved cap over each shell.
Row 5 (arch row): Ch 3, ch 3, sc in 4th ch of first ch-7 arch, ch 5, sc in 4th ch of next ch-7 arch, ch 3, dc in top of tch. Turn. (4 sts: 2 dc, 2 sc; plus ch-3 sp, ch-5 sp, ch-3 sp.)
Work each sc into the middle chain of its arch, not around the arch. This puts the sc exactly where they were in Row 2. Row 5 is the same as Row 2, so the next Fan centers itself.
Rows 6–122: Repeat Rows 3–5 another 39 times. That makes 40 repeats in total, and the last row you work is an arch row. Place a marker every 10 repeats.
Row 123 (closing row): Ch 3, 3 dc in ch-3 sp, dc in sc, 5 dc in ch-5 sp, dc in sc, 3 dc in ch-3 sp, dc in top of tch. (15 sts.)
Do not fasten off. The strip should now measure 4 in x 71.5 in (10.2 cm x 181.6 cm).
Border
The border is one round of sc in the same color.
Border gauge: 4 sc per 1 in (2.5 cm) along the long sides. That means 2 sc in the end of each dc row (0.5 in / 1.3 cm tall) and 3 sc in the end of each tr row (0.75 in / 1.9 cm tall).
Round 1: Ch 1. Do not turn.
- Top edge (Row 123): 3 sc in first st (corner), sc in each of next 13 sts, 3 sc in last st (corner). (19 sc, corners included.)
- First long side: working into the row ends, 2 sc in each dc row end and 3 sc in each tr row end. (286 sc between the corners.)
- Bottom edge (foundation ch): 3 sc in first ch (corner), sc in each of next 13 ch, 3 sc in last ch (corner). (19 sc, corners included.)
- Second long side: repeat the first long side. (286 sc.)
- Sl st in first sc to join. (19 + 286 + 19 + 286 = 610 sc.)
Why the math works: each long side has 83 dc-height rows and 40 tr rows. The dc-height rows are Rows 1, 2 and 123, plus the cap and arch rows of all 40 repeats. That gives 83 x 2 = 166 sc plus 40 x 3 = 120 sc, so 286 sc. At 4 sc per inch, 286 sc covers exactly 71.5 in (181.6 cm).
The short edges have 13 sc worked 1 per stitch plus two 3-sc corner groups, so 19 sc in total. The border adds 0.25 in (0.6 cm) all around, so the strip ends up at 4.5 in x 72 in (11.4 cm x 182.9 cm).
Fasten off and weave in the ends.
Hanging Tab
Row 1: With RS facing, join yarn in the 8th sc of the top edge, ch 1, sc in same st and in next 4 sc. Turn. (5 sc over sc 8–12, centered.)
Rows 2–24: Ch 1, sc in each sc across. Turn. (5 sc.)
The tab should measure 1.25 in (3.2 cm) wide and 6 in (15.2 cm) long. Fasten off and leave a 12 in (30.5 cm) tail. Fold the tab to the WS so it forms a 3 in (7.6 cm) loop, then whipstitch the last row behind Row 1 of the tab.
Make All Pieces
- Color A (purple): 4 strips, each with border and tab
- Color B (cream): 3 strips, each with border and tab
Layout grid (left to right, room side):
| A | B | A | B | A | B | A |
  1   2   3   4   5   6   7
Lay all seven strips side by side and check that their lengths match to within 0.5 in (1.3 cm). If they don’t, re-block the short strip or count its repeats.
Joining
The strips are not seamed together. Each one hangs on its own, so the curtain can part at any gap. In this design, joining means putting the strips on the rod in a consistent way.
- Method: slide the tabs onto the rod in grid order, 1 to 7.
- Stitch-to-stitch logic: each tab sits over sc 8–12 of a 19-sc top edge, so every strip hangs centered and its edges stay vertical.
- Spacing: 7 x 4.5 in = 31.5 in (80.0 cm) of lace plus 6 gaps of 0.5 in = 3 in (7.6 cm), for 34.5 in (87.6 cm) in total.
- Tension advice: whipstitch the tab firmly but not tightly. If it is too tight the top border puckers. If it is too loose the strip tilts forward.
- Size checkpoint: measure across from the outer edge of strip 1 to the outer edge of strip 7. It should be 34.5 in (87.6 cm). Even out the gaps as needed.
Final Blocking
- Soak each strip in cool water for 10 minutes, then gently squeeze out the water. Do not wring.
- Roll the strip in a towel and press to remove extra water.
- Pin the corners to 4.5 in x 72 in (11.4 cm x 182.9 cm).
- Pin the tip of each Fan so its tr spread evenly, then pin each ch-7 cap into a smooth curve.
- Check that both long edges are straight with a measuring tape.
- Let the strip dry completely, then unpin it.
- Hang the strips for 24 hours and measure them again. Cotton can relax by up to 1 in (2.5 cm).
Final Quality-Control Checklist
- Each strip has exactly 40 Fans, each with 4 tr and 3 ch-1 spaces.
- Each strip is 4.5 in (11.4 cm) wide along its whole length.
- Each strip is 72 in (182.9 cm) long, not counting the tab.
- The border has 19 sc on each short edge and 286 sc on each long side.
- Tabs are centered, 1.25 in (3.2 cm) wide, with 3 in (7.6 cm) loops.
- Colors run A-B-A-B-A-B-A.
- All ends are woven in securely.
Troubleshooting
- Wavy long edges: too many border sc. Recheck 2 sc per dc row and 3 sc per tr row.
- Edges pull in: too few border sc, or the ch-4 at the start of the fan rows is too short.
- Fans lean: the Row 5 sc are not in the 4th ch of each arch. Count the chains carefully.
- Flat or tight caps: loosen the ch-7 chains slightly.
- Strip narrower than 4 in (10.2 cm): loosen the ch-3 and ch-5 in the arch rows.
- Strip twists while hanging: the tab is off center. Resew it over sc 8–12.
Care
Hand wash in cool water with mild detergent and dry flat, reshaping the arches while the strips are damp. Do not tumble dry, because heat can shrink cotton unevenly.
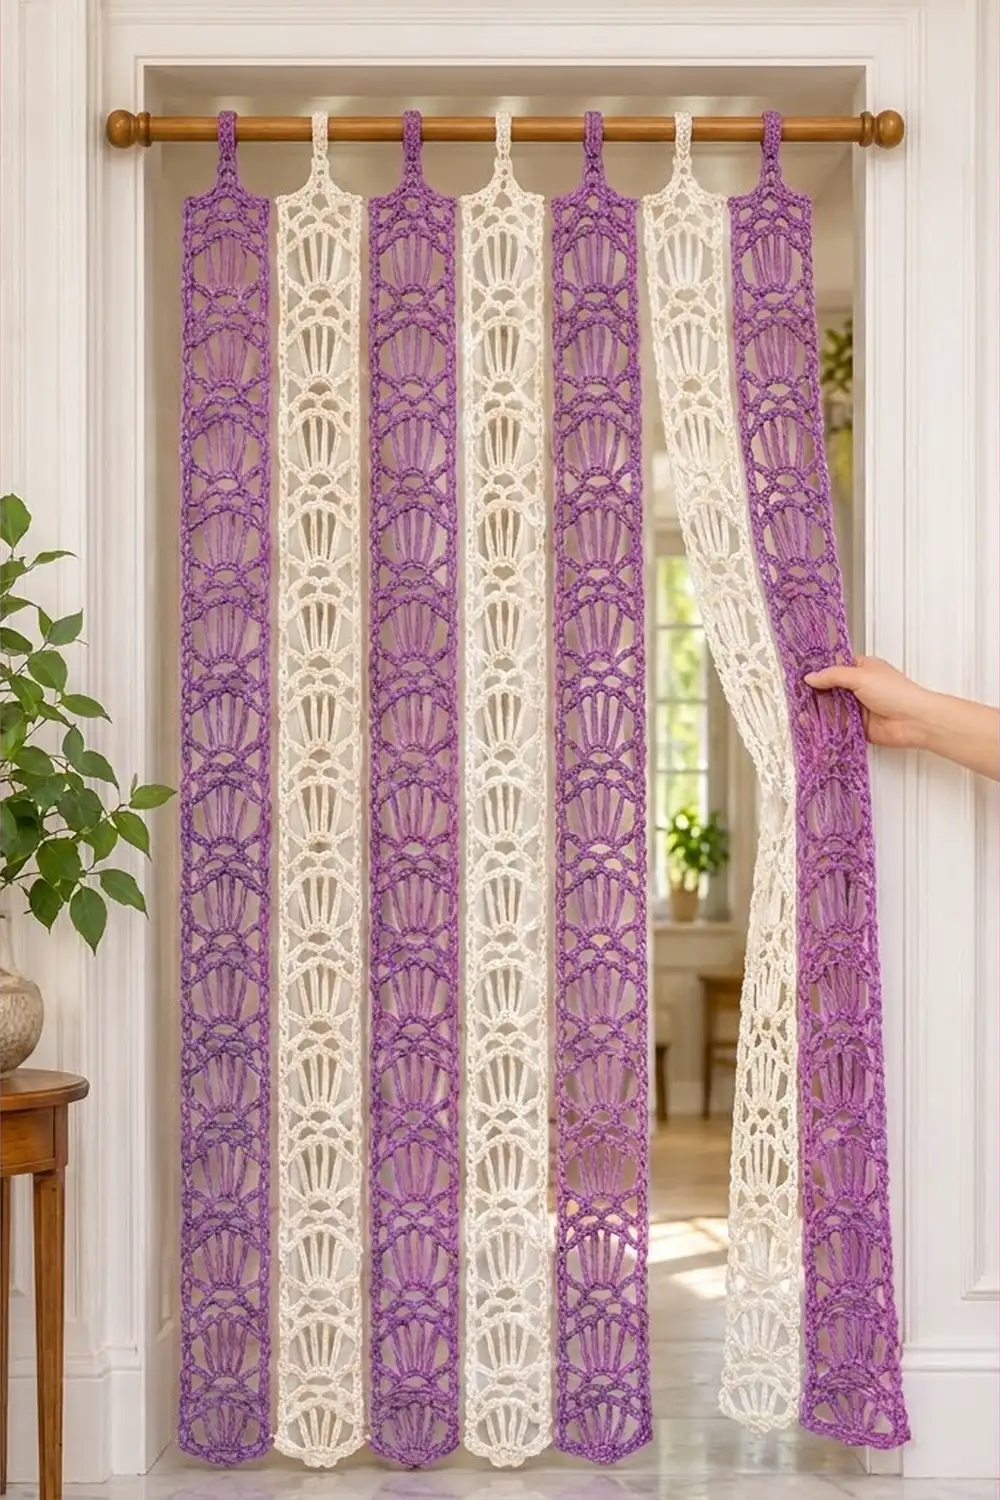
Final Notes
The measurements build on each other in a chain. 15 dc make a strip 4 in (10.2 cm) wide. Each repeat adds 1.75 in (4.4 cm), so 40 repeats plus the base and closing rows give 71.5 in (181.6 cm). The 286-sc border sides match that length at 4 sc per inch, and the border brings each strip to 4.5 in x 72 in (11.4 cm x 182.9 cm). Seven strips with 0.5 in (1.3 cm) gaps hang 34.5 in (87.6 cm) wide. Check your swatch, count your Fans, and the curtain will hang straight and even.
Happy crocheting!