

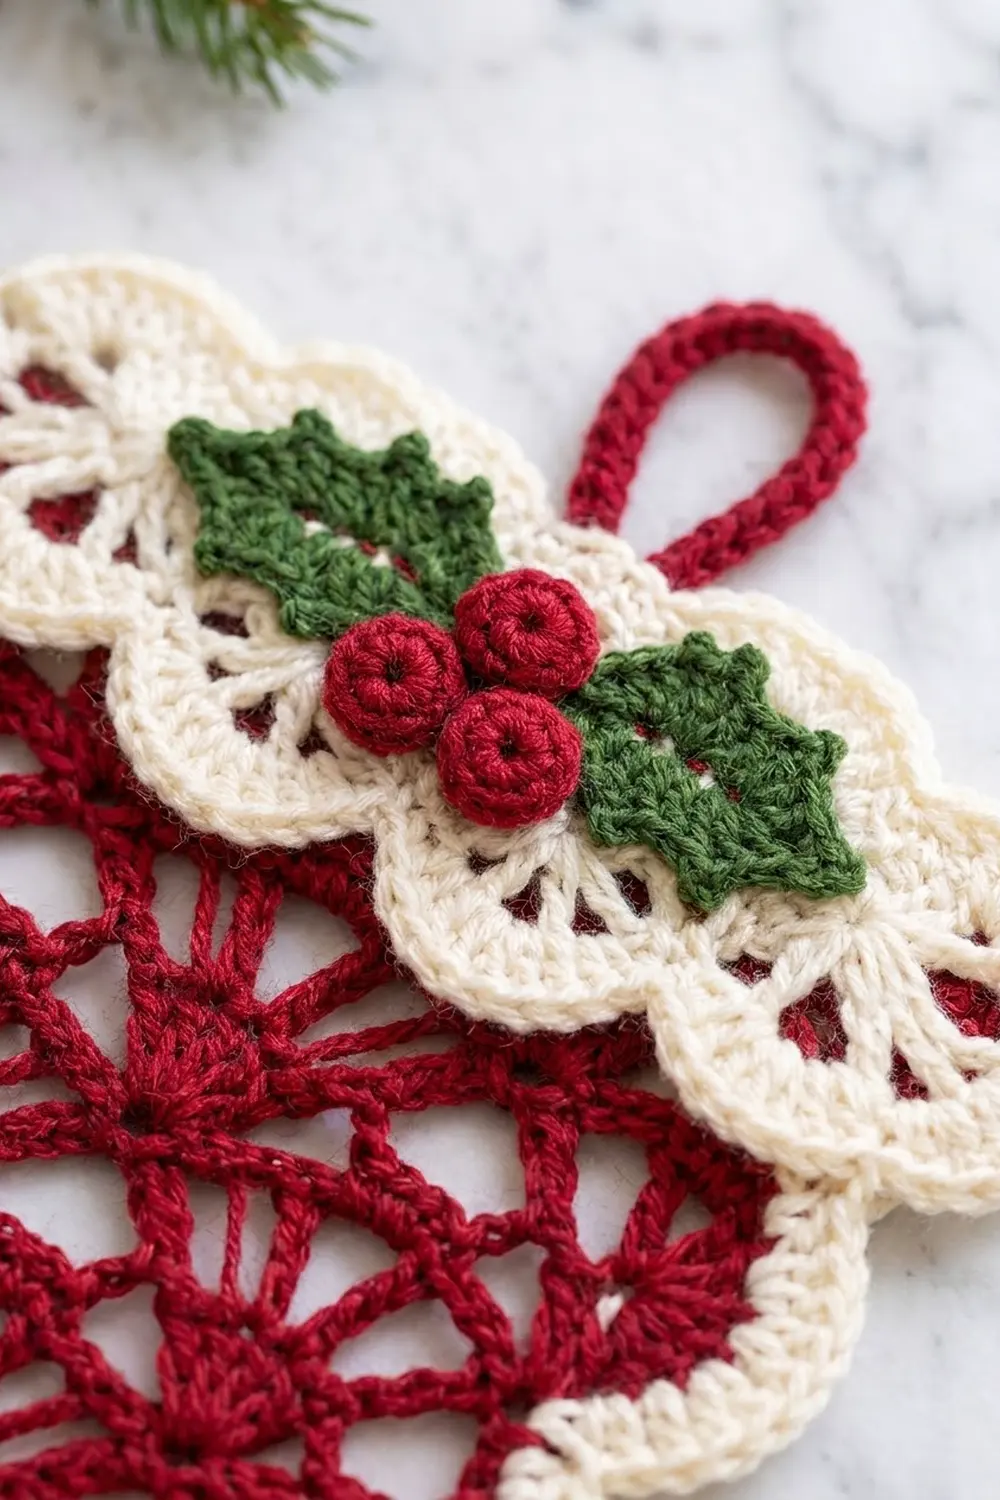
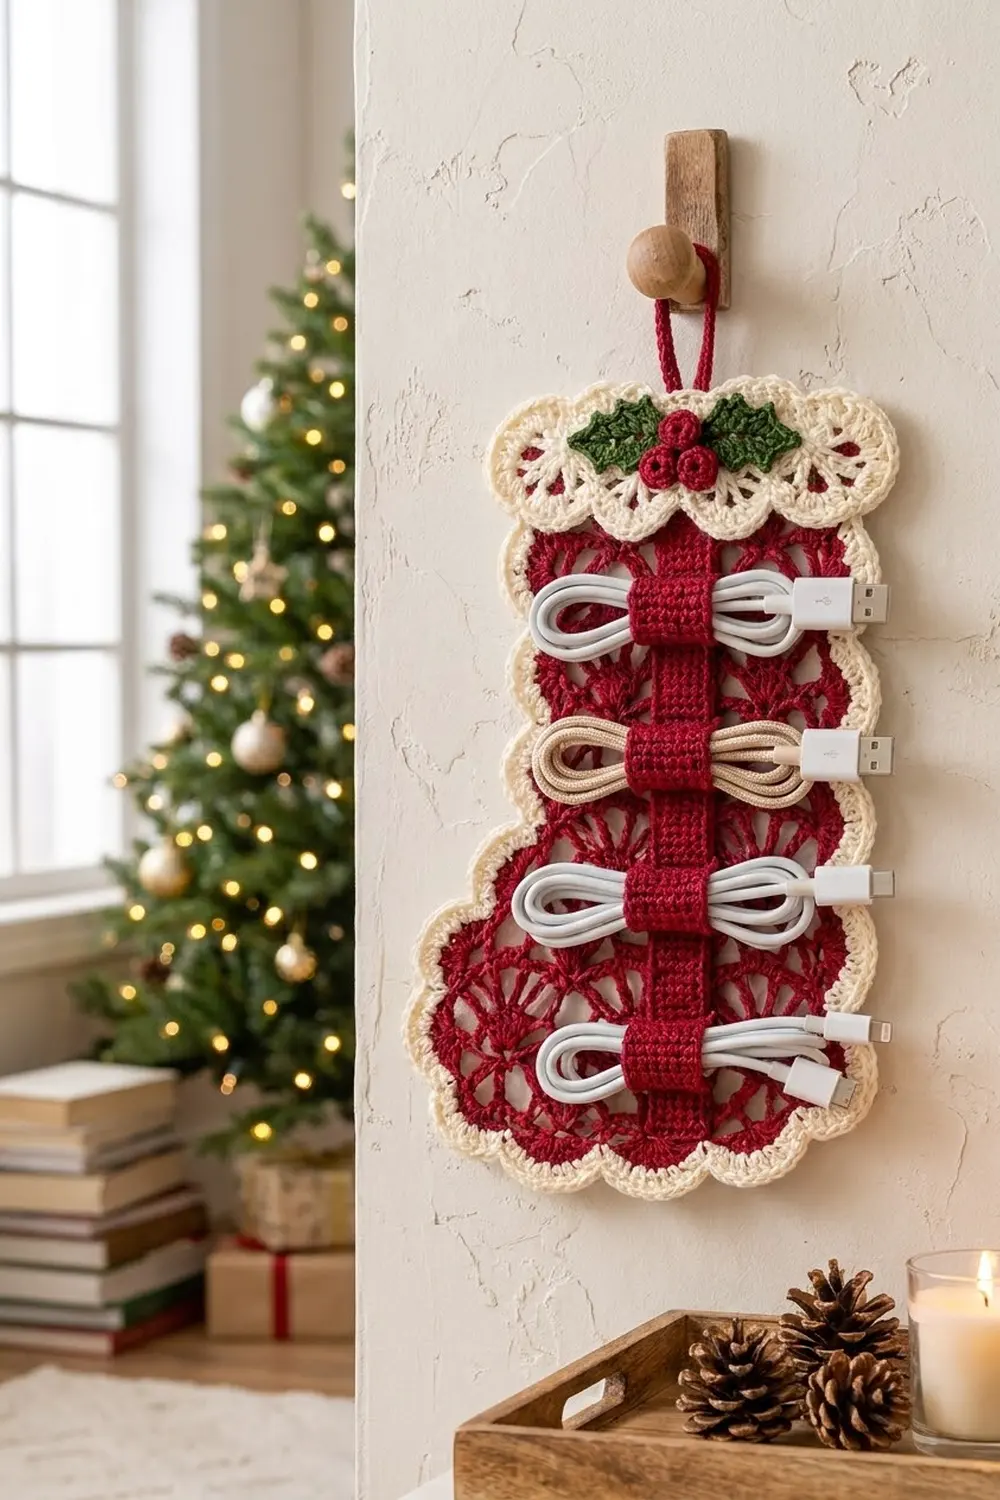
This holiday stocking hangs on the wall and keeps charging cables tidy. The cranberry red panel is worked in an open fan lace that looks like stacked seashells. A cream lace cuff and a scalloped cream border frame it, and a small holly sprig with three berries sits on the cuff.
A solid red strip runs down the center of the leg and carries four flat rings. Coil a cable, slide it through a ring, and it stays put. It’s cheerful on a desk wall, by the entryway, or next to a charging station.
The pattern uses US crochet terms. The finished organizer measures 9 in (22.9 cm) wide at the foot and 12 in (30.5 cm) tall, plus a 2 in (5.1 cm) hanging loop.
You work the stocking flat from the bottom up. The foot comes first at full width, then the leg continues over only part of the stitches, and two cream rows make the cuff. After that you add a two-round border, block the piece, and sew on the strap, rings, loop, and holly.
Finished Size and Construction
- Finished size: 9 in (22.9 cm) wide at foot × 12 in (30.5 cm) tall; leg 6 in (15.2 cm) wide
- Skill level: Intermediate
- Terminology: US
- Yarn weight: Worsted (#4)
- Hook: 5.0 mm (H-8); 4.0 mm (G-6) for the holly and berries
- Number of pieces: 1 main panel, plus a strap, 4 rings, a hanging loop, 2 leaves and 3 berries sewn on
- Layout: Single stocking, toe pointing left when the right side (RS) faces you
- Panel size before border: 7.5 in (19.1 cm) wide at foot, 4.5 in (11.4 cm) wide at leg, 10.5 in (26.7 cm) tall
- Border depth: 0.75 in (1.9 cm)
Materials
Use a smooth worsted cotton or cotton blend. It shows the lace clearly, blocks flat, and keeps the rings firm. Acrylic also works, but it may need steam to lie flat.
- Red: 50 g, about 90 m (98 yd)
- Cream: 25 g, about 45 m (49 yd)
- Green: 5 g, about 9 m (10 yd)
These quantities include a margin of roughly 15 percent.
Tools: 5.0 mm (H-8) hook, 4.0 mm (G-6) hook, tapestry needle, stitch markers, rust-proof pins, blocking mat, spray bottle, and a small pinch of fiberfill (optional) for the berries.
Abbreviations (US Terms)
- ch – chain
- sl st – slip stitch
- sc – single crochet
- hdc – half double crochet
- dc – double crochet
- sc2tog – single crochet 2 together
- sk – skip
- sp – space
- st(s) – stitch(es)
- RS / WS – right side / wrong side
- MR – magic ring
Special stitches
- Fan: (dc, ch 1) 4 times, then dc in the same st. That makes 5 dc and 4 ch-1 sps, 9 sts in all.
- Beginning half fan: ch 4 (counts as dc + ch 1), then (dc, ch 1, dc) in the same st. That’s 5 sts.
- Ending half fan: (dc, ch 1) twice, then dc in the same st. That’s 5 sts.
- Shell (border): 5 dc in the same st.
- Picot: ch 2, then sl st in the 2nd ch from the hook.
Gauge and Checkpoints
Lace gauge (5.0 mm hook): one fan repeat (6 foundation ch) = 1.5 in (3.8 cm), and 2 rows = 1.5 in (3.8 cm).
Solid gauge (5.0 mm hook): 16 sc and 16 rows = 4 in (10.2 cm).
Test the lace first. Ch 19 and work Rows 1–4 of the foot pattern with 3 fans instead of 5. The swatch should measure 4.5 in (11.4 cm) wide and 3 in (7.6 cm) tall after a light steam.
Checkpoints:
- After Row 1: 7.5 in (19.1 cm) wide
- After Row 6: 7.5 × 4.5 in (19.1 × 11.4 cm)
- After Row 12: 9 in (22.9 cm) tall; leg 4.5 in (11.4 cm) wide
- After Row 14: 10.5 in (26.7 cm) tall
- After the border: 9 × 12 in (22.9 × 30.5 cm)
If the piece is too big, go down 0.5 mm in hook size. If it’s too small, go up 0.5 mm. If only the height is off, check your dc height: pull up the first loop to the same height every time.
Stocking Panel
The panel is worked in rows with the red yarn and the 5.0 mm hook. Row 1 is the RS. Odd rows are “A” rows and even rows are “B” rows.
Row A pattern: Ch 1, sc in first dc, fan in next sc, sc in center dc of next fan. Repeat from * across, working the last sc in the 3rd ch of the turning ch-4.
Row B pattern: Work a beginning half fan in the first sc, sc in center dc of next fan, fan in next sc. Repeat from * until 1 sc remains, then work an ending half fan in the last sc.
With N fans, an A row has N fans and N + 1 sc. The matching B row has N − 1 fans, 2 half fans and N sc. Both rows total 10N + 1 sts.
Foot
Foundation: Ch 31.
Row 1 (RS, A): Sc in the 2nd ch from the hook. Sk 2 ch, fan in next ch, sk 2 ch, sc in next ch. Repeat from * 4 more times. Turn. (5 fans, 6 sc = 51 sts)
Row 2 (WS, B): Work the Row B pattern. Turn. (4 fans, 2 half fans, 5 sc = 51 sts)
Rows 3–6: Work Rows A and B alternately. Do not turn at the end of Row 6 yet. (51 sts each row)
Check that the foot measures 7.5 × 4.5 in (19.1 × 11.4 cm).
Leg
Row 6 ends at the right-hand edge, which is the back of the stocking.
Row 7 (RS, A): Turn. Ch 1, sc in first dc, then fan in next sc, sc in center dc of next fan 3 times. Turn and leave the rest of the row unworked. (3 fans, 4 sc = 31 sts)
The unworked part forms the top of the foot (the step). From the leg outward it holds 2 dc, sc #4, a full fan of 5 dc, sc #5 and the ending half fan of 3 dc. The last dc of that half fan is the toe-top corner.
Row 8 (WS, B): Work the Row B pattern over the leg. Turn. (2 fans, 2 half fans, 3 sc = 31 sts)
Rows 9–12: Work Rows A and B alternately. (31 sts each row)
On the final yarn over of Row 12, change to cream. Fasten off the red.
Cuff
Rows 13–14 (cream): Work Row A, then Row B. Do not fasten off. (31 sts each row; Row 14 has 16 dc and 3 sc)
Each Row 13 fan sits on a red fan below it, so the color change follows a natural scalloped line.
Check that the panel is 10.5 in (26.7 cm) tall, 7.5 in (19.1 cm) wide at the foot and 4.5 in (11.4 cm) wide at the leg.
Strap and Rings
Strap (red, 5.0 mm hook)
Ch 5. Work 1 sc in the 2nd ch from the hook and in each ch across (4 sc). For Rows 2–34, ch 1 and sc across (4 sc). The strap measures 1 × 8.5 in (2.5 × 21.6 cm). Fasten off.
Rings (make 4, red, 5.0 mm hook)
Ch 20 and join into a ring with a sl st. Take care not to twist the chain.
- Rnd 1: Ch 1, sc in each ch, join. (20 sc)
- Rnds 2–3: Ch 1, sc in each st, join. (20 sc)
Fasten off. Each ring lies flat at 2.5 × 0.75 in (6.4 × 1.9 cm).
Hanging Loop and Holly
Hanging loop (red, 5.0 mm hook)
Ch 21. Sc in the 2nd ch from the hook and in each ch across. (20 sc, 5 in / 12.7 cm) Fasten off and leave a long tail.
Holly leaves (make 2, green, 4.0 mm hook)
Ch 9. Work in the back bumps, starting in the 2nd ch from the hook:
- First side: sl st, sc, hdc, picot, dc, dc, picot, hdc, sc.
- Base: 3 sc in the last ch.
- Second side: Work along the other side of the chain: sc, hdc, picot, dc, dc, picot, hdc, sc, sl st.
- Tip: Ch 3, sl st in the first sl st.
Each leaf is about 1.75 in (4.4 cm) long, with two picot points on each side and a pointed tip.
Berries (make 3, red, 4.0 mm hook)
- Rnd 1: 6 sc in a MR. (6)
- Rnd 2: Sc in each st. (6)
- Rnd 3: Sc2tog 3 times. (3)
Tuck the tails, or a wisp of fiberfill, inside. Close the hole and fasten off. Each berry is about 0.5 in (1.3 cm) across.
Border
Border gauge: Round 1 works at about 4 sc per 1 in (2.5 cm), using 3 sc per row-end. Round 2 adds a 0.5 in (1.3 cm) shell, so the total border depth is 0.75 in (1.9 cm).
Round 1 (cream)
Hold the panel RS facing and work around it counterclockwise. In the steps below, a “corner” means 3 sc in one st, and side counts do not include corner stitches.
- Work 3 sc in the last dc of Row 14 (top-right corner).
- Top: 1 sc in each dc and sc of Row 14, skipping the ch-1 sps. (17 sc)
- Work 3 sc in the 3rd ch of Row 14’s turning ch (top-left corner).
- Leg side: 2 sc in the Row 14 row-end, then 3 sc in each row-end of Rows 13–7. (23 sc)
- Inner corner: 1 sc at the point where Row 7 meets Row 6. (1 sc)
- Step: 1 sc in each unworked dc of Row 6, and 2 sc in each of sc #4 and sc #5. (13 sc)
- Work 3 sc in the toe-top corner dc.
- Toe side: 2 sc in the Row 6 row-end, then 3 sc in each row-end of Rows 5–1. (17 sc)
- Work 3 sc in the first free loop of the foundation ch (bottom-left corner).
- Bottom: 1 sc in each of the next 29 free loops. (29 sc)
- Work 3 sc in the last free loop (bottom-right corner).
- Back side: 3 sc in each row-end of Rows 1–13, then 2 sc in the Row 14 row-end. (41 sc)
- Join with a sl st to the first sc.
(Sides 140 sc + inner corner 1 sc + 5 corners × 3 sc = 156 sc)
Round 2 (cream)
Sl st into the center sc of the top-right corner. Ch 3 (counts as dc) and work 4 dc in the same st to make the first shell. Each bracketed repeat below is [sk 1, sc in next st, sk 1, shell in next st].
- Top: 5 repeats. The 5th shell lands in the center sc of the top-left corner.
- Leg side, inner corner and step: 10 repeats. The 10th shell lands in the center sc of the toe-top corner.
- Toe side: 5 repeats. The last shell lands in the center sc of the bottom-left corner.
- Bottom: 8 repeats. The last shell lands in the center sc of the bottom-right corner.
- Back side: 10 repeats, then sk 1, sc in next st, sk 1. Join with a sl st to the top of the beginning ch-3.
(39 shells + 39 sc = 234 sts)
Fasten off.
Why the math works
Each repeat uses 4 sts. If a shell sits on the center sc of each corner, the stitches between two corner centers must equal 4 × (repeats) − 1.
- Top: 1 + 17 + 1 = 19 = 4 × 5 − 1
- Leg side + inner corner + step: 1 + 23 + 1 + 13 + 1 = 39 = 4 × 10 − 1
- Toe side: 1 + 17 + 1 = 19 = 4 × 5 − 1
- Bottom: 1 + 29 + 1 = 31 = 4 × 8 − 1
- Back side: 1 + 41 + 1 = 43 = 4 × 11 − 1
The inner-corner sc lands on a skipped st. This draws the concave corner in instead of letting it ruffle.
Final Blocking
- Weave in all ends on the panel, and leave the sewing tails on the small pieces.
- Pin the stocking RS up to 9 × 12 in (22.9 × 30.5 cm). The leg should measure 6 in (15.2 cm) wide.
- Pin the center dc of each border shell to make even scallops.
- Open each fan in the body with a pin so the lace lies flat.
- Mist the piece until it is damp, or steam it lightly while holding the iron above the fabric. Let it dry completely.
- Remove the pins.
- Sew the strap: Center it on the leg, 0.25 in (0.6 cm) below the cuff, so it ends 0.25 in (0.6 cm) above the bottom edge. Whipstitch both long edges, catching the solid sc and dc of the lace.
- Attach the rings: Lay each flattened ring across the strap. Tack only the back layer of the ring to the strap across its middle 1 in (2.5 cm), so cords can still pass through the ring. Center the first ring 1.25 in (3.2 cm) below the top of the strap and space the rest 2 in (5.1 cm) apart.
- Attach the hanging loop: Fold it in half and sew both ends 0.5 in (1.3 cm) down on the back of the cuff, at the center. The loop should rise 2 in (5.1 cm) above the top edge.
- Add the holly: Sew the leaves to the center of the cuff with the bases touching and the tips pointing left and right. Sew the berries over the leaf bases in a triangle, with one on top and two below.
Final Quality-Control Checklist
- [ ] The panel measures 7.5 × 10.5 in (19.1 × 26.7 cm) before the border.
- [ ] Rows 1–6 have 51 sts each and Rows 7–14 have 31 sts each.
- [ ] Round 1 of the border has 156 sc and Round 2 has 39 shells.
- [ ] A shell is centered on all 5 outer corners.
- [ ] The finished organizer is 9 × 12 in (22.9 × 30.5 cm).
- [ ] The strap is straight and centered on the leg.
- [ ] All 4 rings open fully.
- [ ] The hanging loop holds the full weight without stretching the cuff.
Troubleshooting
- The fans lean or drift: Check that each fan sits in an sc and each sc sits in the center dc of a fan.
- The leg sits on the wrong side: Make sure Row 1 is the RS. Row 7 must start at the edge where Row 6 ended.
- The border ruffles: Use a smaller hook, or work 2 sc instead of 3 in one row-end on each side. Then recheck the 4 × k − 1 count for that side.
- The border cups: Use a larger hook for Round 2.
- A cable slips out: Tighten the ring by working Rnd 3 with the 4.0 mm hook.
- The berries flatten: Add more fiberfill before closing.
Care
Spot-clean the organizer, or hand-wash it in cool water. Reshape it and dry it flat, re-pinning the scallops if needed.
Final Notes
The measurements build on each other. A fan repeat of 1.5 in (3.8 cm) gives a foot 7.5 in (19.1 cm) wide and a leg 4.5 in (11.4 cm) wide. Rows of 0.75 in (1.9 cm) each give a panel 10.5 in (26.7 cm) tall. The 0.75 in (1.9 cm) border then brings the finished organizer to 9 × 12 in (22.9 × 30.5 cm). If your gauge matches at the first checkpoint, every count after it will fit.
Happy crocheting!