

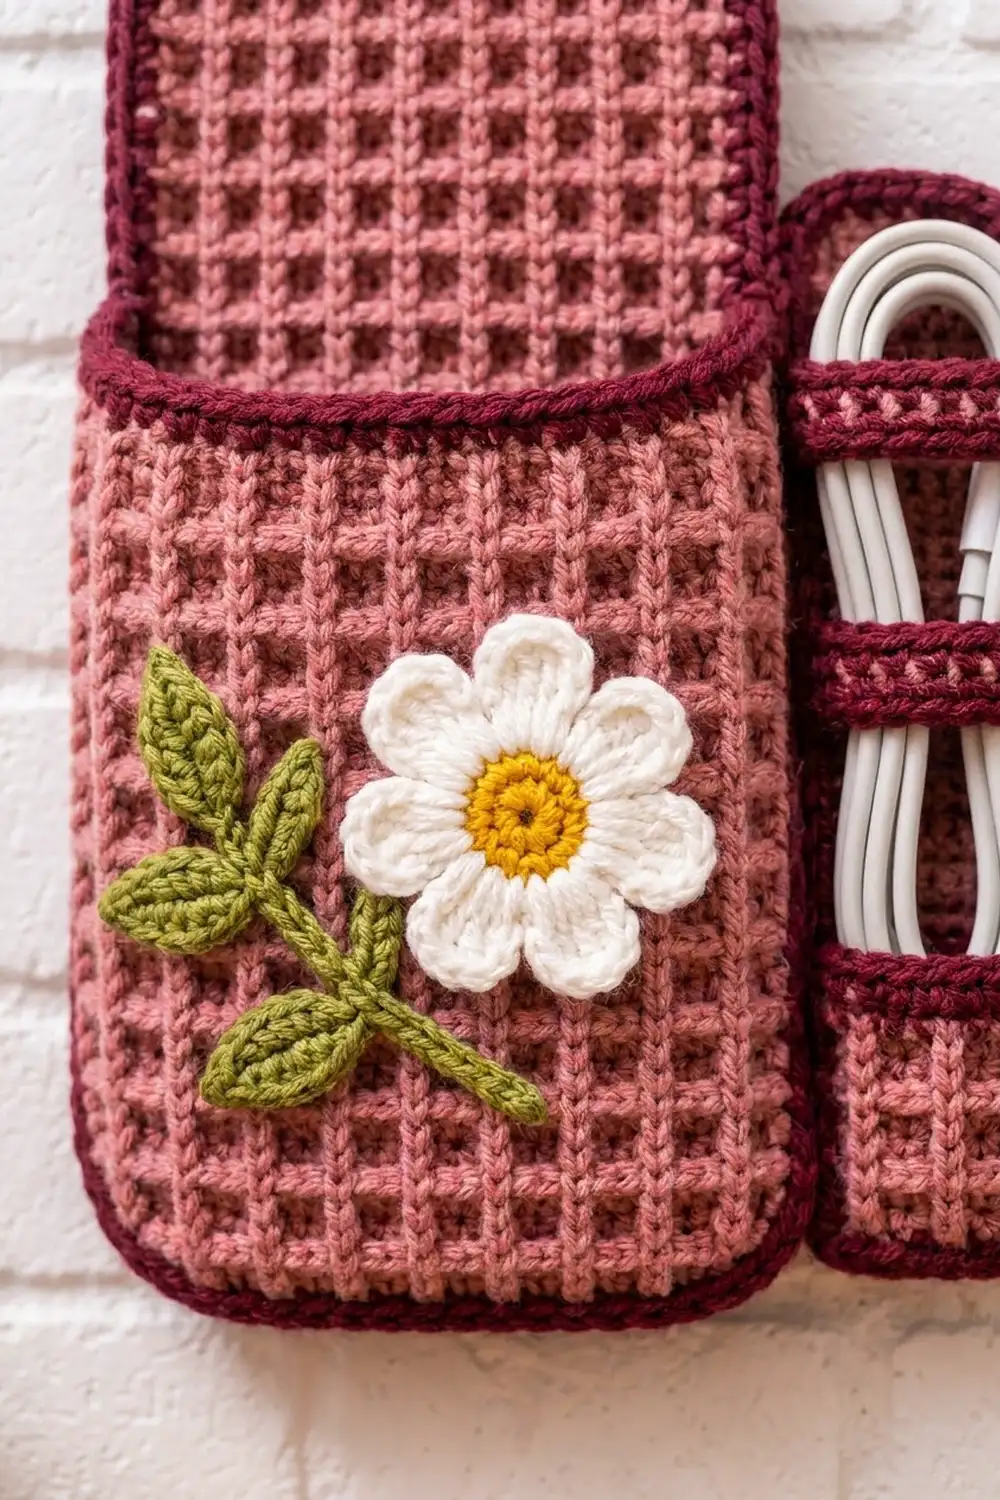
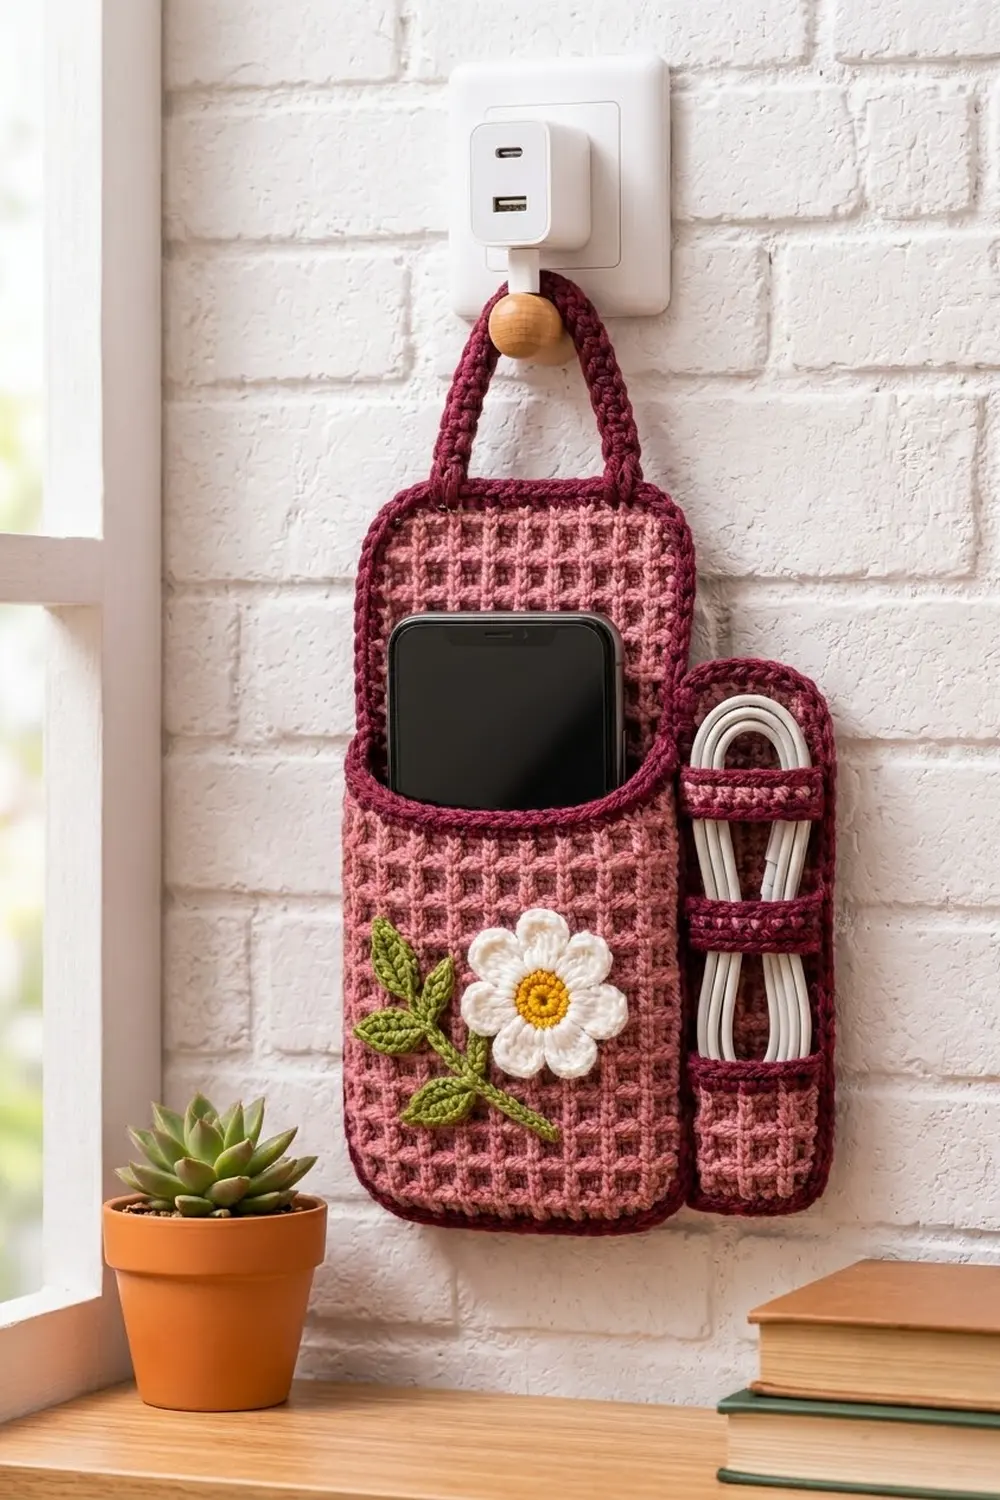
This wall-hanging phone holder keeps your phone off the floor while it charges. It hangs from a wall charger by a crocheted handle. The main fabric is a dusty rose waffle-grid stitch, and each panel has a rope-like burgundy border.
A white daisy with a golden yellow center and an olive green leaf sprig decorate the front pocket. A narrow side strip with two burgundy straps holds the spare charging cable.
The pattern uses US crochet terms. The finished holder measures 9 in (22.9 cm) wide by 10 in (25.4 cm) tall without the handle. With the handle, it is about 13 in (33.0 cm) tall.
You will make three flat waffle-stitch panels: a back panel, a front pocket and a side cable strip. Each panel gets a two-round burgundy border. Then you make a corded handle, two cable straps, a daisy and a leaf sprig, and sew everything together.
Finished Size and Construction
- Finished size: 9 in (22.9 cm) wide x 10 in (25.4 cm) tall, plus a 3 in (7.6 cm) handle arc
- Skill level: Intermediate (post stitches, reverse sc, sewing)
- Terminology: US
- Yarn weight: Worsted (#4), cotton or cotton blend
- Hook: 5 mm (H-8)
- Number of pieces: 3 panels + 1 handle + 2 straps + 1 daisy + 1 stem + 5 leaves
- Layout: The pocket sits over the lower part of the back panel, and the cable strip is sewn to the right edge
- Panel sizes before border: back 5 x 9 in (12.7 x 22.9 cm); pocket 5 x 6 in (12.7 x 15.2 cm); strip 2 x 7 in (5.1 x 17.8 cm)
- Border depth: 0.5 in (1.3 cm) per edge (two rounds)
- Panel sizes after border: back 6 x 10 in (15.2 x 25.4 cm); pocket 6 x 7 in (15.2 x 17.8 cm); strip 3 x 8 in (7.6 x 20.3 cm)
Materials
Choose a smooth worsted cotton or cotton blend. Cotton keeps the waffle texture crisp and holds its shape with a phone inside. Avoid fuzzy yarns, because they blur the grid.
- Dusty rose (main color): 110 g / about 200 m
- Burgundy (borders, handle, straps): 30 g / about 55 m
- White (daisy petals): 6 g / about 11 m
- Golden yellow (daisy center): 3 g / about 5 m
- Olive green (stem and leaves): 8 g / about 14 m
Tools: 5 mm (H-8) hook, tapestry needle, stitch markers, scissors, measuring tape, rust-proof pins and a blocking mat.
All quantities include a margin of about 15 percent for swatching and sewing tails.
Abbreviations (US Terms)
- ch: chain
- sl st: slip stitch
- sc: single crochet
- hdc: half double crochet
- dc: double crochet
- FPdc: front post double crochet
- rev sc: reverse single crochet (crab stitch)
- st(s): stitch(es)
- tch: turning chain
- RS / WS: right side / wrong side
- rep: repeat
FPdc: Yarn over and insert the hook from front to back to front around the post of the stitch. Yarn over and pull up a loop, then (yarn over, pull through 2 loops) twice.
Rev sc (crab stitch): Work from left to right (if you crochet right-handed). Insert the hook into the next stitch to the right, pull up a loop, then yarn over and pull through both loops.
Waffle-grid stitch (multiple of 3 + 2 sts):
- Row 1: Dc in 4th ch from hook (skipped 3 ch count as first dc) and in each ch across. Turn.
- Row 2: Ch 2 (counts as dc), *FPdc around next st, dc in next 2 sts; rep from * to last st, dc in top of tch. Turn.
- Row 3: Ch 2 (counts as dc), *FPdc around each of next 2 sts, dc in next st; rep from * to last st, dc in top of tch. Turn.
- Rep Rows 2-3 for pattern.
Row 3 puts a dc on top of each FPdc from Row 2 and post stitches on top of each pair of plain dc. Switching back and forth like this builds the raised squares.
Gauge and Checkpoints
Gauge: 16 sts and 8 rows = 4 in (10.2 cm) in waffle-grid stitch, before border.
That is 4 sts and 2 rows per inch. Make the cable strip first. It is the smallest panel, so it also works as your gauge test.
Checkpoints:
- Strip after Row 1: 2 in (5.1 cm) wide.
- Strip after Row 14: 2 x 7 in (5.1 x 17.8 cm).
- Back panel after Row 18: 5 x 9 in (12.7 x 22.9 cm).
- Pocket after Row 12: 5 x 6 in (12.7 x 15.2 cm).
- Each panel after border: 1 in (2.5 cm) larger each way.
If the strip is too wide, switch to a 4.5 mm hook. If it is too narrow, switch to a 5.5 mm hook. If the width is right but the height is off, change how tall you pull up your dc loops. Keep the row counts the same, because the border math depends on them.
Back Panel
With dusty rose, ch 22.
Row 1: Dc in 4th ch from hook and in each ch across. Turn. (20 sts)
Row 2: Ch 2, *FPdc around next st, dc in next 2 sts; rep from * 5 more times, dc in top of tch. Turn. (20 sts: 6 FPdc, 14 dc)
Row 3: Ch 2, *FPdc around each of next 2 sts, dc in next st; rep from * 5 more times, dc in top of tch. Turn. (20 sts: 12 FPdc, 8 dc)
Rows 4-18: Rep Rows 2-3 seven more times, then rep Row 2 once. (20 sts every row)
Fasten off. The panel measures 5 x 9 in (12.7 x 22.9 cm).
Front Pocket
With dusty rose, ch 22.
Rows 1-3: Work as Rows 1-3 of the back panel. (20 sts)
Rows 4-12: Rep Rows 2-3 four more times, then rep Row 2 once. (20 sts every row)
Fasten off. The pocket measures 5 x 6 in (12.7 x 15.2 cm).
Side Cable Strip
With dusty rose, ch 10.
Row 1: Dc in 4th ch from hook and in each ch across. Turn. (8 sts)
Row 2: Ch 2, *FPdc around next st, dc in next 2 sts; rep from * once more, dc in top of tch. Turn. (8 sts)
Row 3: Ch 2, *FPdc around each of next 2 sts, dc in next st; rep from * once more, dc in top of tch. Turn. (8 sts)
Rows 4-14: Rep Rows 2-3 five more times, then rep Row 2 once. (8 sts every row)
Fasten off. The strip measures 2 x 7 in (5.1 x 17.8 cm).
Handle
With burgundy, ch 37.
Row 1: Sc in 2nd ch from hook and in each ch across. (36 sc)
Row 2: Do not turn. Rotate the work and sl st in each free loop of the foundation ch. (36 sl st)
Fasten off and leave long tails at both ends. The firm, rounded cord measures 9 in (22.9 cm).
Cable Straps (make 2)
With burgundy, ch 15.
Row 1: Sc in 2nd ch from hook and in each ch across. (14 sc)
Fasten off and leave long tails. Each strap is 3.5 in (8.9 cm) long. That leaves 0.5 in (1.3 cm) of slack across the 3 in (7.6 cm) bordered strip, so a folded cable fits underneath.
Daisy
Rnd 1: With golden yellow, make a magic ring and work 8 sc in the ring. Join with sl st to first sc. (8 sc)
Rnd 2: Ch 1, 2 sc in each st around. Join. Fasten off yellow. (16 sc)
Rnd 3: Join white in any st. *(Hdc, 2 dc, hdc) in next st, sl st in next st; rep from * 7 more times. Join. (8 petals; 40 sts: 32 petal sts + 8 sl st)
Fasten off and leave a long tail. The daisy is about 2.75 in (7.0 cm) across.
Leaf Sprig
Stem: With olive green, ch 17. Sl st in the back bump of the 2nd ch from hook and of each ch across. (16 sl st, about 4 in / 10.2 cm) Fasten off and leave a long tail.
Leaf (make 5): With olive green, ch 7.
Rnd 1: Sc in 2nd ch from hook, hdc in next ch, dc in next 2 ch, hdc in next ch, then (sc, ch 2, sc) in last ch for the tip. Now work along the opposite side of the foundation ch: hdc in next ch, dc in next 2 ch, hdc in next ch, sc in next ch. Join with sl st to first sc. (12 sts + ch-2 tip)
Fasten off and leave a tail. Each leaf is about 1.75 in (4.4 cm) long, with a rounded base and a pointed tip.
Make All Pieces
Before you start assembly, check that you have:
- Dusty rose: 1 back panel, 1 pocket, 1 cable strip
- Burgundy: 1 handle, 2 straps, and the borders on all 3 panels
- Yellow and white: 1 daisy
- Olive green: 1 stem, 5 leaves
Assembly layout (front view):
       ___handle___
      |            |
+--------------+
|  BACK PANEL  |
+--------------+-----+
|              |STRIP|
|    POCKET    |strap|
|   daisy +    |     |
|   sprig      |strap|
+--------------+-----+
     6 in       3 in
The bottom of the strip lines up with the bottoms of the pocket and back panel. The top of the strip sits 1 in (2.5 cm) above the top edge of the pocket.
Border (All Three Panels)
Work this border on each panel before you join anything. It’s listed here so all the border math is in one place.
Border gauge: Work 4 sc per inch along the stitch edges and 2 sc per dc row-end along the sides. At 2 rows per inch, the sides also come to 4 sc per inch, so the border lies flat in both directions.
Corner rule: Each corner stitch gets 2 sc instead of 3, which softens the corners into a gentle curve. In the counts below, the top and bottom totals include both corner pairs. The side totals are only the stitches between the corners.
Rnd 1 (burgundy): With RS facing, join burgundy in the first st of the last row.
- Back panel: Top: 2 sc in first st, sc in next 18 sts, 2 sc in last st (22 sc). Side: 2 sc in each of 18 row-ends (36 sc). Bottom, in the free loops of the foundation ch: 2 sc in first ch, sc in next 18 ch, 2 sc in last ch (22 sc). Second side: 36 sc. Join. (116 sc)
- Pocket: Top 22, side 24 (12 row-ends x 2), bottom 22, side 24. Join. (92 sc)
- Strip: Top: 2 sc in first st, sc in next 6 sts, 2 sc in last st (10 sc). Side 28 (14 row-ends x 2), bottom 10, side 28. Join. (76 sc)
Rnd 2 (burgundy): Ch 1, rev sc in each sc around. Join and fasten off. (Back 116, pocket 92, strip 76)
Why the math works: Each top and bottom count is the row width plus 2 (one extra sc at each corner). Each side count is the number of rows times 2. Since both directions have 4 sc per inch, every bordered panel grows by exactly 1 in (2.5 cm) each way, or 0.5 in (1.3 cm) per edge.
Joining
Sew all the joins with burgundy and a tapestry needle. Stitch through the back loops of the Rnd 1 sc, below the crab stitch, so the rope edge stays visible.
1. Pocket to back panel. Lay the pocket on the back panel with RS up and the bottoms and sides lined up. Both pieces are 6 in (15.2 cm) wide. Whipstitch the bottoms together 1:1 (22 sc to 22 sc). Then whipstitch each side: the pocket’s 24 side sc match the lowest 24 of the back panel’s 36 side sc, 1:1. Leave the top of the pocket open. The top 12 side sc of the back panel stay unsewn, so 3 in (7.6 cm) of back panel shows above the pocket.
2. Strip to body. Place the strip to the right of the body with the bottoms lined up. Whipstitch the strip’s 28 left-side sc to the lowest 28 right-side sc of the back panel, 1:1. Catch the pocket edge too where the layers overlap.
3. Straps. Lay one strap across the strip 1.5 in (3.8 cm) below its top and the other 2 in (5.1 cm) above its bottom. Sew both ends of each strap firmly to the strip’s border.
4. Handle. Sew the handle ends to the WS of the back panel, 1.5 in (3.8 cm) in from each top corner and 0.75 in (1.9 cm) down. This makes a 3 in (7.6 cm) tall arc.
5. Appliqués. Pin the daisy to the pocket with its center about 2 in (5.1 cm) from the pocket’s right edge and 3 in (7.6 cm) up from the bottom. Pin the stem on a diagonal, running down and to the left from the daisy. Sew 1 leaf at the tip of the stem and 2 pairs of leaves below it, spaced 1 in (2.5 cm) apart. Sew through the pocket layer only, so the pocket stays open.
Tension: Pull each sewing stitch snug but not tight. The seam should be the same length as the edges it joins.
Size checkpoint: The assembled holder should measure 9 x 10 in (22.9 x 25.4 cm), plus the handle.
Final Blocking
- Soak the assembled holder in cool water and gently squeeze out the extra water. Do not wring it.
- Roll it in a towel to remove more moisture.
- Lay it RS up on a blocking mat.
- Pin the outer edges to 9 x 10 in (22.9 x 25.4 cm).
- Shape the rounded corners with your fingers and smooth the daisy petals flat.
- Slip a folded piece of card into the pocket so the layers don’t stick together.
- Let it dry completely before you take out the pins.
Final Quality-Control Checklist
- Back panel is 6 x 10 in (15.2 x 25.4 cm), pocket is 6 x 7 in (15.2 x 17.8 cm), strip is 3 x 8 in (7.6 x 20.3 cm)
- Border counts are 116, 92 and 76 sc
- Waffle squares line up in neat columns
- Pocket opening is free, and the appliqués are sewn through the pocket layer only
- Both straps hold a folded cable without sagging
- Handle ends are secure and the arc is centered
- All tails are woven in on the WS
Troubleshooting
Waffle squares slant or drift: Start every row with ch 2 and end it in the top of the tch. A missed edge stitch shifts the repeat.
Border ruffles: You added extra sc along the sides. Stick to exactly 2 sc per row-end.
Border cups or pulls in: Your sc are too tight. Use a hook 0.5 mm larger for Rnd 1 only.
Pocket gapes away from the back panel: Re-sew the sides 1:1. Skipped stitches make one edge longer than the other.
Daisy petals curl: Pin and block the daisy flat before you sew it on.
Holder tilts when hanging: The strip adds weight on the right side. Move the right handle end 0.25 in (0.6 cm) closer to the center.
Care
Take out the phone and cable first. Hand wash in cool water with mild soap and lay flat to dry.
Final Notes
Here is how the measurements build on each other. A gauge of 16 sts and 8 rows in 4 in (10.2 cm) gives panels of 5 x 9 in (12.7 x 22.9 cm), 5 x 6 in (12.7 x 15.2 cm) and 2 x 7 in (5.1 x 17.8 cm). The two-round border adds 1 in (2.5 cm) each way. Sewing the seams stitch to stitch then gives a holder that measures 9 x 10 in (22.9 x 25.4 cm). Check your gauge on the strip and keep your stitch counts exact, and every piece will line up.
Happy crocheting!