

This sleepy cat keeps your charging cables tidy. It is one flat lavender panel shaped like a cat’s head and body, with two pointed ears, closed eyes and a cream muzzle. A plum strip runs down the center and is held in place by six raised bands. Coiled cables tuck under the strip in the five gaps between the bands, and a plum loop at the top hangs the organizer on a hook or peg.
The palette is soft lavender, deep plum and cream. The style is cute but practical: a plain single-crochet base, a neat rope-look border and simple embroidered features. This pattern uses US crochet terms throughout.
The finished organizer measures about 7 in (17.8 cm) wide and 13.6 in (34.5 cm) tall without the hanging loop. The loop adds about 1.5 in (3.8 cm).
You work the body bottom-up in rows, shaping the rounded corners, shoulders and ears as you go. Then you add a two-round plum border and the hanging loop. Finally, you make the muzzle, the center strip and six bands separately and sew them on.
Finished Size and Construction
- Finished size: 7 in × 13.6 in (17.8 cm × 34.5 cm), plus a 1.5 in (3.8 cm) loop
- Skill level: Easy to intermediate
- Terminology: US
- Yarn weight: Worsted (#4)
- Hook: 4.5 mm (US 7)
- Number of pieces: 1 finished item: the main panel, plus a muzzle, a center strip and 6 bands that you sew on
- Layout: Single vertical panel, no joining
- Panel size before border: 6.5 in × 13.1 in (16.5 cm × 33.3 cm) including the ears
- Border depth: 0.25 in (0.6 cm) on each side
Materials
Use a smooth worsted-weight acrylic or cotton blend. Cotton holds its shape well under the weight of the cables. A slightly fuzzy acrylic gives a softer look. The amounts below assume about 200 m per 100 g.
- Lavender (body): 35 g / 70 m
- Plum (border, loop, strip, bands, embroidery): 20 g / 40 m
- Cream (muzzle): 5 g / 10 m
All quantities include a margin of about 20%.
Tools:
– 4.5 mm (US 7) crochet hook
– Tapestry needle
– Stitch markers
– Scissors
– Tape measure
– Blocking mat and rust-proof pins
– Spray bottle
Abbreviations (US Terms)
- ch – chain
- sc – single crochet
- sc2tog – single crochet 2 together
- sc3tog – single crochet 3 together
- sl st – slip stitch
- st(s) – stitch(es)
- RS / WS – right side / wrong side
- rev sc – reverse single crochet (crab stitch)
Special stitch: Reverse single crochet. With the RS facing, work from left to right. Insert the hook into the next stitch to the right, yarn over and pull up a loop, then yarn over and pull through both loops. This makes a twisted, corded edge.
Gauge and Checkpoints
Gauge: 16 sc × 18 rows = 4 in (10.2 cm) in single-crochet rows.
Work a test swatch of 20 sc × 20 rows before you start. Because this is a single-piece item, the body panel is effectively your test. Measure it at each checkpoint below and stop to adjust if it is off.
- After Row 5: 6.5 in (16.5 cm) wide across 26 sts.
- After Row 27: 6 in (15.2 cm) tall.
- After Row 54: 12 in (30.5 cm) tall.
- After the ears: 13.1 in (33.3 cm) total height.
If your piece is too big, go down 0.5 mm in hook size. If it is too small, go up 0.5 mm. If only the height is off, add or remove rows in the straight section (Rows 6–49). Then recount your border side stitches as described in the Border section.
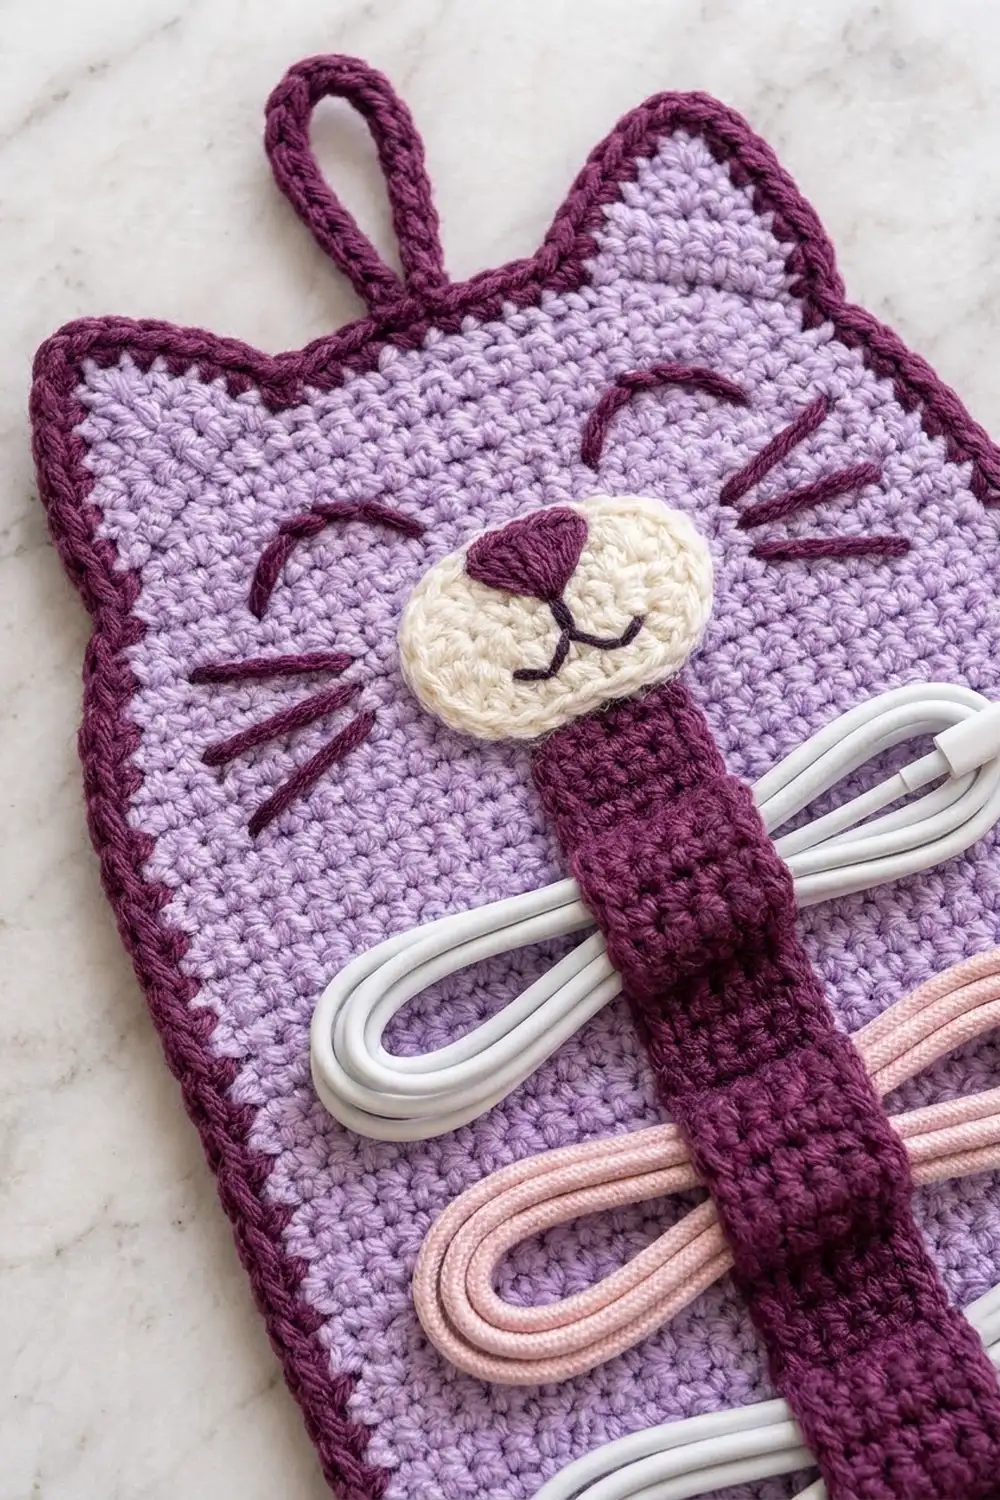
Main Panel (Lavender)
Turn at the end of every row. The ch 1 at the start of a row does not count as a stitch.
Row 1 (RS): Ch 19. Sc in the 2nd ch from the hook and in each ch across. (18 sts; 4.5 in / 11.4 cm)
Row 2: Ch 1, 2 sc in the first st, sc in the next 16 sts, 2 sc in the last st. (20 sts)
Row 3: Ch 1, 2 sc in the first st, sc in the next 18 sts, 2 sc in the last st. (22 sts)
Row 4: Ch 1, 2 sc in the first st, sc in the next 20 sts, 2 sc in the last st. (24 sts)
Row 5: Ch 1, 2 sc in the first st, sc in the next 22 sts, 2 sc in the last st. (26 sts; 6.5 in / 16.5 cm)
These four increase rows round off the bottom corners.
Rows 6–49: Ch 1, sc in each st across. (26 sts per row; 44 rows)
Checkpoint: the panel should measure about 10.9 in (27.7 cm) tall.
Row 50: Ch 1, sc2tog, sc in the next 22 sts, sc2tog. (24 sts)
Row 51: Ch 1, sc2tog, sc in the next 20 sts, sc2tog. (22 sts; 5.5 in / 14.0 cm)
These two rows round the shoulders.
Rows 52–54: Ch 1, sc in each st across. (22 sts per row)
Checkpoint: the panel should be 12 in (30.5 cm) tall. Do not fasten off.
First Ear
You work the first ear over the first 7 sts of Row 54.
Ear Row 1: Ch 1, sc in the next 7 sts. Leave the rest unworked. (7 sts; 1.75 in / 4.4 cm)
Ear Row 2: Ch 1, sc2tog, sc in the next 3 sts, sc2tog. (5 sts)
Ear Row 3: Ch 1, sc in each st across. (5 sts)
Ear Row 4: Ch 1, sc2tog, sc in the next st, sc2tog. (3 sts)
Ear Row 5: Ch 1, sc3tog. (1 st) Fasten off.
Second Ear
Skip the next 8 unworked sts of Row 54. These form the top of the head between the ears, 2 in (5.1 cm) wide. Join lavender with the same side facing as for the first ear, in the next st. Repeat Ear Rows 1–5 over the last 7 sts. Fasten off.
Checkpoint: the panel measures 6.5 in × 13.1 in (16.5 cm × 33.3 cm), and each ear rises 1.1 in (2.8 cm).
Muzzle (Cream)
Round 1: Ch 6. Sc in the 2nd ch from the hook, sc in the next 3 ch, then 3 sc in the last ch. Working along the opposite side of the chain, sc in the next 3 ch, then 2 sc in the last ch (the same ch as the first sc). Join with sl st to the first sc. (12 sts)
Round 2: Ch 1, 2 sc in the first st, sc in the next 3 sts, 2 sc in each of the next 3 sts, sc in the next 3 sts, 2 sc in each of the last 2 sts. Join with sl st. (18 sts; about 2.25 in × 1.25 in / 5.7 cm × 3.2 cm)
Fasten off and leave a 12 in (30.5 cm) tail for sewing.
Center Strip (Plum)
Row 1: Ch 6. Sc in the 2nd ch from the hook and in each ch across. (5 sts; 1.25 in / 3.2 cm)
Rows 2–38: Ch 1, sc in each st across. (5 sts per row)
The strip measures about 8.4 in (21.3 cm) long. Fasten off and leave a long tail.
Bands (Plum, make 6)
Row 1: Ch 10. Sc in the 2nd ch from the hook and in each ch across. (9 sts; 2.25 in / 5.7 cm)
Row 2: Ch 1, sc in each st across. (9 sts)
Fasten off and leave a 10 in (25.4 cm) tail.
Border (Plum)
Border gauge: 4 sc per 1 in (2.5 cm) along every edge.
Round 1: With the RS facing, join plum in the first foundation st at the bottom right corner.
- Bottom edge: 2 sc in the first st, sc in the next 16 sts, 2 sc in the last st. That is 18 sts worked one per stitch, plus 2 extra, for 20 sc.
- Side: Work along the row ends of Rows 1–54. Work 1 sc in each row end, but skip every 9th row end. That is 54 rows minus 6 skipped, for 48 sc.
- Ear: Work 4 sc up the outer side, 3 sc in the tip st, then 4 sc down the inner side. That is 11 sc.
- Top of head: Sc in each of the 8 sts. That is 8 sc.
- Ear: 11 sc, worked the same way as the first ear.
- Side: 48 sc, worked the same way as the first side.
Join with sl st to the first sc. (146 sts: 20 + 48 + 11 + 8 + 11 + 48)
Round 2: Ch 1, rev sc in each st around. Join with sl st. (146 sts) Do not fasten off.
Why the math works: At 4 sc per inch, 48 sc cover exactly 12 in. That matches the 54 rows at 4.5 rows per inch, so the sides lie flat without ruffling or pulling. The 2 extra sts at the bottom corners and the 3 sts in each ear tip let the border turn the curves smoothly. The 8 sts across the top of the head match the 8 skipped sts one-for-one.
Hanging Loop (Plum)
- Sl st along the top of the head to the 4th of the 8 top sts.
- Ch 14, then sl st in the 5th top st.
- Ch 1 and work 20 sc into the chain loop.
- Sl st in the 5th top st again. Fasten off and weave in the end through several sts on the WS for strength.
The loop stands about 1.5 in (3.8 cm) tall.
Assembly and Embroidery
- Muzzle: Center the muzzle horizontally over Rows 43–48 and sew around its edge with the cream tail.
- Nose: With plum, satin-stitch a small downward triangle at the top center of the muzzle, about 0.5 in (1.3 cm) wide.
- Mouth: Backstitch a short line down from the nose, then a curved “w” shape below it.
- Eyes: Backstitch two downward-curving arcs over Rows 49–51, each about 0.75 in (1.9 cm) wide, starting about 0.5 in (1.3 cm) outside the muzzle edges.
- Whiskers: Backstitch three straight lines on each side of the muzzle, each about 1 in (2.5 cm) long, fanning slightly apart.
- Strip: Center the strip vertically so it covers Rows 4–41 of the panel. Sew the top and bottom ends down firmly. Leave the long edges unsewn.
- Bands: Center one band over strip Rows 2, 9, 16, 23, 30 and 37. That spaces the bands about 1.6 in (4.1 cm) apart. Wrap each band over the front of the strip and sew its two ends flat onto the panel, about 0.5 in (1.3 cm) beyond each strip edge. Also stitch straight through the band, strip and panel at the center so each band sits raised.
You now have five gaps between the bands, each about 1.1 in (2.8 cm) tall, for cable bundles.
Final Blocking
- Weave in all ends on the WS.
- Pin the panel face up to 7 in × 13.6 in (17.8 cm × 34.5 cm).
- Pin the ears into neat points.
- Mist the piece until it is damp, but avoid soaking the cream muzzle.
- Let it dry completely, at least 12 hours.
- Unpin it and check that the strip lies flat between the bands.
Final Quality-Control Checklist
- The panel is 6.5 in (16.5 cm) wide before the border and 7 in (17.8 cm) after.
- Border Round 1 has 146 sts, and both sides lie flat.
- The ears are matching triangles with crisp tips.
- The muzzle is centered, and the eyes are level.
- The six bands are evenly spaced and firmly anchored.
- The loop is secure and centered between the ears.
Troubleshooting
- The sides ruffle: You have too many border sts. Skip a row end more often.
- The sides pull in: You have too few border sts. Skip less often.
- The ears lean: Check that the sc2tog decreases sit at both edges.
- The muzzle cups: Add 1 extra increase in Round 2 at each end.
- Cables slip out: Add a tacking stitch in the center of each band.
- The panel sags when hung: Use cotton yarn, or block it more firmly.
Care
Hand wash in cool water and lay flat to dry. Do not machine dry, because it can distort the ears and border.

Final Notes
The measurement chain is simple. At 16 sc × 18 rows per 4 in (10.2 cm), you build a 26-stitch panel that is 6.5 in (16.5 cm) wide and 54 rows (12 in / 30.5 cm) tall. The ears bring the height to 13.1 in (33.3 cm). A 146-stitch border with 48 sts per side then frames the panel at 7 in × 13.6 in (17.8 cm × 34.5 cm). Check your gauge early and the rest follows.
Happy crocheting!