

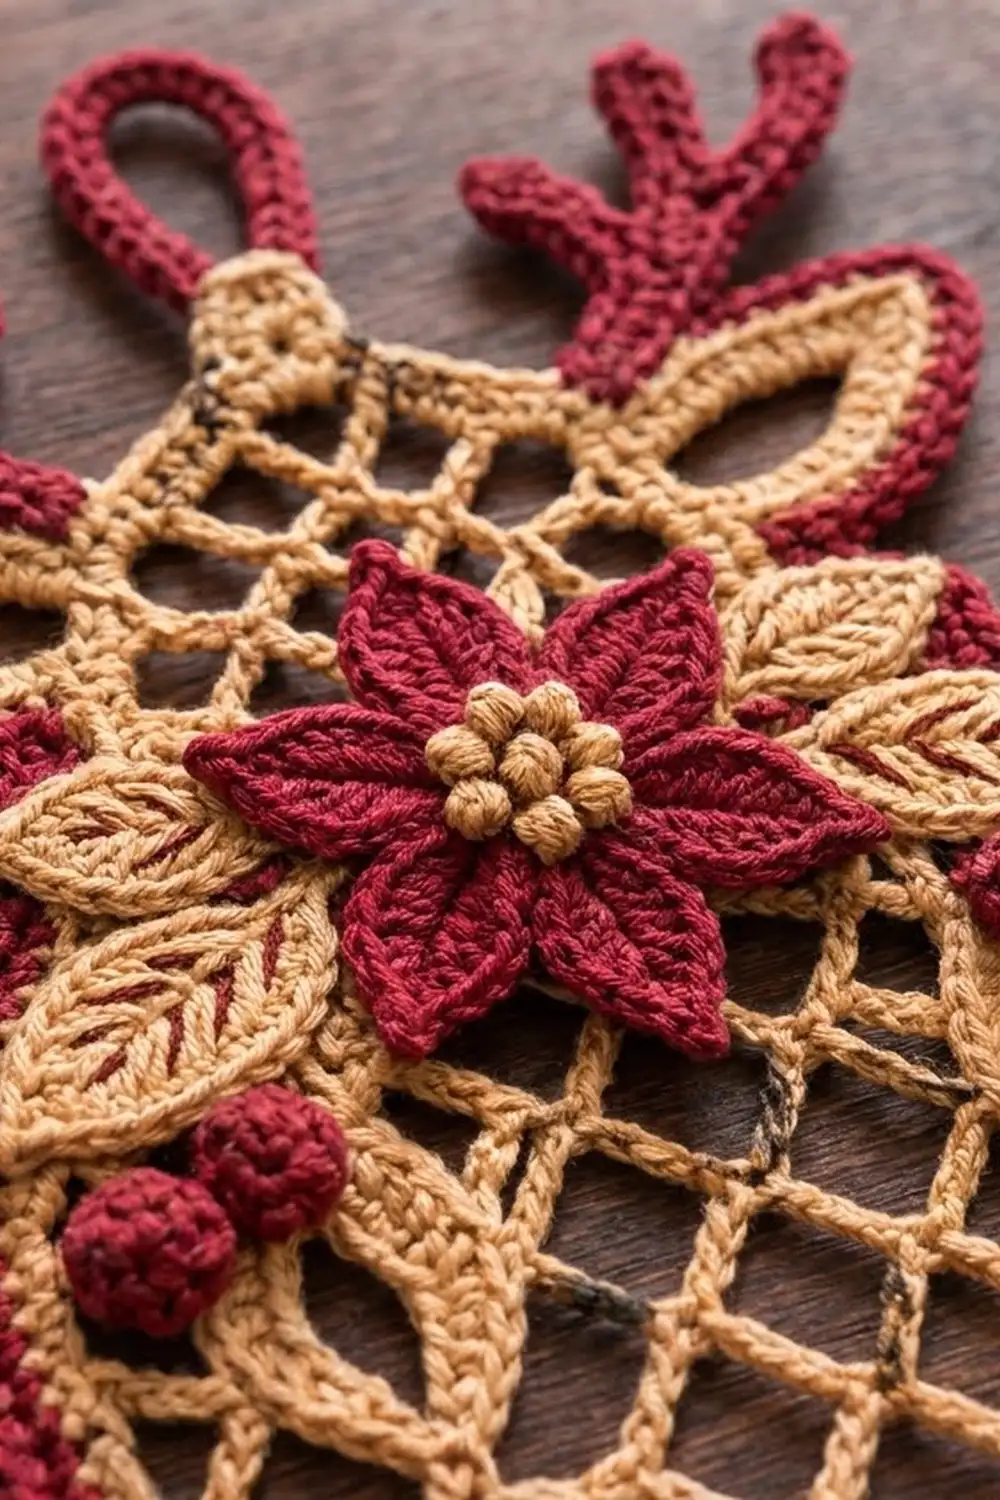
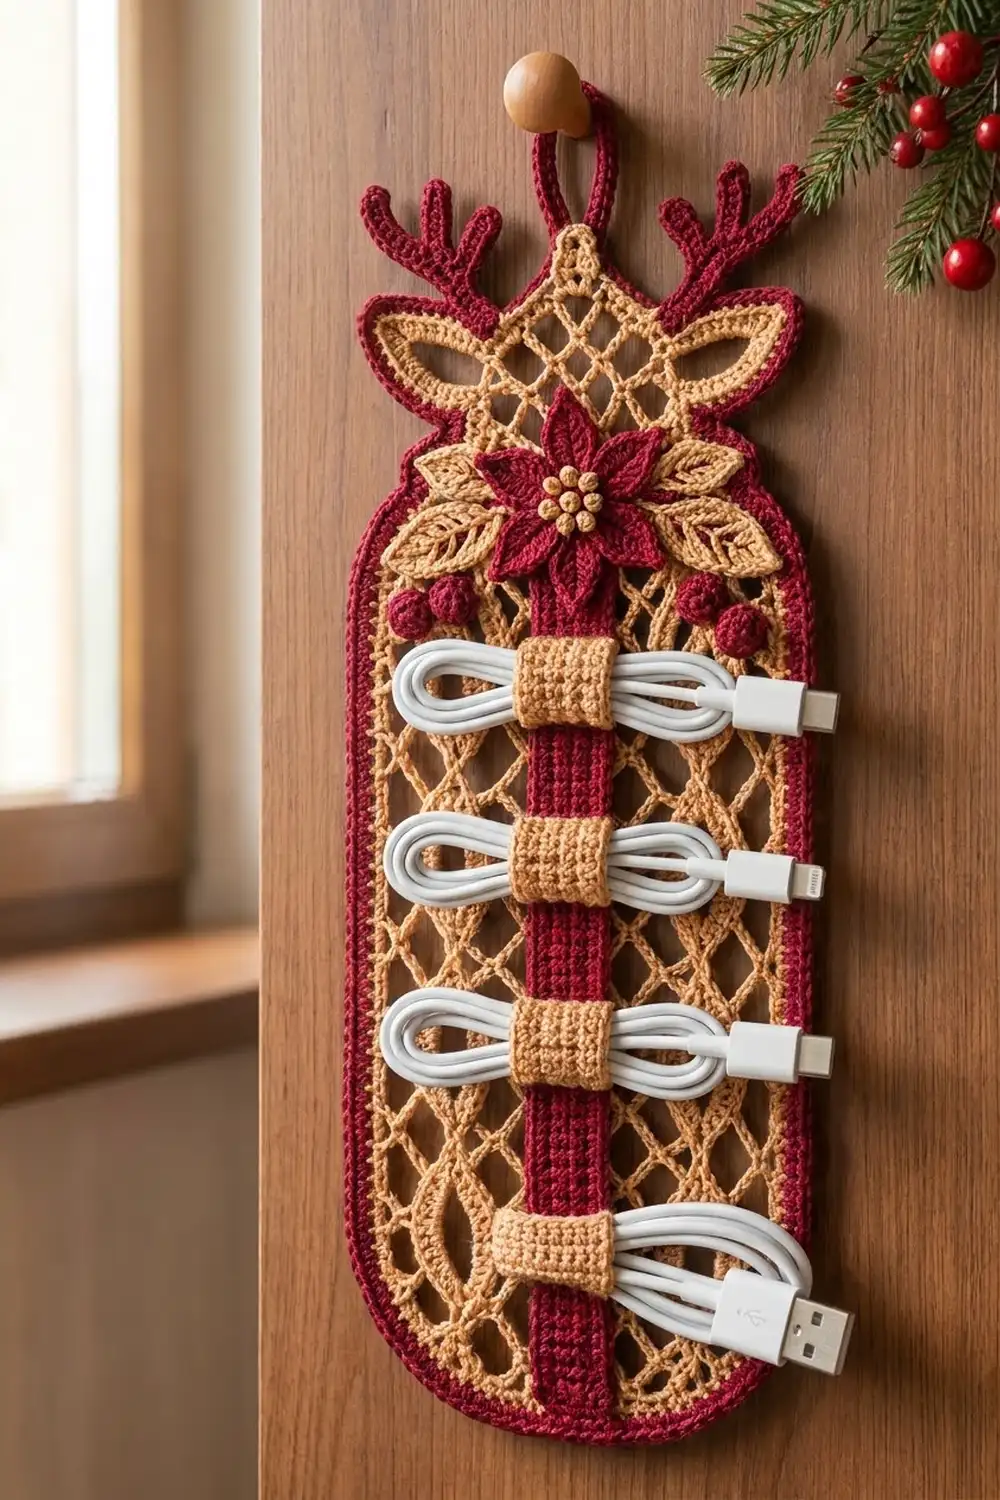
This reindeer cable organizer turns a tangle of charging cords into a festive wall piece. The reindeer’s body and head are a tan diamond-lattice panel. Two tan ears and two branching red antlers sit at the top, and a deep red border frames the whole shape. A red poinsettia with tan leaves and red berries sits over the reindeer’s “chest.”
A ribbed red strap runs down the center and carries four sliding tan keepers. When you tuck a coiled cable under a keeper, it stays put. Two columns of raised tan ovals run through the lattice for texture, which gives the piece a warm cottage-Christmas look.
The pattern uses US crochet terms. The finished panel measures 6.6 in (16.8 cm) wide by 13.2 in (33.5 cm) tall. With the ears and antlers it is about 7.25 in (18.4 cm) wide by 14.6 in (37.1 cm) tall.
First you crochet the lattice panel in rows from the bottom up and add a three-round border. Then you make the small pieces and sew them on.
Finished Size and Construction
- Finished panel size: 6.6 in (16.8 cm) wide x 13.2 in (33.5 cm) tall
- Overall size: about 7.25 in (18.4 cm) x 14.6 in (37.1 cm), including ears and antlers
- Skill level: Intermediate
- Terminology: US crochet terms
- Yarn weight: Sport (CYC 2) cotton
- Hook: 3.25 mm (US D/3)
- Number of pieces: 1 main panel plus 23 small pieces, sewn into one finished item
- Layout: one vertical reindeer panel, with the strap centered and the poinsettia at the top of the strap
- Panel size before border: 5.4 in (13.7 cm) wide x 12 in (30.5 cm) tall
- Border depth: 0.6 in (1.5 cm), three rounds
Materials
Choose a smooth, mercerized sport-weight cotton. It shows the lattice clearly, holds its shape on a wall and resists stretching when cables hang from it.
- Tan / camel: 50 g, about 150 m
- Deep cranberry red: 40 g, about 120 m
These quantities include a margin of about 20% for a gauge swatch and some ripping back.
Tools:
- 3.25 mm (US D/3) crochet hook
- Tapestry needle
- 6 locking stitch markers
- Rust-proof pins and a blocking board
- Scissors and a tape measure
- Spray bottle
Abbreviations (US Terms)
- ch: chain
- sl st: slip stitch
- sc: single crochet
- hdc: half double crochet
- dc: double crochet
- sc2tog: single crochet 2 together
- BLO: back loop only
- sk: skip
- st(s): stitch(es)
- rep: repeat
Special stitch (lattice loop): ch 5, sc in the next ch-5 loop. Each lattice loop counts as 1 loop.
Gauge and Checkpoints
- Lattice gauge: 1 lattice loop = 0.6 in (1.5 cm) wide; 10 rows = 3 in (7.6 cm) tall
- Sc gauge: 5 sc and 5 rows = 1 in (2.5 cm)
Test one piece first. Work Rows 1–10 of the panel and pat the piece flat without stretching it. The straight section should be 5.4 in (13.7 cm) across, and the piece should be 3 in (7.6 cm) tall.
Checkpoints:
- After Row 3: 5.4 in (13.7 cm) wide
- After Row 10: 3 in (7.6 cm) tall
- After Row 35: 10.5 in (26.7 cm) tall
- After Row 40: 12 in (30.5 cm) tall
- After the border: 6.6 in (16.8 cm) x 13.2 in (33.5 cm)
If the panel is too big, go down a hook size. If it is too small, go up a hook size. Change the hook, not the counts, because the border math depends on the loop counts.
Main Panel (Tan)
The panel is a ch-5 lattice. In a plain row, the turning ch 5 forms the first loop, so each row keeps the same number of loops as the row before.
Plain row: ch 5, turn, sc in first ch-5 loop, *ch 5, sc in next ch-5 loop; rep from * across.
Increase row (+2 loops): ch 5, turn, sc in first loop, ch 5, sc in same loop, *ch 5, sc in next loop; rep from * across, ch 5, sc in same last loop.
Decrease row (−2 loops): turn, sl st in first 3 ch of first loop, ch 1, sc in same loop, *ch 5, sc in next loop; rep from * until 1 loop remains, leave it unworked.
Foundation: ch 22.
Row 1: sc in 6th ch from hook, *ch 5, sk 3 ch, sc in next ch; rep from * across. (5 loops)
Row 2 (increase row): 7 loops.
Row 3 (increase row): 9 loops. The bottom is now rounded.
Rows 4–35 (plain rows): 9 loops in each row. (32 rows)
On Row 4, place a marker on loop 3 and on loop 7, counting from the right edge. These mark the two oval columns.
Row 36 (decrease row): 7 loops.
Row 37 (decrease row): 5 loops.
Row 38 (decrease row): 3 loops. These three rows shape the head’s shoulders.
Rows 39–40 (plain rows): 3 loops. Fasten off.
Total: 40 rows, 12 in (30.5 cm) tall and 5.4 in (13.7 cm) wide across the straight section.
Border
Border gauge: 5 sc = 1 in (2.5 cm). Each straight side has one ch-5 edge loop for every 2 rows, which is 0.6 in (1.5 cm) of height. Working 3 sc per edge loop gives exactly 5 sc per inch.
Round 1 (tan): Join tan at the bottom right of the foundation and sc around as follows:
- Bottom edge (foundation, 5 loops): 3 sc in each loop = 15 sc
- Right bottom curve (Rows 1–3): 8 sc evenly
- Right side (Rows 4–35, 16 edge loops): 3 sc in each = 48 sc
- Right shoulder (Rows 36–38): 10 sc evenly
- Right top side (Rows 39–40, 1 edge loop): 3 sc
- Top edge (Row 40, 3 loops): 3 sc in each loop = 9 sc
- Left top side: 3 sc; left shoulder: 10 sc; left side: 48 sc; left bottom curve: 8 sc
Sl st to first sc. Total: 162 sc (15 + 8 + 48 + 10 + 3 + 9 + 3 + 10 + 48 + 8). Fasten off.
Round 2 (red): Join red in any sc on the bottom edge. Sc in each sc around. On each bottom curve, work 2 sc in the 2nd, 4th and 6th st of that curve. Sl st to first sc. Total: 168 sc (162 worked 1-per-stitch + 6 increases). Each curve now has 11 sc.
Round 3 (red): Sc in each sc around, again working 3 evenly spaced increases on each 11-st bottom curve. Sl st to first sc. Total: 174 sc (168 worked 1-per-stitch + 6 increases).
Why the math works: The straight edges get exactly 1 sc per sc, so they stay flat at 5 sc per inch. Only the outward bottom curves need extra stitches as the border grows. The shoulders are short and slightly concave, so they need no increases.
Hanging loop (red): In the center sc of the top edge, ch 18, sl st in the same st, turn, work 24 sc into the ch-18 loop, then sl st to the base. Fasten off. The loop stands about 1.2 in (3.0 cm) tall.
Three sc rounds add 0.6 in (1.5 cm) on every side. That gives 5.4 + 1.2 = 6.6 in (16.8 cm) of width and 12 + 1.2 = 13.2 in (33.5 cm) of height.
Make All Pieces
Ears (make 2, tan with red edge):
Ch 10. Rnd 1: sc in 2nd ch from hook, hdc, dc in next 4 ch, hdc, sc, 3 sc in last ch; working along the other side of the chain: sc, hdc, dc in next 4 ch, hdc, sc. Sl st to first sc. (19 sts)
Rnd 2 (red): sl st in each st around. (19 sl st) Fasten off. Each ear is 1.75 in (4.4 cm) long and 0.9 in (2.3 cm) wide.
Antlers (make 2, red):
Ch 14. Sc in 2nd ch from hook and in next 2 ch (tip). Ch 5, sc in 2nd ch from hook and in next 3 ch (first tine). Sc in next 3 main ch. Ch 6, sc in 2nd ch from hook and in next 4 ch (second tine). Sc in next 3 main ch. Ch 4, sc in 2nd ch from hook and in next 2 ch (third tine). Sc in last 4 main ch. (13 sc on the main beam: 3 + 3 + 3 + 4) Fasten off. Each antler is 2.25 in (5.7 cm) tall.
Poinsettia (make 1, red with tan center):
Rnd 1: magic ring, 8 sc in ring, sl st to first sc. (8 sc)
Rnd 2: *ch 7; working back down the chain: sl st in 2nd ch from hook, sc, hdc, dc, dc, hdc; sl st in next sc of Rnd 1; rep from * 7 more times. (8 petals) Fasten off.
With tan, work 7 French knots in the center. The flower is about 2.75 in (7.0 cm) across.
Leaves (make 4, tan):
Ch 9. Sc in 2nd ch from hook, hdc, dc in next 3 ch, hdc, sc, 3 sc in last ch; working along the other side: sc, hdc, dc in next 3 ch, hdc, sc. Sl st to first sc. (17 sts) Fasten off. Each leaf is 1.5 in (3.8 cm) long.
Berries (make 4, red):
Rnd 1: magic ring, 6 sc in ring. (6 sc)
Rnd 2: sc2tog 3 times. (3 sts) Tuck the tail inside, cinch it closed and fasten off.
Center strap (make 1, red):
Ch 46. Row 1: sc in 2nd ch from hook and in each ch across. (45 sc)
Rows 2–5: ch 1, turn, sc BLO in each st across. (45 sc) Fasten off. The strap is 9 in (22.9 cm) long and 1 in (2.5 cm) wide, with ribs running lengthwise.
Cable keepers (make 4, tan):
Ch 4. Row 1: sc in 2nd ch from hook and in next 2 ch. (3 sc)
Rows 2–18: ch 1, turn, sc in each st. (3 sc) Leave a long tail. Each strip is 0.6 in (1.5 cm) wide and 3.6 in (9.1 cm) long.
Oval cords (make 4, tan):
Ch 66. Sl st in the back bump of the 2nd ch from hook and of each ch across. (65 sl st) Each cord is about 11 in (27.9 cm) long.
Layout (front view):
          [antler] (loop) [antler]
     [ear]   [head, Rows 36-40]   [ear]
   [leaf][leaf] (POINSETTIA) [leaf][leaf]
   (berry)(berry)           (berry)(berry)
   | oval col |   | strap |   | oval col |
   | loop 3   |   |  K1   |   | loop 7   |
   |          |   |  K2   |   |          |
   |          |   |  K3   |   |          |
   |          |   |  K4   |   |          |
    \__________ red border ____________/
Joining
Sew each piece on with its own tail and a tapestry needle. Keep the stitches small and snug, but never so tight that they pucker the lattice. Pin each piece before you sew it, then check that the panel still lies flat.
- Oval cords: Pin 2 cords along each marked column from Row 4 to Row 35, a height of 9.6 in (24.4 cm). The two cords in a column touch at every 4th row (Rows 4, 8, 12 and so on through Row 36) and bow apart in between. This gives 8 ovals per column, each 1.2 in (3.0 cm) tall. Couch the cords to the lattice every 0.5 in (1.3 cm), then trim any extra.
- Keepers: Wrap each strip around the strap and sew its short ends together to make a 3.6 in (9.1 cm) ring. Center the keepers 1.4, 3.4, 5.4 and 7.4 in (3.6, 8.6, 13.7, 18.8 cm) from the bottom end of the strap.
- Strap: Center the strap on the panel from Row 4 to Row 33 (30 rows = 9 in / 22.9 cm). Sew both short ends down firmly. Tack the strap’s center line to the lattice halfway between each pair of keepers. Leave the keeper zones loose so the cables can slide under.
- Ears: Sew one ear behind each shoulder, angled up and outward, so that about 0.3 in (0.8 cm) sticks out past the border.
- Antlers: Sew the bottom 0.8 in (2.0 cm) of each antler behind a top corner, one on each side of the hanging loop, with the tines angled outward.
- Poinsettia group: Center the poinsettia over Rows 33–37 so it covers the top end of the strap. Add 2 leaves on each side, fanned outward, then 2 berries below each pair of leaves.
Size checkpoint: The assembled panel should still measure 6.6 in (16.8 cm) x 13.2 in (33.5 cm). If it has drawn in, your couching or tacking is too tight.
Final Blocking
- Pin the panel face up on the blocking board at 6.6 in (16.8 cm) x 13.2 in (33.5 cm).
- Pin the lattice so every diamond is even and every oval is symmetrical.
- Spray the panel until it is damp, but don’t soak the poinsettia.
- Pin the antler tines and the ear tips into shape.
- Let it dry completely, for at least 12 hours.
- Unpin it and check the measurements again.
Final Quality-Control Checklist
- The panel measures 6.6 in (16.8 cm) x 13.2 in (33.5 cm)
- Border Round 3 has 174 sc and lies flat
- Both oval columns have 8 ovals and line up
- The ears match each other, and so do the antlers
- The poinsettia has 8 petals and 7 knots
- The keepers slide freely and hold a coiled cable
- The hanging loop is centered and secure
- All ends are woven in
Troubleshooting
The lattice slants or narrows: You are missing the first or last loop. Count the loops at the end of every row.
The border ruffles: There are too many sc on the straight sides. Work exactly 3 sc per edge loop.
A bottom curve cups: Add 1 more increase per curve on Round 3.
The strap puckers the panel: Tack it again with looser stitches.
The keepers are too tight for cables: Add 2 rows to each keeper strip.
Care
Take the cables out, hand wash the organizer in cool water, roll it in a towel and dry it flat. Block it again if the lattice loses its shape.
Final Notes
Every measurement follows from the gauge. 1 loop = 0.6 in (1.5 cm), so 9 loops make 5.4 in (13.7 cm). Ten rows make 3 in (7.6 cm), so 40 rows make 12 in (30.5 cm). Three border rounds add 0.6 in (1.5 cm) on each side, for a finished panel of 6.6 in (16.8 cm) x 13.2 in (33.5 cm). If you check these numbers at each stage, the reindeer will come together cleanly.
Happy crocheting!