
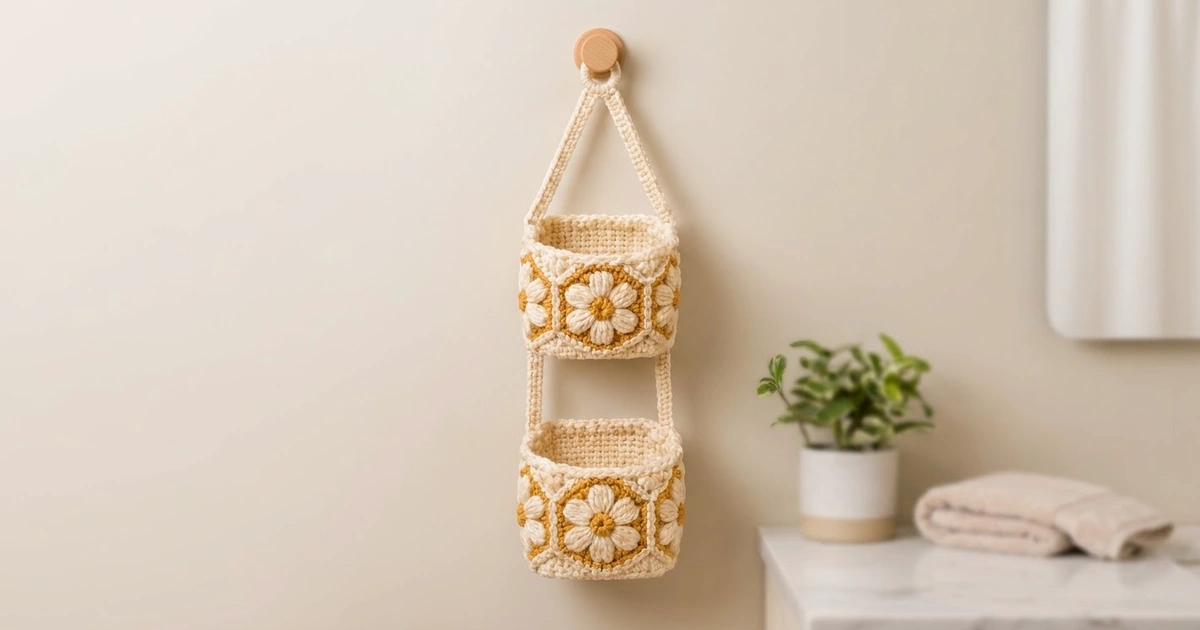
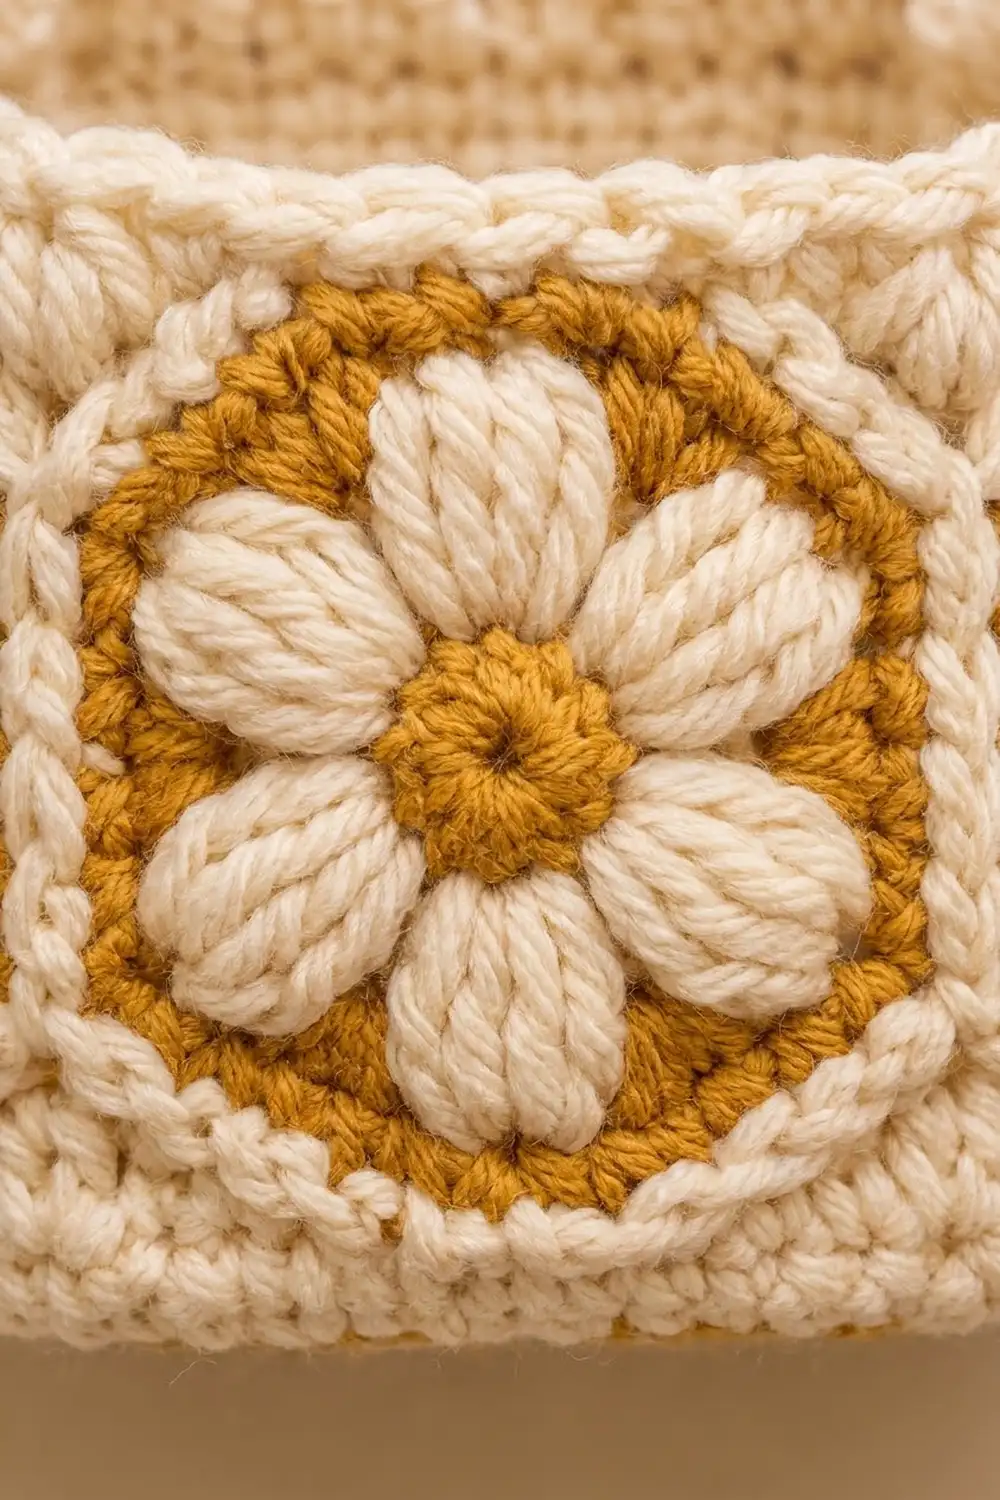
The Honey Daisy holder is a two-tier hanging basket set that keeps two spare toilet paper rolls in view and within reach. Each basket wall is a ring of daisy hexagons, and each daisy has a mustard center, six plump cream puff petals, and a crisp mustard outline.
The palette is soft and warm: natural cream with golden mustard accents. Raised cream seam ridges frame every motif, and a thick rolled rim finishes each basket. The style is cottage-meets-boho and suits a neutral bathroom.
This pattern uses US crochet terms. Each basket measures 5.5 in (14.0 cm) wide, 5.5 in (14.0 cm) deep, and about 6 in (15.2 cm) tall. The full hanging piece is about 25.5 in (64.8 cm) long from the top of the ring to the bottom of the lower basket.
For each basket, you make a square base, four hexagons, and eight triangle fillers. You join the hexagons and triangles into a band, seam the band to the base, and add a rim. Then two straps link the baskets, and a ring hanger goes on top.
Finished Size and Construction
- Basket size: 5.5 x 5.5 in (14.0 x 14.0 cm) base, about 6 in (15.2 cm) tall
- Overall hanging length: about 25.5 in (64.8 cm)
- Skill level: Intermediate
- Terminology: US
- Yarn weight: Worsted / aran (#4)
- Hook: 5.0 mm (H-8)
- Number of pieces: 29 (2 bases, 8 hexagons, 16 triangles, 2 straps, 1 hanger)
- Layout per basket: 4 hexagons in a ring, 4 triangles on top and 4 on the bottom
- Hexagon size: 5.5 in (14.0 cm) point to point, 4.75 in (12.1 cm) flat to flat, 2.75 in (7.0 cm) per side
- Band size before rim: 22 in (55.9 cm) around x 4.75 in (12.1 cm) tall
- Rim depth: about 0.9 in (2.3 cm)
Materials
Choose a smooth cotton or cotton blend in worsted or aran weight. Cotton holds its shape and the puff petals stay crisp. Avoid fuzzy yarns, which blur the petal texture.
- Cream: 250 g, about 425 m (most of the project)
- Mustard: 40 g, about 70 m (hexagon centers and outlines)
These quantities include a margin of roughly 15–20% for gauge swatches and seams.
Tools:
– 5.0 mm (H-8) crochet hook
– Tapestry needle
– Stitch markers (at least 8)
– Locking pins or clips
– Scissors
– Measuring tape
– Blocking mat and pins
Abbreviations (US Terms)
- ch – chain
- sl st – slip stitch
- sc – single crochet
- dc – double crochet
- sc2tog – single crochet 2 together
- sc3tog – single crochet 3 together
- rev sc – reverse single crochet (crab stitch)
- MR – magic ring
- sp – space
- sk – skip
- RS / WS – right side / wrong side
Special stitch: Large Puff (lp). (Yo, insert hook in the stitch, yo, pull up a loop to 0.75 in / 1.9 cm tall) 5 times. You now have 11 loops on the hook. Yo and pull through all 11 loops, then ch 1 to close. The closing ch 1 is not counted as a stitch.
Gauge and Checkpoints
Gauge: 16 sc and 18 rows = 4 in (10.2 cm) in sc rows.
Make one hexagon and one triangle before anything else. Every assembly count depends on those two pieces sharing the same side length.
Checkpoints:
– Base after Rnd 6: 3 in (7.6 cm) square
– Base after Rnd 11: 5.5 in (14.0 cm) square
– Hexagon after Rnd 5: 2.75 in (7.0 cm) per side, 4.75 in (12.1 cm) flat to flat
– Triangle: 2.75 in (7.0 cm) base, about 2.4 in (6.1 cm) tall
– Joined band: 22 in (55.9 cm) around
If your hexagon is too big, go down to a 4.5 mm hook. If it’s too small, go up to a 5.5 mm hook. Pull the puff loops up to the same height every time, because uneven puffs distort the hexagon more than hook size does.
Base (make 2)
Use cream. Work in joined rounds with the RS facing. Each side count below includes that side’s two corner sc. The ch-2 corner spaces are not counted as stitches.
Rnd 1: MR, ch 1, (2 sc, ch 2) 4 times in the ring, sl st to the first sc. (8 sc: 2 per side)
Rnd 2: Sl st into the next sc, then sl st into the corner sp. Ch 1. (Sc, ch 2, sc) in the corner sp, sc in each sc to the next corner; repeat from * 3 more times. Sl st to the first sc. (16 sc: 4 per side)
Rnds 3–11: Repeat Rnd 2. Each round adds 2 sc per side.
| Round | Per side | Total |
|---|---|---|
| 3 | 6 | 24 |
| 6 | 12 | 48 |
| 9 | 18 | 72 |
| 11 | 22 | 88 |
Fasten off. Rnd 11 has 88 sc, with 22 sc per side.
Daisy Hexagon (make 8)
Rnd 1 (mustard): MR, ch 1, 12 sc in the ring, sl st to the first sc. Fasten off. (12 sc)
Rnd 2 (cream): Join in any sc. Ch 2 (does not count as a stitch). Lp in the same st, ch 3, sk 1. Lp in the next st, ch 3, sk 1; repeat from * 4 more times. Sl st to the top of the first lp. Fasten off. (6 lp, 6 ch-3 sps)
Rnd 3 (mustard): Join in any ch-3 sp. Ch 3 (counts as dc), then (dc, ch 2, 2 dc) in the same sp. Sc in the closing ch of the next lp. (2 dc, ch 2, 2 dc) in the next ch-3 sp, sc in the next lp; repeat from * 4 more times. Sl st to the top of ch-3. Fasten off. (30 sts: 24 dc + 6 sc; 5 sts per side; 6 ch-2 corners)
This round is the conversion round. The ch-2 corners sit between the petals, and each petal points to the middle of a side.
Rnd 4 (cream): Join in any ch-2 corner. Ch 3, then (dc, ch 2, 2 dc) in the same sp. Dc in each of the next 5 sts. (2 dc, ch 2, 2 dc) in the next corner, dc in each of the next 5 sts; repeat from * 4 more times. Sl st to join. (54 dc: 2 + 5 + 2 = 9 per side)
Rnd 5 (cream): Sl st into the corner sp. Ch 1. (Sc, ch 2, sc) in the corner, sc in each of the next 9 dc; repeat from * 5 more times. Sl st to join and fasten off, leaving a 12 in (30.5 cm) tail. (66 sc: 1 + 9 + 1 = 11 per side)
Checkpoint: 2.75 in (7.0 cm) per side, 4.75 in (12.1 cm) flat to flat.
Triangle Filler (make 16)
Use cream. Work in rows and turn at the end of each row. Ch 1 at the start of each row does not count as a stitch.
Row 1: Ch 12, sc in the 2nd ch from the hook and in each ch across. (11 sc)
Row 2: Ch 1, sc across. (11)
Row 3: Ch 1, sc2tog, sc in the next 7, sc2tog. (9)
Row 4: Ch 1, sc across. (9)
Row 5: Ch 1, sc2tog, sc in the next 5, sc2tog. (7)
Row 6: Ch 1, sc across. (7)
Row 7: Ch 1, sc2tog, sc in the next 3, sc2tog. (5)
Row 8: Ch 1, sc across. (5)
Row 9: Ch 1, sc2tog, sc in the next st, sc2tog. (3)
Row 10: Ch 1, sc across. (3)
Row 11: Ch 1, sc3tog. (1)
Fasten off. Each slanted side has exactly 11 row ends, and the base has 11 sts. Those numbers match the hexagon’s 11 sts per side.
Straps and Hanger
Connecting strap (make 2): In cream, ch 4. Sc in the 2nd ch from the hook and in the next 2 ch (3 sc). Work 29 more rows of 3 sc, for 30 rows total. The strap measures 0.75 x 6.7 in (1.9 x 17.0 cm).
Hanger (make 1):
– Ring: In cream, ch 14 and sl st to form a ring. Ch 1, work 24 sc into the ring, then sl st to join. Next rnd: ch 1, sc in each sc around, sl st to join. (24 sc)
– Arm 1: Row 1: ch 1, sc in the same st and the next 2 (3 sc). Rows 2–40: ch 1, turn, 3 sc. Fasten off.
– Arm 2: Sk 1 sc on the ring after Arm 1 and join in the next sc. Work exactly like Arm 1.
Each arm is about 0.75 x 8.9 in (1.9 x 22.6 cm).
Make All Pieces
Per basket: 1 base, 4 hexagons, 8 triangles.
Total: 2 bases, 8 hexagons, 16 triangles, 2 straps, 1 hanger.
Color use per hexagon: mustard for Rnds 1 and 3, cream for Rnds 2, 4, and 5. Bases, triangles, straps, and the hanger are all cream.
Band layout (unrolled; the last column wraps back to the first):
  T    T    T    T        T = top triangle (point down)
H    H    H    H          H = hexagon (flat top and bottom)
  B    B    B    B        B = bottom triangle (point up)
Each top triangle sits in the V between two neighboring hexagons, and each bottom triangle fills the matching V below. The hexagon points meet at the center of each triangle’s point.
Joining
Method: cream sc seam, worked with WS together and RS facing you. This leaves the raised ridge on the outside.
Stitch-to-stitch logic: Each hexagon slant has 11 sc (corner sc included), and each triangle slant has 11 row ends. Work 1 sc through each matching pair, 11 sc per seam. At hexagon corners, insert the hook under the ch-2 sp along with the corner sc. Do not add extra stitches.
Order:
1. Join a top triangle and a bottom triangle to the upper-right and lower-right slants of Hexagon 1.
2. Join Hexagon 2’s upper-left and lower-left slants to those same two triangles.
3. Continue until all four hexagons are in place.
4. Close the ring by joining Hexagon 4 to the first two triangles.
5. Tack each pair of meeting hexagon points with one sl st.
Tension: Keep seam stitches the same height as your fabric sc. Seams that are too tight pucker the band, and seams that are too loose let the panels gape.
Checkpoint: The band’s top edge has 88 sts (4 hexagon tops x 11 + 4 triangle bases x 11), and so does the bottom edge. The band measures 22 in (55.9 cm) around and 4.75 in (12.1 cm) tall.
Attach the base: Place the base corners at the center stitch (stitch 6 of 11) of four bottom triangles, and pin. Work a cream sc seam through both layers, WS together, for 22 sc per side (88 total). Skip the ch-2 corner spaces.
Border (Basket Rim)
Rim gauge: The same 16 sc = 4 in (10.2 cm), so 88 sc = 22 in (55.9 cm).
Rnd 1: Join cream at the top of the band. Ch 1, sc in each of the 88 top-edge sts. Skip the hexagon corner ch-2 spaces and seam ridges. Sl st to join. (88 sc: 22 per face)
Rnds 2–3: Ch 1, sc in each sc, sl st to join. (88 sc: 22 per face)
Rnd 4: Ch 1, rev sc in each sc, sl st to join. (88 rev sc)
Fasten off. The rim is about 0.9 in (2.3 cm) deep and rolls slightly outward.
Why the math works: The band edge has 88 sts with no stitches added at seams. Each face carries 22 sts: 11 from the hexagon top plus 5.5 from each half-triangle at the corners. That matches the base’s 22 sts per side, so the walls stand straight with no flare or pull.
Assembly of the Tiers
- Find the center of each side face on both baskets and mark it.
- Sew the bottom 1 in (2.5 cm) of each hanger arm to the outside of the top basket. Center each arm on a side face, overlapping the rim.
- Sew the top 1 in (2.5 cm) of each connecting strap to the lower outside edge of the top basket, directly below an arm.
- Sew the other end of each strap 1 in (2.5 cm) over the rim of the bottom basket, on the matching side faces.
- The gap between the tiers is about 4.7 in (11.9 cm).
Final Blocking
- Wet the finished holder thoroughly in cool water, then press out the water gently. Don’t wring it.
- Roll it in a towel to remove excess moisture.
- Stuff each basket snugly with a towel or a 5 in (12.7 cm) box so the walls dry square.
- Pin the straps and arms straight on a mat.
- Shape the hexagon petals with your fingers and press the rims round.
- Let it dry completely, usually 24–36 hours.
Final Quality-Control Checklist
- Each base measures 5.5 in (14.0 cm) square, with 22 sc per side.
- Each hexagon has 11 sc per side.
- Every triangle has 11 sts on its base and 11 row ends on each slant.
- Each band has 88 sts at both the top and bottom edges.
- All seam ridges are on the outside.
- The rim has 88 sts on every round.
- The straps and arms are centered and aligned vertically.
- All ends are woven in securely.
- The holder hangs straight when empty.
Troubleshooting
- Hexagon cups: Your puffs are too short. Pull the loops up to the full 0.75 in (1.9 cm).
- Hexagon ruffles: Your Rnd 4 dc are too loose. Go down half a hook size.
- Triangle doesn’t fill the V: Check your row gauge. Eleven rows should measure about 2.4 in (6.1 cm).
- Band longer than the base: You worked extra stitches at the seams. Rework the seams at 11 sc each.
- Rim flares: Work the rev sc round with a hook one size smaller.
- Basket tilts: The straps are sewn off-center. Re-measure and re-sew them.
Care
Hand wash in cool water with mild soap and reshape while damp. Lay flat or hang to dry, away from direct heat.

Final Notes
The measurement chain is simple:
– Gauge of 16 sc per 4 in (10.2 cm)
– Hexagon and triangle sides of 11 sts, or 2.75 in (7.0 cm)
– Band of 88 sts, or 22 in (55.9 cm) around
– Base of 22 sts per side, or 5.5 in (14.0 cm)
– Rim of 88 sts
If each link checks out, the baskets come out square, the walls stand straight, and the finished holder hangs at about 25.5 in (64.8 cm).
Happy crocheting!