
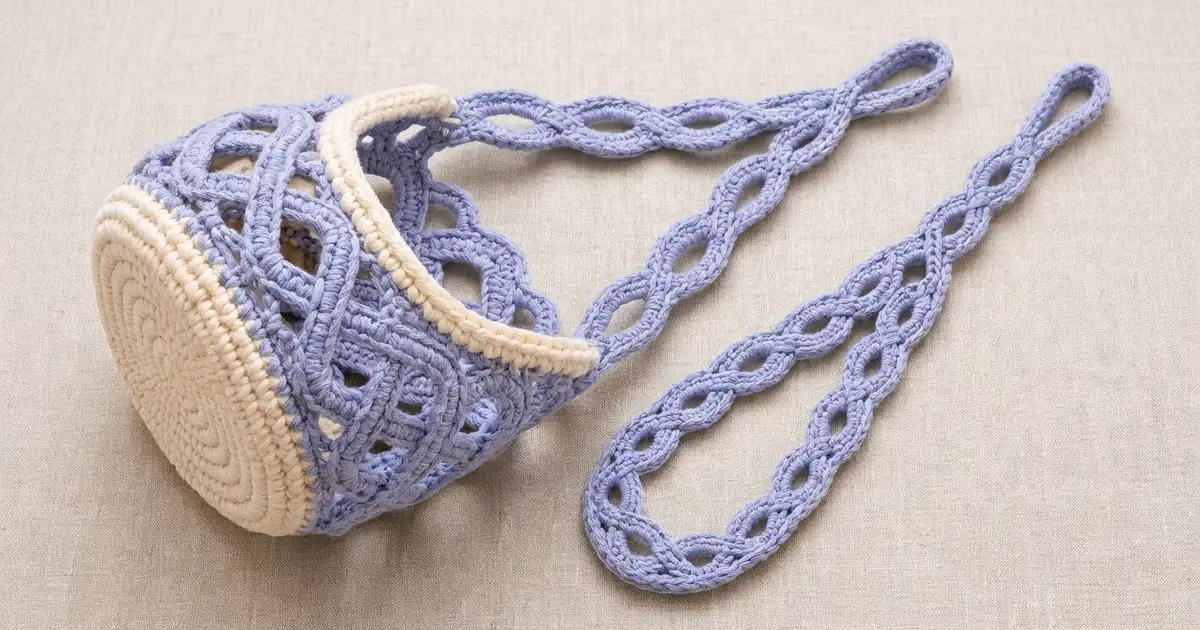
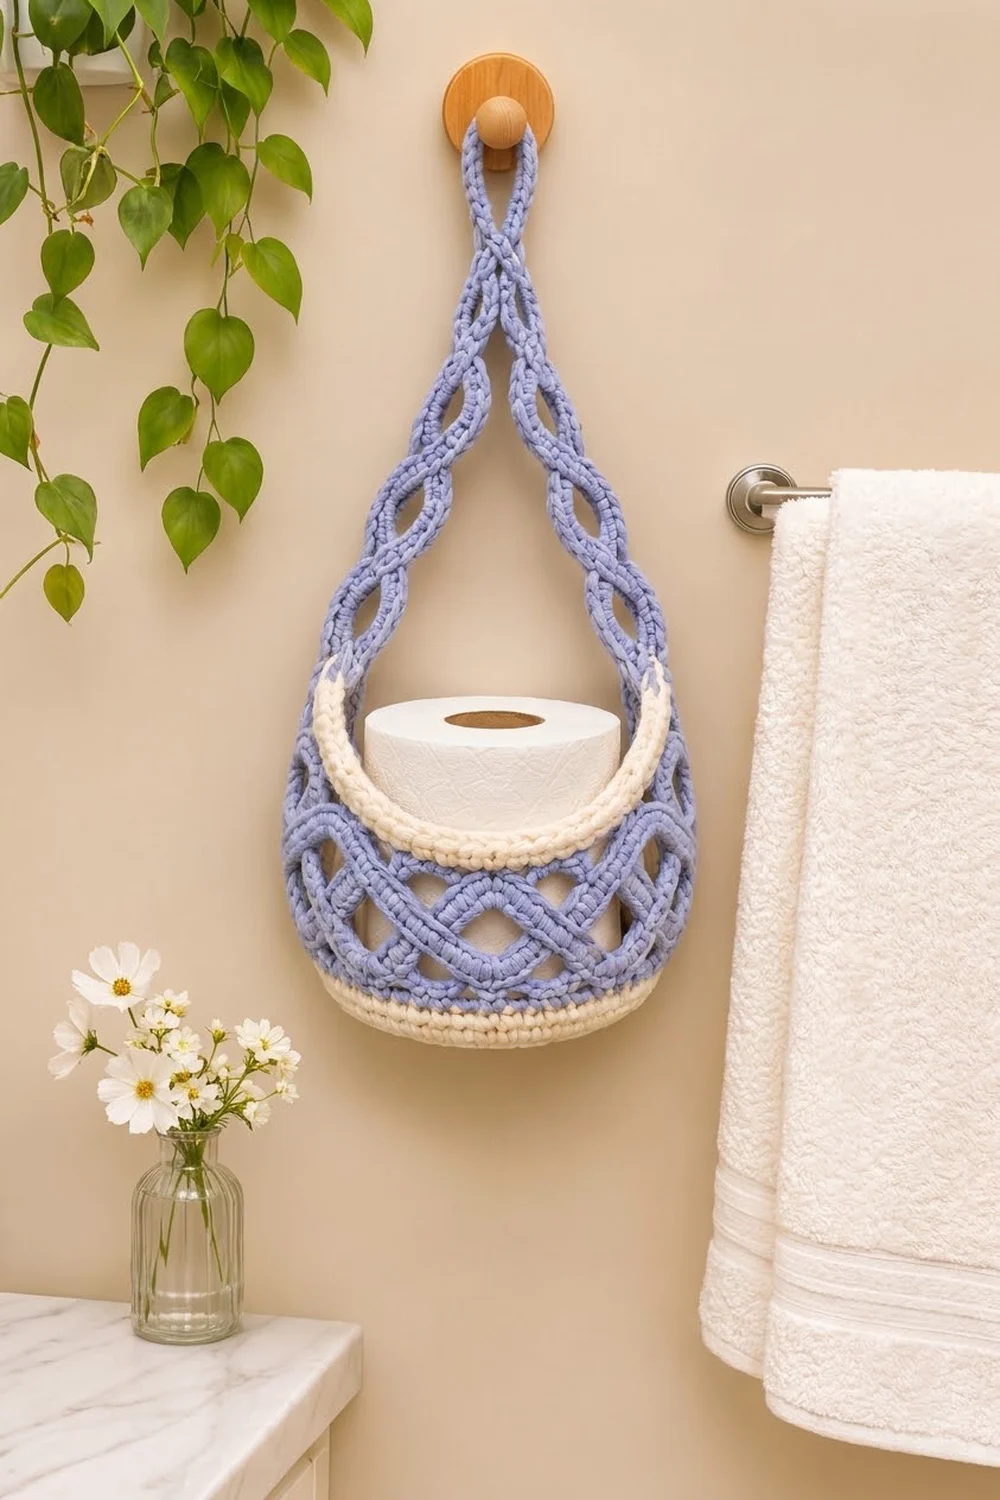
This hanging basket puts a spare toilet roll (or two) right where you need it. It has a solid cream base, a periwinkle-blue openwork lattice body and a soft cream rim that dips low at the front, so rolls are easy to lift out. A slim lattice strap crosses below a small loop that hangs on any wall peg or hook.
The style is light and airy, a little like macramé, but it is all simple crochet: single crochet, chain loops and a few double crochet shells. The base and bottom band are cream. The lattice and strap are periwinkle. The rim is cream again, which frames the opening.
This pattern uses US crochet terms. The finished basket measures about 6 in (15.2 cm) wide, 5 in (12.7 cm) tall at the front and 6.5 in (16.5 cm) tall at the back. The total hanging length is about 21 in (53.3 cm).
You work the base in joined rounds and turn the edge up with a back-loop round. Then you work the lattice body in the round, shape the taller back panel in rows, and add the cream rim. The strap is worked separately and sewn on at the end.
Finished Size and Construction
- Finished size: 6 in (15.2 cm) wide; 5 in (12.7 cm) tall at front; 6.5 in (16.5 cm) tall at back
- Skill level: Easy–Intermediate
- Terminology: US
- Yarn weight: Worsted (#4), cotton or cotton blend
- Hook: 5.0 mm (US H-8)
- Number of pieces: 2 (basket, strap)
- Layout: strap ends sewn to the two upper side corners of the basket
- Base size: 5.75 in (14.6 cm) diameter
- Front height before rim: 4.25 in (10.8 cm)
- Rim depth: 0.75 in (1.9 cm), 3 rows
- Strap: 30.25 in (76.8 cm) long × 1.5 in (3.8 cm) wide
Materials
Choose a smooth, firm worsted cotton. Cotton holds the lattice open and doesn’t stretch under the weight of a roll. Acrylic works, but the basket will sag more.
- Color A – Cream: 50 g, about 88 m
- Color B – Periwinkle Blue: 85 g, about 150 m
These quantities include a margin of about 15% for gauge swatches and differences in tension.
Tools:
– 5.0 mm (US H-8) crochet hook
– 4 stitch markers
– Tapestry needle
– Scissors
– Measuring tape
– Rust-proof pins and a blocking surface
– A toilet roll (handy for shaping while you block)
Abbreviations (US Terms)
- MR – magic ring
- ch – chain
- sl st – slip stitch
- sc – single crochet
- inc – 2 sc in the same stitch
- sc2tog – single crochet 2 together
- dc – double crochet
- BLO – back loop only
- sp – space
- st(s) – stitch(es)
- RS – right side
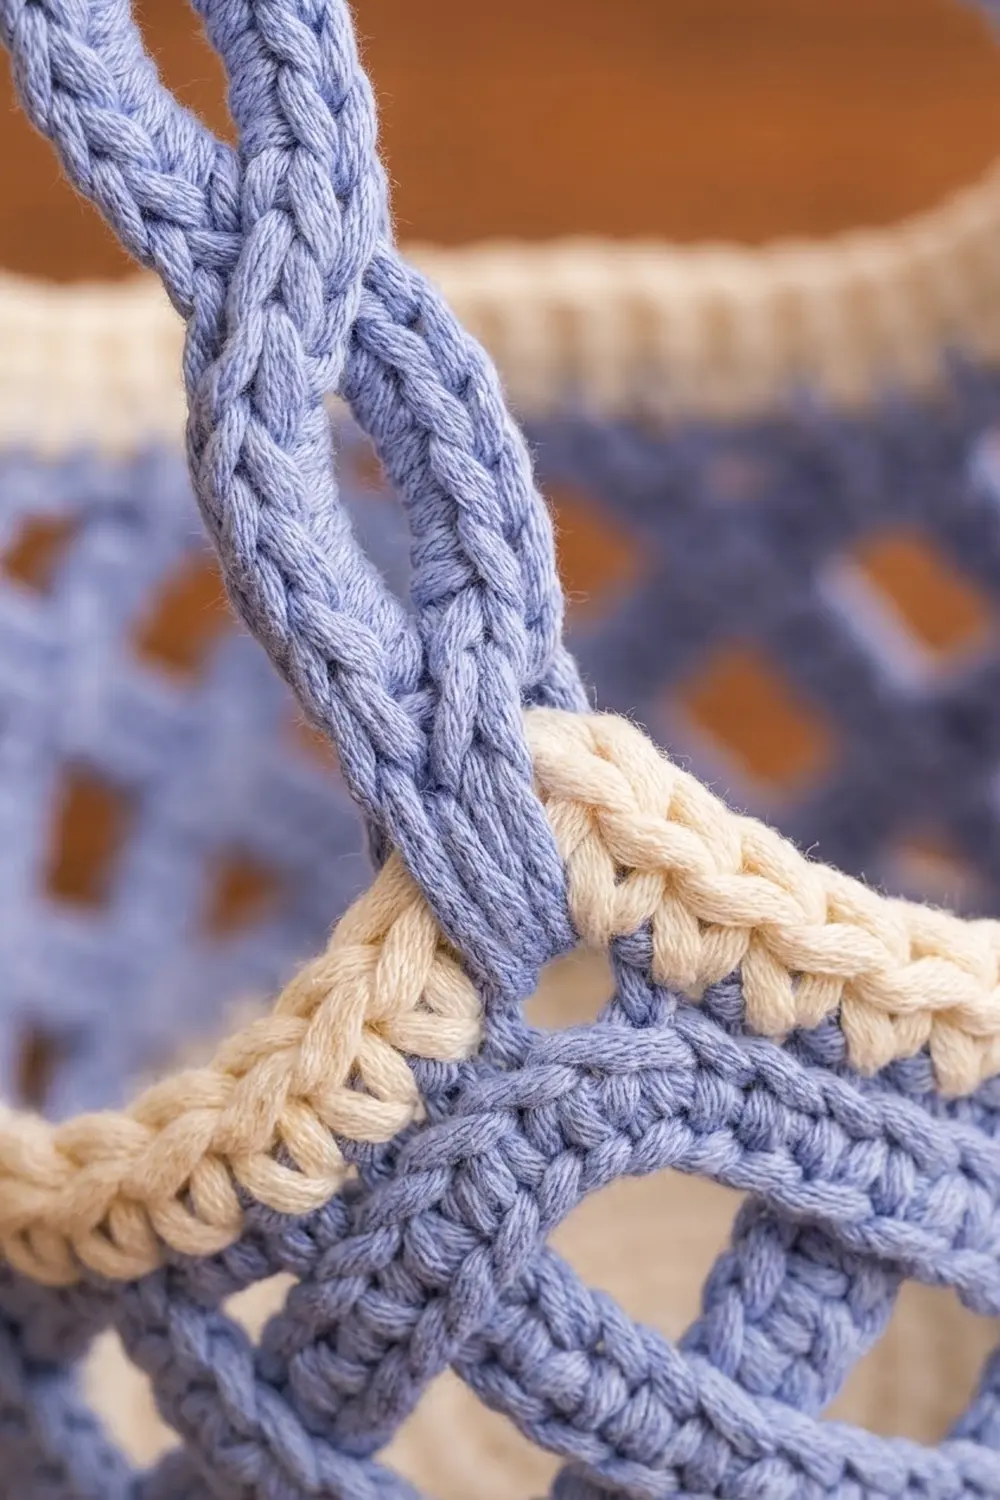
Special stitch – Lattice loop: ch 5, skip the stated stitches or space, sc in the next stated stitch or space. When you stack these loops, they make the diamond trellis.
Gauge and Checkpoints
Gauge: 16 sc and 17 rounds = 4 in (10.2 cm) in sc worked in the round. In the lattice, one loop repeat covers 4 sts, which is 1 in (2.5 cm), and each lattice round adds about 0.6 in (1.5 cm) of height.
Test your gauge by working the base first. It is solid sc, so it acts as your swatch.
Checkpoints:
– After Rnd 6 (36 sts): about 2.9 in (7.4 cm) across.
– After Rnd 12 (72 sts): 5.75 in (14.6 cm) across.
– After Rnd 16: the cream band stands 1 in (2.5 cm) tall.
– After Rnd 21: the wall measures about 4 in (10.2 cm) from the base.
– After Rnd 22: front height is 4.25 in (10.8 cm).
– After Back Row 4: back height is about 6.5 in (16.5 cm).
If your base is too big, go down half a hook size (4.5 mm). If it’s too small, go up to 5.5 mm. Don’t add or remove stitches, because the lattice repeat depends on a total of 72.
Base (Color A – Cream)
Join every round with a sl st to the first sc and ch 1. The ch 1 does not count as a stitch. The joins line up along one side of the basket, which is where you want them.
Rnd 1: 6 sc in MR. (6)
Rnd 2: Inc in each st around. (12)
Rnd 3: (Sc 1, inc) 6 times. (18)
Rnd 4: (Sc 2, inc) 6 times. (24)
Rnd 5: (Sc 3, inc) 6 times. (30)
Rnd 6: (Sc 4, inc) 6 times. (36)
Rnd 7: (Sc 5, inc) 6 times. (42)
Rnd 8: (Sc 6, inc) 6 times. (48)
Rnd 9: (Sc 7, inc) 6 times. (54)
Rnd 10: (Sc 8, inc) 6 times. (60)
Rnd 11: (Sc 9, inc) 6 times. (66)
Rnd 12: (Sc 10, inc) 6 times. (72)
Tip: on the even rounds from Rnd 8 onward, you can start with half the plain stitches (for example, sc 3, inc, then sc 7, inc around, ending with sc 4) so the base stays round and doesn’t turn hexagonal. The total stays the same.
Bottom Band (Color A)
Rnd 13: Sc in BLO of each st around. (72) This makes the fold that turns the wall upward.
Rnds 14–16: Sc in each st around. (72)
On the final sl st of Rnd 16, pull Color B through. Fasten off Color A.
Checkpoint: the band stands 1 in (2.5 cm) tall and the base lies flat.
Lattice Body (Color B – Periwinkle)
Rnd 17: Ch 1, sc in first st, (ch 5, skip 3 sts, sc in next st) 17 times, ch 2, skip last 3 sts, dc in first sc.
The sc sit on sts 1, 5, 9 … 69. The ch 2 + dc counts as the 18th loop and leaves your hook at the center of that loop. (18 loops)
Rnd 18: Ch 1, sc around the post of the joining dc, (ch 5, sc in next ch-5 sp) 17 times, ch 2, dc in first sc. (18 loops)
Rnds 19–21: Repeat Rnd 18. (18 loops each round)
Checkpoint: the wall is about 4 in (10.2 cm) tall and the diamonds are clearly open. If the loops look slack, tighten your chains a little rather than shortening them.
Rnd 22 (conversion round): Ch 1, 2 sc around the post of the joining dc, 4 sc in each of the next 17 ch-5 sps, 2 sc in the final ch-2 sp, sl st to first sc.
Count: (17 spaces × 4 sc) + (2 + 2 in the split last loop) = 68 + 4 = 72 sts. Fasten off.
Place a marker in st 1 and another in st 35. Sts 1–35 are the front (35 sts). Sts 36–72 are the back (37 sts).
Back Panel (Color B, worked in rows)
With RS facing, join Color B in st 36.
Row 1: Ch 1, sc in st 36, (ch 5, skip 3 sts, sc in next st) 9 times.
The sc land on sts 36, 40 … 72. (9 loops, 10 sc)
Row 2: Ch 5 (counts as dc + ch 2), turn, sc in first ch-5 sp, (ch 5, sc in next ch-5 sp) 8 times, ch 2, dc in last sc. (8 full loops + 2 half loops)
Row 3: Ch 1, turn, sc in first dc, (ch 5, sc in next ch-5 sp) 8 times, ch 5, sc in 3rd ch of turning ch. (9 loops)
Row 4 (scallops): Ch 1, turn, sc in first sc, (5 dc in next ch-5 sp, sc in next sc) 9 times.
Count: 1 + (9 × 6) = 55 sts, which makes 9 scallop arches. Fasten off.
Checkpoint: the back stands about 6.5 in (16.5 cm) tall, and the front stays at 4.25 in (10.8 cm).
Border: Cream Rim (Color A)
The rim runs down the left side edge of the back panel, across the 35 front stitches, and up the right side edge. The scalloped top of the back stays blue.
Border gauge: 4 sc per 1 in (2.5 cm), the same as the base.
Row 1: With RS facing, join Color A at the top left corner of the back panel (the side edge of Row 4). Work 10 sc evenly down the side edge: 3 sc in the Row 4 row-end, 2 sc in Row 3, 3 sc in Row 2 and 2 sc in Row 1. Then sc in each of front sts 1–35. Work 10 sc up the other side edge in the same row-end order, reversed (2, 3, 2, 3).
Count: 10 (side) + 35 (front) + 10 (side) = 55 sts.
Row 2: Ch 1, turn, sc in next 9 sts, sc2tog, sc in next 33 sts, sc2tog, sc in last 9 sts.
Count: 9 (side) + 1 (corner) + 33 (front) + 1 (corner) + 9 (side) = 53 sts.
Row 3: Ch 1, turn, sc in each st across. (53) Fasten off.
Why the math works: The front stitches are worked 1-to-1, so the rim stays exactly the width of the opening. The side edges are about 2.3 in (5.8 cm) tall. At 4 sc per inch that needs about 9 sts, and 10 gives slight ease so the edge doesn’t pucker. Each sc2tog is placed at an inside corner, where the side meets the front. Because those corners are concave, the decreases stop the rim from rippling and give the smooth U-curve.
Checkpoint: the rim is 0.75 in (1.9 cm) deep. The front now measures 5 in (12.7 cm) tall.
Strap (Color B)
Foundation: Ch 122.
Row 1: Sc in 2nd ch from hook and each ch across. (121)
Row 2: Ch 1, turn, sc in first st, (ch 5, skip 3 sts, sc in next st) 30 times. (30 loops)
Row 3: Ch 5 (counts as dc + ch 2), turn, sc in first ch-5 sp, (ch 5, sc in next ch-5 sp) 29 times, ch 2, dc in last sc. (29 full loops + 2 half loops)
Row 4: Ch 1, turn, sc in dc, sc in ch-2 sp, sc in next sc, (3 sc in next ch-5 sp, sc in next sc) 29 times, sc in turning-ch sp, sc in 3rd ch of turning ch.
Count: 1 + 1 + 1 + (29 × 4) + 1 + 1 = 121 sts.
Fasten off and leave a 12 in (30.5 cm) tail on both ends.
Checkpoint: the strap measures 30.25 in (76.8 cm) by about 1.5 in (3.8 cm).
Assembling the Strap
- Fold the strap in half and mark the fold.
- Measure 3 in (7.6 cm) down from the fold. Give one leg a half-twist so the two legs cross.
- Whipstitch the legs together where they cross, over about 1 in (2.5 cm). This forms the hanging loop.
- Pin each strap end to the outside of the basket at one upper side corner, where the rim meets the scalloped back. Overlap about 1.5 in (3.8 cm) down the side.
- Check that both legs hang at the same length, then whipstitch each end in place through the rim and the lattice behind it.
Final Blocking
- Wet the basket and strap in cool water and press out the extra water with a towel.
- Put a toilet roll (wrapped in a plastic bag) inside the basket to hold the shape.
- Ease the lattice diamonds open with your fingers so they look even.
- Shape the rim into a smooth U and pin the scallops so each arch is round.
- Lay the strap flat and pin it straight. Leave the crossing loop as it is.
- Let everything dry completely, then remove the roll.
Final Quality-Control Checklist
- Base is 5.75 in (14.6 cm) across and lies flat.
- Bottom band is 1 in (2.5 cm) tall.
- 18 lattice loops in every round, 5 rounds in total.
- Rnd 22 has 72 sts; front 35, back 37.
- Back has 9 even scallops.
- Rim has 53 sts with no ripples at the corners.
- Strap legs are equal in length and the loop is 3 in (7.6 cm).
- All ends are woven in securely.
Troubleshooting
- Base cups or ripples: Cupping means your tension is too tight; ripples mean too loose. Change hook size rather than the stitch count.
- Lattice slants in a spiral: Make sure you start each round around the joining dc and not in the next space.
- Rim flares at the corners: Check that you worked both sc2tog in Row 2.
- Rim pulls in at the sides: Add 1 sc to each side in Row 1, then add 1 more sc to each side section in Row 2.
- Basket tips forward when hanging: Move the strap ends slightly toward the back.
- Strap stretches: Use 100% cotton, or work the strap with a 4.5 mm hook.
Care
Hand wash in cool water and lay flat to dry, reshaping over a toilet roll. Don’t tumble dry.
Final Notes
Each stage depends on the one before it. The 72-stitch base sets the 18-loop lattice. Rnd 22 turns the lattice back into 72 stitches, which split into a 35-stitch front and a 37-stitch back. The back rows end in 9 scallops, and the 55-to-53-stitch rim frames the opening. If you check your measurements at each checkpoint, the finished basket will come out at 6 in (15.2 cm) wide and hang about 21 in (53.3 cm) from the peg.
Happy crocheting!