

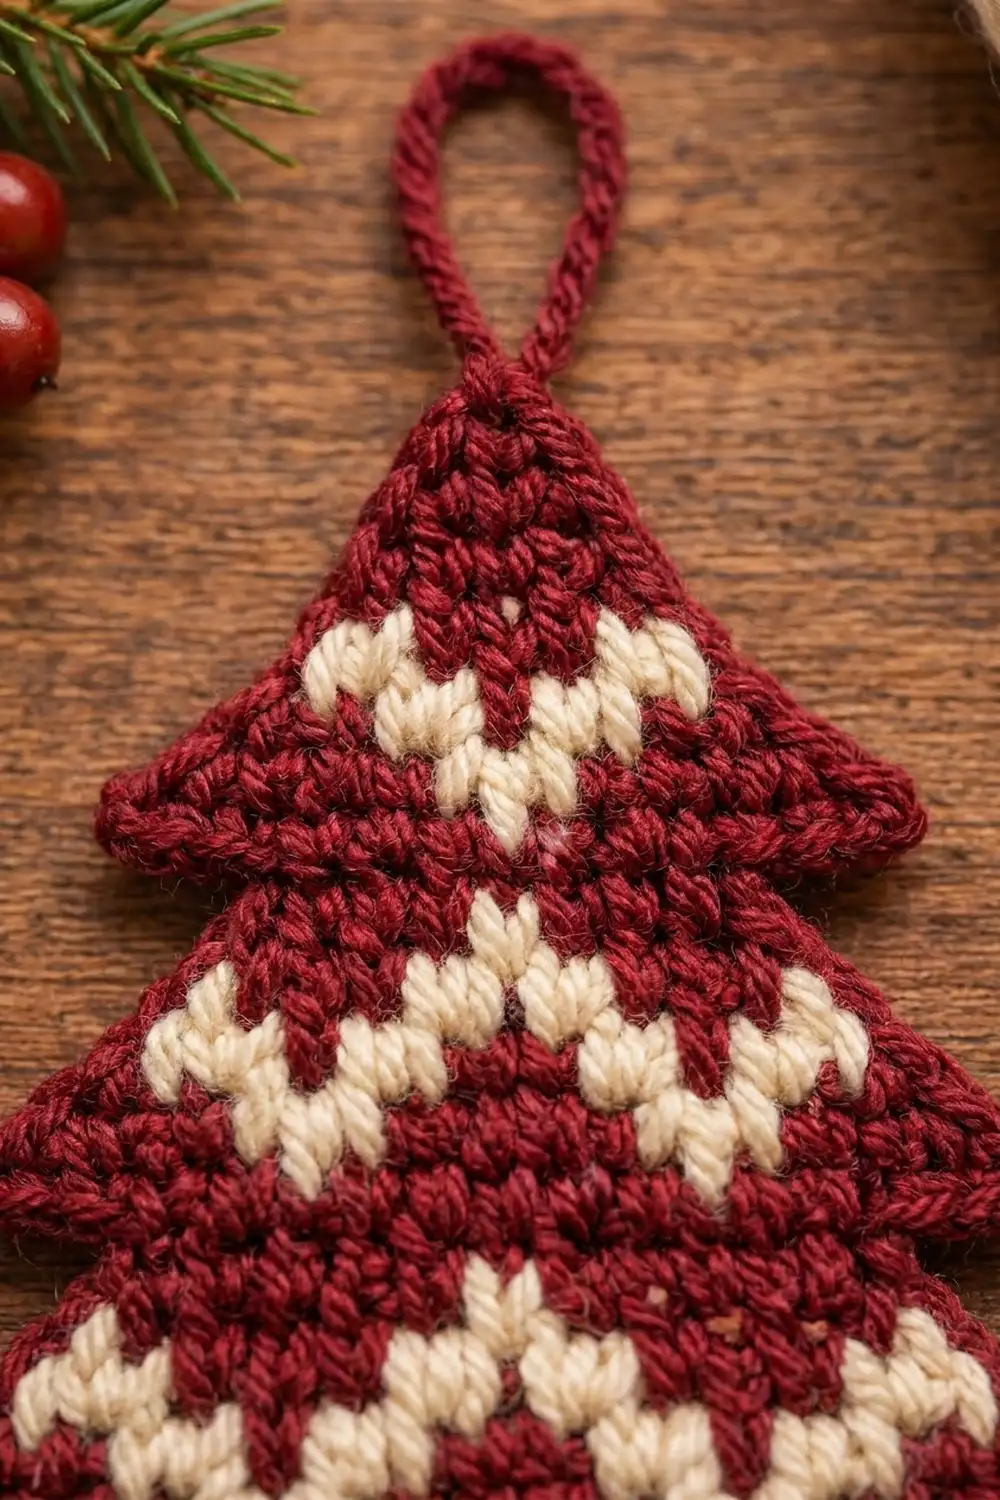
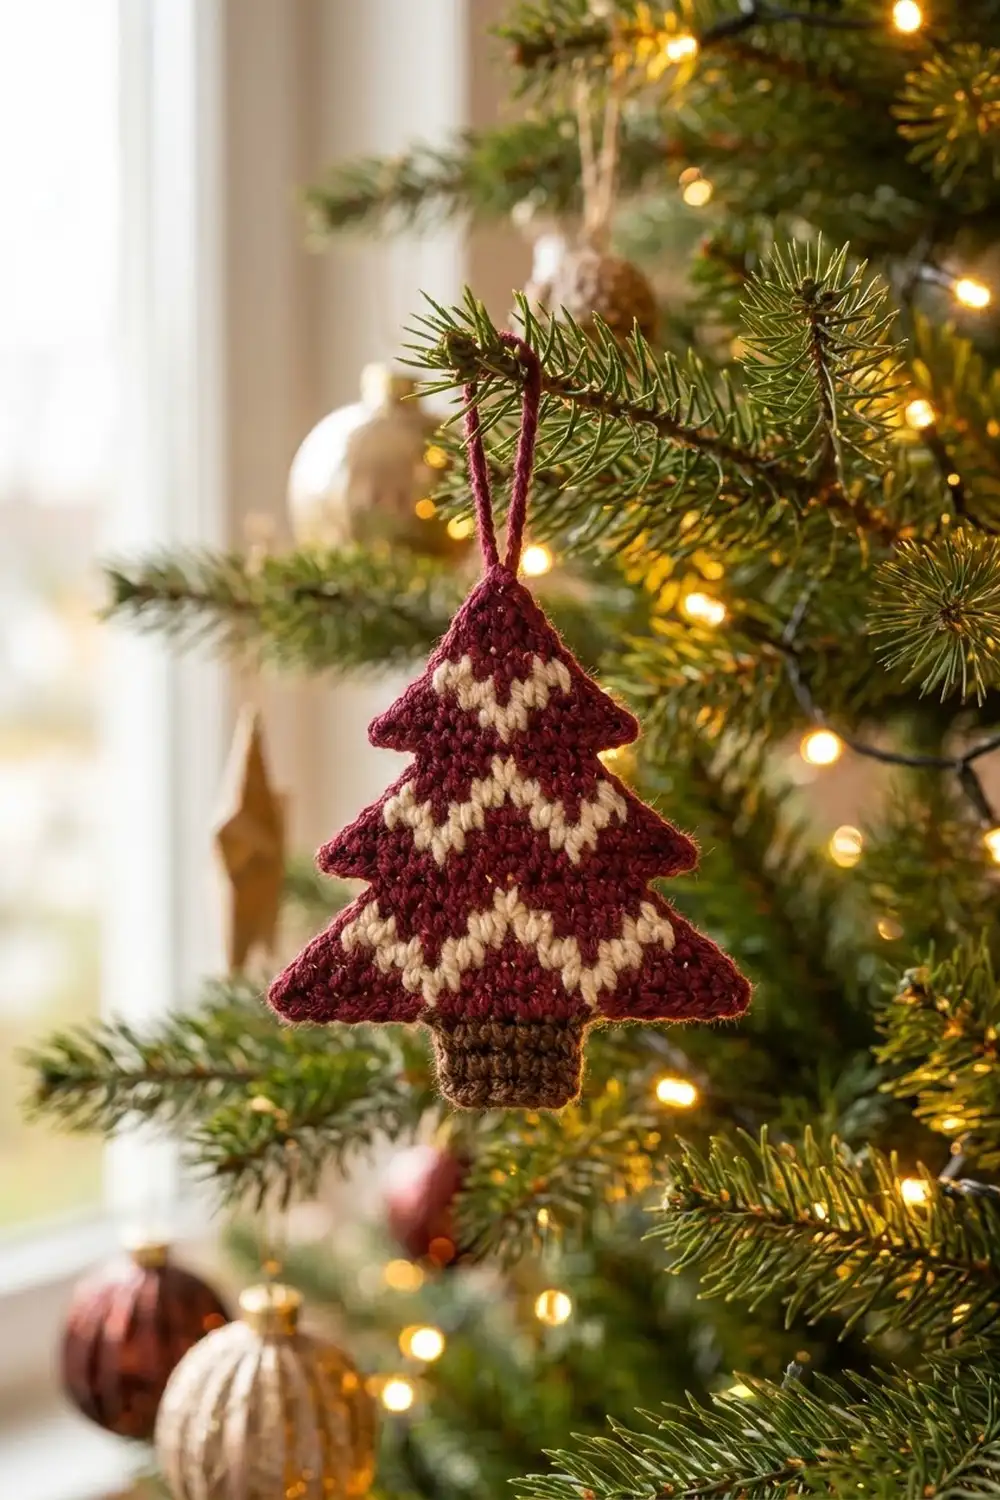
This little tree ornament has a cozy Nordic sweater look. A burgundy tree with three tiers sits on a short brown trunk. Crisp cream zigzags run across the tiers, and a matching burgundy loop at the top makes it ready to hang.
The ornament is worked flat in rows of single crochet, with tapestry (carried-yarn) colorwork for the zigzags. All terms are US crochet terms. The finished piece measures about 4.6 in (11.7 cm) wide and 5 in (12.7 cm) tall, plus a 1.5 in (3.8 cm) hanging loop.
Construction is simple and all in one piece. You start at the bottom of the trunk and work upward. Each tier begins with a short chain on one side and foundation stitches on the other, so it steps out past the tier below. The tier then shrinks by one stitch at each end on every row. A single round of edging outlines the whole shape, and the hanging loop is chained straight off the tip.
There is no sewing and no joining. You only weave in a few ends at the end.
Finished Size and Construction
- Finished size: about 4.6 in wide x 5 in tall (11.7 x 12.7 cm), plus a 1.5 in (3.8 cm) loop
- Skill level: Easy-intermediate (basic tapestry crochet)
- Terminology: US
- Yarn weight: Worsted (#4)
- Hook: 4.0 mm (G-6)
- Number of pieces: 1
- Layout: Single flat motif: trunk plus 3 stacked tiers
- Piece size before border: 4.2 in wide x 4.6 in tall (10.7 x 11.7 cm)
- Border depth: 1 round of sc, about 0.2 in (0.5 cm) on every edge
Materials
Use a smooth worsted-weight yarn with good stitch definition. Cotton or a cotton blend gives the crispest zigzags, and soft acrylic also works well. Avoid fuzzy or brushed yarns, because they blur the colorwork.
Yarn (one ornament):
- Color B (burgundy): 10 g, about 20 m
- Color C (cream): 3 g, about 6 m
- Color T (brown, trunk): 3 g, about 6 m
These quantities include a margin for swatching and weaving in ends.
Tools:
- 4.0 mm (G-6) crochet hook
- Tapestry needle
- Scissors
- Stitch markers (2)
- Rust-proof pins and a foam blocking mat
- Spray bottle with clean water
Abbreviations (US Terms)
- ch: chain
- sc: single crochet
- sl st: slip stitch
- st(s): stitch(es)
- sc2tog: single crochet 2 together (decrease)
- sc3tog: single crochet 3 together (double decrease)
- fsc: foundation extension single crochet (see below)
- B / C / T: burgundy / cream / brown
- RS / WS: right side / wrong side
Foundation extension sc (fsc): this is used to add stitches past the end of a row. Insert the hook into the base (the “chain” strand at the bottom) of the last sc made. Yarn over and pull up a loop (2 loops on the hook). Yarn over and pull through 1 loop; this makes the new base chain. Yarn over and pull through 2 loops. Each fsc adds 1 stitch. Work the next fsc into the base of the one you just made.
Tapestry sc: carry the unused color along the top of the previous row and work your stitches over it, so it stays hidden inside them. To change color, work the last yarn over of the stitch before the change with the new color. Keep the carried strand relaxed.
Gauge and Checkpoints
Gauge: 18 sc and 20 rows = 4 in (10.2 cm) in sc, worked flat. That is 4.5 sts and 5 rows per inch.
Treat the trunk and Row 6 as your test piece. They take ten minutes and tell you everything you need to know:
- After Row 5: the trunk is 7 sts wide, about 1.6 in (4.1 cm), and 1 in (2.5 cm) tall.
- After Row 6: the bottom tier is 19 sts, about 4.2 in (10.7 cm) wide.
- After Row 11: total height is about 2.2 in (5.6 cm).
- After Row 12: the middle tier is 15 sts, about 3.3 in (8.4 cm) wide.
- After Row 17: total height is about 3.4 in (8.6 cm).
- After Row 18: the top tier is 11 sts, about 2.4 in (6.1 cm) wide.
- After Row 23: total height is about 4.6 in (11.7 cm).
- After the border: about 4.6 x 5 in (11.7 x 12.7 cm).
If Row 6 measures more than 4.4 in (11.2 cm): go down to a 3.75 mm (F-5) hook.
If it measures less than 4 in (10.2 cm): go up to a 4.5 mm (7) hook.
Tapestry rows often tighten up. If your colorwork tier comes out narrower than your plain rows, loosen your grip on the carried strand rather than changing the hook.
Pattern
Begin each regular row with ch 1 and turn. The ch 1 does not count as a stitch. The rows that add width (Rows 6, 12 and 18) begin with a longer chain instead. Stitch counts are given at the end of each row.
Trunk (Color T)
Row 1: With T, ch 8. Sc in the 2nd ch from the hook and in each ch across. (7 sts)
Rows 2–5: Ch 1, turn, sc in each st across. (7 sts)
On the last sc of Row 5, change to B for the final yarn over. Cut T, leaving a 6 in (15.2 cm) tail.
Tier 1 (Bottom Tier)
Row 6 (widening row): With B, ch 7 and turn. Sc in the 2nd ch from the hook and in the next 5 ch (6 sc). Sc in each of the 7 trunk sts (13 sts so far). Then work 6 fsc off the end of the row. (19 sts)
Place a marker in the first and last st. These are the tier’s outer corners.
Rows 7–9 are the zigzag band. Lay C along the top of the row and carry it through all three rows. The color sequences are symmetrical, so they read the same in both directions.
Row 7: Ch 1, turn. Sc2tog with B. Then work 3 B, 1 C, 3 B, 1 C, 3 B, 1 C, 3 B. Sc2tog with B. (17 sts: 1 + 15 + 1)
Row 8: Ch 1, turn. Sc2tog with B. Then work 1 B, then (1 C, 1 B) six times. Sc2tog with B. (15 sts: 1 + 13 + 1)
Row 9: Ch 1, turn. Sc2tog with B. Then work 3 B, 1 C, 3 B, 1 C, 3 B. Sc2tog with B. (13 sts: 1 + 11 + 1)
Cut C, leaving a 4 in (10.2 cm) tail.
Row 10: Ch 1, turn. Sc2tog, sc in the next 9 sts, sc2tog. (11 sts)
Row 11: Ch 1, turn. Sc2tog, sc in the next 7 sts, sc2tog. (9 sts)
The band has a W shape. The cream stitches sit low at the center and every 4th st in Row 7, rise through every other st in Row 8, and peak in Row 9.
Tier 2 (Middle Tier)
Row 12 (widening row): Ch 4 and turn. Sc in the 2nd ch from the hook and in the next 2 ch (3 sc). Sc in each of the 9 sts (12 sts so far). Then work 3 fsc. (15 sts)
Row 13: Ch 1, turn, and pick up C to carry. Sc2tog with B. Then work 1 B, 1 C, 3 B, 1 C, 3 B, 1 C, 1 B. Sc2tog with B. (13 sts: 1 + 11 + 1)
Row 14: Ch 1, turn. Sc2tog with B. Then work 1 B, then (1 C, 1 B) four times. Sc2tog with B. (11 sts: 1 + 9 + 1)
Row 15: Ch 1, turn. Sc2tog with B. Then work 1 B, 1 C, 3 B, 1 C, 1 B. Sc2tog with B. (9 sts: 1 + 7 + 1)
Cut C.
Row 16: Ch 1, turn. Sc2tog, sc in the next 5 sts, sc2tog. (7 sts)
Row 17: Ch 1, turn. Sc2tog, sc in the next 3 sts, sc2tog. (5 sts)
Tier 3 (Top Tier)
Row 18 (widening row): Ch 4 and turn. Sc in the 2nd ch from the hook and in the next 2 ch (3 sc). Sc in each of the 5 sts (8 sts so far). Then work 3 fsc. (11 sts)
Row 19: Ch 1, turn, and pick up C to carry. Sc2tog with B. Then work 3 B, 1 C, 3 B. Sc2tog with B. (9 sts: 1 + 7 + 1)
Row 20: Ch 1, turn. Sc2tog with B. Then work 1 B, 1 C, 1 B, 1 C, 1 B. Sc2tog with B. (7 sts: 1 + 5 + 1)
Cut C. These two rows form the small V in the top tier.
Row 21: Ch 1, turn. Sc2tog, sc in the next 3 sts, sc2tog. (5 sts)
Row 22: Ch 1, turn. Sc2tog, sc in the next st, sc2tog. (3 sts)
Row 23: Ch 1, turn. Sc3tog. (1 st)
This single stitch is the apex. Do not fasten off.
Border
Border gauge: same as the body, 4.5 sc per inch. The border is one round of B sc worked around the whole outline. Use these placement rules:
- Work 1 sc in each row end along the slopes and trunk sides.
- Work 1 sc in each free foundation loop along the undersides of the tiers and the bottom of the trunk.
- Work 3 sc in each outer corner stitch.
- Work an sc2tog at each inner corner, where a tier’s underside meets the slope or trunk below it.
Round 1: Ch 1. Work 3 sc in the apex st. Now go down one side as follows:
- Tier 3 slope: 1 sc in each row end of Rows 22, 21, 20 and 19. (4 sc)
- Tier 3 outer corner: 3 sc in the end st of Row 18. (3 sc)
- Tier 3 underside: 1 sc in each of the 2 remaining free loops of the extension. (2 sc)
- Inner corner: sc2tog over the row ends of Rows 17 and 16. (1 sc)
- Tier 2 slope: 1 sc in each row end of Rows 15, 14 and 13. (3 sc)
- Tier 2 outer corner: 3 sc in the end st of Row 12. (3 sc)
- Tier 2 underside: 1 sc in each of the 2 remaining free loops. (2 sc)
- Inner corner: sc2tog over the row ends of Rows 11 and 10. (1 sc)
- Tier 1 slope: 1 sc in each row end of Rows 9, 8 and 7. (3 sc)
- Tier 1 outer corner: 3 sc in the end st of Row 6 (marked). (3 sc)
- Tier 1 underside: 1 sc in each of the 5 remaining free loops. (5 sc)
- Trunk inner corner: sc2tog over the row ends of Rows 5 and 4. (1 sc)
- Trunk side: 1 sc in each row end of Rows 3 and 2. (2 sc)
- Trunk bottom corner: 3 sc in the end st of Row 1. (3 sc)
That is 36 sc for one side.
Trunk bottom: 1 sc in each of the 5 foundation loops between the two corner sts. (5 sc)
Work the second side as a mirror image of the first, again 36 sc, ending just before the first sc of the round. Join with a sl st to the first sc.
Total: 3 (apex) + 36 + 5 (trunk bottom) + 36 = 80 sc.
Hanging loop: Sl st into the center sc of the 3 apex sc. Ch 15, then sl st into the same center sc. Fasten off and weave the end through the base of the loop twice to secure it.
Why the math works: At this gauge one sc row is almost exactly as tall as one sc is wide. That means 1 sc per row end lies flat along both the straight trunk sides and the diagonal tier edges. The 3 sc at each outer corner give the extra length needed to turn a sharp point. The sc2tog at each inner corner removes the extra length that would otherwise bunch up in the notch. Each side has 6 rows per tier, but the corner and inner-corner rules use some of those row ends, so the counts above already account for every row end exactly once.
Final Blocking
- Weave in all ends along same-color stitches on the WS. Hide the cream tails inside the cream rows.
- Mist the ornament until it is evenly damp. Do not soak it.
- Lay it RS up on a blocking mat.
- Pin the apex and the two Row 6 corners so the Tier 1 width is 4.6 in (11.7 cm).
- Pin the Row 12 and Row 18 corners so each tier is symmetrical. Check the overall height of 5 in (12.7 cm).
- Pin the two trunk bottom corners square.
- Straighten the hanging loop and let the piece dry fully, about 4–6 hours.
Final Quality-Control Checklist
- Stitch counts at the widening rows are 19, 15 and 11.
- Each tier narrows by exactly 2 sts per row.
- The cream zigzags are centered and mirror evenly from left to right.
- No carried cream strand shows through on the RS.
- The border has 80 sc, with sharp points at every outer corner.
- The inner corners lie flat, with no ripples or gaps.
- The piece measures about 4.6 x 5 in (11.7 x 12.7 cm), plus a 1.5 in (3.8 cm) loop.
- All ends are woven in securely.
Troubleshooting
Cream shows between burgundy stitches. Keep the carried strand tucked tightly against the top of the row. Also give the working yarn a small tug after each color change.
The colorwork rows pucker. The carried strand is too tight. Spread the stitches out on the hook every few stitches before you continue.
A tier leans to one side. Check that you started with the long chain at the end where the yarn is, and finished with the fsc on the other side, with the full count of each.
The zigzag looks off-center. Recount the color sequence. Each colorwork row should start and end with an sc2tog in B.
The border ruffles on the slopes. You may have worked 2 sc into some row ends. Use exactly 1 per row end.
The inner corners gape. Make sure you worked the sc2tog there, and pull it snug.
The tips are rounded. Work all 3 corner sc into the same stitch, then pin the tips firmly when blocking.
Care
Hand wash in cool water with mild soap, press out the water in a towel, and dry flat, reshaping as you go. Store flat or hanging so the tiers stay crisp.
Final Notes
Everything follows from one measurement chain:
- The gauge is 4.5 sts and 5 rows per inch.
- The trunk is 7 sts, about 1.6 in (4.1 cm).
- The tiers widen to 19, 15 and 11 sts and narrow by 2 sts each row.
- The body is 23 rows tall and measures 4.2 x 4.6 in (10.7 x 11.7 cm).
- An 80-sc border round brings it to about 4.6 x 5 in (11.7 x 12.7 cm).
- A 15-chain loop finishes the top.
Check your measurements at each checkpoint and the shape takes care of itself. Make one for your own tree, or a handful to tie onto gifts.
Happy crocheting!