

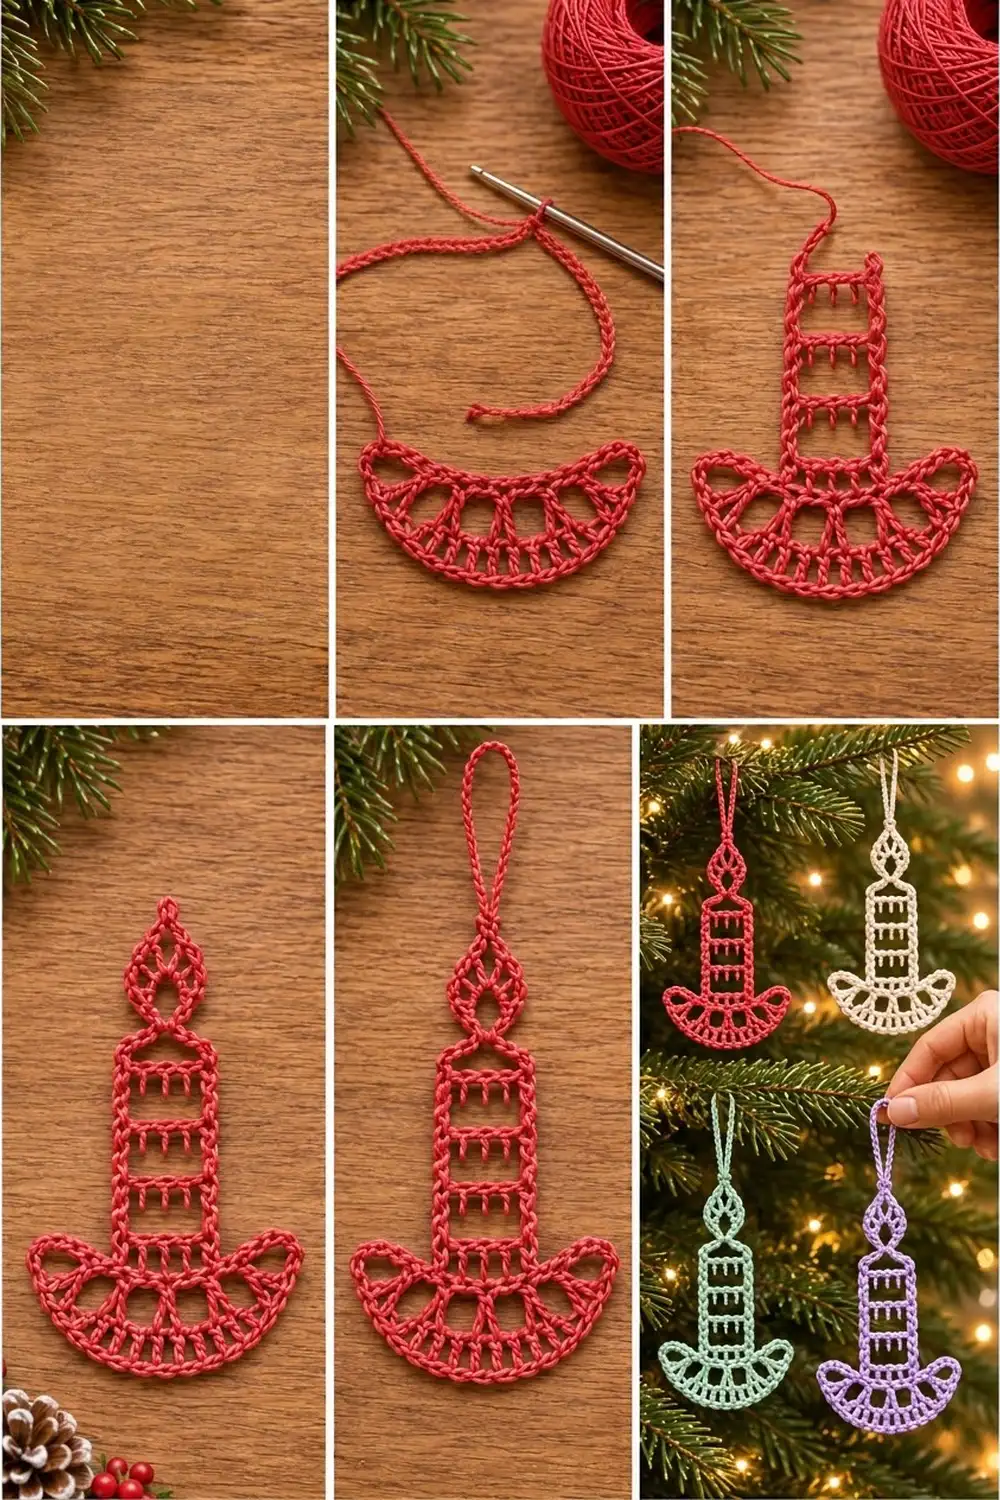
The Windowlight Candle is a lacy, flat thread ornament. A tall candle stands in a fan-shaped holder, with a small open flame on top and a long hanging loop. The candle body is a ladder of open windows and short-post bands. The holder is an airy half circle with spoke windows. The flame narrows at a pinched waist, opens into a small diamond, and closes to a point.
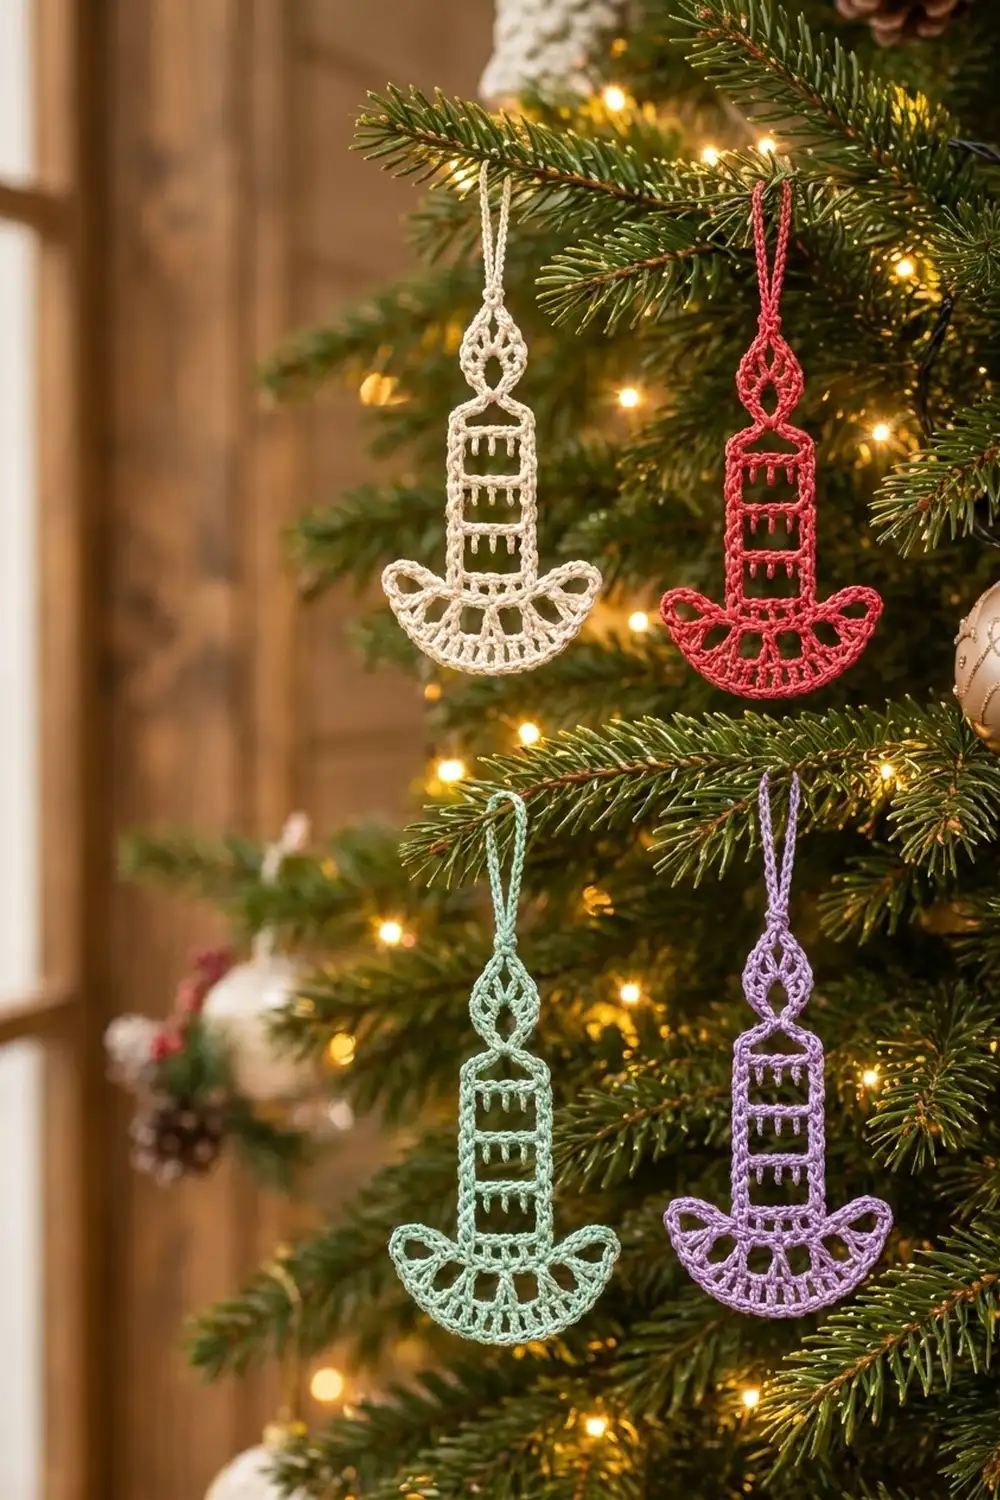
The sample is worked in classic Christmas red. The same pattern looks just as pretty in cream, mint green, and soft lavender. You can make one in each color to hang together on the tree, or tie one onto a gift as a keepsake tag.
This pattern uses US crochet terms. The finished ornament measures about 2.75 in (7.0 cm) wide and 4.6 in (11.7 cm) tall, not counting the loop. The loop hangs about 1.75 in (4.4 cm) above the flame tip.
The ornament is one single piece with no sewing. First you work the holder as a half circle in rows, then you add a rim row along its straight edge and work the candle upward from the center of that rim. The flame and hanging loop come straight off the top of the candle. Last, a one-row border finishes the curved edge of the holder and forms its two pointed tips.
Finished Size and Construction
- Finished size: 2.75 in (7.0 cm) wide x 4.6 in (11.7 cm) tall, plus loop
- Skill level: Easy-intermediate
- Terminology: US crochet terms
- Yarn weight: Size 3 crochet thread (Lace, weight 0)
- Hook: 2.0 mm (US steel size 4)
- Number of pieces: 1
- Layout: One candle shape, worked in rows in a single piece
- Piece size: Holder 2.75 in (7.0 cm) wide x 1.3 in (3.3 cm) deep; candle 0.8 in (2.0 cm) wide x 2.3 in (5.8 cm) tall; flame 0.9 in (2.3 cm) wide x 1.0 in (2.5 cm) tall
- Size before border: 2.4 in (6.1 cm) wide x 4.5 in (11.4 cm) tall
- Border depth: About 1/8 in (0.3 cm), one row along the holder’s curved edge
Working notes: Every row is turned. Turning chains count as stitches unless the row starts with ch 1. The only joins are the rejoin for the candle and the rejoin for the border, so the piece needs just three short pieces of thread.
Thread work is small, so count often. A miscounted row in the holder or candle shows up clearly once the piece is starched.
Materials
Choose a mercerized cotton crochet thread in size 3, about 150 m (164 yd) per 50 g. Mercerized cotton has a slight sheen and clear stitch definition. It also takes starch well, which helps the open windows hold their shape.
- Red (sample color): 5 g, about 15 m (16.4 yd)
- Optional extra colors (cream, mint, lavender): 5 g, about 15 m (16.4 yd) each per ornament
These amounts include a margin of about 30 percent for your gauge test, tails, and weaving in ends.
Tools:
- 2.0 mm (US steel size 4) crochet hook
- Tapestry needle with a small eye
- Scissors
- Stitch marker
- Blocking board or foam mat, and rustproof pins
- Spray starch or fabric stiffener
- Ruler or tape measure
Abbreviations (US Terms)
- ch – chain
- sl st – slip stitch
- sc – single crochet
- dc – double crochet
- tr – treble crochet
- sk – skip
- sp – space
- st(s) – stitch(es)
- tch – turning chain
- RS – right side
- sc2tog / sc3tog – single crochet 2 (or 3) together
- dc2tog – double crochet 2 together
Special stitch – dc3tog (cluster): *Yarn over, insert hook in next st, yarn over and pull up a loop, yarn over and pull through 2 loops; repeat from * 2 more times (4 loops on hook), yarn over and pull through all 4 loops.
Beginning cluster: Ch 2 (counts as the first leg), dc2tog over the next 2 sts. This counts as one dc3tog.
Gauge and Checkpoints
Gauge: 9 dc and 3 dc rows = 1 in (2.5 cm), and 10 ch = 1 in (2.5 cm). A tr row is about 0.45 in (1.1 cm) tall. A sc row is about 1/8 in (0.3 cm) tall.
Test one piece first. Work Holder Rows 1 to 3, then measure before going on. These rows are your gauge test, and if they measure correctly you can keep going without starting over.
Checkpoints:
- After Holder Row 1: about 0.8 in (2.0 cm) across the straight edge
- After Holder Row 2: about 1.7 in (4.3 cm) across
- After Holder Row 3: about 2.4 in (6.1 cm) across
- After the candle (Row C7): candle 0.8 in (2.0 cm) wide and 2.3 in (5.8 cm) tall
- After the flame: whole piece about 4.5 in (11.4 cm) tall
- After the border and blocking: 2.75 in (7.0 cm) x 4.6 in (11.7 cm)
If your piece is too big, change to a 1.75 mm hook. If it is too small, change to a 2.25 mm hook. If the holder ruffles, your chains are too loose. If it cups, work the Row 2 chains a little more loosely.
Holder
The holder is a half circle worked in turned rows, starting at the center of its straight top edge and growing outward.
Row 1: Make a magic ring. Ch 3 (counts as dc), 7 dc in ring. Pull the ring fully closed. Turn. (8 dc)
Close the ring firmly before you turn. A loose ring leaves a hole at the center of the rim and makes Row 4 harder to work neatly.
Row 2: Ch 4 (counts as tr), *ch 3, tr in next dc; repeat from * 6 more times, working the last tr in the top of the tch. Turn. (8 tr, 7 ch-3 sps)
These chain spaces form the open spoke windows of the holder.
Row 3: Ch 3 (counts as dc), *4 dc in next ch-3 sp, dc in next tr; repeat from * 6 more times, working the last dc in the top of the tch. Turn. (36 dc)
Count check: 1 starting dc + 7 repeats x 5 dc = 36 dc. The piece should now measure 2.4 in (6.1 cm) across the straight edge and lie flat.
Row 4 (rim): Rotate the work so you can work along the straight edge. Ch 1, then work into the row ends: 3 sc over the end of Row 3, 4 sc over the end of Row 2, 3 sc over the end of Row 1, 1 sc over the base of the ring, 3 sc over the other end of Row 1, 4 sc over the end of Row 2, and 3 sc over the end of Row 3. (21 sc)
Count check: 10 sc per side + 1 center sc = 21 sc. At 9 sts per in, 21 sc fit the 2.4 in (6.1 cm) straight edge without pulling. Fasten off.
Candle
The candle is worked upward from the center 7 sc of the rim. That leaves 7 rim sc free on each side.
Row C1 (band): With RS facing, join thread with a sl st in the 8th sc of the rim. Ch 3 (counts as dc), dc in next 6 sc. Turn. (7 dc)
Row C2 (window): Ch 3 (counts as dc), ch 5, sk next 5 dc, dc in top of tch. Turn. (2 dc, 1 ch-5 sp)
Row C3 (band): Ch 3 (counts as dc), 5 dc in ch-5 sp, dc in top of tch. Turn. (7 dc)
Rows C4 to C7: Repeat Rows C2 and C3 twice more. Do not fasten off. (Row C7: 7 dc)
You now have 4 bands of short dc posts with 3 open windows between them. In each band, the dc tops form the horizontal bar and the posts sit directly under it. The candle measures 0.8 in (2.0 cm) wide and 2.3 in (5.8 cm) tall, because each of its 7 rows is 1/3 in tall.
Tip: Always work the last dc of each row into the top chain of the turning chain. If you skip it, the candle gets narrower and starts to lean.
Flame
Row F1 (waist): Ch 1, sc2tog over first 2 dc, sc3tog over next 3 dc, sc2tog over last 2 sts (last leg in the tch). Turn. (3 sts)
This row gathers 7 stitches into 3 and makes the pinched waist between the candle and the flame.
Row F2: Ch 3 (counts as dc), 2 dc in same st, ch 3, sk next st, 3 dc in last st. Turn. (6 dc, 1 ch-3 sp)
The flame is now at its widest, about 0.9 in (2.3 cm).
Row F3: Work a beginning cluster over the first 3 dc, ch 3, sc in ch-3 sp, ch 3, dc3tog over last 3 dc (last leg in top of tch). Turn. (2 clusters, 1 sc, 2 ch-3 sps)
Row F4: Ch 1, sc in first cluster, ch 2, sc in center sc, ch 2, sc in top of beginning cluster. Turn. (3 sc, 2 ch-2 sps)
The chains of Rows F3 and F4 meet at the center sc and form the small diamond opening inside the flame.
Row F5 (tip): Ch 1, sc3tog over the 3 sc, skipping the ch-2 sps. (1 st)
Hanging loop: Ch 35, sl st in top of the sc3tog. Fasten off, leaving a 4 in (10.2 cm) tail. Weave the tail down through the base of the loop twice to anchor it.
The 35 ch measure about 3.5 in (8.9 cm), so the folded loop hangs about 1.75 in (4.4 cm). Without the loop, the whole piece now measures about 4.5 in (11.4 cm) tall.
Border
The border is one row along the curved edge of the holder. It firms up the bottom edge and forms the two pointed tips at the top corners of the holder.
Border gauge: At this gauge a sc is as wide as a dc (9 sts per in), so working one sc into each dc keeps the edge flat.
Border Row: With RS facing, join thread in the first st of Holder Row 3 (the right-hand tip, next to the rim). Ch 1, (sc, ch 3, sc) in same st, sc in each of next 34 dc, (sc, ch 3, sc) in last dc. Fasten off. (38 sc, 2 ch-3 tips)
Count check: this trim row puts 1 sc in each existing stitch and adds a few extras. That gives 36 sc (1 in each Row 3 dc) + 2 extra sc (1 extra at each tip) = 38 sc, plus the 2 ch-3 tip loops.
Why the math works: Holder Row 3 has 36 dc along a curve about 3.8 in (9.7 cm) long. At 9 per in, 36 sc cover about 4 in (10.2 cm), which gives slight ease and keeps the edge flat instead of tight. The extra sc and ch-3 at each end turn the tips into points without pulling on the curve. The border adds about 1/8 in (0.3 cm) all around the curve. The holder grows from 2.4 in (6.1 cm) to about 2.6 in (6.6 cm) wide before blocking, and blocks to 2.75 in (7.0 cm).
Weave in all ends through stitches of the same color, never across the open windows.
Final Blocking
- Soak the ornament in cool water, then press it gently in a towel. Do not wring it.
- Lay it RS up on your blocking board.
- Pin the flame tip and the center of the holder’s bottom curve so the piece measures 4.6 in (11.7 cm) tall.
- Pin the two holder tips 2.75 in (7.0 cm) apart, easing them slightly upward so they flare.
- Pin the candle sides straight so the candle is 0.8 in (2.0 cm) wide from top to bottom.
- Use pins to open each candle window and each holder spoke window, so the bands sit level.
- Pin the flame into a teardrop 0.9 in (2.3 cm) wide, with the diamond opening centered.
- Spray with starch or brush on fabric stiffener. Let it dry completely, at least 12 hours.
- Unpin the ornament and straighten the loop.
Final Quality-Control Checklist
- Holder Row 3 has 36 dc, and the rim has 21 sc
- The candle sits on the center 7 rim sc, with 7 sc free on each side
- The candle has 4 bands of 7 dc and 3 open windows
- The flame waist is clearly narrower than the candle
- The flame has one small diamond opening and a single-stitch point
- The border has 38 sc and two ch-3 tips
- The finished size is 2.75 in (7.0 cm) x 4.6 in (11.7 cm)
- The loop is secure and hangs about 1.75 in (4.4 cm)
- No tails show across the windows
Troubleshooting
The holder ruffles. Your Row 2 chains are too loose, or Row 3 is too tall. Use a smaller hook for Row 2 or chain more tightly.
The holder cups and won’t lie flat. The chains are too tight. Work the ch-3 sps more loosely, or use a hook one size larger for Row 2.
The candle leans to one side. You probably joined in the wrong rim stitch. Count in from either end: the candle should start in sc 8 and end in sc 14.
The candle gets narrower as it grows. You’re missing the last dc in the turning chain. Count 7 dc on every band row.
The windows close up. The ch-5 is a little shorter than the 5 skipped dc. Chain slightly more loosely, and pin the windows open during blocking.
The flame looks lopsided. Check that the beginning cluster and the last dc3tog each use 3 sts, and that the center sc goes into the ch-3 sp.
The loop twists. Wet it during blocking and pin it straight while it dries.
The ornament curls after drying. Wet it again, pin it flat, and use a stronger starch.
Care
Hand wash in cool water with mild soap, press flat, and starch again to restore the shape. Store flat between sheets of tissue paper.
Final Notes
Here is how the measurements build. Holder Row 3 measures 2.4 in (6.1 cm) across with 36 dc. The 21-sc rim matches that straight edge, and the candle rises 2.3 in (5.8 cm) from the rim’s center 7 sc. The flame adds 1.0 in (2.5 cm), so the piece is 4.5 in (11.4 cm) tall before the border. The 38-sc border and blocking bring it to 2.75 in (7.0 cm) x 4.6 in (11.7 cm), with a 1.75 in (4.4 cm) loop on top.
If each checkpoint matches as you go, the finished candle will match too. Once you know the rows, one ornament is a quick evening project. Make one in red, then try cream, mint, and lavender for a full set on the tree.
Happy crocheting!