

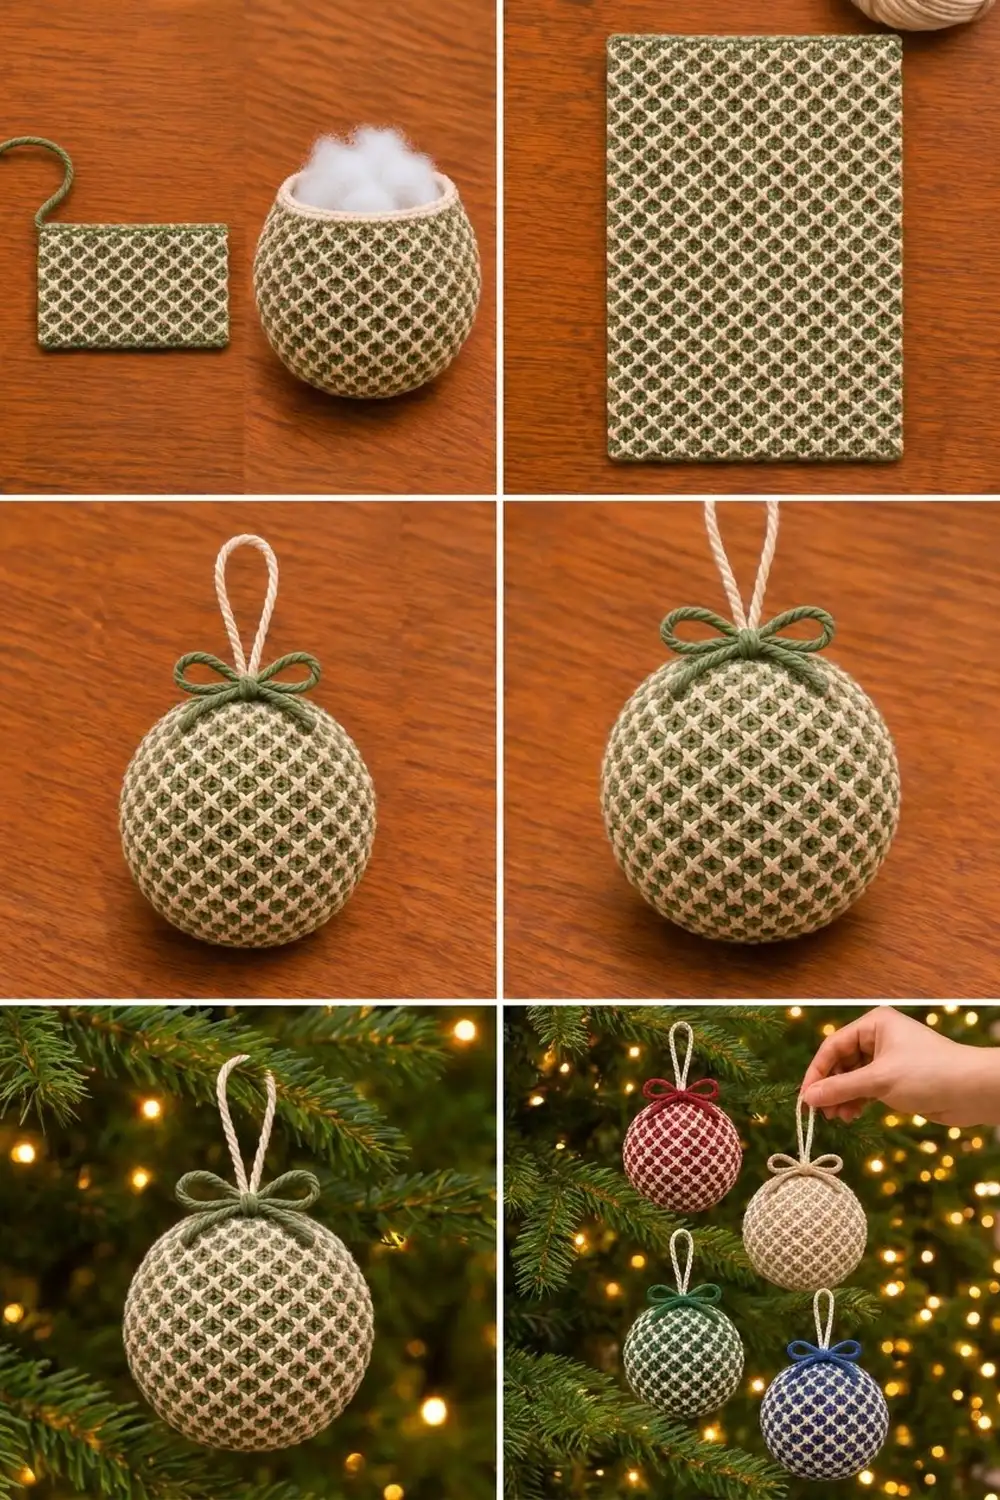
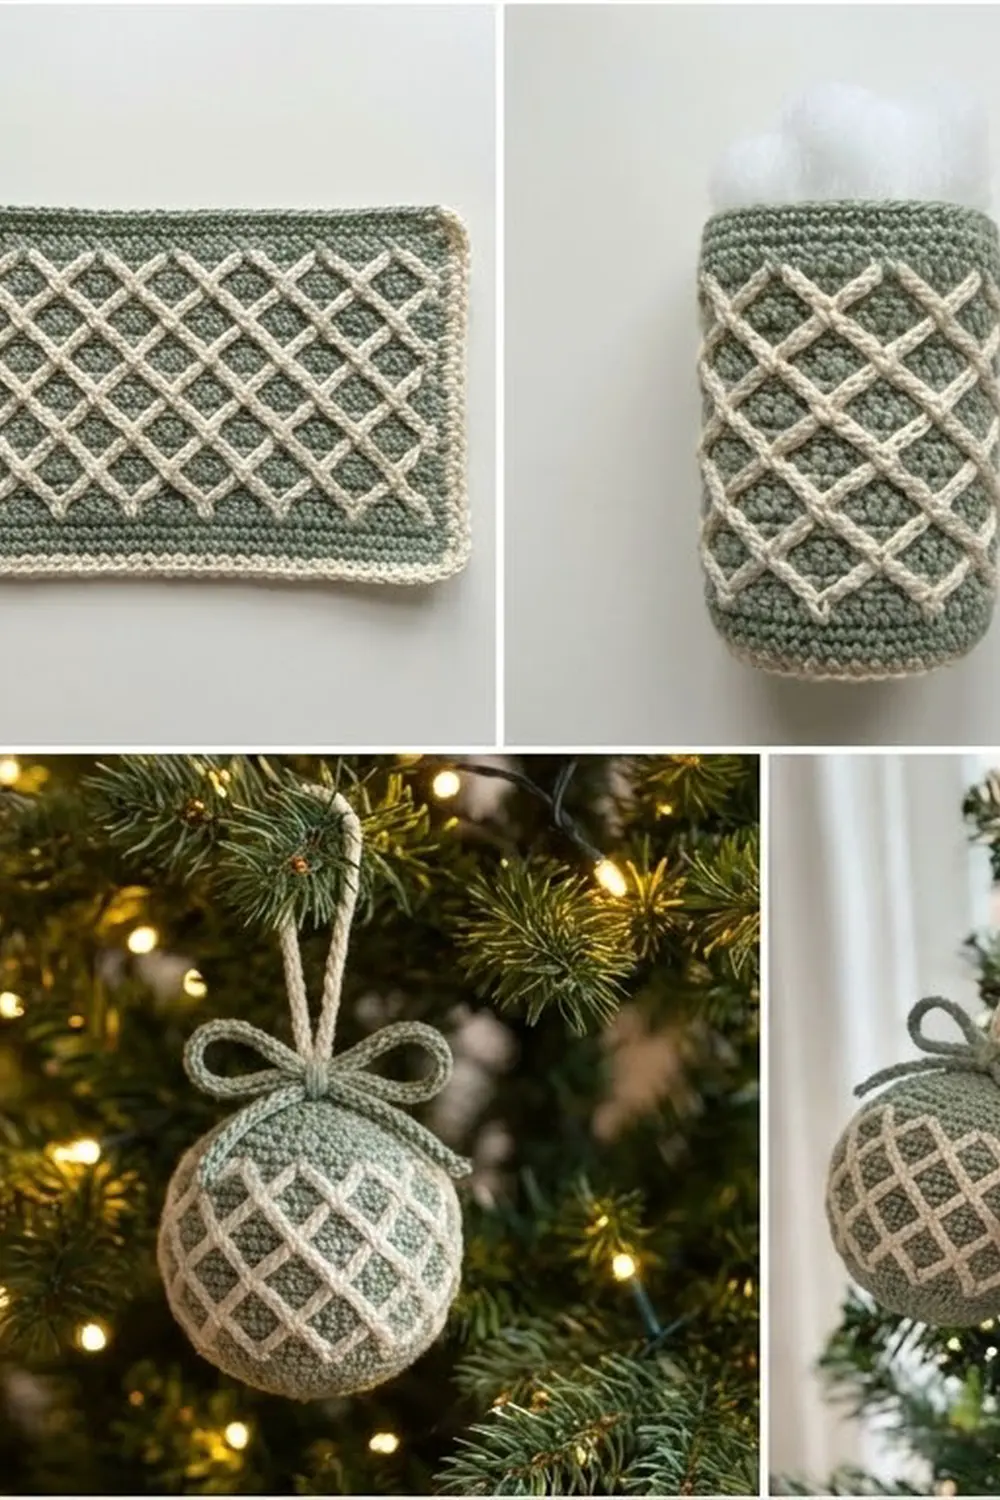
This ornament has a cream lattice over a sage-green background. Small crossed double crochet “X” shapes sit in offset rows, so the cream lines run diagonally around the ball and form diamonds. A cream twisted-cord loop and a sage-green bow finish the top.
The palette is two colors: sage green and cream. For the rest of your tree, the same pattern works in red, beige, dark green or navy blue with cream. The style is classic and calm, and it suits rustic or Scandinavian tree themes.
This pattern uses US crochet terms. The finished ornament is about 3.5 in (8.9 cm) in diameter.
You make the whole ornament as one flat rectangle with right side facing on every row. Then you add a single crochet border, seam the short edges into a tube, gather both ends and stuff it. No shaping rounds are needed because the gathering makes the sphere.
Finished Size and Construction
- Finished size: about 3.5 in (8.9 cm) diameter, 10.5 in (26.7 cm) circumference
- Skill level: Intermediate
- Terminology: US crochet terms
- Yarn weight: DK (3), cotton or cotton blend
- Hook: 3.5 mm (E-4)
- Number of pieces: 1 panel (plus 2 twisted cords)
- Layout: a single rectangle, seamed into a tube
- Panel size before border: 10 in × 5 in (25.4 cm × 12.7 cm)
- Border depth: about 0.25 in (0.6 cm) per side
- Panel size after border: 10.5 in × 5.5 in (26.7 cm × 14.0 cm)
Materials
Use a smooth, mercerized or matte DK cotton. Cotton keeps the crossed stitches crisp, which makes the lattice clear. Avoid fuzzy yarns because they blur the X shapes.
- Color A, sage green: 15 g / 34 m (panel, border, bow)
- Color B, cream: 15 g / 34 m (lattice rows, hanging loop)
These quantities include a safety margin of about 20 percent.
Tools:
– 3.5 mm (E-4) crochet hook
– Tapestry needle
– About 10 g polyester fiberfill
– Scissors
– Stitch markers (2)
– Ruler or tape measure
– Pins and a blocking mat
Abbreviations (US Terms)
- ch – chain
- sc – single crochet
- dc – double crochet
- sk – skip
- st(s) – stitch(es)
- RS – right side
Special stitch – crossed pair (X): Sk next st, dc in following st, then working in front of the dc you just made, dc in the skipped st. One crossed pair uses 2 sts and makes 2 sts.
Note: Do not turn after any row. Fasten off at the end of every row, leaving a 4 in (10.2 cm) tail. Rejoin at the right-hand edge for the next row. The border crochets over these tails, so they stay hidden.
Gauge and Checkpoints
Gauge in pattern: 20 sts and 17 rows = 4 in (10.2 cm) after a light steam.
Test swatch: Ch 21. Work Rows 1–17 as written below, but with 20 sts. On Row 2-type rows, work ch 3, 9 crossed pairs and 1 dc (20 sts). On Row 4-type rows, work ch 3, 1 dc, 8 crossed pairs and 2 dc (20 sts). Your swatch should measure 4 in × 4 in (10.2 cm × 10.2 cm).
Checkpoints on the panel:
– After Row 5: 10 in (25.4 cm) wide, about 1.2 in (3.0 cm) tall
– After Row 13: about 3 in (7.6 cm) tall
– After Row 21: 10 in × 5 in (25.4 cm × 12.7 cm)
– After the border: 10.5 in × 5.5 in (26.7 cm × 14.0 cm)
Too big? Change to a 3.25 mm (D-3) hook. Too small? Change to a 3.75 mm (F-5) hook. If only the height is off, check how tall your dc are. Crossed dc pulled too tight make the rows short, and the ball will come out flattened.
Panel
Foundation: With Color A, ch 51.
Row 1 (A, RS): Sc in 2nd ch from hook and in each ch across. Fasten off. (50 sts)
Row 2 (B, crossed row A): With RS facing, join B in the first st at the right edge. Ch 3 (counts as dc). Crossed pair 24 times, then dc in last st. Fasten off. (50 sts: 1 + 48 + 1)
Row 3 (A): Join A in the top of the ch-3 at the right edge. Ch 1, sc in each st across. Fasten off. (50 sts)
Row 4 (B, crossed row B, offset): Join B in the first st. Ch 3 (counts as dc), dc in next st. Crossed pair 23 times, then dc in each of the last 2 sts. Fasten off. (50 sts: 2 + 46 + 2)
Row 5 (A): Join A in the top of the ch-3. Ch 1, sc in each st across. Fasten off. (50 sts)
Rows 4 and 2 are offset by one stitch. Because of that, each X in Row 4 sits between two X’s of Row 2, and the cream lines form diagonals. The green sc rows show as the diamond centers.
Rows 6–21: Repeat Rows 2–5 four more times. That is five repeats of Rows 2–5 in total, ending with a green Row 21.
Row totals: 21 rows: 11 green sc rows (Rows 1, 3, 5 … 21) and 10 cream crossed rows. Of the cream rows, 5 are type A (Rows 2, 6, 10, 14, 18) and 5 are type B (Rows 4, 8, 12, 16, 20). Every row has 50 sts.
Checkpoint: 10 in × 5 in (25.4 cm × 12.7 cm). Do not weave in the tails. Lay them along the side edges, pointing toward the panel’s center line.
Border
The border is one round of green sc. It neatens the edges, gives a firm stitch line for seaming and gathering, and traps all the row tails.
Border gauge: 20 sc = 4 in (10.2 cm) along the long edges. On the side edges (row ends), about 5.2 sc per inch is enough to keep the edge flat.
Corner definition: Each corner is 3 sc worked into one stitch. The middle sc is the corner stitch. Each per-side count below includes both of that side’s corner stitches, and each corner stitch counts once on each of the two sides it joins.
Border Round (A): With RS facing, join A in the first st of Row 21.
- Top long edge: 3 sc in first st, sc in each of next 48 sts, 3 sc in last st.
- Left side edge (row ends): Work down the 21 row ends, crocheting over the tails as you go. Work 1 sc in each green sc row-end (11 sc), 2 sc in each type-A cream row-end (5 rows = 10 sc) and 1 sc in each type-B cream row-end (5 sc). Total 26 sc.
- Bottom long edge: Work across the foundation chain: 3 sc in first ch, sc in each of next 48 ch, 3 sc in last ch.
- Right side edge: Work up the row ends as on the left side. (26 sc)
- Sl st to the first sc. Fasten off, leaving an 18 in (45.7 cm) tail for seaming.
Counts per side (corners included):
– Long sides: 1 corner + 1 + 48 + 1 + 1 corner = 52 sts each
– Short sides: 1 corner + 1 + 26 + 1 + 1 corner = 30 sts each
Round total: 52 + 52 + 30 + 30 − 4 shared corners = 160 sts. You can check this another way: two long edges of 3 + 48 + 3 = 54 sts each give 108, and two side edges of 26 give 52, so 108 + 52 = 160.
Why the math works: On the long edges, 50 base stitches at 20 sc per 4 in measure exactly 10 in (25.4 cm). The 2 extra sc at each corner turn the corner and do not stretch the edge. On the short sides, the 5 in (12.7 cm) of rows needs about 25 sc to lie flat. The 26 sc you work, at 5.2 sc per inch, lie flat once blocked. The extra sc on each type-A cream row covers the tall dc row-ends, so there are no gaps. Both short sides have the same 30 sts, so they match stitch for stitch when you seam them.
Checkpoint: 10.5 in × 5.5 in (26.7 cm × 14.0 cm).
Seaming and Shaping the Ball
Seam the tube: Fold the panel with RS out so the two 30-st short sides meet. With the long tail and a tapestry needle, whipstitch through the back loops of matching border stitches, 1 to 1, along all 30 sts. Keep the tension even, firm enough to close the gap but not puckered. The tube’s circumference is about 10.5 in (26.7 cm).
Gather the bottom: Cut 20 in (50.8 cm) of Color A. Weave it in and out through every border sc along one 52-st opening, going down through each st. Pull tight until the hole closes completely. Make several stitches across the center and knot it securely.
Stuff: Add fiberfill through the open top in small tufts. Push it outward against the walls so the ball becomes round rather than barrel-shaped. Stop when the ball is about 3.5 in (8.9 cm) across and still slightly soft. Overstuffing pulls the lattice open and lets fiberfill show through.
Gather the top: Weave a second 20 in (50.8 cm) strand of A through the remaining 52 border sts. Before you close it, top up the stuffing, then pull tight and knot. Leave both tails long; you use them in the next step.
Hanging loop: Cut 36 in (91.4 cm) of Color B. Fold it in half, twist the two strands firmly in one direction until they kink, then fold the length in half again and let it twist back on itself. Knot the ends together. Form a loop about 2.75 in (7.0 cm) tall, push the knotted ends into the top gather and sew them down securely with the gathering tails.
Bow: Make a twisted cord from 36 in (91.4 cm) of Color A the same way. Tie it in a bow around the base of the loop so it is about 3 in (7.6 cm) wide. Trim the ends to about 1 in (2.5 cm) and add a stitch at the knot to hold it.
Final Blocking
- Before seaming, pin the bordered panel flat to 10.5 in × 5.5 in (26.7 cm × 14.0 cm) on a blocking mat.
- Pin each corner first, then the middle of each edge, then fill in every 1 in (2.5 cm).
- Hold a steam iron 0.5 in (1.3 cm) above the panel and steam it lightly. Do not press, because pressing flattens the X stitches.
- Leave the panel pinned until it is completely dry and cool.
- Unpin it and check that the X’s run in straight diagonals.
- After stuffing, roll the ball gently between your palms to settle the stitches. Then give it a light shot of steam from 2 in (5.1 cm) away to even out the surface.
Final Quality-Control Checklist
- Every row has 50 sts and the panel has 21 rows
- The cream rows alternate type A and type B, so the X’s are offset
- The panel measured 10 in × 5 in (25.4 cm × 12.7 cm) before the border
- The border has 160 sts: long sides 52 each, short sides 30 each
- No tails are visible along the side edges
- The seam was matched 30 to 30 and lies flat
- Both gathers are fully closed and secured
- The ball measures about 3.5 in (8.9 cm) across and is evenly round
- The loop is firmly anchored and the bow is centered
Troubleshooting
The lattice runs straight up instead of diagonally. You repeated the same crossed row type twice. Check that the cream rows alternate type A and type B.
The panel is narrower at the top than at the bottom. Your sc rows are tightening. Go up half a hook size for the green rows only.
The side border ruffles. Use 1 sc in every row-end on the type-A cream rows as well (21 sc per side, 25 per short side with corners). Then seam those two shorter sides together 25 to 25.
There is a hole at the gathered end. Go around the opening a second time with the strand and pull again before knotting.
The ball looks egg-shaped. Push more stuffing toward the equator and less toward the poles, then roll it between your palms.
Fiberfill shows through. Remove a little stuffing, or tuck a circle of matching felt inside before you stuff.
Care
Spot-clean with cool water and mild soap, then reshape and let it air-dry. Store the ornament in a box where it won’t be crushed so it keeps its round shape.
Final Notes
The measurement chain is simple. A gauge of 20 sts and 17 rows = 4 in (10.2 cm) gives a 50-st, 21-row panel of 10 in × 5 in (25.4 cm × 12.7 cm). The 160-st border brings it to 10.5 in × 5.5 in (26.7 cm × 14.0 cm). Seaming 30 sts to 30 sts makes a tube of 10.5 in (26.7 cm) circumference. Gathering both 52-st edges and stuffing turns that tube into a ball of about 3.5 in (8.9 cm). If each checkpoint is right, the finished ornament will be right too. Once you have made one, try the red, beige, dark green and blue colorways for a full set on your tree.
Happy crocheting!