

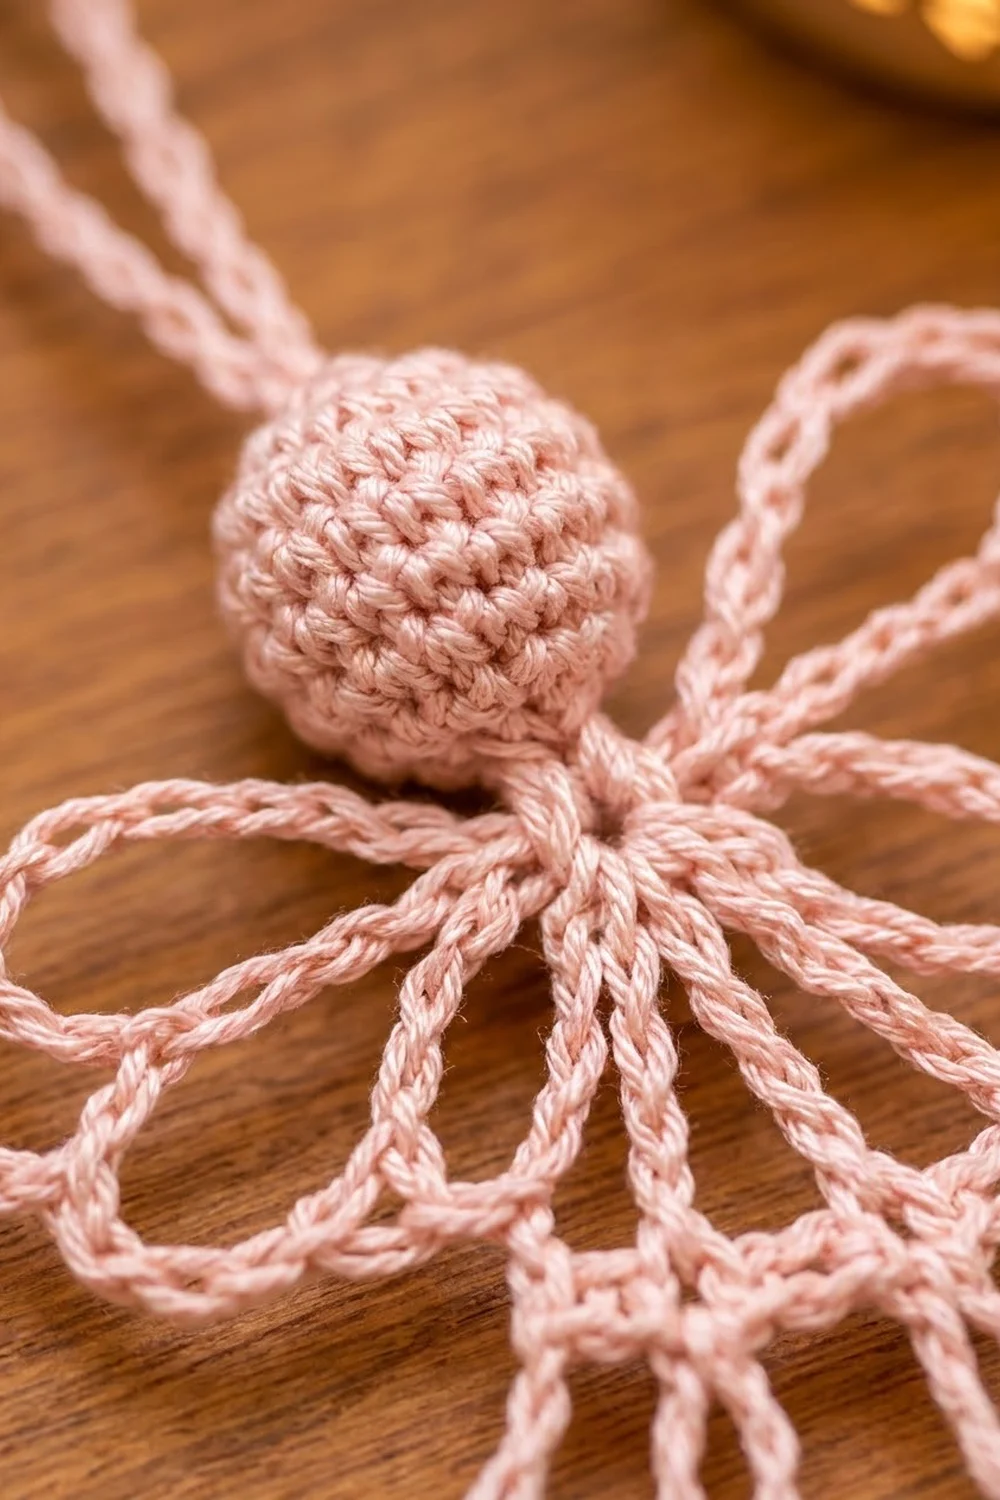
This little angel is a lacy, open ornament in soft blush pink. The skirt is a fan of long double treble spokes with three chain bars stepping outward like tiers. The hem ends in a row of hanging scallop loops. A small solid crocheted ball forms the head, and two double-lobed wings open out from the neck on each side.
The whole angel uses one color, a pale pink mercerized cotton with a soft sheen. The style is delicate and vintage, close to classic thread angels. The slightly heavier cotton gives crisp outlines that show up clearly on a tree branch.
All instructions use US crochet terms. The finished angel is about 4 in (10.2 cm) wide at the hem and 3.3 in (8.4 cm) tall from the top of the head to the scallop tips. The hanging loop adds about 1.25 in (3.2 cm), for 4.55 in (11.6 cm) overall.
Construction is simple. You crochet the skirt flat, top-down, starting from a small chain ring at the neck and adding two spokes per row, and finish it with the scallop row. Then you work the wings as chain loops into the same neck ring. Last, you make and stuff the head, sew it over the ring and add the hanging loop.
Finished Size and Construction
- Finished size: 4 in (10.2 cm) wide x 3.3 in (8.4 cm) tall, without the hanging loop
- With hanging loop: 4.55 in (11.6 cm) tall
- Skill level: Easy-intermediate (long stitches and chain loops)
- Terminology: US crochet terms
- Yarn weight: Fingering-weight mercerized cotton (or size 3 crochet thread)
- Hook: 2.25 mm (US B-1)
- Number of pieces: 1 lace body (skirt and wings) plus 1 small head, sewn into a single ornament
- Layout: Single ornament, no assembly grid
- Wingspan: about 3.25 in (8.3 cm)
- Head: about 0.7 in (1.8 cm) across
- Skirt size before the scallop edge: 3.5 in (8.9 cm) wide x 2.1 in (5.3 cm) tall
- Scallop edge depth: about 0.5 in (1.3 cm)
Materials
Yarn: Choose a smooth, tightly plied mercerized cotton in fingering weight. It holds starch well and shows the twisted chain texture clearly. Avoid fuzzy or very soft acrylic, because the lace will collapse and the wing loops won’t keep their shape.
- Blush pink: about 10 g / 40 m (44 yd)
That makes one angel. The amount includes a margin of about 30 percent for swatching, tails and the hanging loop. For a set of three, buy one 50 g ball.
Tools:
- 2.25 mm (US B-1) crochet hook
- Tapestry needle
- Small pinch of polyester fiberfill
- 1 stitch marker
- Scissors
- Fabric starch, or a 1:1 mix of white glue and water
- Blocking board or foam mat, plus rustproof pins
- Plastic wrap
Abbreviations (US Terms)
- ch – chain
- sl st – slip stitch
- sc – single crochet
- sc2tog – single crochet 2 together
- dtr – double treble crochet
- sp(s) – space(s)
- tch – turning chain
- st(s) – stitch(es)
- MR – magic ring
Special stitch: double treble (dtr). Yarn over 3 times, insert the hook in the stitch or space, yarn over and pull up a loop (5 loops on the hook). [Yarn over, pull through 2 loops] 4 times.
A ch 5 at the start of a row counts as the first dtr.
Gauge and Checkpoints
Gauge isn’t critical for an ornament, but it controls whether the wings, head and skirt look in proportion. Make the skirt first and use it as your test piece.
Gauge:
- 10 ch = 1.25 in (3.2 cm)
- 1 dtr = 0.6 in (1.5 cm) tall
- Head with 18 sc around = about 0.7 in (1.8 cm) across
Checkpoints (measured flat, before blocking, gently smoothed):
- After Row 1: about 1.5 in (3.8 cm) wide and 0.75 in (1.9 cm) from the top of the ring
- After Row 2: about 2.5 in (6.4 cm) wide and 1.4 in (3.6 cm) tall
- After Row 3: about 3.5 in (8.9 cm) wide and 2.1 in (5.3 cm) tall
- After Row 4: about 4 in (10.2 cm) wide and 2.6 in (6.6 cm) tall
If the skirt is too big: go down to a 2.0 mm hook. If it is too small: go up to a 2.5 mm hook. Keep every chain count the same; the stitch math doesn’t change with hook size.
Skirt
Work the skirt flat in turned rows, top-down from the neck ring. Each row adds 2 dtr, one in the first ch-4 sp and one in the last ch-4 sp. This keeps the fan symmetrical, with one dtr running straight down the center.
Neck ring: Ch 8, sl st in the first ch to form a ring.
Row 1 (tier 1): Ch 5 (counts as dtr), ch 4, [dtr in ring, ch 4] 3 times, dtr in ring. Turn.
Count: 5 dtr and 4 ch-4 sps.
Work all Row 1 stitches into the lower half of the ring. Leave the upper half free for the wings.
Row 2 (tier 2): Ch 5 (counts as dtr), ch 4, dtr in next ch-4 sp, ch 4, [dtr in next dtr, ch 4] 3 times, dtr in next ch-4 sp, ch 4, dtr in top of tch. Turn.
Count: 7 dtr and 6 ch-4 sps.
Skip the two middle ch-4 sps of Row 1. Only the first and last spaces get a new spoke.
Row 3 (tier 3): Ch 5 (counts as dtr), ch 4, dtr in next ch-4 sp, ch 4, [dtr in next dtr, ch 4] 5 times, dtr in next ch-4 sp, ch 4, dtr in top of tch. Turn.
Count: 9 dtr and 8 ch-4 sps.
The ch-4 sps of each row lie along the bottom of that tier and form the three chain bars across the skirt. The dtr posts form the long spokes.
Checkpoint: 3.5 in (8.9 cm) wide x 2.1 in (5.3 cm) tall. Don’t fasten off. Go straight to Row 4 in the Scallop Edge section, then come back here for the wings.
Wings
Each wing has two lobes, a large upper lobe and a smaller lower lobe. Each lobe is a long chain loop with a shorter chain loop nested inside, so the lobes look outlined.
Hold the finished skirt right side facing, with the neck ring at the top. Join the yarn with a sl st in the free upper half of the ring, just left of the first dtr of Row 1.
Left lower lobe: Ch 14, sl st in ring (outer loop). Ch 8, sl st in ring (inner loop).
Left upper lobe: Ch 20, sl st in ring (outer loop). Ch 12, sl st in ring (inner loop).
Sl st 2 times across the top of the ring to move to the right side.
Right upper lobe: Ch 20, sl st in ring. Ch 12, sl st in ring.
Right lower lobe: Ch 14, sl st in ring. Ch 8, sl st in ring.
Fasten off, leaving a 4 in (10.2 cm) tail, and weave it in through the ring.
Count: 4 lobes and 8 chain loops in total (2 x ch 20, 2 x ch 12, 2 x ch 14, 2 x ch 8).
A ch-20 loop is about 2.5 in (6.4 cm) around, so each upper lobe sticks out about 1.2 in (3.0 cm) from the neck. With the head in the middle, the wingspan blocks to about 3.25 in (8.3 cm).
Head
Work in continuous rounds. Mark the first stitch of each round.
Rnd 1: 6 sc in MR. (6)
Rnd 2: 2 sc in each st around. (12)
Rnd 3: [Sc in next st, 2 sc in next st] 6 times. (18)
Rnds 4–5: Sc in each st around. (18)
Rnd 6: [Sc in next st, sc2tog] 6 times. (12)
Stuff firmly with a small pinch of fiberfill.
Rnd 7: Sc2tog 6 times. (6)
Fasten off, leaving a 10 in (25.4 cm) tail. Thread the tail through the front loops of the last 6 sts and pull closed.
Checkpoint: about 0.7 in (1.8 cm) across.
Attach the head: Set the head on top of the neck ring so it covers the ring and the wing bases. Using the tail, sew through the ring and the base of the head 3 to 4 times. The bottom of the head should sit at the top of the center spoke.
Hanging Loop
Join the yarn with a sl st through the top center of the head. Ch 22, then sl st in the same spot. Fasten off and weave the end down into the head.
The ch-22 loop is about 2.75 in (7.0 cm) around and stands about 1.25 in (3.2 cm) above the head.
Scallop Edge (Border)
The scallop edge is the only border on this angel. Work it straight after Row 3 of the skirt, before the wings. It’s described here so all the border math is in one place.
Border gauge: Each ch-9 loop spans one ch-4 sp of Row 3, which is about 0.45 in (1.1 cm) wide. The loop hangs about 0.5 in (1.3 cm) below the chain bar.
Row 4 (scallops): Ch 1, sc in first dtr, [ch 9, sc in next dtr] 8 times, working the last sc in the top of the tch. Fasten off and weave in.
Count: 9 sc and 8 ch-9 loops.
Per side: The center dtr divides the hem into two halves. The left half has 4 loops over 5 dtr, counting the center dtr. The right half has 4 loops over 5 dtr and shares the center dtr. That’s 4 + 4 = 8 loops on 5 + 5 − 1 = 9 dtr.
Why the math works: The skirt adds exactly 2 dtr per row, so the rows have 5, 7 and 9 dtr. A row always has one fewer gap than dtr, so the gaps are 4, 6 and 8. Row 4 puts one sc on each of the 9 dtr and one ch-9 loop over each of the 8 gaps.
Each ch-9 loop is about 1.1 in (2.8 cm) long but spans only about 0.45 in (1.1 cm). The extra length drops into a rounded U, which gives the even scalloped hem. The two end loops flare out slightly, taking the hem from 3.5 in (8.9 cm) to about 4 in (10.2 cm) wide.
Final Blocking
Blocking makes this ornament. Without starch, the wings and scallops will flop.
- Weave in all the ends securely first, because starch locks loose tails in place.
- Cover the blocking board with plastic wrap.
- Mix the starch, or make a 1:1 mix of white glue and water.
- Dip the whole angel, head included. Squeeze out the excess and blot it in a towel so nothing drips.
- Lay it face up and pin the head and neck first.
- Pin the center spoke straight down. Then pin the hem to 4 in (10.2 cm) wide, with one pin at the bottom of each of the 8 scallops.
- Pin the 3 chain bars into gentle, even curves. Keep the spokes straight.
- Open each outer wing loop into a rounded petal, center the inner loop inside it and pin. The wingspan should be 3.25 in (8.3 cm).
- Lay the hanging loop flat above the head.
- Let it dry completely, at least 12 hours. Then unpin it and check the measurements.
Final Quality-Control Checklist
- The skirt rows have 5, 7 and 9 dtr, and the hem has 8 scallops.
- One dtr runs straight down the center from the neck.
- The three chain bars are level and evenly curved.
- The wings are mirror images: the upper lobes match and the lower lobes match.
- Every wing lobe has an inner loop centered inside it.
- The head is round and firm, about 0.7 in (1.8 cm) across, and covers the neck ring.
- The angel measures about 4 in (10.2 cm) x 3.3 in (8.4 cm).
- The hanging loop is centered and the angel hangs straight.
- No ends show and nothing feels sticky.
Troubleshooting
The skirt cups instead of lying flat. Your ch-4 sps are too tight. Make your chains looser, or use ch 5 in Row 3 only.
The skirt ruffles. Your chains are too loose. Change to ch-3 sps or use a 2.0 mm hook.
The fan is lopsided. Check that each row starts with ch 5 and ends in the top of the tch. Missing an end stitch removes a spoke from one side.
The scallops lie flat instead of rounding. The ch-9 loops are too short for your gauge. Try ch 10, and pin each scallop down when blocking.
The wings are different sizes. Recount the chains. Being off by even 1 or 2 chains is easy to see, so undo the loop and redo it.
Stuffing shows through the head. Your sc are too loose. Use a smaller hook for the head only, or use less stuffing.
The angel tilts on the tree. The hanging loop is off center. Remove it and rejoin it at the exact top of the head.
Care
Spot clean only, with a damp cloth. If the angel loses its shape after a few seasons, rinse it, starch it again and re-block it.

Final Notes
Everything starts from gauge: a dtr about 0.6 in (1.5 cm) tall and 10 ch measuring 1.25 in (3.2 cm). Over Rows 1–3 the skirt grows from 1.5 in (3.8 cm) to 2.5 in (6.4 cm) to 3.5 in (8.9 cm) wide. The scallop row brings it to 4 in (10.2 cm) wide and 2.6 in (6.6 cm) tall. Adding the 0.7 in (1.8 cm) head makes the angel 3.3 in (8.4 cm) tall, plus the 1.25 in (3.2 cm) hanging loop. Check each stage and your finished angel will match.
Happy crocheting!