
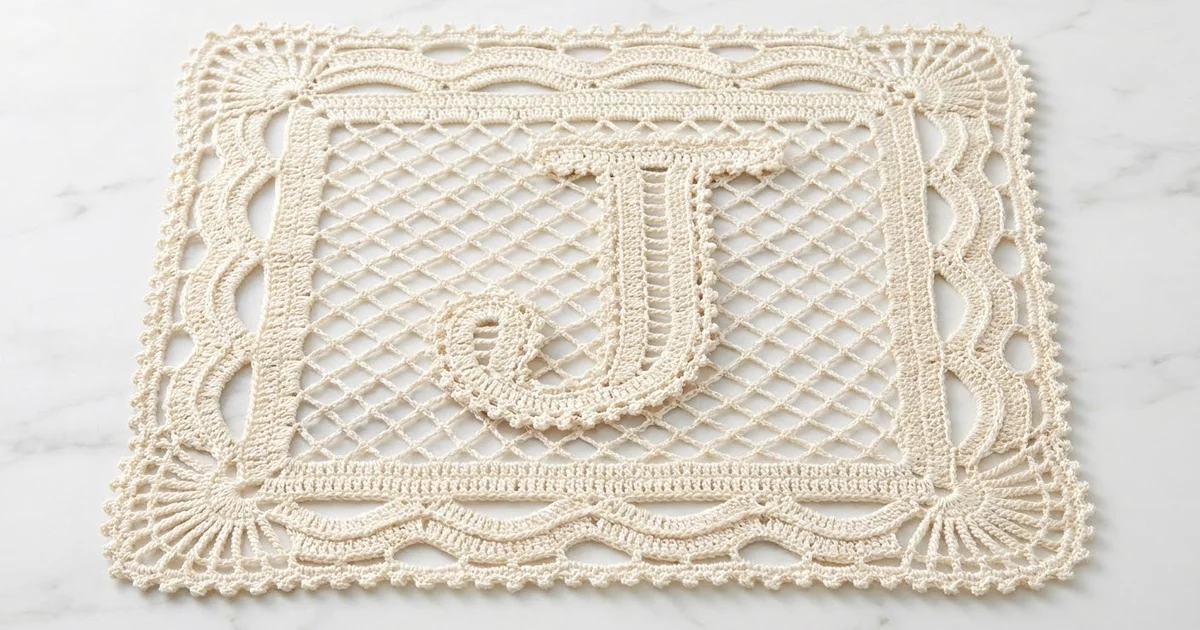
This lace square has a tall serif letter J in the middle. The letter is worked as a ladder tape and floats in an open diamond mesh. Around the mesh is a frame of rolling waves, with a fan in each corner and small picots along the outer edge. It looks like a vintage monogram from a linen drawer sachet or an old dresser set.
The square uses one color only: cream or ivory size 10 cotton crochet thread. All of the interest comes from texture. The solid tape of the letter stands out against the open net, and the waves add movement to the frame. All instructions use US crochet terms.
After blocking, the square measures 7.0 in x 7.0 in (17.8 cm x 17.8 cm). You can use it as a doily, a framed monogram, a pillow appliqué or a gift.
You build it in four stages. First, crochet the J as a separate tape and give it a picot edging. Second, work the frame in rounds outward from a chain ring. Third, pin the J inside the frame and work the mesh, joining it to both. Fourth, add a two-round border.
Finished Size and Construction
- Finished size: 7.0 in x 7.0 in (17.8 cm x 17.8 cm)
- Skill level: Intermediate to experienced
- Terminology: US crochet terms
- Yarn weight: Size 10 cotton crochet thread (Lace, 0)
- Hook: 1.5 mm (US steel 8)
- Number of pieces: 1. The letter and frame are separate stages, but the mesh joins them into one piece.
- Layout: A single square with the letter centered
- Letter size: 3.75 in x 2.75 in (9.5 cm x 7.0 cm)
- Inner opening of frame: 5.0 in (12.7 cm) square
- Size before border: 6.4 in (16.3 cm) square
- Border depth: 0.3 in (0.8 cm) per side
Materials
Thread: Use smooth, mercerized size 10 cotton. It keeps stitches crisp and holds starch well. Avoid soft or fuzzy cotton, because it blurs the mesh joins.
- Cream/Ivory: 20 g (about 112 m)
Tools:
- 1.5 mm (US steel 8) hook
- Fine tapestry needle
- 4 locking stitch markers
- Rustproof pins and a blocking board
- Ruler
- Spray starch (optional)
The thread amount includes a margin of about 20% for swatching and differences in tension.
Abbreviations (US Terms)
- ch – chain
- sl st – slip stitch
- sc – single crochet
- hdc – half double crochet
- dc – double crochet
- tr – treble crochet
- fdc – foundation double crochet
- sk – skip
- sp – space
- st(s) – stitch(es)
- RS – right side
Special stitches:
- Picot: Ch 3, then sl st in the 3rd ch from the hook.
- Edge loop: The extra chains of a turning chain that bow out past the edge of the tape.
Gauge and Checkpoints
Gauge: 8 dc = 1 in (2.5 cm). 4 dc rows = 1 in (2.5 cm).
Use the J as your gauge test. The tape is 8 sts wide (6 dc plus a ch-2 sp), so it should measure 1 in (2.5 cm) across. Ten stem rows should measure 2.5 in (6.4 cm).
Checkpoints:
- Serif: 2.25 in (5.7 cm) wide
- Finished J: 3.75 in x 2.75 in (9.5 cm x 7.0 cm)
- Frame Rnd 1: 5.2 in (13.2 cm)
- Frame Rnd 2: 5.7 in (14.5 cm)
- Frame Rnd 3: 6.4 in (16.3 cm)
- Border Rnd 4: 6.6 in (16.8 cm)
- Border Rnd 5: 7.0 in (17.8 cm)
If your J is too big, switch to a 1.3 mm hook. If it is too small, switch to a 1.65 mm hook. Change hooks before you start the frame, because the J has to fit inside the 5.0 in (12.7 cm) opening.
Part 1: The Letter J
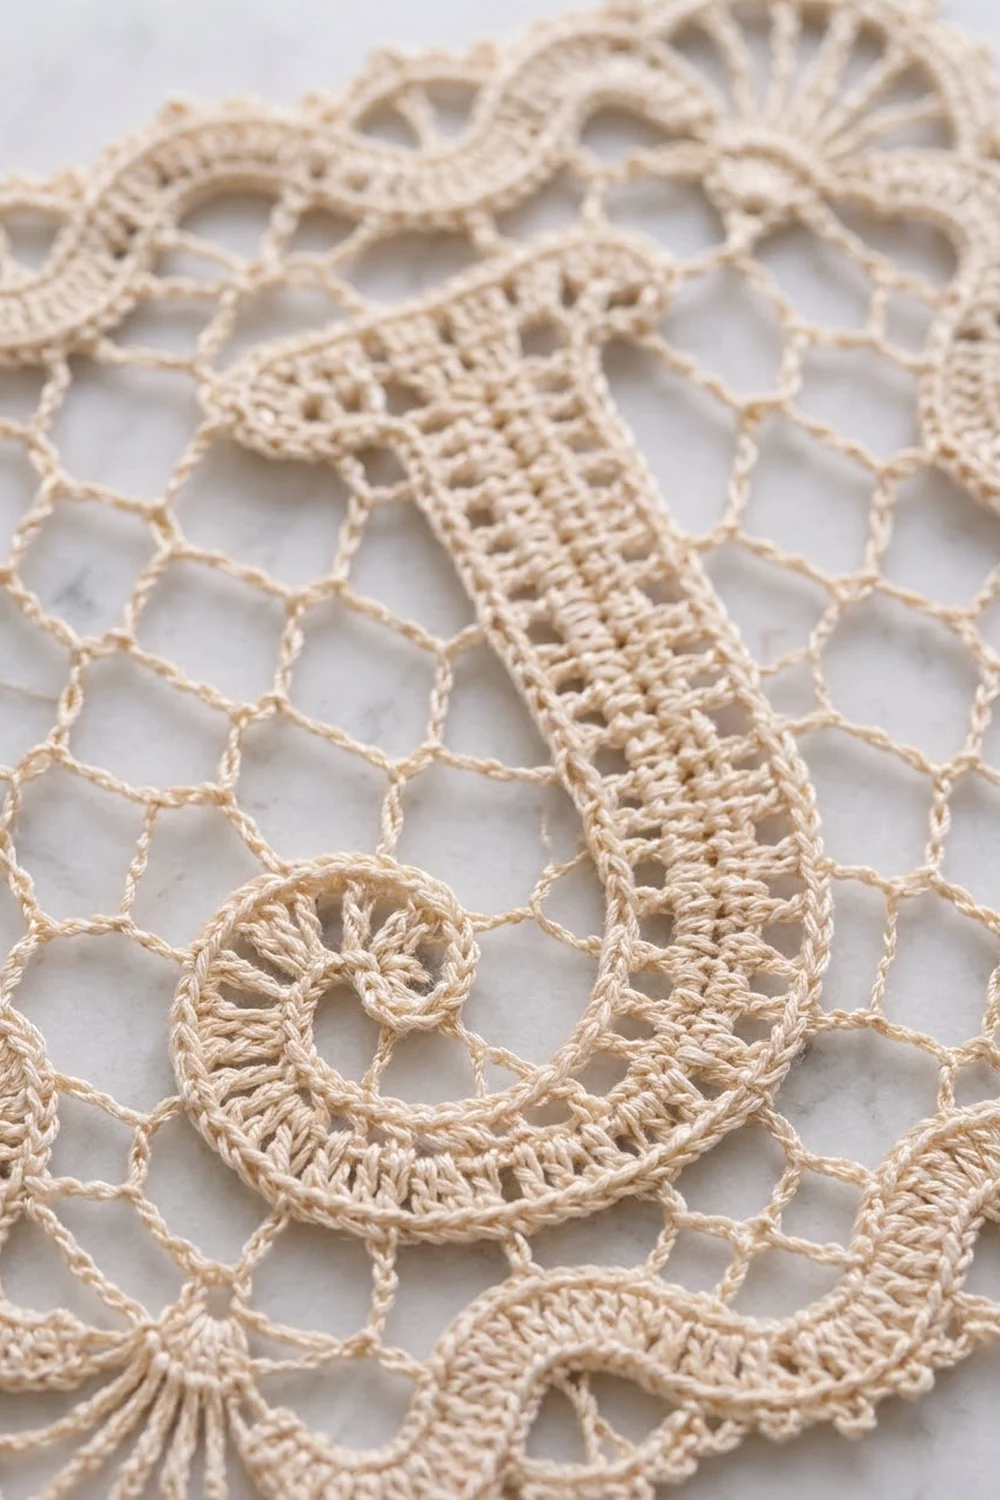
The J is one tape. You start at the top of the stem and work downward into the curl. The serif is added afterward along the foundation chain.
Stem
Ch 10.
Row 1: Dc in the 4th ch from the hook and in the next ch. Ch 2, sk 2 ch, dc in the last 3 ch. (6 dc, counting the skipped ch as 1 dc, and 1 ch-2 sp)
Rows 2–10: Ch 5 and turn (counts as the first dc plus a ch-2 edge loop). Dc in the next 2 dc, ch 2, sk the ch-2 sp, dc in the next 2 dc, then dc in the top of the turning ch. (6 dc and 1 ch-2 sp)
The center chain bars make the ladder look. Checkpoint: the stem is 2.5 in (6.4 cm) long and 1 in (2.5 cm) wide.
Curve (Rows 11–16)
These are wedge rows. Tall stitches on the outer edge and short stitches on the inner edge bend the tape. Odd rows start at the outer edge and even rows start at the inner edge. The tape is reversible, so if it bends the wrong way, turn it over.
Rows 11, 13, 15: Ch 6 and turn (counts as tr plus a ch-2 edge loop). Tr in the next 2 sts, ch 2, sk the sp, dc in the next st, hdc in the last 2 sts. (6 sts, 1 ch-2 sp)
Rows 12, 14, 16: Ch 3 and turn (counts as hdc plus a ch-1 loop). Hdc in the next st, dc in the next st, ch 2, sk the sp, tr in the next 2 sts, tr in the top of the turning ch. (6 sts, 1 ch-2 sp)
After Row 16, the tape should have turned about 180 degrees.
Curl (Rows 17–20)
Rows 17 and 19: Ch 6 and turn (counts as tr plus a ch-2 edge loop). Tr in the next 2 sts, ch 2, sk the sp, hdc in the next st, sc in the last 2 sts. (6 sts, 1 ch-2 sp)
Rows 18 and 20: Ch 1 and turn (does not count). Sc in the first 2 sts, hdc in the next st, ch 2, sk the sp, tr in the next 2 sts, tr in the top of the turning ch. (6 sts, 1 ch-2 sp)
Fasten off, leaving a 6 in (15.2 cm) tail. Roll the end of the tape inward into a spiral that rests against the curve. Tack it in place with 3 or 4 small stitches.
Serif
Hold the J with the foundation chain at the top and the RS facing you. Join with a sl st in the right-hand corner loop of the foundation chain.
Row S1: Ch 6. Dc in the 4th ch from the hook and in the next 2 ch (4 dc of overhang). Dc in each of the 10 free foundation loops. Work 4 fdc, starting the first one into the base of the last dc. (18 dc: 4 + 10 + 4)
Row S2: Ch 1 and turn. Sc in each st across. (18 sc)
Checkpoint: the serif is 2.25 in (5.7 cm) wide and extends 0.5 in (1.3 cm) past each side of the stem.
J Edging
Join at the top right corner of the serif. Ch 1, then work around the whole outline:
- 3 sc in each serif corner
- 1 sc in each serif st and in each free loop under the overhangs
- (2 sc, picot, 2 sc) in each ch-2 edge loop
- 2 sc in each ch-1 loop
- 2 sc around each plain dc or tr row end
- 1 sc around each hdc or sc row end
Sl st to the first sc to join and fasten off.
The J has 14 ch-2 edge loops (9 on the stem and 5 on the curve and curl), so the edging has 14 picots. These picots are where the mesh attaches.
Part 2: The Frame (Rounds 1–3)
Foundation: Ch 160 and sl st to the first ch to form a ring, without twisting the chain. Place markers in ch 1, 41, 81 and 121 to mark the corners. Work Rnd 1 into the top loop of each ch only, so the bottom loops stay free for the mesh.
Rnd 1: Ch 1. (Sc, ch 2, sc) in the corner ch, sc in the next 39 ch. Repeat from * 3 more times. Sl st to the first sc. (41 sc per side, including the corner sc. Total: 160 + 4 = 164 sc, plus 4 ch-2 sps.)
Rnd 2 (inner band): Sl st into the corner sp. Ch 3 (counts as dc), ch 2, dc in the same sp. Dc in the next 41 sc, (dc, ch 2, dc) in the corner sp. Repeat from * 2 more times. Dc in the next 41 sc, then sl st to the top of the ch-3. (43 dc per side. Total: 164 + 8 = 172 dc.)
Rnd 3 (waves and fans): Sl st into the corner sp. Ch 4 (counts as tr), ch 1, (tr, ch 1) 5 times, tr in the same sp to make a 7-tr fan.
Sk 2 dc. Over the next 39 dc, work [sc, hdc, dc, dc, tr, tr, tr, tr, tr, dc, dc, hdc, sc] 3 times. Sk 2 dc. In the corner sp, work (tr, ch 1) 6 times, then tr. Repeat from * around, leaving out the last fan. Sl st to the top of the ch-4.
Count: 39 wave sts per side and 7 tr per fan, so 156 + 28 = 184 sts, plus 24 ch-1 sps. Each side has 3 crests.
Checkpoint: 6.4 in (16.3 cm). Don’t fasten off. Put the live loop on a locking marker.
Part 3: The Mesh Filling
Pin the frame flat at 6.4 in (16.3 cm). Center the J in the opening with about 0.6 in (1.5 cm) of space above and below it, and pin it firmly.
Each inner side has 41 free loops, counting both corner chains. Number them 1 to 41.
Row 1: Sl st in the bottom right corner loop (loop 1). (Ch 5, sk 3 loops, sc in the next loop) 10 times, ending in loop 41. (10 ch-5 loops)
Row 2: Sl st up 2 side loops. Ch 2, sc in the 3rd ch of the first loop. (Ch 5, sc in the 3rd ch of the next loop) 9 times. Ch 2, then sl st 2 loops up on the opposite side. (9 full loops plus 2 half loops)
Row 3: Sl st up 2 side loops. Ch 5, sc in the first loop. (Ch 5, sc in the next loop) 8 times. Ch 5, then sl st 2 loops up on the opposite side. (10 loops)
Rows 4–20: Repeat Rows 2 and 3, ending with a Row 2 repeat. Each row climbs 2 loops on both sides, so after Row 20 you are 38 loops up.
Working around the J: When a row reaches the letter, sc into the nearest J picot or edging sc instead of the next loop. Sl st along the edging to where the row continues on the other side, then go on in pattern. Rows that cross the J have fewer full loops. Join every J picot at least once.
Row 21 (joining row): Sl st up 2 side loops to top loop 1. Ch 2, sk 1 top loop, sc in top loop 3. Ch 2, sc in the next Row 20 loop, ch 2, sk 3 top loops, sc in the next top loop. Repeat from * 8 more times, ending in top loop 39. Ch 2 and sl st in top loop 41. (10 sc into the top edge and 9 mesh joins)
Fasten off. Each sc join forms a small knot where the strands cross.
Border (Rounds 4–5)
Border gauge: 8 sts = 1 in (2.5 cm). Rnd 4 adds 0.1 in (0.3 cm) on each side, and Rnd 5 adds 0.2 in (0.5 cm).
Put the live loop from Rnd 3 back on your hook.
Rnd 4 (leveling round): Sl st across to the center (4th) tr of the fan. Ch 1, (sc, ch 2, sc) in that tr.
[Sc in the next ch-1 sp, sc in the next tr] 3 times. Over the 39 wave sts, work [tr, dc, hdc, hdc, sc, sc, sc, sc, sc, hdc, hdc, dc, tr] 3 times. [Sc in the next tr, sc in the next ch-1 sp] 3 times. (Sc, ch 2, sc) in the center tr. Repeat from * around, leaving out the last corner. Sl st to the first sc.
Count per side: 1 + 6 + 39 + 6 + 1 = 53 sts. The total is 156 + 52 (fan sts and sps) + 4 extra corner sc = 212 sts.
Rnd 5 (picot edge): Sl st into the corner sp. Ch 1, (sc, picot, sc) in the same sp. Sc in the next st, [picot, sc in the next 4 sts] 13 times, (sc, picot, sc) in the corner sp. Repeat from * around, leaving out the last corner. Sl st to the first sc and fasten off.
Count per side: 53 sc worked 1 per st, with 13 picots. The total is 212 (1 per existing st) + 8 extra corner sc = 220 sc, and 52 + 4 = 56 picots.
Why the math works: Each side grows by 2 sts per round, 1 at each corner: 41, then 43. Rnd 3 skips 2 dc at each end, which leaves 39 sts, exactly 3 waves of 13. Rnd 4 adds back 6 fan sts and 1 corner sc at each end, for 53. Rnd 5 uses 1 + (13 x 4) = 53, so the picots sit every 0.5 in (1.3 cm) with nothing left over.
Final Blocking
- Weave in the ends along the tape or frame, not through the mesh.
- Soak the square in cool water for 10 minutes. Press it between towels without wringing.
- Mark a 7.0 in (17.8 cm) square on your board.
- Pin the corners first, then the middle of each side, then each picot.
- Open each mesh diamond with a pin tip, and straighten the J stem.
- Pin the curl so the spiral holds its shape.
- Starch lightly if you like. Let it dry fully, at least 12 hours.
Final Quality-Control Checklist
- All 4 sides measure 7.0 in (17.8 cm).
- Each side has 3 crests and 13 picots, and each corner has a 7-ray fan.
- The J is centered and vertical, and the curl lies flat.
- All 14 J picots are joined to the mesh.
- There are no puckers where the mesh meets the frame.
- All ends are hidden.
Troubleshooting
The J is too big: Rework it with a smaller hook, or leave out Row 10.
The curve isn’t bending enough: Keep the tr side on the outer edge and tighten the inner sc stitches.
The mesh pulls the frame inward: Add 1 ch to each loop.
The square ruffles after Rnd 4: Check that you worked the inverse heights over the waves (tr over sc, sc over tr).
The picots are uneven: Count 53 sts per side before you start Rnd 5.
Care
Hand wash in cool water with mild soap, then dry flat and pinned. Starch again for crispness if you like.

Final Notes
Here is the measurement chain. The 1 in (2.5 cm) tape makes a 3.75 in (9.5 cm) J. The J sits in a 5.0 in (12.7 cm) opening. The frame brings the square to 6.4 in (16.3 cm), the leveling round to 6.6 in (16.8 cm), and the picot edge to 7.0 in (17.8 cm). If each checkpoint matches, the square will block cleanly. Happy crocheting!