
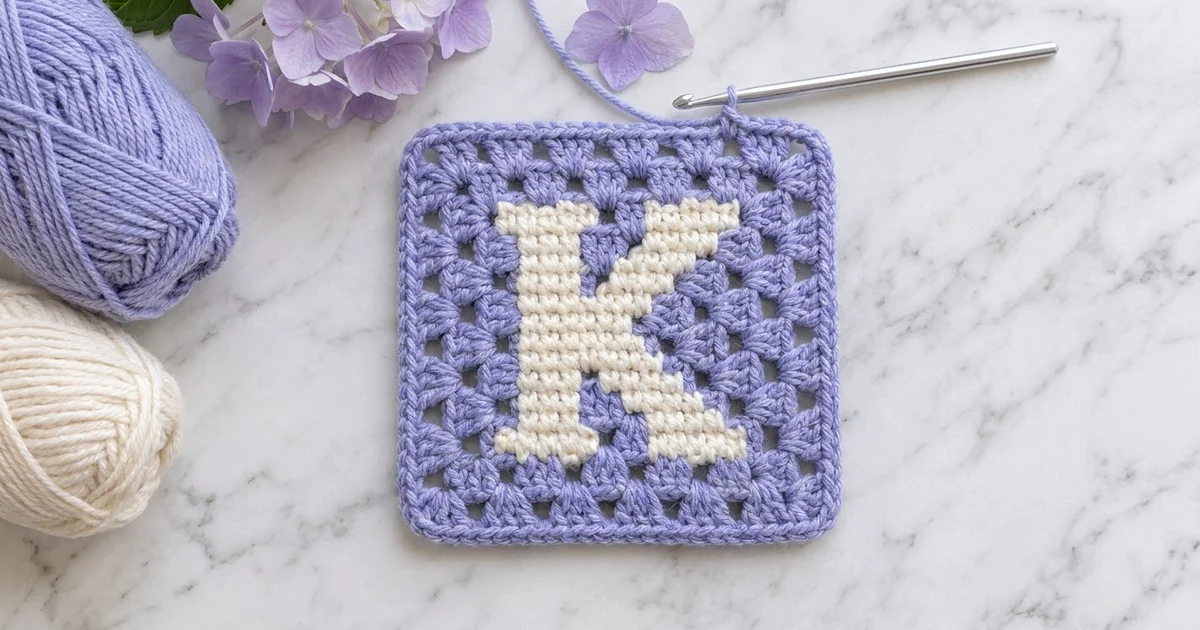
This square puts a bold, cream uppercase K right in the middle of a soft lavender granny frame. The letter has a classic serif look: a straight stem with little feet top and bottom, an arm angling up to the right, and a leg angling down to the right, each ending in its own serif.
Only two colors are used. Periwinkle lavender forms the background and the frame, and creamy off-white forms the letter. The dense single crochet of the monogram contrasts nicely with the open, lacy granny clusters around it, and a smooth solid border finishes the edge.
The pattern is written in US crochet terms. The finished square measures 7 in (17.8 cm) on each side after blocking. It works well as a coaster-sized gift, a mug rug, a nursery wall piece, or a name-letter keepsake.
Construction is simple. You crochet a small colorwork panel in rows with the K worked into it, then edge the panel with a round of single crochet. Two granny cluster rounds go around that, and two rounds of single crochet finish the border.
Finished Size and Construction
- Finished size: 7 in x 7 in (17.8 cm x 17.8 cm)
- Skill level: Intermediate (tapestry color changes plus basic granny rounds)
- Terminology: US crochet terms
- Yarn weight: Worsted weight (#4), cotton or cotton blend
- Hook: 4.0 mm (US G-6)
- Number of pieces: 1 single square motif
- Layout: One square only; no joining
- Letter panel size: 3.8 in x 3.8 in (9.7 cm x 9.7 cm)
- Size before border: 6.2 in x 6.2 in (15.7 cm x 15.7 cm)
- Border depth: 0.4 in (1.0 cm) on each side
Materials
Yarn: Use a smooth worsted weight cotton or cotton blend. Cotton gives the crisp stitch definition that makes the letter easy to read and helps the square lie flat. A yarn with roughly 85 m per 50 g is ideal.
- Color A, Lavender (periwinkle): 20 g, about 35 m
- Color B, Cream: 8 g, about 14 m
These quantities include a margin for your gauge check and weaving in ends.
Tools:
- 4.0 mm (US G-6) crochet hook
- Tapestry needle
- Scissors
- Stitch markers (at least 4)
- Measuring tape or ruler
- Blocking mat and rustproof pins
- Spray bottle with clean water
Abbreviations (US Terms)
- ch: chain
- sc: single crochet
- dc: double crochet
- sl st: slip stitch
- sk: skip
- sp(s): space(s)
- st(s): stitch(es)
- beg: beginning
- rep: repeat
- RS / WS: right side / wrong side
- A / B: Lavender / Cream
Special technique: tapestry color change. Work the last sc of a color until 2 loops remain on the hook, then yarn over with the new color and pull through. Carry the unused color along the top of the row below and work your sc over it, so it stays hidden inside the stitches. Keep the carried strand relaxed so the fabric doesn’t pucker.
Granny cluster (cl): 3 dc worked into the same st or sp.
Gauge and Checkpoints
Panel gauge: 18 sc x 20 rows = 4 in (10.2 cm) in tapestry single crochet.
Granny gauge: One 3-dc cluster plus its ch-1 measures about 0.75 in (1.9 cm) across. Each granny round adds about 0.5 in (1.3 cm) to every side.
Border gauge: About 21 sc = 4 in (10.2 cm) along the edge. Border sc are packed slightly tighter than flat rows because they sit on the tops of dc.
Make the letter panel first and use it as your gauge check. Measure at each stage:
- After Row 19 (panel): 3.8 in (9.7 cm) wide and tall
- After Round 1: 4.2 in (10.7 cm)
- After Round 2: 5.2 in (13.2 cm)
- After Round 3: 6.2 in (15.7 cm)
- After Border Round 1: 6.6 in (16.8 cm)
- After Border Round 2: 7.0 in (17.8 cm)
A difference of up to 0.1 in (0.3 cm) is fine for the panel, and up to 0.25 in (0.6 cm) for the finished square.
If your panel is too big, go down to a 3.75 mm hook. If it’s too small, go up to a 4.5 mm hook. If the panel is square but the granny rounds ruffle, use a hook a half size smaller for the granny rounds only.
Letter Panel (Tapestry Single Crochet)
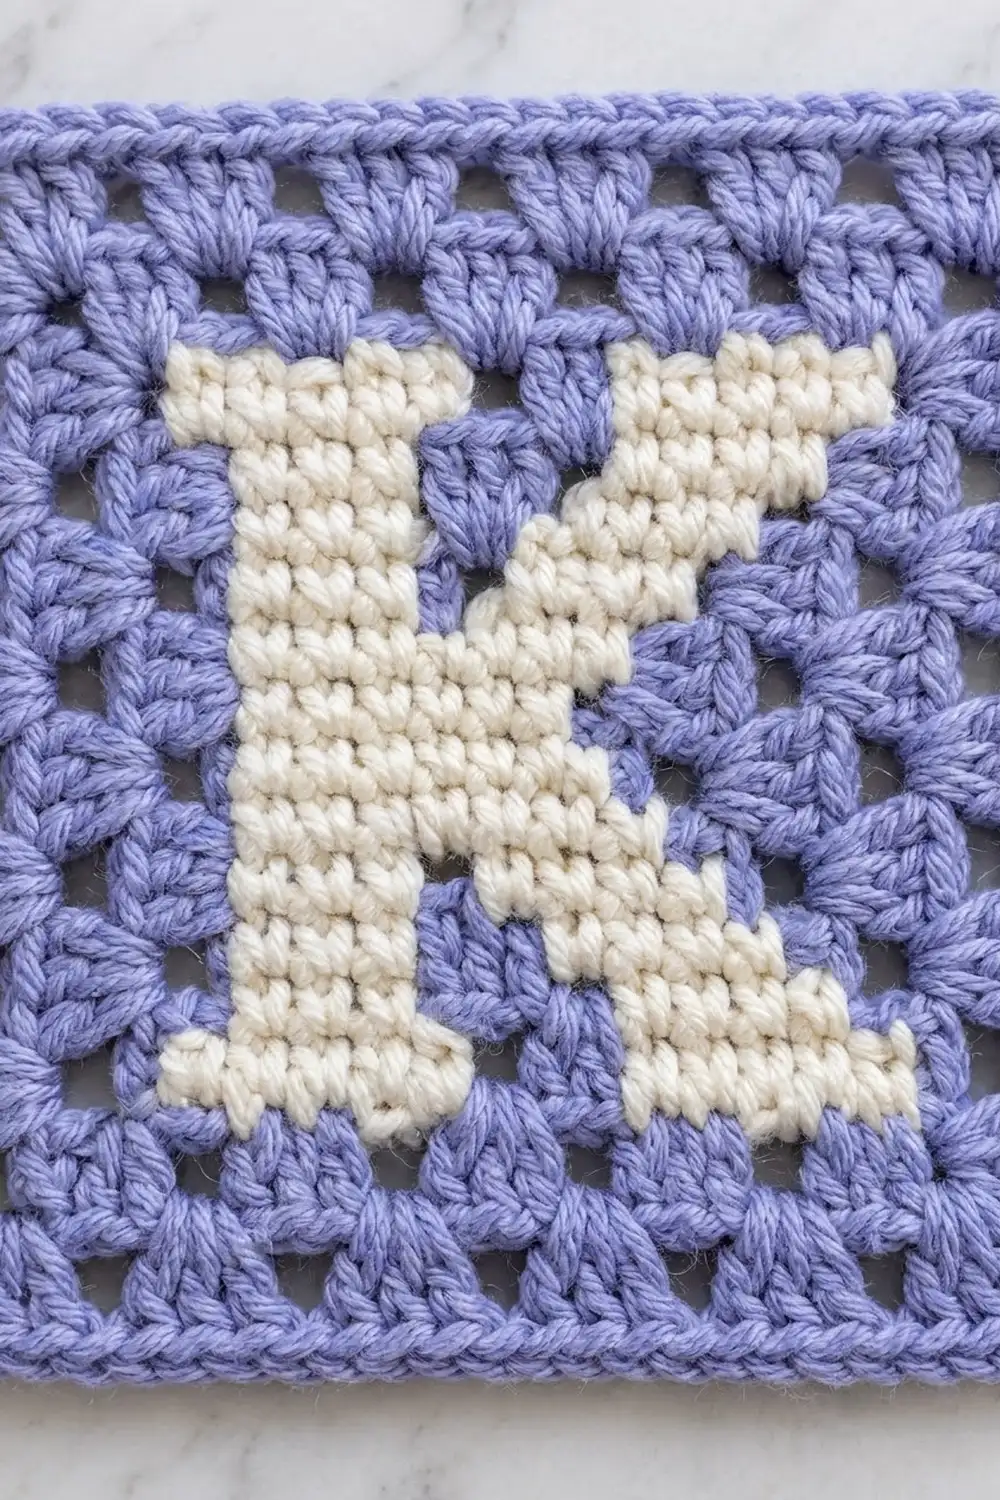
The panel is 17 sts wide and 19 rows tall. The K is cream and everything else is lavender. Rows 1 and 19 are solid lavender, so the letter has a lavender margin one row deep at the top and bottom and one stitch wide at each side.
Read the color sequences exactly as written; they’re already in working order. Odd rows are RS rows and even rows are WS rows. Every row has 17 sc. Ch 1 and turn at the end of each row. The turning ch doesn’t count as a st.
With A, ch 18.
Row 1 (RS): Sc in 2nd ch from hook and in each ch across. (17 sc)
Join B at the start of Row 2 and carry it from here on.
Row 2 (WS): 1 A, 8 B, 1 A, 6 B, 1 A. (bottom serifs)
Row 3 (RS): 2 A, 4 B, 4 A, 4 B, 3 A.
Row 4: 3 A, 4 B, 4 A, 4 B, 2 A.
Row 5: 3 A, 4 B, 3 A, 4 B, 3 A.
Row 6: 3 A, 4 B, 3 A, 4 B, 3 A.
Row 7: 4 A, 4 B, 2 A, 4 B, 3 A.
Row 8: 3 A, 4 B, 2 A, 4 B, 4 A.
Row 9: 5 A, 4 B, 1 A, 4 B, 3 A.
Row 10: 3 A, 8 B, 6 A. (leg meets stem)
Row 11: 6 A, 8 B, 3 A. (arm meets stem)
Row 12: 3 A, 4 B, 1 A, 4 B, 5 A.
Row 13: 4 A, 4 B, 2 A, 4 B, 3 A.
Row 14: 3 A, 4 B, 2 A, 4 B, 4 A.
Row 15: 3 A, 4 B, 3 A, 4 B, 3 A.
Row 16: 3 A, 4 B, 3 A, 4 B, 3 A.
Row 17: 2 A, 4 B, 4 A, 4 B, 3 A.
Row 18: 1 A, 8 B, 1 A, 6 B, 1 A. (top serifs)
Fasten off B, leaving a 6 in (15.2 cm) tail.
Row 19 (RS): With A only, sc across. (17 sc)
How the letter reads (RS facing, left to right): The stem sits in columns 4 to 7. The bottom and top serifs span columns 2 to 9 under the stem and columns 11 to 16 under the leg and arm. The leg moves one column to the left every 2 rows as it climbs, from columns 12 to 15 in Row 3 to columns 9 to 12 in Row 9, and joins the stem in Rows 10 and 11. The arm mirrors it on the way up, reaching columns 12 to 15 in Row 17.
Checkpoint: The panel should measure 3.8 in x 3.8 in (9.7 cm x 9.7 cm), with the K facing the right way on the RS.
Don’t fasten off A.
Frame Rounds
Work all rounds with A and the RS facing. Don’t turn.
Round 1: Single Crochet Edging
After Row 19, your hook is at the top left corner with the RS facing. Rotate the panel to work down the left edge.
Round 1: Work 17 sc evenly down the left side row ends, skipping the row ends of Rows 6 and 14. Ch 2. Work 17 sc across the foundation chain, 1 in each ch. Ch 2. Work 17 sc up the right side row ends, skipping Rows 14 and 6. Ch 2. Sc in each of the 17 sts of Row 19. Ch 2 and sl st to the first sc of the round.
Count: 17 sc per side, 68 sc total, plus 4 ch-2 corner sps. The corners in this round are chain spaces, not stitches, so each side’s 17 sc don’t include any corner stitches.
Checkpoint: 4.2 in (10.7 cm) square. Place a marker in each ch-2 corner sp.
Round 2: Conversion to Granny Clusters
This round turns the 17 sc on each side into 5 side clusters plus 2 corner groups. A cluster goes in every 3rd sc, so you skip 2 sc between clusters.
Round 2: Sl st in next 2 sc (you’re now in the 3rd sc of the left side). Ch 3 (counts as dc), 2 dc in same sc. [Ch 1, sk 2 sc, 3 dc in next sc] 4 times. Ch 1, sk 2 sc. *(3 dc, ch 2, 3 dc) in corner sp, ch 1, [sk 2 sc, 3 dc in next sc, ch 1] 5 times, sk 2 sc; rep from * 2 more times. (3 dc, ch 2, 3 dc) in last corner sp, ch 1, sl st to top of beg ch-3.
On each side, the clusters go in sc 3, 6, 9, 12 and 15. Sc 1, 2, 16 and 17 are skipped next to the corners.
Count: Each side has 5 side clusters plus a corner group at each end, so 7 clusters (21 dc) per side when you count both corner groups. The round has 28 clusters (84 dc), 24 ch-1 sps (6 per side) and 4 ch-2 corner sps.
Checkpoint: 5.2 in (13.2 cm) square.
Round 3: Granny Round
Round 3: Sl st in next 2 dc and in next ch-1 sp. Ch 3 (counts as dc), 2 dc in same sp, ch 1. [3 dc in next ch-1 sp, ch 1] 4 times. (3 dc, ch 2, 3 dc) in corner sp, ch 1. *[3 dc in next ch-1 sp, ch 1] 6 times, (3 dc, ch 2, 3 dc) in corner sp, ch 1; rep from * 2 more times. 3 dc in next ch-1 sp, ch 1, sl st to top of beg ch-3.
Count: Each side has 6 side clusters plus a corner group at each end, so 8 clusters (24 dc) per side. The round has 32 clusters (96 dc), 28 ch-1 sps (7 per side) and 4 ch-2 corner sps.
Checkpoint: 6.2 in (15.7 cm) square. This is the size before the border.
Border
The border is 2 rounds of sc in A. It adds 0.4 in (1.0 cm) on each side, taking the square from 6.2 in (15.7 cm) to 7.0 in (17.8 cm).
Border gauge: About 21 sc = 4 in (10.2 cm) along the edge.
Border Round 1: Ch 1, sc in same st as join. Sc in each dc and in each ch-1 sp around, working 3 sc in each ch-2 corner sp. Join with sl st to the first sc.
Count per side: 24 dc + 7 ch-1 sps = 31 sc between corner groups. With the outer sc of each corner group added, that’s 33 sc between the corner center sts. Counting both corner center sts, each side has 35 sc. The round has 4 x 33 + 4 corner sts = 136 sc.
Place a marker in each corner center sc.
Border Round 2: Ch 1, sc in each sc around, working 3 sc in each marked corner sc. Move the markers up to the new center sts. Join with sl st to the first sc. Fasten off.
Count per side: 35 sc between corner center sts, or 37 sc per side when you count both corner sts. The round has 4 x 35 + 4 = 144 sc.
Why the math works: Each side of Round 3 has 31 places to work (24 dc tops and 7 ch-1 sps). One sc in each keeps the border edge the same length as the granny side, so it doesn’t ruffle or pull in. The 3-sc corners add 1 st on each side of each corner per round. That makes each side 2 sts longer per round (33 to 35), which matches the length the square gains as it widens. At 21 sc per 4 in (10.2 cm), 33 sc covers about 6.3 in (16.0 cm). That matches the 6.2 in (15.7 cm) side before the border within the allowed difference.
Final Blocking
- Weave in all ends on the WS. Weave cream tails into cream stitches and lavender tails into lavender stitches so nothing shows through.
- Lightly mist the square with water until it’s damp but not soaked.
- Lay it RS up on a blocking mat.
- Pin the 4 corner center sts first to make a 7 in x 7 in (17.8 cm x 17.8 cm) square.
- Pin the middle of each side, then add pins every 1 in (2.5 cm) in between, keeping the edges straight.
- Gently ease the letter panel square, making sure the stem of the K is vertical.
- Let it dry completely, usually 6 to 12 hours, before unpinning.
Final Quality-Control Checklist
- The panel has 19 rows with 17 sc in each.
- The K reads correctly on the RS, with the stem on the left.
- No cream shows through the lavender, and no lavender shows through the cream.
- Round 1 has 17 sc per side and 4 ch-2 corners.
- Round 2 has 7 clusters per side and Round 3 has 8, counting corner groups.
- Border Round 2 has 144 sc, with 37 per side including the corners.
- All 4 sides measure 7 in (17.8 cm) and the corners are square.
- All ends are woven in securely.
Troubleshooting
The K looks puckered. The carried strand is too tight. After each color change, spread the stitches out along the hook before working over the carried yarn.
Cream shows through the lavender. Keep the carried yarn at the back of each stitch and work over it firmly. A slightly smaller hook for the panel also helps.
The letter is slanted. Single crochet worked in rows can lean slightly. Block the panel square before Round 1, or pin it more firmly during the final blocking.
Round 2 ruffles. Check that you skipped exactly 2 sc between clusters, or try a hook a half size smaller for the granny rounds.
Round 2 pulls the panel in. Your dc are tight. Use a hook a half size larger for Rounds 2 and 3.
The border waves. Check that Border Round 1 has 31 sc between corner groups. Extra stitches make the edge wave.
The corners are rounded. Re-pin the corner center sts firmly while blocking.
Care
Hand wash in cool water with a mild detergent. Press the water out in a towel and dry flat, reshaping the square to 7 in (17.8 cm).

Final Notes
The whole square depends on one chain of measurements. The 17-stitch by 19-row letter panel measures 3.8 in (9.7 cm). The sc edging brings it to 4.2 in (10.7 cm). The two granny rounds take it to 5.2 in (13.2 cm) and then 6.2 in (15.7 cm). The 2-round border finishes it at 7.0 in (17.8 cm). Measure at each step and the square will finish true.
Once you know the method, you can plan any other letter on the same 17 x 19 grid and make a matching set of initials.
Happy crocheting!