
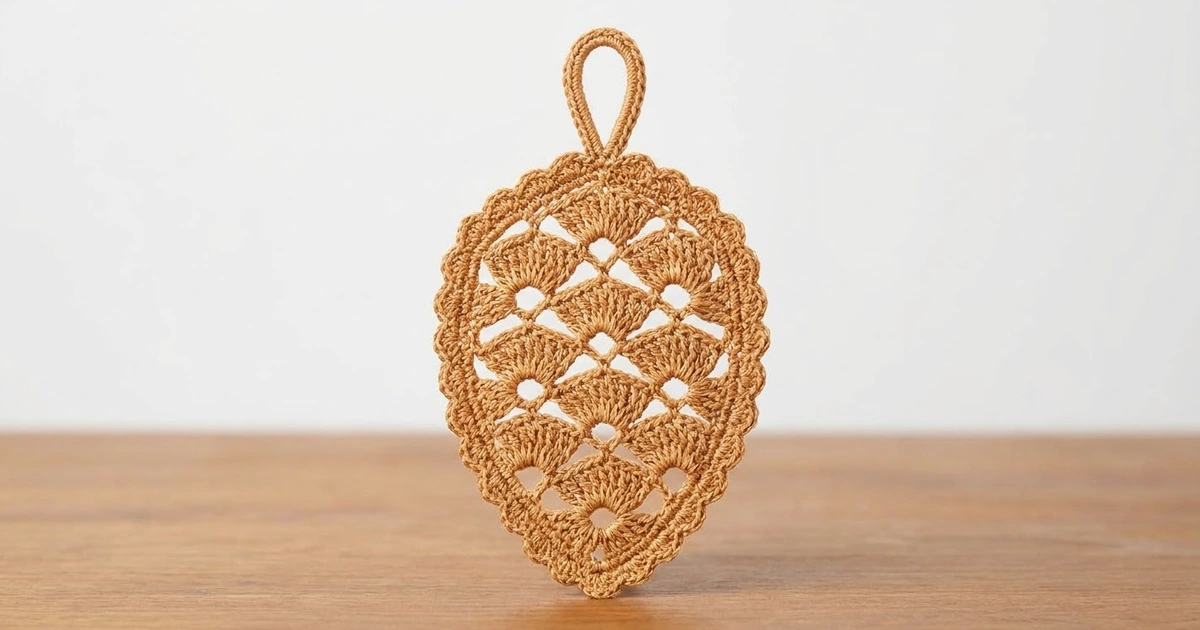
This little pine cone ornament is light, lacy, and quick to make. Each “scale” is a fan of double crochet that opens upward from a chain arch. The tiers stack and overlap like the scales of a real cone, and a smooth scalloped outline ties the shape together.
The sample is in a warm caramel cotton that looks like natural pine. The design also works well in sage green, dusty pink, or cream, so you can make a matching set for the tree. Mercerized cotton keeps the stitches crisp and the lace open.
The pattern uses US crochet terms. The finished ornament is 3.5 in (8.9 cm) wide and 5.5 in (14.0 cm) tall, not counting the loop. With the hanging loop it measures about 7 in (17.8 cm).
You work it flat in turned rows, starting at the bottom tip. Arch rows and shell rows alternate. The tiers grow from 2 shells to 4, then shrink back to 1 at the top. A two-round border and a hanging loop finish it.
Finished Size and Construction
- Finished size: 3.5 in (8.9 cm) wide x 5.5 in (14.0 cm) tall, plus a 1.5 in (3.8 cm) loop
- Skill level: Easy-intermediate (you need to count chain arches and shells)
- Terminology: US crochet terms
- Yarn weight: Fingering (#1) mercerized cotton
- Hook: 2.5 mm
- Number of pieces: 1
- Layout: One flat lace ornament, tip at the bottom, loop at the top
- Piece size before border: 3 in (7.6 cm) wide x 5 in (12.7 cm) tall
- Border depth: 0.25 in (0.6 cm) on every edge
- Size after border: 3.5 in (8.9 cm) x 5.5 in (14.0 cm)
Materials
Yarn: Use a smooth, tightly plied, fingering-weight mercerized cotton of about 170 m per 50 g. Avoid fuzzy or very soft yarns, because they blur the arches. Cotton holds its shape after blocking and won’t stretch on the branch.
Per ornament (one color):
– Caramel / tan (main sample): 8 g, about 27 m
– Optional colorways, the same amount each: sage green, dusty pink, cream (8 g, about 27 m per ornament)
These quantities include a margin of about 25% for your gauge swatch, the loop, and weaving in ends.
Tools:
– 2.5 mm crochet hook
– Tapestry needle
– Scissors
– Rustproof pins and a blocking board or foam mat
– Spray bottle with water
– Optional: liquid fabric stiffener or a light starch spray
– Ruler or tape measure
Abbreviations (US Terms)
- ch – chain
- sl st – slip stitch
- sc – single crochet
- dc – double crochet
- st(s) – stitch(es)
- sp – space
- sk – skip
- ch-5 sp – the space under a chain-5 arch
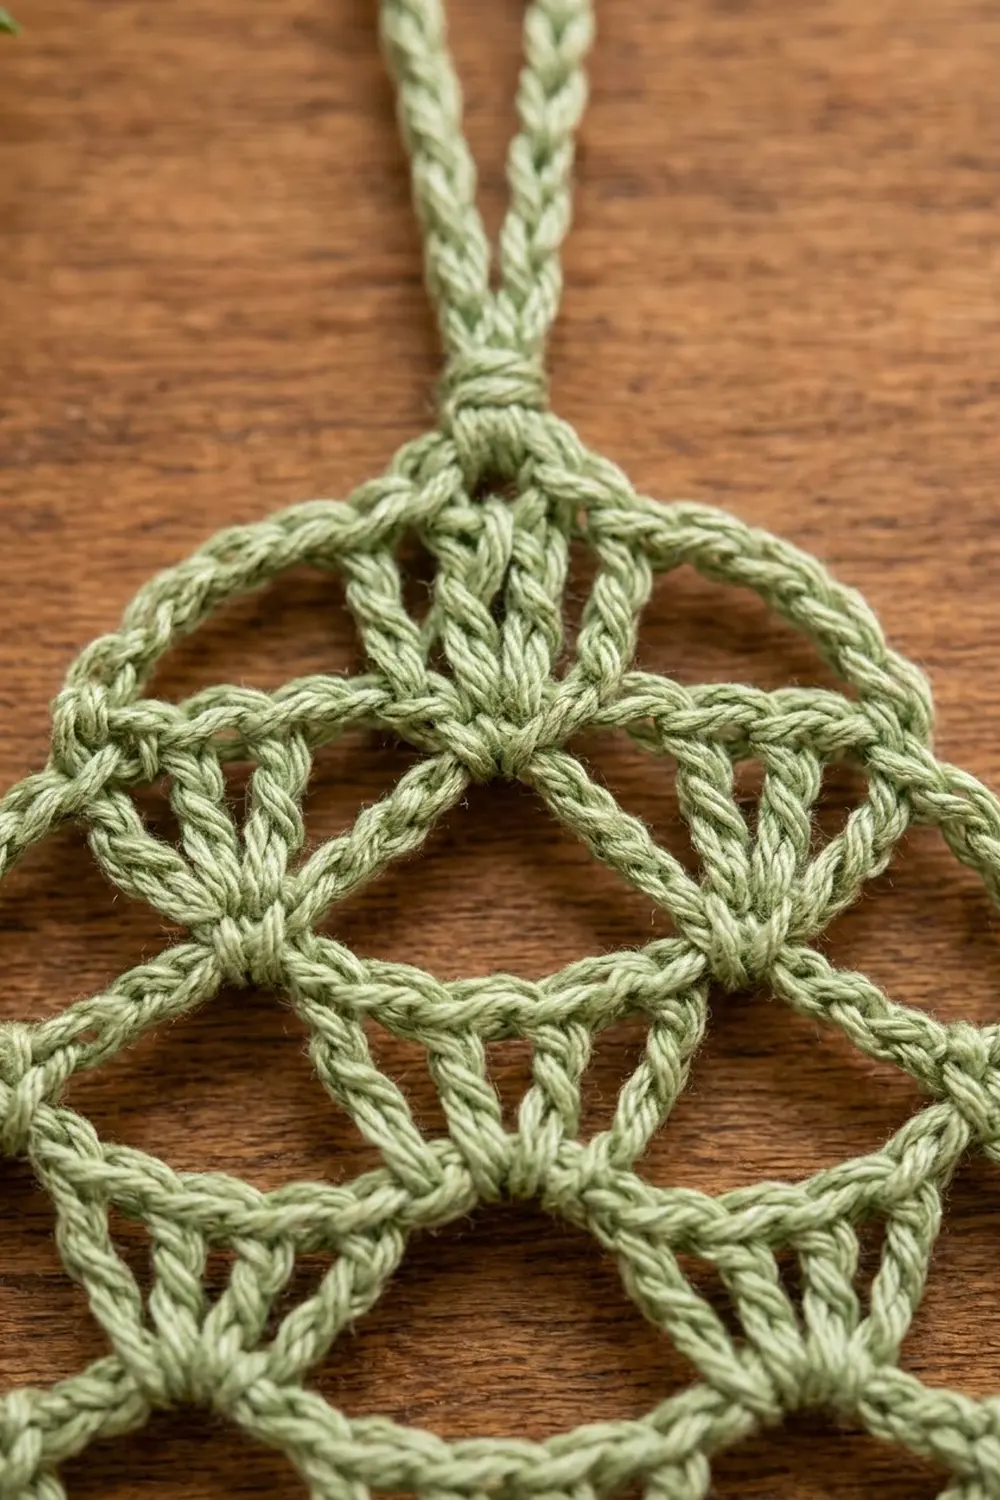
Special stitch – Shell: Work 5 dc into the same ch-sp. The 3rd dc is the center dc. The arches of the next row are anchored there.
When a shell starts a row, the ch 3 counts as the first dc, so you only work 4 more dc.
Gauge and Checkpoints
Lace gauge is easiest to check by measuring the piece itself, so treat your first ornament as the test piece. Work Rows 1–3, lay the piece flat without stretching it, and measure.
- After Row 3 (2 shells): 1.5 in (3.8 cm) wide x 1.25 in (3.2 cm) tall
- After Row 7 (4 shells, widest point): 3 in (7.6 cm) wide x 2.75 in (7.0 cm) tall
- After Row 13 (before border): 3 in (7.6 cm) wide x 5 in (12.7 cm) tall
- After the border: 3.5 in (8.9 cm) x 5.5 in (14.0 cm)
Each shell covers about 0.75 in (1.9 cm) of width, and each row adds about 0.38 in (1.0 cm) of height.
Too big? Change to a 2.25 mm hook, or chain more tightly. Loose ch-5 arches are the most common cause.
Too small? Change to a 2.75 mm hook. Check that your dc are fully pulled up, not squashed.
A difference of 0.25 in (0.6 cm) is fine for an ornament. Blocking will even it out.
Pattern
You work in turned rows from the bottom tip upward. Every odd row is a shell row and every even row is an arch row.
Foundation: Ch 5, sl st in the first ch to form a ring.
Row 1 (tip fan): Ch 3 (counts as dc), 6 dc in ring. Turn. (7 dc)
This makes the small half-circle fan at the tip.
Row 2 (arch row): Ch 1, sc in first dc, ch 5, sk 2 dc, sc in next dc (the center dc), ch 5, sk 2 dc, sc in top of turning ch-3. Turn. (3 sc, 2 ch-5 sps)
Row 3 (shell row): Sl st in first ch-5 sp, ch 3 (counts as dc), 4 dc in same sp. Work a Shell in the next ch-5 sp. Turn. (2 shells, 10 dc)
Checkpoint: 1.5 in (3.8 cm) wide.
Increase Section
Increase arch rule: An increase arch row has one edge arch at each end plus one arch between each pair of shell centers. A row of k shells gives k + 1 arches.
Row 4 (increase arch row): Ch 1, sc in first dc. Ch 5, sc in center dc of first shell. Ch 5, sc in center dc of next shell. Ch 5, sc in top of turning ch-3. Turn. (4 sc, 3 ch-5 sps)
The two edge arches are short and bow outward. They create the scalloped silhouette.
Row 5 (shell row): Sl st in first ch-5 sp, ch 3, 4 dc in same sp. Work a Shell in each of the next 2 ch-5 sps. Turn. (3 shells, 15 dc)
Row 6 (increase arch row): Ch 1, sc in first dc. Ch 5, sc in center dc of first shell. Ch 5, sc in center dc of next shell; repeat from * to * once more. Ch 5, sc in top of turning ch-3. Turn. (5 sc, 4 ch-5 sps)
Row 7 (shell row): Sl st in first ch-5 sp, ch 3, 4 dc in same sp. Work a Shell in each of the next 3 ch-5 sps. Turn. (4 shells, 20 dc)
Checkpoint: 3 in (7.6 cm) wide x 2.75 in (7.0 cm) tall. This is the widest point.
Decrease Section
Decrease arch rule: A decrease arch row has no edge arches. The arches run only from one shell center to the next, so k shells give k − 1 arches. The outer 2 dc of each edge shell stay unworked and become part of the scalloped outline.
Row 8 (decrease arch row): Sl st in first 2 dc, ch 1, sc in next dc (center dc of first shell). Ch 5, sc in center dc of next shell; repeat from * to * 2 more times. Leave the last 2 dc unworked. Turn. (4 sc, 3 ch-5 sps)
Row 9 (shell row): Sl st in first ch-5 sp, ch 3, 4 dc in same sp. Work a Shell in each of the next 2 ch-5 sps. Turn. (3 shells, 15 dc)
Row 10 (decrease arch row): Sl st in first 2 dc, ch 1, sc in next dc. Ch 5, sc in center dc of next shell; repeat from * to * once more. Leave the last 2 dc unworked. Turn. (3 sc, 2 ch-5 sps)
Row 11 (shell row): Sl st in first ch-5 sp, ch 3, 4 dc in same sp. Work a Shell in the next ch-5 sp. Turn. (2 shells, 10 dc)
Row 12 (decrease arch row): Sl st in first 2 dc, ch 1, sc in next dc. Ch 5, sc in center dc of next shell. Leave the last 2 dc unworked. Turn. (2 sc, 1 ch-5 sp)
Row 13 (top shell): Sl st in the ch-5 sp, ch 3, 4 dc in same sp. Do not fasten off. (1 shell, 5 dc)
Checkpoint: 3 in (7.6 cm) wide x 5 in (12.7 cm) tall.
Stitch-count summary:
| Row | Type | Count |
|---|---|---|
| 1 | Tip fan | 7 dc |
| 2 | Arch | 3 sc, 2 arches |
| 3 | Shell | 2 shells / 10 dc |
| 4 | Arch (inc) | 4 sc, 3 arches |
| 5 | Shell | 3 shells / 15 dc |
| 6 | Arch (inc) | 5 sc, 4 arches |
| 7 | Shell | 4 shells / 20 dc |
| 8 | Arch (dec) | 4 sc, 3 arches |
| 9 | Shell | 3 shells / 15 dc |
| 10 | Arch (dec) | 3 sc, 2 arches |
| 11 | Shell | 2 shells / 10 dc |
| 12 | Arch (dec) | 2 sc, 1 arch |
| 13 | Top shell | 1 shell / 5 dc |
The rows match in pairs above and below the widest point: Rows 5 and 9 are both 3 shells, Rows 3 and 11 are both 2 shells. That symmetry is what gives the oval cone shape.
Border
Border gauge: 7 sc = 1 in (2.5 cm), measured along the curved edge. Each long side, from top point to tip, measures about 6 in (15.2 cm) along its curve.
The ornament has two long “sides”: left and right. Each one runs from the top point down to the tip point.
Round 1 (outline chain): Do not turn. Ch 1, sc in the center (3rd) dc of the top shell. This is the top point sc.
Work down the first side, putting 1 sc into the end of each row from Row 13 down to Row 1, with ch 3 before each sc. That is 13 row-end sc. Place each sc as follows:
– Shell rows and Row 1: into the side of the edge dc (or turning ch-3)
– Increase arch rows (2, 4, 6): around the edge sc
– Decrease arch rows (8, 10, 12): into the top of the outermost unworked dc at that edge
At the tip, ch 3 and sc into the foundation ring. This is the tip point sc.
Work up the second side the same way, from Row 1 to Row 13: (ch 3, sc in row end) 13 times. Then ch 3 and sl st in the first sc.
Count: 28 sc and 28 ch-3 sps in total.
Per side, that is 15 sc, counting the top point sc and the tip point sc, with 14 ch-3 sps between them. The two point sc are shared by both sides, so 15 + 15 − 2 = 28.
Round 2 (smooth scallop): Sl st in the first ch-3 sp, ch 1. Work 3 sc in each ch-3 sp around. Sl st in the first sc. Fasten off.
Count: 3 x 28 sps = 84 sc in total. Each side has 14 sps x 3 sc = 42 sc.
Why the math works: 42 sc per side at 7 sc per inch is 6 in (15.2 cm), which matches the measured curve of each side. The border lies flat without ruffling or cupping. It adds 0.25 in (0.6 cm) on every edge, so 3 in (7.6 cm) becomes 3.5 in (8.9 cm) and 5 in (12.7 cm) becomes 5.5 in (14.0 cm).
Hanging loop: Join the thread with a sl st around the Round 1 top point sc, which sits between the two 3-sc groups at the top. Ch 24, then sl st in the same place to form a loop.
Work 30 sc over the chain loop, then sl st at the base. Fasten off.
The covered loop stands about 1.5 in (3.8 cm) tall, which brings the total height to 7 in (17.8 cm).
Final Blocking
- Weave in all ends along the back of the stitches, never through the open arches.
- Wet the ornament fully in cool water. Press out the water in a towel; do not wring.
- Lay it flat on the blocking board, right side up, with the tip pointing down.
- Pin the top point and the tip point 5.5 in (14.0 cm) apart.
- Pin the widest point (at Row 7) to 3.5 in (8.9 cm) across.
- Pin each outer border scallop so it curves evenly. Open every ch-5 arch into a smooth curve.
- Lightly pin the 5 dc of each shell into a fan so the “scales” open upward.
- Optional: spray lightly with stiffener or starch for a crisp ornament.
- Leave it pinned until completely dry, usually 6–12 hours.
- Unpin it, then hang it by the loop for 1 hour so it settles.
Final Quality-Control Checklist
- Shell counts per row read 1, 2, 3, 4, 3, 2, 1 from the tip upward, with the 7-dc fan at the bottom
- Every arch is ch 5, with no 4s or 6s
- Each arch is anchored on the center (3rd) dc of a shell
- Rows 8, 10, and 12 each leave 2 unworked dc at both ends
- Border Round 1 has 28 sc and 28 ch-3 sps
- Border Round 2 has 84 sc, 42 on each side
- The finished size is 3.5 in (8.9 cm) x 5.5 in (14.0 cm)
- The loop is 1.5 in (3.8 cm), fully covered, and centered at the top
- All ends are secure and hidden
Troubleshooting
The ornament curls or cups. The arches are too tight. Use a looser chain or go up 0.25 mm for the arch rows only.
The edges ripple. The chains are too loose, or the border has extra sc. Recount Round 2: it should have exactly 3 sc per space.
It looks lopsided. One shell probably landed in the wrong space. Check the shell count row by row against the summary table.
The shells look flat instead of fanned. Make all 5 dc in the same space and pin them into a fan during blocking.
The loop twists. Make sure you worked the sc evenly over the chain, then block the loop flat.
The cone is too narrow or too wide. Check gauge at Row 7, the widest point, and adjust the hook size.
Care
Hand wash in cool water with a mild soap, press out the water, and lay flat to dry. Re-block and re-starch if needed. Store flat in tissue so the arches don’t crush.

Final Notes
Here is the measurement chain: Row 3 is 1.5 in (3.8 cm) wide. Row 7 is 3 in (7.6 cm) wide at the widest point. Row 13 is 3 in (7.6 cm) x 5 in (12.7 cm). The 0.25 in (0.6 cm) border brings the ornament to 3.5 in (8.9 cm) x 5.5 in (14.0 cm), and the 1.5 in (3.8 cm) loop finishes it at 7 in (17.8 cm) tall.
If you check gauge at each stage, every ornament in your set will match, whatever color you choose.
Happy crocheting!