
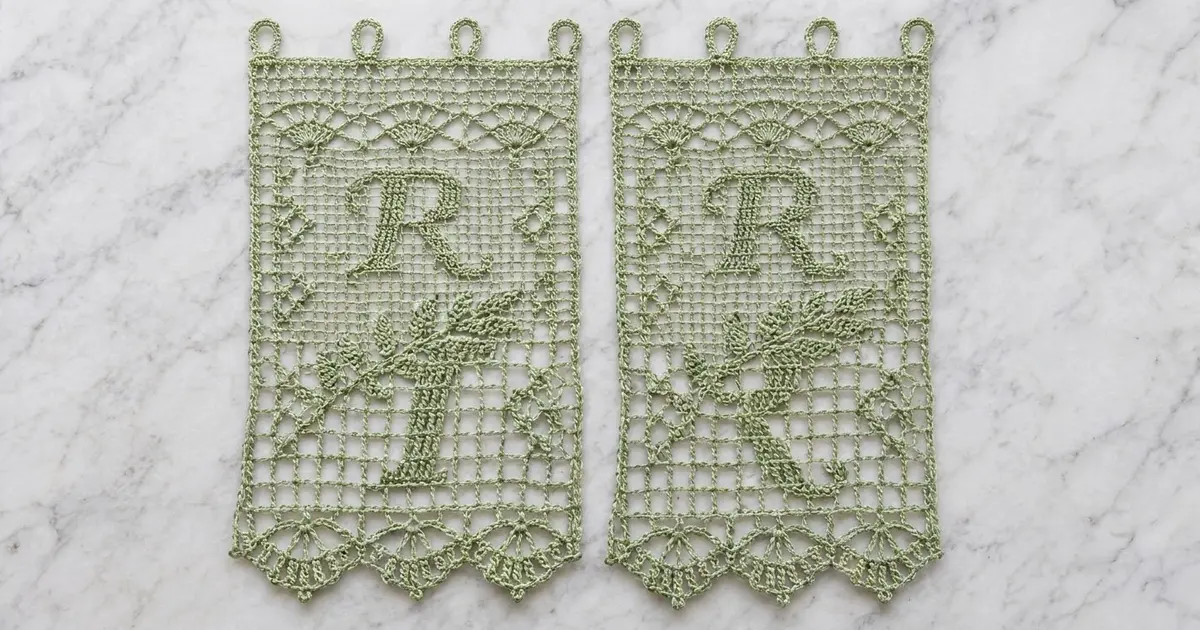
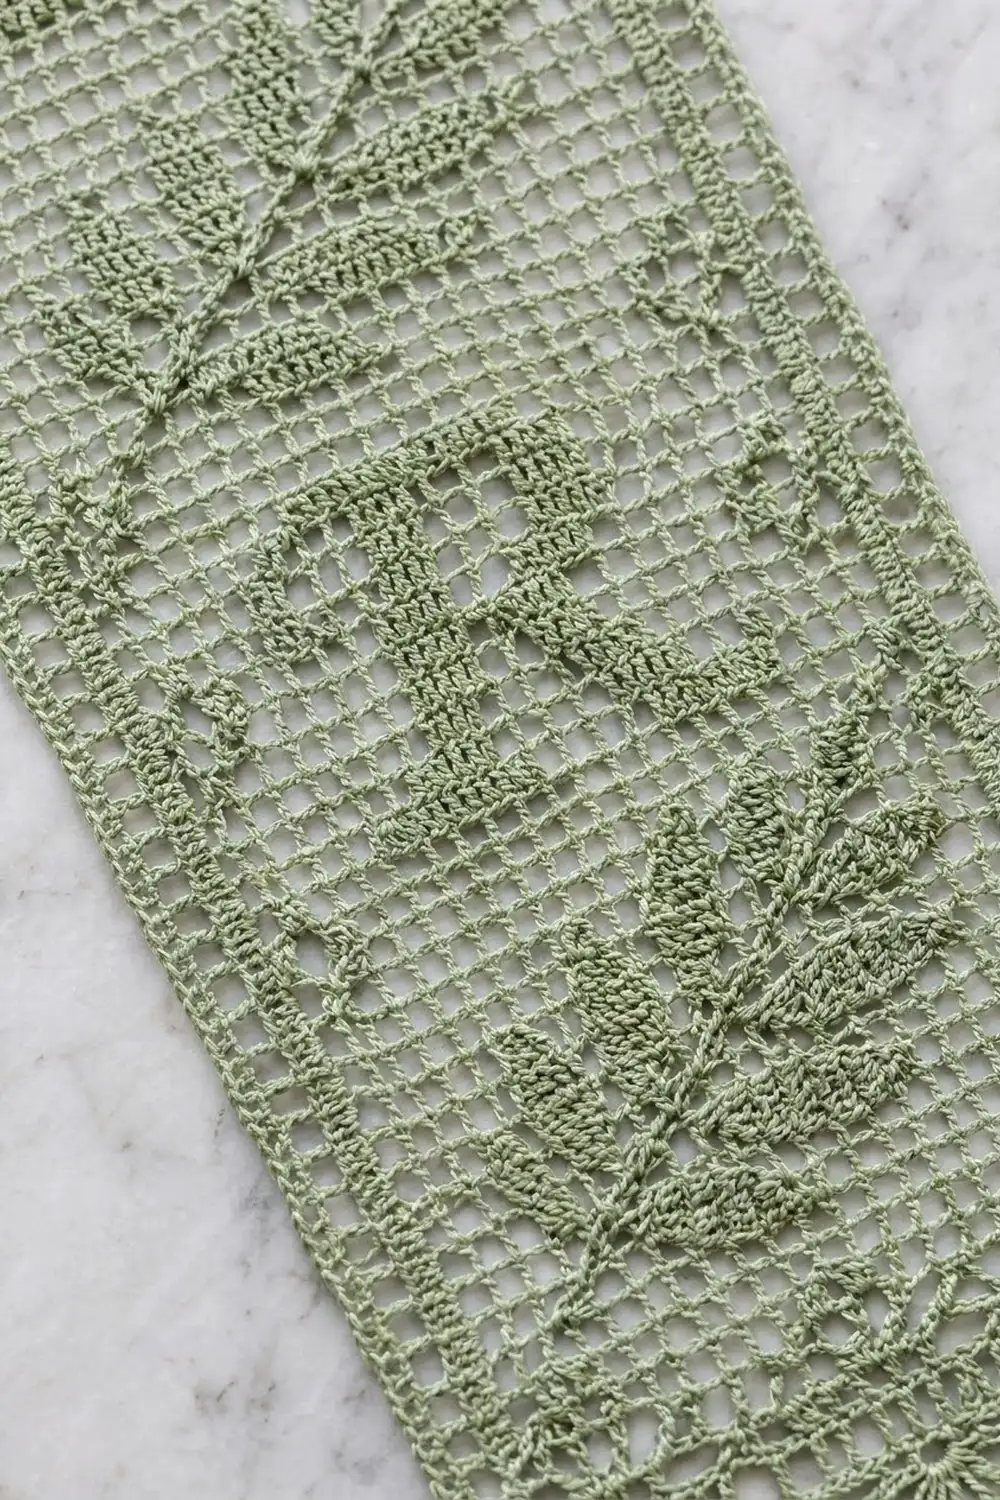
This pair of filet crochet curtain panels pairs a classic script “R” monogram with leafy sprigs, all worked in one soft sage green cotton thread. Each panel stacks three monograms and three diagonal leaf sprigs in alternating bands on an open mesh ground, framed by a solid block line on each long side.
The top of each panel has a band of small downward fans with four round hanging tabs above it. The bottom ends in four scallops, each one holding a fan of double crochets finished with picot shells. The look is light, vintage, and a little formal, and it suits a French door, a narrow window, or a pantry doorway.
The pattern uses US crochet terms. Each finished panel measures 14 in (35.6 cm) wide and 50 in (127.0 cm) long in the filet body. The scalloped edging adds 2.25 in (5.7 cm) and the tabs add 1.5 in (3.8 cm), for a total length of 53.75 in (136.5 cm).
Each panel is one piece worked flat from the bottom up in filet mesh. You then add a single crochet edge along both long sides, work the scalloped edging into the foundation chain, and work the tabs off the last row. Make two identical panels. They hang side by side and are not joined to each other.
Finished Size and Construction
- Finished size (each panel): 14 in x 53.75 in (35.6 cm x 136.5 cm) including edging and tabs
- Skill level: Intermediate
- Terminology: US
- Yarn weight: Size 3 cotton crochet thread (super fine)
- Hook: 2.0 mm
- Number of pieces: 2 identical panels, not joined
- Layout: Panels hang side by side on one rod
- Piece size before edging: 14 in x 50 in (35.6 cm x 127.0 cm), 42 mesh x 150 rows
- Border depth: 2.25 in (5.7 cm) scallops at the bottom, 1.5 in (3.8 cm) tabs at the top, and a single crochet side edge with no measurable added width
Materials
Use a mercerized cotton thread in size 3. The crisp twist shows the blocks and spaces clearly and blocks well. Avoid fuzzy or very stretchy fibers, because a long panel will sag under its own weight.
- Sage green: 300 g (about 960 m) for both panels, or 150 g (about 480 m) per panel
Tools:
- 2.0 mm crochet hook
- Tapestry needle
- Stitch markers
- Rustproof pins and a large blocking surface (at least 16 in x 56 in / 40.6 cm x 142.2 cm)
- Spray bottle and a measuring tape
The quantities above include a margin of about 10% for the gauge swatch and tension differences.
Abbreviations (US Terms)
- ch – chain
- sl st – slip stitch
- sc – single crochet
- dc – double crochet
- sk – skip
- sp – space
- st(s) – stitch(es)
- RS / WS – right side / wrong side
Special stitches
- Open mesh (space): ch 2, sk 2 sts, dc in next st.
- Block: dc in each of the next 3 sts. Over a space, work 2 dc in the ch-2 sp, then dc in the next dc.
- Picot: ch 3, sl st in 3rd ch from hook.
Every filet row has 127 sts: 42 mesh x 3 sts, plus 1 closing dc. The ch 3 at the start of each row counts as the first dc.
Gauge and Checkpoints
Gauge: 12 mesh and 12 rows = 4 in (10.2 cm) in filet mesh. That works out to 3 mesh and 3 rows per inch (2.5 cm).
Work a swatch first. Ch 39, dc in 4th ch from hook and in each ch across (37 sts, 12 blocks). Then work 11 rows of open mesh, block it, and measure the center.
Checkpoints (unblocked panels may run slightly shorter):
- After Row 1: 14 in (35.6 cm) wide
- After Row 26 (first leaf band): 8.67 in (22.0 cm) long
- After Row 70: 23.33 in (59.3 cm)
- After Row 136 (last monogram band): 45.33 in (115.1 cm)
- After Row 150: 50 in (127.0 cm)
If your swatch is too big, use a 1.75 mm hook. If it is too small, use a 2.25 mm hook. If only the height is off, change how far you pull up the first loop of each dc, not the hook size. Gauge mistakes add up over 150 rows: a mesh that is 1/32 in too tall makes the panel almost 5 in (12.7 cm) too long.
Reading the Grids
In the grids below, X is a block and . is an open mesh. The grids show only the motif columns. Work every motif row with one block at each side edge and open mesh in the rest of the field, as described in each band.
Read each grid from the bottom line up. Odd rows are RS rows, so read them right to left. Even rows are WS rows, so read them left to right.
Monogram grid (14 mesh x 18 rows):
..XXXXXXXXX...
.XX.XX....XX..
XX..XX.....XX.
X...XX.....XX.
....XX.....XX.
....XX....XX..
....XXXXXXX...
....XX..XX....
....XX...XX...
....XX...XX...
....XX....XX..
....XX....XX..
....XX.....XX.
....XX.....XX.
....XX......XX
...XXX......XX
..XXXX......XX
.XXXXXXX....XX
Leaf sprig grid (18 mesh x 18 rows):
...............XX.
............XX.XX.
.............XXX..
.........XX..XX...
...XX.....X.XX....
..XXXX....XXX..XX.
....XXX..XX..XXXX.
......XXXX..XXX...
..XX...XX..XX.....
.XXXX.XXX.XX......
...XXXXXXXX.......
......XXX.........
.....XXX..........
....XXX...........
...XX.............
..XX..............
.XX...............
XX................
Panel (Make 2)
Foundation: Ch 129.
Row 1 (RS, solid row): Dc in 4th ch from hook (the skipped 3 ch count as 1 dc) and in each ch across. Turn. (127 sts, 42 blocks)
Solid row: Ch 3, dc in each st across. Turn. (127 sts)
Open row: Ch 3, dc in next 3 sts (side block), ch 2, sk 2, dc in next st 40 times, dc in next 2 sts, dc in top of turning ch (side block). Turn. (127 sts: 2 blocks + 40 spaces)
Rows 2–4: Work 3 open rows.
Leaf Band (22 rows)
- 2 rows: Open rows.
- 18 rows: Side block, 11 open mesh, 18 mesh following the leaf grid, 11 open mesh, side block. (1 + 11 + 18 + 11 + 1 = 42 mesh)
- 2 rows: Open rows.
Monogram Band (22 rows)
- 2 rows: Open rows.
- 18 rows: Side block, 13 field mesh, 14 mesh following the monogram grid, 13 field mesh, side block. (1 + 13 + 14 + 13 + 1 = 42 mesh)
- Diamonds: In monogram grid rows 8, 9, and 10, work a small diamond in each 13-mesh field. On both sides, place it on field mesh 5–7, counting inward from the side block.
- Row 8: open, block, open
- Row 9: 3 blocks
- Row 10: open, block, open
- All other field mesh stay open.
- 2 rows: Open rows.
Body Sequence
- Rows 5–26: Leaf Band
- Rows 27–48: Monogram Band
- Rows 49–70: Leaf Band
- Rows 71–92: Monogram Band
- Rows 93–114: Leaf Band
- Rows 115–136: Monogram Band
Each grid starts on an odd (RS) row, because every band is 22 rows long and starts with 2 open rows.
Top Fan Band
- Rows 137–139: Open rows.
- Row 140: Solid row (WS).
- Rows 141–142: Open rows.
- Rows 143–145: Side block, then [4 open, 5-mesh fan] 4 times, 4 open, side block. (1 + 40 + 1 = 42 mesh)
- Row 143 fan: block, open, block, open, block
- Row 144 fan: open, 3 blocks, open
- Row 145 fan: 2 open, block, 2 open
- Rows 146–149: Open rows.
- Row 150: Solid row (WS). (127 sts) Do not fasten off; continue with the tabs in the Border section.
Make All Pieces
Make 2 panels in sage green, about 150 g (480 m) each. Both panels are identical, and the monogram faces correctly on the RS of each one.
[ Panel A ]  [ Panel B ]
  tabs x4      tabs x4
  R            R
  leaf         leaf
  R            R
  leaf         leaf
  R            R
  leaf         leaf
  scallops     scallops
Joining (Hanging the Pair)
The panels are not sewn to each other. Each one hangs from its own four tabs, and the pair meets at the center of the rod. Before you hang them, check that both panels have the same 150 rows and block to the same 14 in x 50 in (35.6 cm x 127.0 cm). Any difference shows clearly when they hang side by side. Keep your tension even on the tab rows so the four loops are the same size.
Border
Border gauge: About 9 sc = 1 in (2.5 cm) across the bottom and top. About 6 sc = 1 in (2.5 cm) along the sides.
Tabs (top edge)
Tab Row 1 (RS): Ch 1, sc in each st across. Turn. (127 sc)
Tab Row 2 (WS): Ch 1, sc in first 14 sc, ch 20, sk 3 sc, sc in next 29 sc 3 times, ch 20, sk 3 sc, sc in last 14 sc. Turn. (115 sc + 4 ch-20 loops)
Tab Row 3 (RS): Ch 1, sc in each sc and 30 sc in each ch-20 loop. Fasten off. (115 + 120 = 235 sts)
Why it works: 14 + 3 x (3 + 29) + 3 + 14 = 127. The tab centers fall on sts 16, 48, 80, and 112, which are 32 sts apart and mirror each other around st 64. Each finished loop fits a rod up to 3/4 in (1.9 cm) thick.
Side Edges
With RS facing, join the thread at the bottom of one long side. Work 2 sc around each row-end dc post from Row 1 to Row 150. Fasten off. (300 sc per side) Repeat on the other side.
Why it works: 150 rows x 2 sc = 300 sc. That is 6 sc per inch, the same as 3 rows per inch x 2, so the edge stays flat.
Bottom Scallop Edging
Row 1 (RS): With RS facing, join the thread in the first foundation ch at the right corner. Ch 1, then work 2 sc in the first ch, 1 sc in each of the next 125 ch, and 2 sc in the last ch. Turn. (127 + 2 = 129 sc)
Row 2 (WS): Ch 1, sc in first sc, ch 5, sk 7 sc, sc in next sc across. Turn. (16 ch-5 loops, 17 sc)
Row 3 (RS): Ch 1, sc in first sc. Then repeat the following 4 times: 5 sc in next loop, sc in next sc, ch 2, sk next loop, [dc, ch 1] 6 times in next sc, dc in same sc, ch 2, sk next loop, sc in next sc, 5 sc in next loop, sc in next sc. Turn. (4 fans of 7 dc, 121 sts including chains)
Row 4 (WS): Ch 1, sc in first sc, ch 4, sk next 6 sc. Then repeat the following 4 times: sc in ch-2 sp, [ch 3, sc in next ch-1 sp] 6 times, ch 3, sc in next ch-2 sp, ch 4, sk 6 sc, sc in next sc, and ch 4, sk 6 sc to start the next repeat. On the last repeat, end with sc in the last sc. Turn. (7 ch-3 sps per scallop, 8 ch-4 sps)
Row 5 (RS): Ch 1, sc in first sc. Then repeat the following 4 times: 4 sc in ch-4 sp, sk next sc, [(sc, dc, picot, dc, sc) in next ch-3 sp, sk next sc] 7 times, 4 sc in next ch-4 sp, sc in next sc. Fasten off. (28 picot shells)
Why it works: 129 = 4 x 32 + 1, so each scallop sits on exactly 32 sc. In Row 2, each scallop takes 4 loops (32 ÷ 8). Each fan grows from the center sc and spans the 2 loops it skips, which shapes the arch.
Final Blocking
- Weave in all ends along the solid block lines and side edges.
- Soak each panel in cool water for 15 minutes, then press out the water in a towel. Do not wring.
- Pin the body to 14 in x 50 in (35.6 cm x 127.0 cm). Pin both side edges straight first, then the top and bottom.
- Pin each scallop’s picot shells into a smooth arch. Pin the center of each tab into a round loop.
- Check that the mesh is square: 12 mesh should measure 4 in (10.2 cm) in both directions.
- Let the panel dry completely before you unpin it, then block the second panel to match.
Final Quality-Control Checklist
- Each filet row has 127 sts
- 150 rows, with 3 monograms and 3 leaf sprigs alternating, a monogram at the top
- Diamonds sit level with the middle of each monogram
- 4 top fans are evenly spaced, and the solid lines on Rows 1, 140, and 150 are straight
- Each side edge has 300 sc
- 4 even scallops with 7 picot shells each
- 4 tabs, 32 sts apart
- Both panels measure 14 in x 53.75 in (35.6 cm x 136.5 cm)
Troubleshooting
- Mesh leans or looks like diamonds: You may be skipping the wrong number of sts. Count 3 sts per mesh, every mesh.
- Monogram reads backwards: Read the RS rows right to left. Row 1 of each grid must fall on an odd row.
- Side edges ruffle: Work fewer sc per row-end, or use a smaller hook for the side edge.
- Scallops cup: Loosen the ch-3 and ch-4 spaces in Row 4.
- Panel grows too long when hung: Block it firmly, and use mercerized cotton rather than a softer blend.
Care
Hand wash in cool water with a mild detergent. Dry flat and re-pin the scallops; do not hang the panels while wet.

Final Notes
The measurements build in a chain. Three mesh per inch gives 42 mesh = 14 in (35.6 cm) wide. Three rows per inch gives 150 rows = 50 in (127.0 cm) long. The 127 bottom sts become 129 sc, which divide into 4 scallops of 32 sc each, and add 2.25 in (5.7 cm). The four tabs add 1.5 in (3.8 cm), for a total of 53.75 in (136.5 cm). Match your gauge on the swatch and both panels will match each other.
Happy crocheting!