

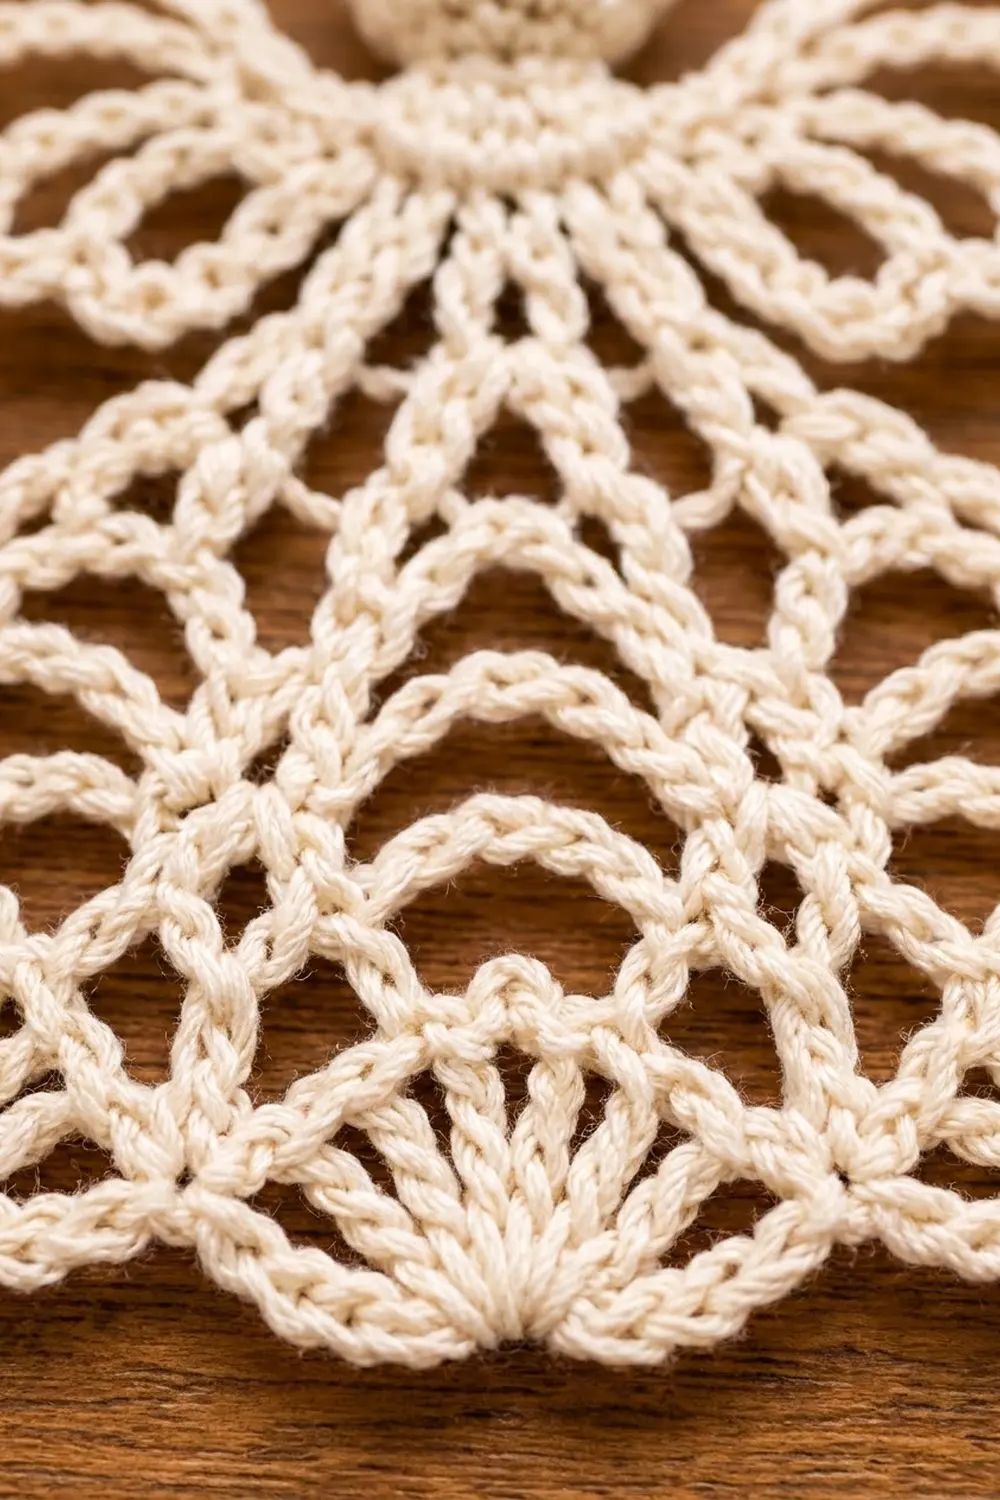
The Snowlace Angel is a small lace tree ornament. It has a round, solid head, butterfly wings made from nested chain loops, and a bell skirt that opens out from neat treble spokes into layered arches and a hem of scalloped fans. In one soft cream cotton it looks like vintage thread lace, but it works up much faster.
The pattern uses US crochet terms. The finished angel is 4.5 in (11.4 cm) wide at the hem and 4.5 in (11.4 cm) tall from the top of the head to the lowest point of the hem. The hanging loop adds 1.5 in (3.8 cm) above that.
The angel is one continuous piece. You crochet the head in the round and stuff it lightly. Then you turn at the neck and work the skirt flat in rows, finishing with the two-row scalloped hem border. Next you add the wings at each shoulder, and you chain the hanging loop last. There is nothing to sew together.
Make one angel first to check your gauge and stitch counts. After that, make as many as you like for the tree, for gift tags, or for a garland of single ornaments.
Finished Size and Construction
- Finished size: 4.5 in (11.4 cm) wide × 4.5 in (11.4 cm) tall, plus a 1.5 in (3.8 cm) hanging loop
- Wingspan: 4 in (10.2 cm) from wing tip to wing tip
- Skill level: Easy-intermediate
- Terminology: US
- Yarn weight: Sport (#2) cotton
- Hook: 2.5 mm (B/1–C/2)
- Number of pieces: 1 (worked in one continuous piece)
- Layout: Head on top, wings at the shoulders, skirt fanning downward
- Head size: 1 in (2.5 cm) diameter
- Size before border (after Row 5): 4 in (10.2 cm) wide × 3.75 in (9.5 cm) tall
- Border depth (Rows 6–7): 0.75 in (1.9 cm)
Materials
Yarn: Use a smooth, tightly plied mercerized cotton in sport weight. Mercerized cotton shows the stitches clearly and holds its shape well after blocking. Avoid fuzzy or very splitty yarns, because they blur the chain arches.
- Cream / ivory: 13 g, about 40 m (44 yd) per angel
This quantity includes a margin of roughly 20% for your gauge swatch, the tail ends, and the hanging loop.
Tools:
– 2.5 mm crochet hook
– A small pinch (about 1 g) of polyester fiberfill
– Tapestry needle
– Stitch marker
– Scissors
– Blocking mat and rust-proof pins
– Spray bottle with water
– Optional: liquid fabric stiffener or starch spray
Abbreviations (US Terms)
- ch – chain
- sl st – slip stitch
- sc – single crochet
- dc – double crochet
- tr – treble crochet
- inc – 2 sc in the same stitch
- dec – single crochet 2 together (invisible decrease recommended)
- sp – space
- st(s) – stitch(es)
- RS / WS – right side / wrong side
Special stitch – Fan: Work 9 dc into the same ch-5 arch.
Gauge and Checkpoints
Gauge: 24 sc and 26 rounds = 4 in (10.2 cm) in sc, worked tightly in the round. For lace, gauge matters most at the checkpoints below, so make one complete angel before starting a batch.
Checkpoints:
– After head Round 6: The ball measures 1 in (2.5 cm) across.
– After Row 1: The yoke is 1.75 in (4.4 cm) wide, measured straight across.
– After Row 3: The spokes spread to 2.75 in (7.0 cm) wide at their tips.
– After Row 5: The skirt is 4 in (10.2 cm) wide, and the angel is 3.75 in (9.5 cm) tall.
– After Row 7: The angel is 4.5 in (11.4 cm) wide × 4.5 in (11.4 cm) tall.
Too big? Go down to a 2.25 mm hook, or keep your chains tighter. Long chains are where loose tension adds the most width.
Too small? Go up to a 2.75 mm hook. If only the skirt is short, make sure your treble stitches are fully pulled up.
Pattern
Head (worked in the round)
Work in continuous spiral rounds. Do not join, and move the stitch marker up at the start of each round.
Round 1: 6 sc in a magic ring. (6 sts)
Round 2: Inc in each st around. (12 sts)
Round 3: [Sc in next st, inc] 6 times. (18 sts)
Rounds 4–6: Sc in each st around. (18 sts per round)
Checkpoint: the ball is 1 in (2.5 cm) across.
Round 7: [Sc in next st, dec] 6 times. (12 sts)
Stuff the head firmly enough to make a smooth sphere, but not so firm that the stitches gap.
Round 8: Dec 6 times. (6 sts)
Round 9 (neck): Sc in each st around. (6 sts)
Do not fasten off. Leave the magic-ring tail inside the head.
Skirt (worked flat in rows)
From this point you work back and forth in rows into the 6 neck stitches. Do not join the ends of the rows. The skirt opens into a flat fan below the head, and the gap at the back closes up when you block the piece.
Row 1 (yoke, growth row): Ch 3 (counts as dc), 2 dc in the same st, 3 dc in each of the next 4 sts, 2 dc in the last st. Turn. (17 dc)
Checkpoint: 1.75 in (4.4 cm) wide.
Row 2 (spokes): Ch 6 (counts as tr + ch 2), skip next dc, [tr in next dc, ch 2, skip next dc] 7 times, tr in the top of the turning ch. Turn. (9 tr, 8 ch-2 sps)
The 9 treble stitches sit on dc 1, 3, 5, 7, 9, 11, 13, 15 and 17, so the spokes are evenly spaced from edge to edge.
Row 3 (spoke extension, growth row): Ch 4 (counts as tr), [ch 3, tr in next tr] 8 times, working the last tr into the 4th ch of the turning ch. Turn. (9 tr, 8 ch-3 sps)
Checkpoint: 2.75 in (7.0 cm) wide at the spoke tips.
Row 4 (first arch row): Ch 1, sc in the first tr, [ch 5, sc in next tr] 8 times, working the last sc into the top of the turning ch. Turn. (9 sc, 8 ch-5 arches)
Row 5 (second arch row, growth row): Ch 1, sc in the first sc, [ch 5, sc in next ch-5 arch] 8 times, ch 5, sc in the last sc. Turn. (10 sc, 9 ch-5 arches)
This row moves each arch half a step over so it sits over the arches below. That offset is what gives the skirt its layered, overlapping look.
Checkpoint (size before border): 4 in (10.2 cm) wide × 3.75 in (9.5 cm) tall.
Border (Scalloped Hem)
The border is the two hem rows (Rows 6–7) worked straight on from the skirt. Only the hem edge gets a border. The slanted side edges of the skirt are left as they are, because the row ends of the spokes already make a neat lacy line.
Border gauge: One 9-dc fan, edged, spans about 0.9 in (2.3 cm) across its widest point. Five fans plus the narrow sc points give a hem of 4.5 in (11.4 cm).
Row 6 (fans): Ch 1, sc in the first sc, [Fan in next ch-5 arch, sc in next ch-5 arch] 4 times, Fan in the last ch-5 arch, sc in the last sc. Turn.
Count: 5 Fans (45 dc) + 6 sc = 51 sts.
Row 7 (picot outline): Ch 1, sc in the first sc, sc in the first dc of the next Fan, [ch 2, sc in next dc] 8 times, sc in the next sc. Repeat from * to * 4 more times. Do not turn. Fasten off. (51 sc, 40 ch-2 sps)
Count per Fan: 9 sc + 8 ch-2 sps. Count at the sc points: 6 sc. Total: 45 + 6 = 51 sc, which is one sc for every stitch in Row 6.
Why the math works: Row 5 has 9 arches, an odd number. Fans go into arches 1, 3, 5, 7 and 9, and sc points go into arches 2, 4, 6 and 8. Because the count is odd, a fan lands at each outer edge and one sits exactly at the center, so the hem is symmetrical. Row 7 works one sc into each Row 6 stitch, with no extras, so the outline lies flat without ruffling.
Wings (make 2, worked directly onto the angel)
The wings are crocheted onto the angel itself, so the ornament stays one piece. Each wing attaches at a shoulder, which is the side edge of Row 1.
Right wing: With the RS facing, join the yarn with a sl st around the post of the end dc of Row 1, on the right-hand side.
- Upper inner loop: Ch 10, sl st into the same place.
- Upper outer loop: Ch 16, sl st into the same place.
- Upper lobe outline: Working into the ch-16 loop, [sc, ch 3] 7 times, sc. Sl st into the base. (8 sc, 7 ch-3 sps)
- Lower inner loop: Ch 6, sl st into the base.
- Lower outer loop: Ch 10, sl st into the base.
- Lower lobe outline: Working into the ch-10 loop, [sc, ch 3] 5 times, sc. Sl st into the base. (6 sc, 5 ch-3 sps)
Fasten off.
Left wing: Join around the post of the end dc of Row 1 on the left side, and repeat steps 1–6.
The inner loops float inside the outlined lobes. Point the upper lobe up and out and the lower lobe down and out, so the wing reads as a butterfly shape. Each wing is about 1.5 in (3.8 cm) long, which gives a 4 in (10.2 cm) wingspan including the neck.
Optional: Tack the tip of each inner loop to the inside of its outline with one stitch. This keeps the loops from flipping over.
Hanging Loop
Join the yarn with a sl st into the center top of the head (the Round 1 area). Ch 30, then sl st into the same place. Fasten off. The loop doubles over to about 1.5 in (3.8 cm) tall.
Final Blocking
- Weave in all the ends along the skirt spokes or inside the head. Do not cut them short until after blocking.
- Spritz the angel until it is evenly damp. Do not wet the head enough to soak the stuffing.
- Lay the angel face up on the blocking mat.
- Pin the hem first: put one pin at the center of each of the 5 fans so the hem is a straight 4.5 in (11.4 cm) line.
- Pin each spoke tip so that the 9 trebles fan out evenly.
- Shape the wings. Pin the outer tip of each upper and lower lobe, and pin open several ch-3 picots on each lobe.
- Pin the center of every ch-5 arch in Rows 4–5 so the arches curve smoothly downward.
- If you want a stiffer ornament, apply starch or fabric stiffener now.
- Let the angel dry completely, which takes 6–12 hours, then unpin it and trim the ends.
Final Quality-Control Checklist
- [ ] The head is round, firm, and 1 in (2.5 cm) across, with no stuffing showing.
- [ ] Row 1 has 17 dc.
- [ ] Rows 2–3 each have 9 tr spokes.
- [ ] Row 4 has 8 arches, and Row 5 has 9 arches.
- [ ] Row 6 has 5 fans of 9 dc each and 6 sc (51 sts).
- [ ] Row 7 has 51 sc and 40 ch-2 sps.
- [ ] The wings match: the upper lobes have 8 sc each and the lower lobes have 6 sc each.
- [ ] The angel measures 4.5 in (11.4 cm) wide × 4.5 in (11.4 cm) tall.
- [ ] The hanging loop is secure and centered.
Troubleshooting
The hem ruffles. Your fans are too loose. Work the dc tighter, or drop to a 2.25 mm hook for Rows 6–7 only.
The hem cups upward. The ch-5 arches are too tight. Loosen your chain tension, or work ch 6 for each arch in Row 5.
The skirt is lopsided. Count your Row 5 arches. An even number puts a fan off-center.
The spokes look uneven. Check that each tr in Row 2 sits on an odd-numbered dc of Row 1.
The head wobbles on the neck. Stuff the head a little more firmly before Round 8 so it holds its shape.
The wings droop. Starch the wings, or tack the inner loops in place.
Holes appear at the neck. Use invisible decreases in Rounds 7–8, and keep Round 9 tight.
Care
Hand wash in cool water with a mild soap, press out the water in a towel, and re-block flat to dry. Store the angel flat or in tissue between seasons so the wings and arches keep their shape.

Final Notes
Each stage has its own measurement. The head is 1 in (2.5 cm). The Row 1 yoke is 1.75 in (4.4 cm). The spoke tips in Row 3 reach 2.75 in (7.0 cm). After Row 5 the skirt is 4 in (10.2 cm) wide and 3.75 in (9.5 cm) tall. The border adds 0.75 in (1.9 cm), which brings the angel to its finished 4.5 in (11.4 cm) square silhouette. If each checkpoint matches, the finished size will too. Once your first angel passes the checklist, every later one comes out the same, ready to hang on the tree in a row of snowy lace.
Happy crocheting!