

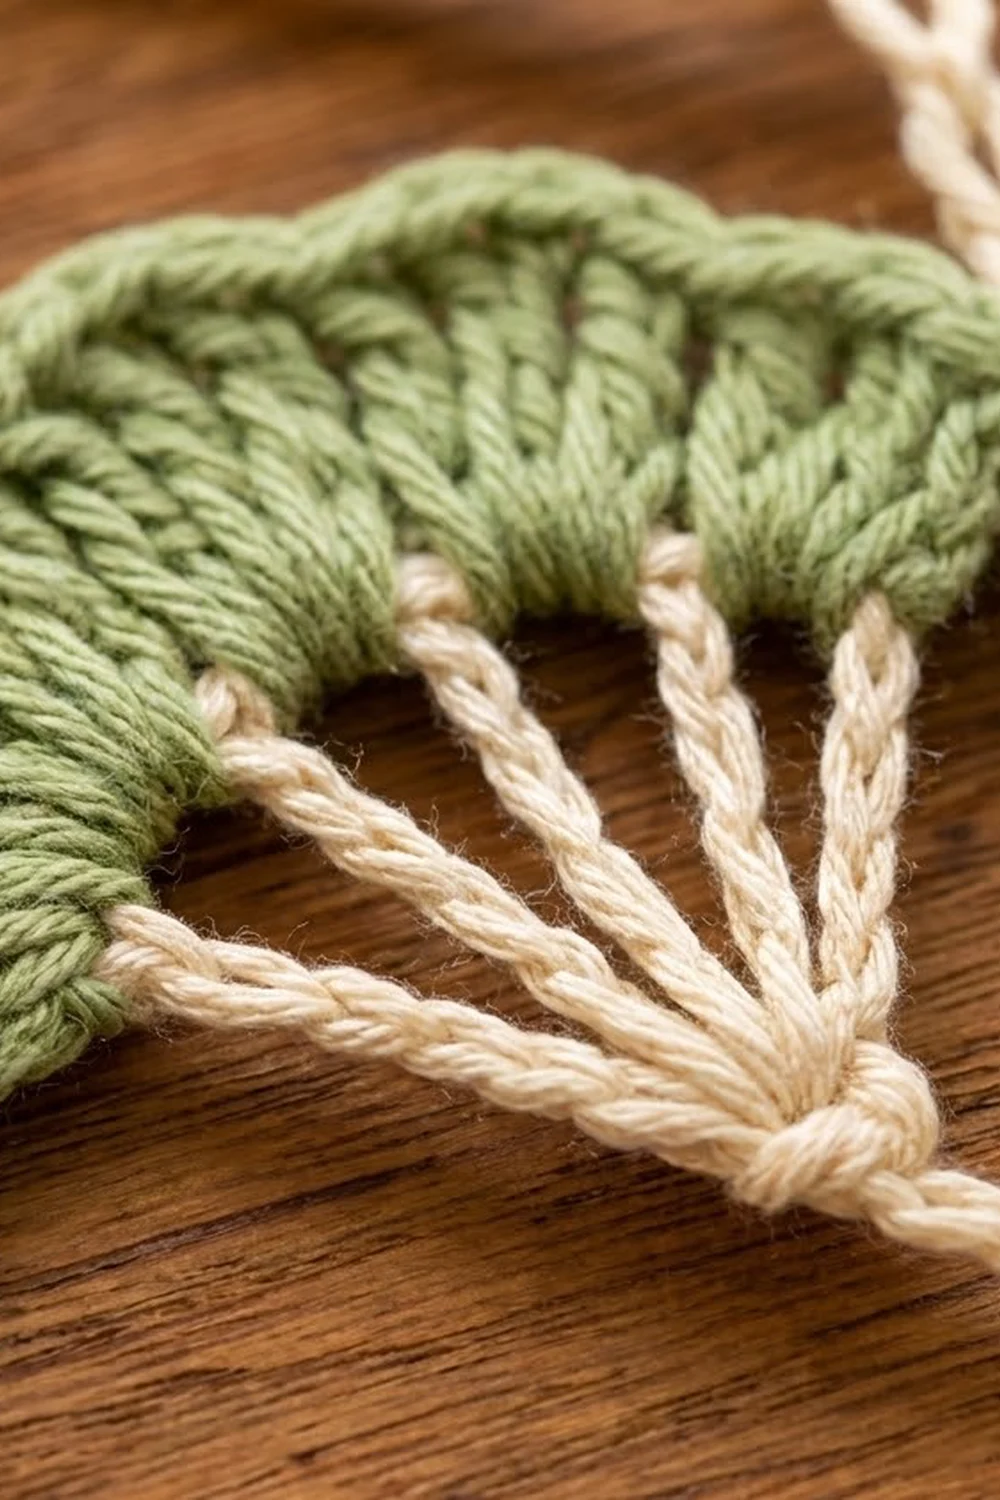
The Ginkgo Spray Table Runner is a light, airy strip of paired fan leaves on a slim chain spine. Each leaf opens like a ginkgo: long cream spokes spread from a small ring and end in a sage green scalloped crescent. It looks delicate and botanical, and it works well down the middle of a table, on a shelf edge, or hung from its top loop.
The palette is two calm colors. Cream forms the structure (spine, stems, rings, spokes and arcs). Sage green forms the leaf edges. This pattern uses US crochet terms throughout.
The finished runner measures 7.5 in (19.1 cm) wide by 20 in (50.8 cm) long, including the hanging loop. There are seven leaf pairs, 14 leaves in total.
The whole runner is one continuous piece. You chain down the spine and build each leaf on the way. You then slip stitch back up the spine to firm it. Finally, you add the green edging to each fan, which acts as the runner’s border.
Finished Size and Construction
- Finished size: 7.5 in (19.1 cm) wide × 20 in (50.8 cm) long
- Skill level: Intermediate (long stitches, working back along chains)
- Terminology: US
- Yarn weight: DK / light worsted (#3) cotton
- Hook: 4.0 mm (G-6)
- Number of pieces: 1 continuous piece
- Layout: 1 vertical spine with 7 leaf pairs (14 leaves)
- Single leaf size (finished): 3.5 in (8.9 cm) wide × 2 in (5.1 cm) tall
- Size before green edging: 6.5 in (16.5 cm) wide × 20 in (50.8 cm) long
- Edging depth: 0.5 in (1.3 cm) at the center of each fan, tapering to nothing at the ends
Materials
Use a smooth, mercerized or combed cotton in DK weight. Cotton holds the open spokes crisply after blocking and does not fuzz over the chain lines. Avoid fluffy or very stretchy acrylics. They make the spine sag and the fans curl.
- Cream (Color A): about 30 g / 69 m
- Sage green (Color B): about 35 g / 80 m
These amounts include roughly a 15% margin for your gauge test and weaving in the ends.
Tools:
- 4.0 mm (G-6) crochet hook
- Tapestry needle
- Scissors
- Rust-proof pins and a blocking mat
- Spray bottle, and light spray starch (optional)
- Measuring tape
Abbreviations (US Terms)
- ch – chain
- sl st – slip stitch
- sc – single crochet
- hdc – half double crochet
- dc – double crochet
- dtr – double treble crochet
- sp(s) – space(s)
- st(s) – stitch(es)
- RS – right side
- [ ] – repeat the instructions in brackets the stated number of times
Special stitch – double treble crochet (dtr): Yarn over 3 times. Insert the hook in the stitch or ring and pull up a loop (5 loops on hook). Then [yarn over, pull through 2 loops] 4 times.
Scallop: (hdc, dc, hdc) all worked in the same stitch.
Gauge and Checkpoints
Chain gauge: 16 ch = 4 in (10.2 cm), measured relaxed.
Test one leaf first. Chain 10 and make one complete leaf (Rounds 1–2 in cream, then Rows 3–4 in green) before you start the runner. Check these numbers:
- After cream Row 1: each dtr spoke is about 1.25 in (3.2 cm) long. From the ring to the spoke tips is about 1.5 in (3.8 cm).
- After cream Row 2: the arc is about 4 in (10.2 cm) along its curve. The fan measures 3 in (7.6 cm) straight across.
- After green Row 4: the leaf is 3.5 in (8.9 cm) wide and 2 in (5.1 cm) tall.
If your leaf is too big, go down to a 3.5 mm hook, or tighten the yarn-overs on the dtr spokes. If it is too small, go up to a 4.5 mm hook. Pull up the first loop of each dtr a little taller.
Spine gauge matters most for length. A 10-ch spine segment should measure 2.5 in (6.4 cm) before the return row.
Part 1: Hanging Loop and Spine Start
Use Color A (cream).
Hanging loop: Ch 8 and sl st in the first ch to form a ring. Laid flat, the loop is 1 in (2.5 cm) long.
First spine segment: Ch 12. This segment is 3 in (7.6 cm) long, and it leaves room for the first pair of fans to open below the loop.
Part 2: The Leaf (Make 1 Left and 1 Right at Each Pair)
Each leaf grows out of the last spine chain you made. Work it as follows.
Stem and ring: Ch 10. Sl st in the 4th ch from the hook to form a small ring. This leaves 6 stem chains between the ring and the spine, which is 1.5 in (3.8 cm).
Row 1 (spokes): Ch 5 (counts as the first dtr). [Ch 3, dtr in ring] 6 times.
Count: 7 dtr spokes and 6 ch-3 sps.
The spokes spread into a fan of a little more than a half circle. Do not crowd the ring. Push the stitches around it as you work.
Row 2 (cream arc): Ch 1 and turn. Sc in the top of the first dtr. [3 sc in the next ch-3 sp, sc in the next dtr] 6 times, working the last sc in the 5th ch of the beginning ch-5.
Count: 1 + (6 × 4) = 25 sc.
This row forms the smooth cream arc across the spoke tips.
Return to the spine: Sl st in each of the next 4 ch of the beginning ch-5, working down toward the ring. Sl st in the ring. Sl st in each of the 6 stem chains. Sl st in the spine chain at the base of the stem.
You are now back on the spine, and the leaf is complete in cream.
Second leaf of the pair: Repeat the stem, ring, Row 1, Row 2 and the return exactly as above, from the same spine chain. You will flip this leaf during blocking so the two fans mirror each other.
Part 3: Completing the Spine
After Pair 1, work as follows.
- Segments: [Ch 10, make a leaf pair] 6 times. This gives Pairs 2–7.
- Tail: Ch 4. This 1 in (2.5 cm) tail ends the spine below the last pair.
Spine chain total: 12 + (6 × 10) + 4 = 76 ch, not counting the 8-ch hanging loop.
Return row (spine reinforcement): Turn. Sl st in the back bump of each spine chain, working up to the top. Skip the stem chains, and slip over each stem junction without working into the stems. That makes 76 sl st. Then sl st in the base of the hanging loop. Fasten off.
The return row doubles the spine. It gives the braided look and stops the runner from stretching lengthwise.
Checkpoint:
- Spine length: 1 in (2.5 cm) loop + 3 in (7.6 cm) + 15 in (38.1 cm) + 1 in (2.5 cm) = 20 in (50.8 cm).
- Width: with the cream fans spread out, the width is about 6.5 in (16.5 cm). That is two 3 in (7.6 cm) fans plus about 0.5 in (1.3 cm) at the spine.
If the spine is more than 0.5 in (1.3 cm) short, your return row is too tight. Pull it out and redo it with a looser hand, or with a hook one size larger.
Part 4: Border – Green Leaf Edging
The green crescent on each leaf is this runner’s border. It is the only edging, and it defines the finished outline. Work it separately on all 14 leaves, always into the 25-sc cream arc.
Edging gauge: Rows 3–4 together add 0.5 in (1.3 cm) of depth at the fan center, and 0.25 in (0.6 cm) of width at each end.
Row 3 (crescent): With RS of the arc facing, join Color B with a sl st in the first sc of Row 2. Then work: sc in next sc, hdc in next sc, [dc in next 2 sc, 2 dc in next sc] 6 times, dc in next sc, hdc in next sc, sc in next sc, sl st in last sc.
Stitches used: 1 + 1 + 1 + 18 + 1 + 1 + 1 + 1 = 25 cream sc, one per existing stitch.
Count: 25 stitches worked one per sc + 6 increase stitches = 31 sts.
Row 4 (scallop edge): Ch 1 and turn. Sc in the first 4 sts. [Scallop in next st, sl st in next st] 11 times. Scallop in next st. Sc in the last 4 sts.
Count check: 4 + 22 + 1 + 4 = 31 sts worked into, which gives 12 scallops.
Fasten off, leaving a 4 in (10.2 cm) tail. Weave the tail into the green stitches only, so it does not show across the cream spokes.
Why the math works:
- The 25 sc arc has 4 sc per spoke section plus 1 starting sc.
- Row 3 keeps the outer 3 stitches at each end short (sl st, sc, hdc), so the crescent tapers. All 6 increases go into the dc center, so the band widens only where the fan is widest. That gives the 31 stitches.
- The 31 stitches split evenly as 4 + 23 + 4. That centers the 12 scallops on the leaf and lets both ends taper the same way.
- The extra 6 stitches on a 4 in (10.2 cm) arc are just enough to let the band lie flat around the outside curve without ruffling.
Edging order: Work the top pair first and move down the runner, finishing both leaves of a pair before you start the next pair. On the right-hand leaf of each pair, join at the end of the arc that mirrors the left-hand leaf, so the edging on both fans looks the same.
Final Blocking
- Weave in all the ends: 2 cream ends on the spine and 28 green ends. Do not trim any end closer than 0.25 in (0.6 cm).
- Mist the runner evenly until it is damp, not soaking.
- Pin the hanging loop at the top of your blocking mat. Pin the spine tail so the spine is straight and exactly 20 in (50.8 cm) long.
- Angle each stem up and out from the spine at about 45 degrees.
- Open each fan. Pin the ring, then pin the tip of each of the 7 spokes so the spokes are evenly spaced and straight.
- Pin the green crescent at its center and both ends. Each leaf should be 3.5 in (8.9 cm) wide and 2 in (5.1 cm) tall.
- Check the runner width at every pair: 7.5 in (19.1 cm).
- Spray lightly with starch if you want crisp spokes. Leave it to dry completely before you unpin it.
Final Quality-Control Checklist
- 7 leaf pairs, 14 leaves in total
- Every leaf has 7 cream spokes and a 25-sc arc
- Every green edging has 31 stitches in Row 3 and 12 scallops in Row 4
- Spine segments between pairs are evenly 2.5 in (6.4 cm)
- Total length is 20 in (50.8 cm) including the loop
- Width is 7.5 in (19.1 cm) at every pair
- The left and right fans of each pair mirror each other
- No green tails show across the cream spokes
- The hanging loop is firm and centered
Troubleshooting
- Fans cup instead of lying flat: Your ch-3 sps are too tight. Loosen them, or work 4 sc instead of 3 in the outer two spaces only. Then adjust Row 3 by working dc instead of 2 dc in the last repeat, to keep 31 stitches.
- Green crescent ruffles: Your tension is too loose for the 6 increases. Use a hook 0.5 mm smaller for the green rows only.
- Spokes twist: Block wet and pin each spoke tip on its own.
- Spine too short or puckered: The return row is too tight. Redo it with a larger hook.
- Leaves droop downward: The stems are too long or loose. Re-block at 45 degrees and starch them.
- Uneven pair spacing: Count each 10-ch segment before you start a leaf. Mark the spine chain with a stitch marker.
Care
Hand wash cold with mild soap. Roll the runner in a towel to remove water, then reshape and dry it flat, pinning again if needed.

Final Notes
The measurements build on each other from the hook outward. The chain gauge of 16 ch = 4 in (10.2 cm) sets the spine: a 1 in (2.5 cm) loop, a 3 in (7.6 cm) start, six 2.5 in (6.4 cm) segments and a 1 in (2.5 cm) tail, for a length of 20 in (50.8 cm).
Each cream fan has 7 spokes and a 25-sc arc, and it measures 3 in (7.6 cm) across. The two fans of a pair plus the spine make the 6.5 in (16.5 cm) width before the edging. The 31-stitch green crescent adds 0.25 in (0.6 cm) at each end of every fan, which brings each leaf to 3.5 in (8.9 cm) and the runner to its finished 7.5 in (19.1 cm) width. If you hit each checkpoint along the way, the finished runner will lie flat, straight and evenly spaced.
Happy crocheting!