
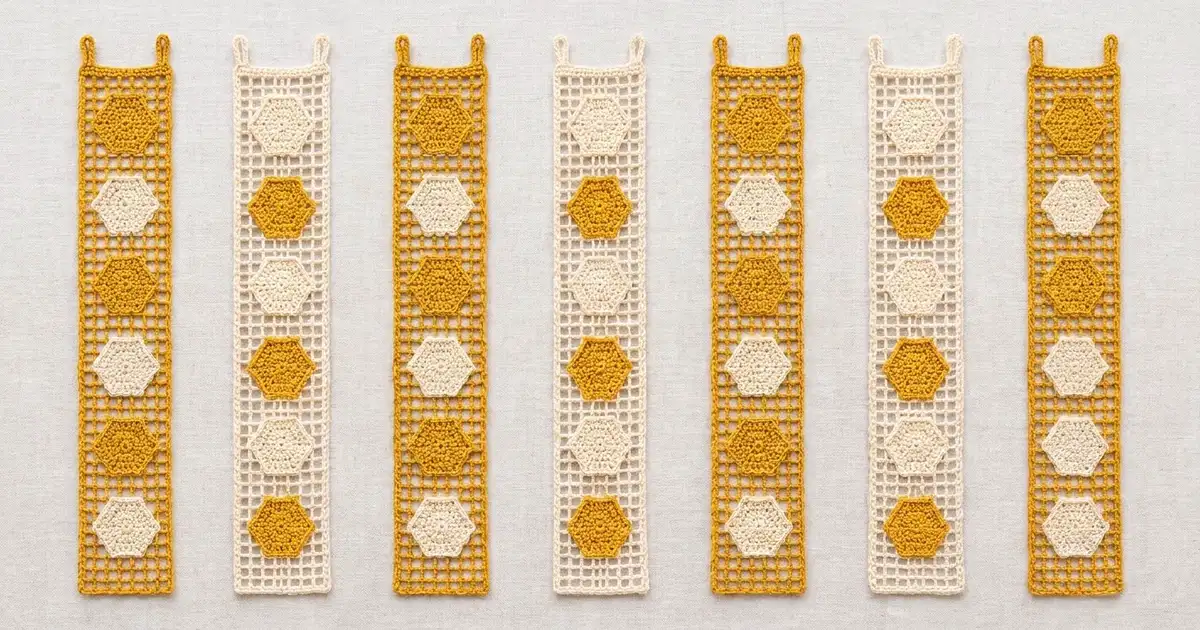
This door curtain is made of seven long filet mesh strips, each decorated with a column of solid crochet hexagons. Mustard and cream panels alternate across the rod, and the hexagons alternate color down each strip. The whole doorway reads like a soft honeycomb grid with light passing through.
The style is airy and graphic: open square mesh, crisp single-crochet edges, and flat hexagons with clear spoke lines. Every panel hangs on its own, so you can walk through the curtain easily and the strips fall back into place.
The pattern uses US crochet terms. Each finished panel measures 7.25 in x 78.5 in (18.4 cm x 199.4 cm), plus loop tabs about 2 in (5.1 cm) tall. Seven panels side by side cover about 50.75 in (128.9 cm).
Construction is simple. You work each panel as a rectangle of filet mesh from the bottom up, add one round of single-crochet border, then add two tabs. The hexagons are worked separately in rounds and sewn onto the mesh in fixed row positions.
Finished Size and Construction
- Panel size: 7.25 in x 78.5 in (18.4 cm x 199.4 cm), tabs extra
- Skill level: Easy-intermediate
- Terminology: US
- Yarn weight: DK (light #3) cotton or cotton blend
- Hook: 4.0 mm (G-6)
- Number of pieces: 7 panels + 77 hexagons
- Layout: 7 panels hung side by side, not joined; 11 hexagons per panel in one centered column
- Hexagon size: 4.5 in (11.4 cm) flat side to flat side, 5.2 in (13.2 cm) point to point
- Panel size before border: 6.75 in x 78 in (17.1 cm x 198.1 cm)
- Border depth: 0.25 in (0.6 cm), one round of sc
Materials
Choose a smooth, mercerized or matte DK cotton. Cotton hangs straight, resists stretching, and shows the mesh clearly. Avoid fuzzy yarns, which blur the squares. The amounts below assume about 100 m per 50 g.
- Mustard yellow: 650 g, about 1,300 m (4 panels + 39 hexagons)
- Cream: 550 g, about 1,100 m (3 panels + 38 hexagons)
These amounts include a margin of roughly 10–15 percent for gauge differences and swatching.
Tools:
- 4.0 mm (G-6) crochet hook
- Tapestry needle
- Locking stitch markers
- Rustproof pins
- Measuring tape
- Blocking surface long enough for a panel, or a clean floor with towels
- Spray bottle
- Curtain rod up to 1 in (2.5 cm) diameter
Abbreviations (US Terms)
- ch – chain
- sl st – slip stitch
- sc – single crochet
- dc – double crochet
- sk – skip
- sp – space
- st(s) – stitch(es)
- t-ch – turning chain
Mesh square: one dc post plus the ch-2 space beside it, closed by the next dc post. Each square is 3 sts wide.
Gauge and Checkpoints
Mesh gauge: 4 squares and 4 rows = 3 in (7.6 cm). One square is 0.75 in (1.9 cm) wide and tall.
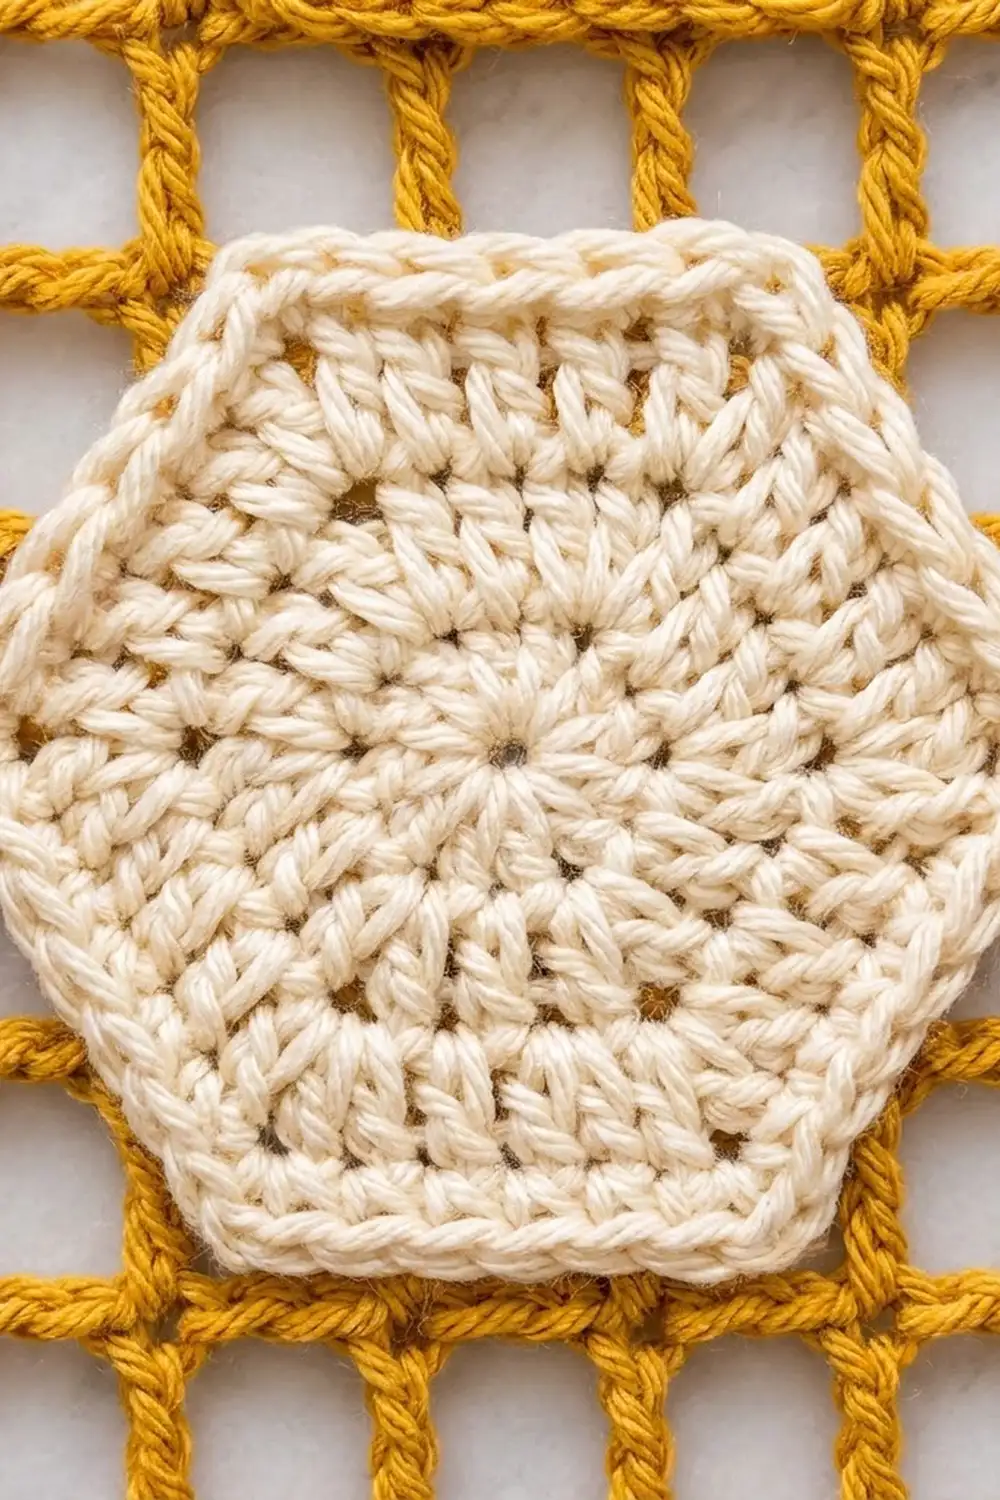
Hexagon gauge: Rounds 1–4 = 4 in (10.2 cm) flat to flat.
Test one piece first. Make one hexagon, then start your first panel and stop after Row 8.
- Hexagon after Round 2: about 2 in (5.1 cm) flat to flat
- Hexagon after Round 4: 4 in (10.2 cm)
- Hexagon after Round 5: 4.5 in (11.4 cm)
- Panel after Row 8: 6.75 in (17.1 cm) wide, 6 in (15.2 cm) tall
- Panel after Row 52: 39 in (99.1 cm) tall
- Panel after Row 104: 78 in (198.1 cm) tall
If your pieces are too big, go down 0.5 mm. If they are too small, go up 0.5 mm. Row height is what usually goes wrong in filet, so measure the height carefully. If the width matches but the rows come out short, lengthen each dc slightly by pulling the first loop up a little taller.
Panel (Make 7: 4 Mustard, 3 Cream)
Work flat, from the bottom edge up. The ch-5 at the start of each row counts as 1 dc + ch 2.
Foundation: Ch 32.
Row 1: Dc in 8th ch from hook, ch 2, sk 2 ch, dc in next ch; repeat from * 7 more times. Turn. (10 dc posts counting the skipped ch, 9 ch-2 sps = 9 squares, 28 sts across)
Row 2: Ch 5, dc in next dc, ch 2, dc in next dc; repeat from * 7 more times, working the last dc in the 3rd ch of the t-ch. Turn. (9 squares, 28 sts)
Rows 3–104: Repeat Row 2. (9 squares, 28 sts in every row)
Do not fasten off. Continue to the border.
Check: The panel is 6.75 in x 78 in (17.1 cm x 198.1 cm). Mark every 10th row, because a missing row will shift the hexagon positions.
Hexagon (Make 77: 39 Mustard, 38 Cream)
Work in joined rounds without turning, right side always facing.
Round 1: Make a magic ring. Ch 3 (counts as dc), dc in ring, ch 2, 2 dc in ring, ch 2; repeat from * 4 more times. Sl st to top of ch-3. (12 dc, 6 ch-2 sps)
Round 2: Ch 3 (counts as dc), dc in next dc, (dc, ch 2, dc) in ch-2 sp, dc in each of next 2 dc; repeat from * 4 more times, (dc, ch 2, dc) in last ch-2 sp. Sl st to top of ch-3. (24 dc: 4 per side, 6 ch-2 sps)
Round 3: Ch 3, dc in each dc to the first ch-2 sp, (dc, ch 2, dc) in ch-2 sp, dc in each dc to next ch-2 sp; repeat around, ending with (dc, ch 2, dc) in the last sp. Sl st to top of ch-3. (36 dc: 6 per side)
Round 4: Repeat Round 3. (48 dc: 8 per side)
Round 5 (edge round): Ch 1, sc in each dc, and work 3 sc in each ch-2 sp. Sl st to first sc. (48 sc + 18 corner sc = 66 sc; 12 per side counting both corner sts)
Fasten off, leaving a 24 in (61.0 cm) tail for sewing. The dc stacked at each corner create the spoke lines.
Check: 4.5 in (11.4 cm) flat to flat, 5.2 in (13.2 cm) point to point.
Make All Pieces
Mustard panel (make 4): mustard mesh. Hexagons in positions 1, 3, 5, 7, 9 and 11 are mustard (6); positions 2, 4, 6, 8 and 10 are cream (5).
Cream panel (make 3): cream mesh. Positions 1, 3, 5, 7, 9 and 11 are cream (6); positions 2, 4, 6, 8 and 10 are mustard (5).
Totals: 4 mustard panels, 3 cream panels, 39 mustard hexagons (24 + 15), 38 cream hexagons (20 + 18).
Layout on the rod (left to right, M = mustard, C = cream):
M C M C M C M
Hexagon column on every panel (top to bottom):
Hex 1   own color      rows 95–100
Hex 2   contrast       rows 86–91
Hex 3   own color      rows 77–82
Hex 4   contrast       rows 68–73
Hex 5   own color      rows 59–64
Hex 6   contrast       rows 50–55
Hex 7   own color      rows 41–46
Hex 8   contrast       rows 32–37
Hex 9   own color      rows 23–28
Hex 10  contrast       rows 14–19
Hex 11  own color      rows 5–10
Row math: 4 margin rows + 11 hexagons x 6 rows + 10 gaps x 3 rows + 4 margin rows = 104 rows.
Joining (Sewing Hexagons to the Mesh)
The panels are not joined to each other. The only joining step is appliqué: sewing each hexagon flat onto its panel.
Placement: Each hexagon covers exactly 6 rows, because 4.5 in (11.4 cm) divided by 0.75 in (1.9 cm) is 6. Its flat bottom edge sits on the top of the row just below its range. Its flat top edge sits on the top of the last row in its range. Center it side to side: the 5.2 in (13.2 cm) width leaves about 0.75 in (1.9 cm), or one square, of open mesh on each side.
Method: Pin the hexagon at all six corners. With its own tail, whipstitch through the back loop of every second edge sc and around the nearest mesh bar or post underneath. That gives 6 tacks per side and 36 tacks per hexagon, plus an extra tack at each corner sc.
Stitch-to-stitch logic: The flat top and bottom sides each lie along the top of one mesh row, so tack them into the dc posts and chains directly underneath. The four slanted sides cross the mesh diagonally. Tack each one to whichever post or chain falls under that sc.
Tension: Sew loosely enough that the mesh stays square. If the squares under a hexagon pull into diamonds, your stitches are too tight.
Size checkpoint: After sewing, the panel should still measure 6.75 in (17.1 cm) wide at every hexagon. Sew with each hexagon’s own tail so the stitches blend in.
Border
Border gauge: 4 sc = 1 in (2.5 cm), both across the top and along the sides.
Round 1: Right after Row 104, ch 1 and do not turn.
- Top edge: 3 sc in the first dc post (corner), 2 sc in next ch-2 sp, sc in next dc; repeat from * 7 more times, 2 sc in last ch-2 sp, 3 sc in the t-ch (corner). (30 sc counting both corner sts)
- First long side: Work 3 sc around each row-end post of Rows 103 down to 2. (306 sc; side total 310 counting both corner sts)
- Bottom edge: 3 sc in first free loop of the foundation ch (corner), sc in each of next 26 free loops, 3 sc in last free loop (corner). (30 sc counting both corner sts)
- Second long side: 3 sc around each row-end post of Rows 2 to 103. (306 sc; side total 310)
Sl st to first sc. (676 sc total: 28 + 308 + 28 + 308 between corners, plus 4 corner sts)
Why the math works: Each square is 3 sts wide and 0.75 in (1.9 cm). Three sc at 4 per inch also fill 0.75 in, so the top and bottom get 3 sc per square and the sides get 3 sc per row. The edge neither ruffles nor pulls in. Rows 1 and 104 are covered by the corner groups, which is why the sides cover 102 row ends.
Tabs (make 2 per panel): Number the top-edge sc 1 to 30, with 1 and 30 as the corners.
- Tab 1: Sl st in sc 3, ch 18, sk sc 4–7, sl st in sc 8. Turn, work 26 sc into the ch-18 loop, sl st in sc 3. Fasten off.
- Tab 2: Work the same from sc 23 to sc 28.
Each tab stands about 2 in (5.1 cm) tall and fits a 1 in (2.5 cm) rod. Weave in all ends.
Check: 7.25 in x 78.5 in (18.4 cm x 199.4 cm), tabs extra.
Final Blocking
- Weave in every end before blocking, including the hexagon tails.
- Lay the panel right side up on a long towel-covered surface.
- Spray until evenly damp, not soaked.
- Pin the corners to 7.25 in x 78.5 in (18.4 cm x 199.4 cm).
- Pin along each long side every 6 in (15.2 cm), keeping the edge straight.
- Nudge the mesh into true squares, especially around each hexagon.
- Flatten each hexagon with your palm and check that its corners are sharp.
- Let it dry completely, then hang the panel for a day so gravity evens out the length.
Final Quality-Control Checklist
- Every panel has 104 rows and 9 squares per row
- Border Round 1 has 676 sc: top and bottom 30 each, sides 310 each
- Each hexagon has 66 edge sc and measures 4.5 in (11.4 cm) flat to flat
- Hexagons sit in the listed rows, centered with one open square on each side
- Hexagon colors alternate, starting and ending with the panel’s own color
- Tabs are mirrored at sc 3–8 and sc 23–28
- All panels match in length within 0.5 in (1.3 cm)
- No ends show on the front
Troubleshooting
Mesh leans or slants: You may be working the last dc into the wrong ch of the t-ch. Always use the 3rd ch.
Squares are tall rectangles: Your dc are too tall. Tighten the yarn-over or go down a hook size.
Hexagon cups: The corners are too tight. Make the ch-2 slightly looser.
Hexagon ruffles: Check the count per side. Each round adds exactly 2 dc per side.
Border waves: You worked more than 3 sc per row end. Rip back and recount.
Panels hang at different lengths: Count the rows, then re-block the short panel and hang it with a weight overnight.
Tab twists: Make sure you skipped exactly 4 sc and worked all 26 sc on the same side of the loop.
Care
Hand wash in cool water with mild soap, press the water out in a towel, and dry flat, reshaping to size. Do not hang wet panels, because the weight of the water can stretch them.

Final Notes
The measurement chain is short and steady. One mesh square is 0.75 in (1.9 cm), so 9 squares make 6.75 in (17.1 cm) and 104 rows make 78 in (198.1 cm). One sc border round adds 0.25 in (0.6 cm) per side, for a finished 7.25 in x 78.5 in (18.4 cm x 199.4 cm). Each 4.5 in (11.4 cm) hexagon fills exactly 6 rows, with 3-row gaps and 4-row margins. Seven panels then cover 50.75 in (128.9 cm) of rod.
Check gauge early and count rows often, and the honeycomb will line up on every strip.
Happy crocheting!