

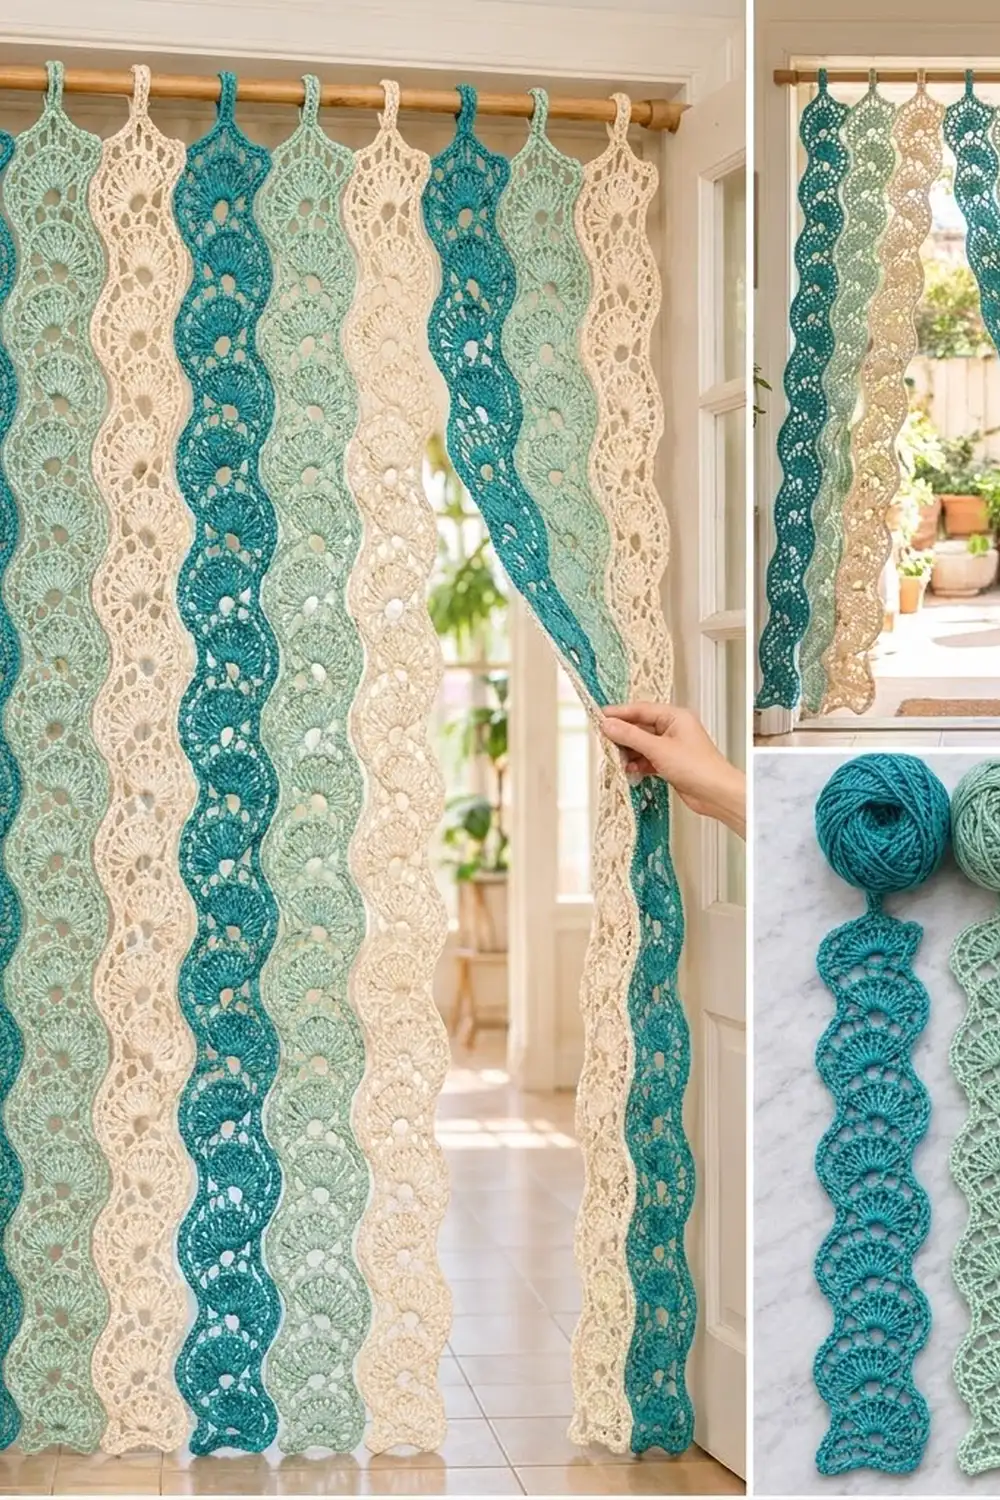
The Seafoam Shell Strip Door Curtain is a breezy, coastal-style divider made from nine narrow strips of stacked fans. Each strip hangs on its own loop, so the curtain parts easily when you walk through and lets light and air pass between the strips.
The colorway repeats deep teal, soft mint and natural cream three times across the rod, which gives an ocean-inspired striped look. The shell stitch makes a scalloped edge on both sides of every strip, so the strips seem to ripple even when they hang still.
This pattern uses US crochet terms. Each finished strip measures 4 in (10.2 cm) wide and 71 in (180.3 cm) long. The hanging loop adds 2 in (5.1 cm), for a total drop of 73 in (185.4 cm). Hung edge to edge, the nine strips cover 36 in (91.4 cm).
Each strip is worked in short rows from the bottom up, using a simple 2-row shell repeat on an 11-stitch base. A leveling row squares off the top. One round of single crochet edging goes around the strip, and a covered chain loop at the top center holds it on the rod.
Finished Size and Construction
- Finished size (curtain): 36 in (91.4 cm) wide x 73 in (185.4 cm) drop including loops
- Skill level: Easy
- Terminology: US crochet terms
- Yarn weight: Worsted (medium #4) cotton
- Hook: 5 mm (H-8)
- Number of pieces: 9 separate strips
- Layout: 9 strips in a single row on a rod, not seamed together
- Strip size before border: 3.5 in (8.9 cm) x 70.5 in (179.1 cm)
- Border depth: 0.25 in (0.6 cm) on every edge
- Strip size after border: 4 in (10.2 cm) x 71 in (180.3 cm)
- Hanging loop: 2 in (5.1 cm) above the top edge; fits a rod up to 1.25 in (3.2 cm) in diameter
Materials
Choose a smooth, mercerized or matte cotton in worsted weight. Cotton hangs straight and holds the fan shapes well. Acrylic will work, but the strips may curl and float more in a draft.
Quantities assume a yarn that runs about 190 m per 100 g.
- Color A, Deep Teal: 450 g (855 m) for 3 strips
- Color B, Mint/Seafoam: 450 g (855 m) for 3 strips
- Color C, Natural Cream: 450 g (855 m) for 3 strips
Each strip uses about 135 g (256 m). The amounts above include a margin of about 10% for your gauge swatch, small differences in tension and the hanging loops.
Tools:
– 5 mm (H-8) crochet hook
– Tapestry needle
– Stitch markers
– Measuring tape
– Rust-proof pins and a blocking surface long enough for one strip, or space to block in sections
– Spray bottle
– Wooden curtain rod, up to 1.25 in (3.2 cm) in diameter, with brackets
Abbreviations (US Terms)
- ch: chain
- sl st: slip stitch
- sc: single crochet
- hdc: half double crochet
- dc: double crochet
- tr: treble crochet
- st(s): stitch(es)
- sk: skip
- RS / WS: right side / wrong side
Special stitches:
– Fan: 9 dc worked into the same stitch.
– Half-fan: 5 dc worked into the same stitch at the edge of a row. At the start of a row, the ch-3 counts as the first dc.
– Standing sc: Start with a slip knot on the hook, insert the hook into the stitch and work a sc as usual.
Gauge and Checkpoints
Pattern gauge: 11 sts and 4 pattern rows (2 full-fan rows and 2 half-fan rows) = 3.5 in (8.9 cm) wide x 2.5 in (6.4 cm) tall. One pattern row is about 0.625 in (1.6 cm) tall.
Use the start of your first strip as the gauge test. You don’t need a separate swatch.
Checkpoints:
– After Row 9: about 3.5 in (8.9 cm) wide across a fan row and 5.25 in (13.3 cm) tall.
– After Row 57: about 35.25 in (89.5 cm) tall.
– After Row 113: about 70.25 in (178.4 cm) tall.
– After Row 114: 70.5 in (179.1 cm) tall with a level top edge.
If your strip is too big: go down to a 4.5 mm hook, or make your dc stitches more snug.
If your strip is too small: go up to a 5.5 mm hook.
Change hooks after Row 9, before you’ve used much yarn. Width matters less than length here, so check height carefully. If your rows run short or tall, see the troubleshooting section for how to add or remove repeats.
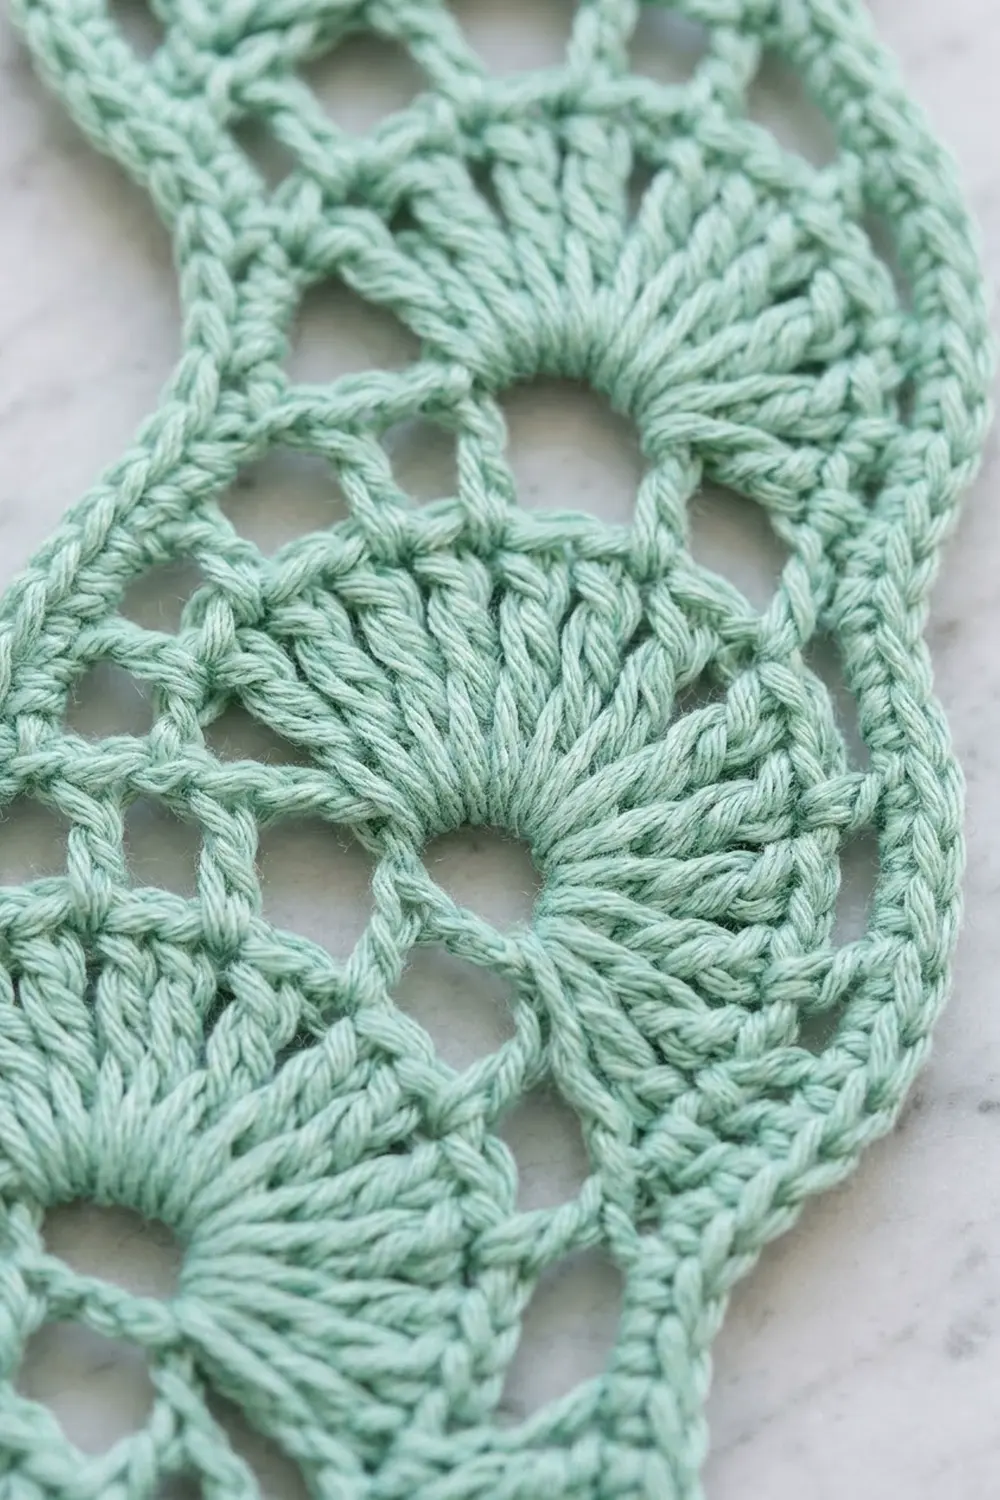
Strip Pattern (Make 9)
Work in rows. Turn at the end of every row. The turning ch-1 does not count as a stitch, and the ch-3 counts as a dc.
Foundation: Ch 12.
Row 1 (WS): Sc in the 2nd ch from the hook and in each ch across, turn. (11 sc)
Row 2 (RS, full-fan row): Ch 1, sc in first st, sk next 4 sts, fan (9 dc) in next st, sk next 4 sts, sc in last st, turn. (11 sts: 1 sc, 9 dc, 1 sc)
The fan sits in the 6th stitch, the exact center of the row. Skipping 4 stitches on each side lets the fan spread to the full strip width.
Row 3 (WS, half-fan row): Ch 3 (counts as dc), 4 dc in first st, sk next 4 dc, sc in next dc (the 5th dc, center of the fan), sk next 4 dc, 5 dc in last st, turn. (11 sts: 5 dc, 1 sc, 5 dc)
The half-fans lean outward past the edges of the strip below. This is what makes the scalloped, wavy side edges.
Row 4: Ch 1, sc in first st (top of the ch-3), sk next 4 dc, fan in center sc, sk next 4 dc, sc in last st, turn. (11 sts)
Row 5: Work as Row 3. (11 sts)
Rows 6–113: Repeat Rows 4–5 another 54 times. (11 sts in every row)
You now have 112 pattern rows (Rows 2–113): 56 full-fan rows and 56 half-fan rows. Row 113 is a half-fan row.
Row 114 (RS, leveling row): Ch 1, sc in first 3 sts, hdc in next st, dc in next st, tr in center sc, dc in next st, hdc in next st, sc in last 3 sts. (11 sts: 3 sc, 1 hdc, 1 dc, 1 tr, 1 dc, 1 hdc, 3 sc)
The stitches get taller toward the dip at the center of the half-fans and shorter toward the high edges, so the top comes out straight. Fasten off. Don’t weave in the starting tail yet. You’ll hide it under the border.
Make All Pieces
Make 9 strips in total:
- Color A, Deep Teal: 3 strips
- Color B, Mint/Seafoam: 3 strips
- Color C, Natural Cream: 3 strips
Layout on the rod (left to right, viewed from the room side):
ROD ==========================================
   [A]  [B]  [C]  [A]  [B]  [C]  [A]  [B]  [C]
  Teal Mint Crm  Teal Mint Crm  Teal Mint Crm
Each strip should have exactly 114 rows before you add the border. That keeps all the fan tiers level when the strips hang next to each other.
Joining: Arranging and Hanging
The strips are not sewn or crocheted to each other. The rod is what holds them together as a curtain. That lets every strip move on its own and swing back into place.
Stitch logic: Each strip hangs from one loop worked into the center stitch of its top border (st 8 of 15). The weight is centered, so the strip hangs straight instead of twisting.
Tension advice: Crochet the loop firmly. A loose loop stretches under the weight of a cotton strip and lets that strip drop lower than its neighbors.
Order of work: Add the border and hanging loop to every strip (see the next section). Then slide the loops onto the rod in the A–B–C order shown above.
Size checkpoint: 9 strips x 4 in (10.2 cm) = 36 in (91.4 cm) when the strips hang edge to edge. This fits doorways 32–36 in (81.3–91.4 cm) wide. On a narrower opening the strips overlap slightly, which gives you more privacy.
Border and Hanging Loop
Border gauge: 11 sc = 3.5 in (8.9 cm), or about 3.2 sc per inch (1.3 sc per cm).
Round 1 (RS): With RS facing, join the same color with a standing sc in the first st of Row 114.
- Top edge: Work 2 more sc in that same st (corner), sc in the next 9 sts, then 3 sc in the last st (corner). (15 sc across the top, including both corner groups)
- First side: Working down the side, 2 sc in each row-end of Rows 113 through 2. Skip the Row 1 row-end, because the corner covers it. (224 sc)
- Bottom edge: Working into the unused loops of the foundation chain, 3 sc in the first ch (corner), sc in the next 9 ch, 3 sc in the last ch (corner). (15 sc, including both corner groups)
- Second side: Working up the other side, 2 sc in each row-end of Rows 2 through 113. (224 sc)
Join with a sl st to the first sc. (478 sc total: 15 + 224 + 15 + 224)
Why the math works: The top and bottom each have 9 sc between the corners, plus a 3-sc group at each corner, for 15. That keeps the short ends flat and square. On the sides, each pattern row is about 0.625 in (1.6 cm) tall. So 112 rows measure 70 in (177.8 cm), and 224 sc over 70 in is 3.2 sc per inch. That matches the 11-sc width gauge, so the sides don’t ripple or pull in. The corner groups are counted only with the top and bottom edges, so no corner is counted twice.
Hanging loop: Sl st in the next 7 sts to reach the 8th sc of the top edge (the center). Ch 14, then sl st in the same 8th sc to form a loop. Work 22 sc over the chain loop, covering it completely, and sl st in the 8th sc again. Fasten off.
The covered loop stands 2 in (5.1 cm) above the top edge and fits a rod up to 1.25 in (3.2 cm) in diameter. Weave in all ends along the WS of the border.
Final Blocking
- Wet each strip in cool water, or mist it heavily with a spray bottle.
- Press out the excess water gently by rolling the strip in a towel. Don’t wring it.
- Lay the strip flat with the RS up. If your blocking surface is short, block the strip in sections.
- Ease each full fan open to 3.5 in (8.9 cm) across the body. The border should measure 4 in (10.2 cm) wide.
- Pin the tip of each half-fan outward so the scallops on both sides line up.
- Check that the strip measures 71 in (180.3 cm) from the bottom edge to the top border.
- Let the strip dry completely before you unpin it.
- Hang all nine strips on the rod for 24 hours so their weight evens out the length.
Final Quality-Control Checklist
- Every strip has 114 rows and 11 sts per row.
- Each border has 478 sc: 15 top, 224 per side, 15 bottom.
- Every strip measures 4 in (10.2 cm) x 71 in (180.3 cm).
- The fan tiers line up across neighboring strips.
- Each loop is centered on the 8th top-border sc and fully covered with 22 sc.
- All loops are the same height, about 2 in (5.1 cm).
- The colors run A–B–C, A–B–C, A–B–C on the rod.
- All ends are woven into the border on the WS.
Troubleshooting
Fans cup or ruffle: Your dc stitches are too loose for the 4 skipped stitches. Go down a hook size, or make the yarn-overs more snug.
Fans look pinched: Make sure you skip exactly 4 sts on each side, not 3.
Side edges look straight, not scalloped: Check that each half-fan has 5 dc, counting the ch-3 at the start of the row.
Strip is too long or too short: Each 2-row repeat adds about 1.25 in (3.2 cm). Add or remove whole repeats, always ending on a half-fan row before Row 114. Adjust the side border count by 4 sc for each repeat you add or remove.
Border waves along the sides: You probably worked more than 2 sc per row-end. Rework the side with exactly 2 sc per row.
Border pulls in along the sides: You probably skipped some row-ends. Rework the side with exactly 2 sc per row.
One strip hangs lower than the others: Its loop has stretched. Rework the loop with a smaller hook, or work it tighter.
Strips twist on the rod: The loop is off-center. Re-attach it at the 8th sc of the top edge.
Care
Hand wash in cool water with mild soap, or machine wash on a gentle cold cycle inside a mesh bag. Lay the strips flat to dry, then re-block them if needed before you hang them again.
Final Notes
Here’s the measurement chain at a glance. Each strip is 11 sts and 3.5 in (8.9 cm) wide. Row 1 plus 112 pattern rows and the leveling row give a length of 70.5 in (179.1 cm). The border has 15 sc on each short edge and 224 sc on each long side, for 478 sc in total, and brings the strip to 4 in (10.2 cm) x 71 in (180.3 cm). The 2 in (5.1 cm) loop makes a 73 in (185.4 cm) drop, and nine strips span 36 in (91.4 cm). If every strip matches these numbers, the fan tiers will line up across the doorway.
Happy crocheting!