

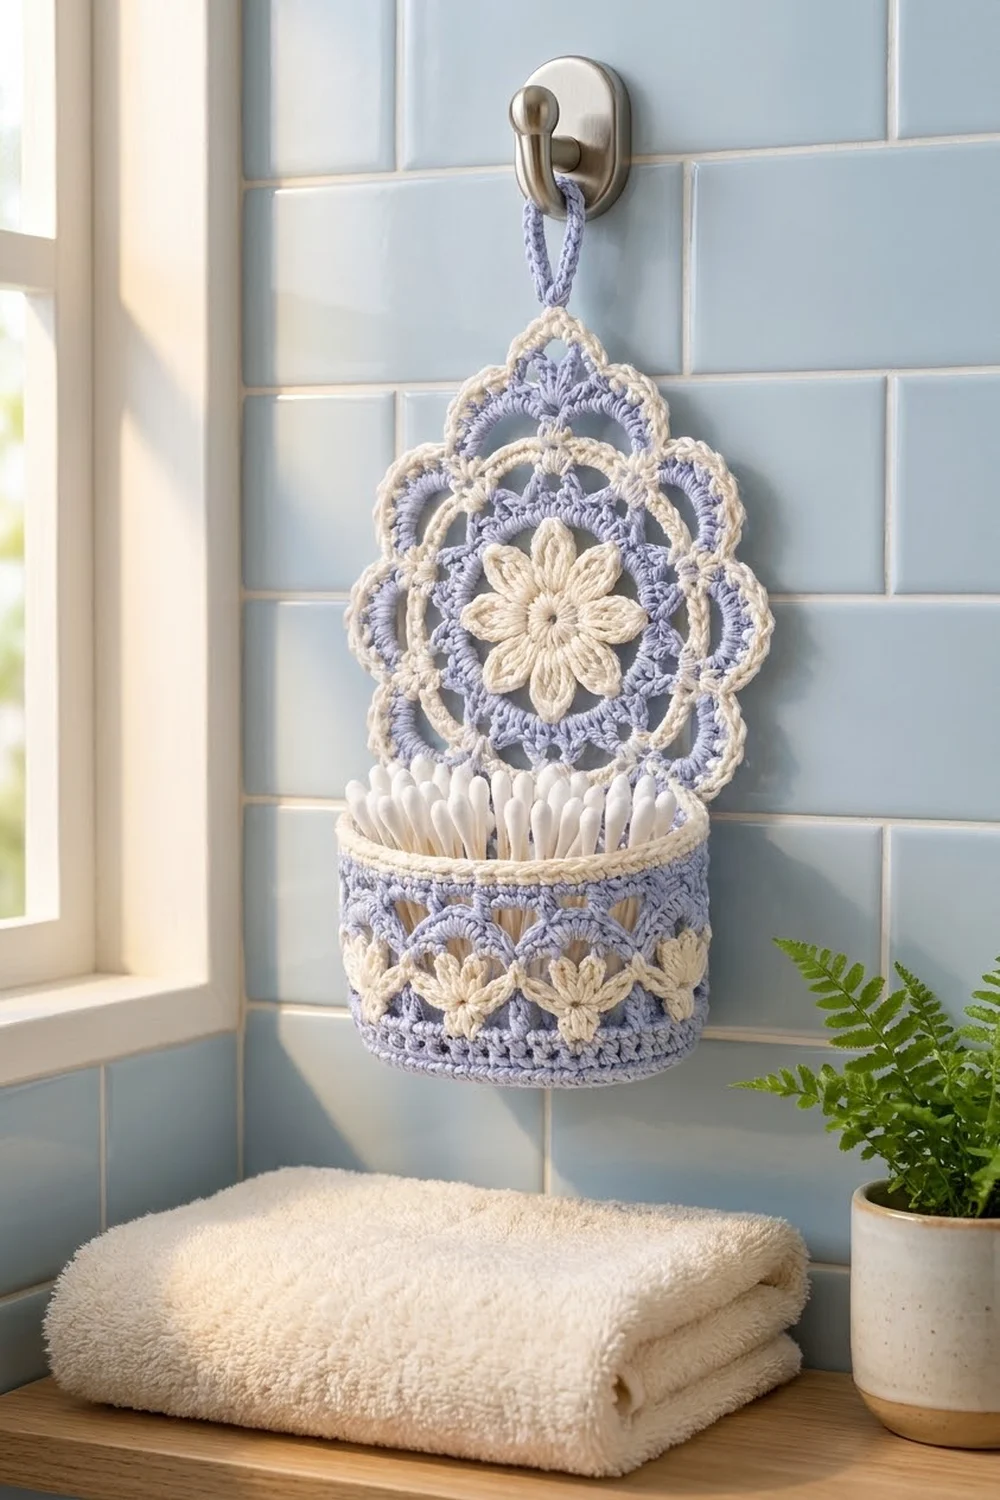
The Periwinkle Bloom Hanging Wall Basket is a small lace organizer for a bathroom, nursery, or entryway. A pointed lace medallion hangs from a slim loop, and a sturdy oval pocket sits on its lower half. It holds cotton swabs, hair ties, or a few makeup brushes.
The palette is soft periwinkle blue and warm ivory. Ivory picks out the center flower, an inner ring, the arch outlines, and the scalloped edge. The basket repeats the theme with a band of little ivory flowers set between blue openwork and blue arches.
This pattern uses US crochet terms. The finished organizer is 6.5 in (16.5 cm) wide and 10.25 in (26.0 cm) tall including the loop. The basket is 5.75 in (14.6 cm) wide, 2.25 in (5.7 cm) deep, and 2.75 in (7.0 cm) tall.
You’ll make three pieces. The back panel is worked in rounds from the center out, and the top and bottom points come from taller stitches. The basket starts as an oval base worked around a foundation chain, then the walls are worked straight up. A short strip makes the hanging loop. Finally, you sew the basket and loop to the panel.
Finished Size and Construction
- Finished size: 6.5 in (16.5 cm) wide x 10.25 in (26.0 cm) tall, including the loop
- Skill level: Intermediate
- Terminology: US crochet terms
- Yarn weight: DK / light (#3) cotton
- Hook: 3.5 mm (E-4)
- Number of pieces: 3 (back panel, basket, hanging loop)
- Layout: basket centered on the lower front of the panel; loop at the top point
- Panel size: 6.5 x 8 in (16.5 x 20.3 cm) with border
- Panel size before border: 6 x 7.5 in (15.2 x 19.1 cm)
- Border depth: 0.25 in (0.6 cm) all around
- Basket: 5.75 x 2.25 in (14.6 x 5.7 cm) base, 2.75 in (7.0 cm) tall
Materials
Use a smooth mercerized or combed DK cotton. It holds its shape near moisture, blocks crisply, and shows lace clearly. Avoid fuzzy or stretchy yarns, because the basket walls need to stand up on their own.
- Color A, periwinkle blue: 40 g, about 90 m
- Color B, ivory: 20 g, about 45 m
Both quantities include a margin of roughly 15 percent for your gauge swatch and joining.
Tools:
- 3.5 mm (E-4) crochet hook
- Tapestry needle
- 4 stitch markers
- Rust-proof pins and a blocking mat
- Spray bottle
- Measuring tape
- Scissors
Abbreviations (US Terms)
- ch – chain
- sl st – slip stitch
- sc – single crochet
- dc – double crochet
- tr – treble crochet
- BLO – back loop only
- sp – space
- st(s) – stitch(es)
- MR – magic ring
Special stitches
- Petal: (dc, tr, ch 2, tr, dc) all in the same stitch.
- 3-dc cluster (cl): *Yarn over, insert hook in the indicated sp, pull up a loop, yarn over and draw through 2 loops; repeat from * 2 more times, then yarn over and draw through all 4 loops on the hook.
- Flower: (cl, ch 2, cl, ch 2, cl) all in the same sp.
- Reverse sc (rev sc): Work sc from left to right (right to left if you’re left-handed). This makes a rolled, beaded edge.
Gauge and Checkpoints
Gauge: 18 sc and 20 rounds = 4 in (10.2 cm) in sc worked in the round. For dc, 18 sts = 4 in (10.2 cm), and each dc round is about 0.45 in (1.1 cm) tall.
Make the basket base first as your test piece, since it’s solid sc in one color. After Round 5 it should measure 5.75 x 2.25 in (14.6 x 5.7 cm).
Panel checkpoints (lightly flattened, before blocking):
- After Round 2: flower is 2 in (5.1 cm) across
- After Round 6: medallion is 4.5 in (11.4 cm) across
- After Round 8: 6 x 7.5 in (15.2 x 19.1 cm)
- After the border: 6.5 x 8 in (16.5 x 20.3 cm)
If your piece is too big, go down to a 3.25 mm hook. If it’s too small, go up to a 3.75 mm hook. Change hooks for the whole project, not just one piece, so the basket still fits the panel.

Back Panel
Work in joined rounds with the right side facing. Don’t turn.
Round 1 (Color B): Make a MR, ch 1, work 16 sc in the ring. Join with a sl st to the first sc. (16 sc)
Round 2 (Color B): Sl st in the next sc, Petal in the next sc; repeat from * 7 more times. Join with a sl st to the first sl st. Fasten off. (8 petals, 8 sl sts)*
Round 3 (Color A): Join Color A with a sc in any ch-2 petal tip, ch 5; sc in the next petal tip, ch 5; repeat from * 6 more times. Join to the first sc. (8 sc, 8 ch-5 sps)*
Round 4 (Color A): Ch 1, sc in the sc, 6 sc in the next ch-5 sp; repeat from * around. Join. (56 sc, 7 per section)*
Round 5 (Color A): Ch 3 (counts as dc), dc in the next 2 sts, ch 1, skip 1, dc in the next 3 sts; dc in the next 3 sts, ch 1, skip 1, dc in the next 3 sts; repeat from * 6 more times. Join to the top of the ch-3. Fasten off. (48 dc, 8 ch-1 sps)*
Each ch-1 window sits between two petals and opens up the blue ring.
Round 6 (Color B): Join with a sc in any dc. Sc in each dc and work 2 sc in each ch-1 sp. Join. (48 + 16 = 64 sc)
This is a conversion round: 48 sts are worked one-for-one, plus 16 sts are added in the windows.
Round 7 (Color B): Pick a st directly above a petal tip for the top of the panel. Ch 1, sc in that st and mark it. Ch 9, skip 7 sts; (sc in the next st, ch 7, skip 7) 3 times; sc in the next st, ch 9, skip 7; (sc in the next st, ch 7, skip 7) 3 times. Join to the first sc. Fasten off. (8 sc, 2 ch-9 loops at top and bottom, 6 ch-7 loops at the sides)
Check the count: 8 x (1 sc + 7 skipped) = 64 sts used.
Round 8 (Color A): Join with a sc in the marked sc. In the top ch-9 loop, work (3 dc, 3 tr, ch 3, 3 tr, 3 dc). Then (sc in the next sc, 11 dc in the next ch-7 loop) 3 times. Sc in the next sc, then (3 dc, 3 tr, ch 3, 3 tr, 3 dc) in the bottom ch-9 loop. Then (sc in the next sc, 11 dc in the next ch-7 loop) 3 times. Join and fasten off.
Count: 6 side fans x 11 dc = 66, plus 2 point fans x 12 sts = 24, plus 8 sc = 98 sts and 2 ch-3 tips. The trebles stretch the top and bottom into points, which gives the panel its diamond-oval shape.
Basket
Base (Color A): Ch 18.
Round 1: Work 3 sc in the 2nd ch from the hook, then sc in the next 15 ch. Work 3 sc in the last ch. Rotate and work along the other side of the foundation chain: sc in the next 15 ch. Join. (3 + 15 + 3 + 15 = 36 sc)
Each round below starts at the first end, then the side, then the second end and the second side.
Round 2: (2 sc in each of the 3 end sts, sc in the 15 side sts) twice. Join. (6 + 15 + 6 + 15 = 42)
Round 3: ((sc in the next st, 2 sc in the next st) 3 times, sc in the 15 side sts) twice. (9 + 15 + 9 + 15 = 48)
Round 4: ((sc in the next 2 sts, 2 sc in the next st) 3 times, sc in the 15 side sts) twice. (12 + 15 + 12 + 15 = 54)
Round 5: ((sc in the next 3 sts, 2 sc in the next st) 3 times, sc in the 15 side sts) twice. (15 + 15 + 15 + 15 = 60)
Checkpoint: 5.75 x 2.25 in (14.6 x 5.7 cm).
Walls
Round 6 (A): Ch 1, sc in the BLO of each st. Join. (60) This makes a ridge so the walls turn up.
Round 7 (A): Sc in each st. (60)
Round 8 (A): Ch 3 (counts as dc), dc in each st. (60 dc)
Round 9 (A): Ch 4 (counts as dc + ch 1), skip 1; dc in the next st, ch 1, skip 1; repeat from * around. Join to the 3rd ch. Fasten off. (30 dc, 30 ch-1 sps)*
Round 10 (B): Join with a sc in any dc. Skip the next (ch-1 sp and dc), work a Flower in the next ch-1 sp, skip the next (dc and ch-1 sp), sc in the next dc; repeat from * around, ending with a sl st to the first sc instead of the last sc. Fasten off. (10 Flowers, 10 sc)*
Each repeat uses 6 positions, and 10 x 6 = 60.
Round 11 (A): Join with a sl st in any sc. Ch 4 (counts as tr); ch 1, sc in the next ch-2 sp, ch 1, sc in the next ch-2 sp, ch 1, tr in the next sc; repeat from * around, leaving out the last tr. Join to the 4th ch. (30 sts, 30 ch-1 sps = 60 positions)*
The trebles rise up between the flowers, and the chains arch over each one.
Round 12 (A): Ch 1, sc in each st and each ch-1 sp. (30 + 30 = 60 sc)
Round 13 (A): Sc in each st. Fasten off. (60)
Round 14 (B): Join and sc in each st. (60)
Round 15 (B): Ch 1, rev sc in each st. Join and fasten off. (60)
Checkpoint: 2.75 in (7.0 cm) tall and still 5.75 in (14.6 cm) wide. The walls should go straight up without flaring.
Hanging Loop
Color A: Ch 25. Sc in the 2nd ch from the hook and each ch across. (24 sc) Fasten off and leave a 10 in (25.4 cm) tail. The strip measures about 5.25 in (13.3 cm).
Make All Pieces
- Back panel: 1, Colors A and B
- Basket: 1, Colors A and B
- Hanging loop: 1, Color A
Work in this order: panel, then panel border (see Border), then basket, then loop, then joining. Assembly layout, seen from the front:
        [ loop ]
     [ lace panel ]
   [=== basket rim ===]
   [  basket walls    ]
   [=== basket base ==]
      (panel tip hidden)
Joining
Use the panel after you’ve bordered and blocked it. Work with Color A and a tapestry needle.
Placement: Center the basket on the panel front so the base sits 0.5 in (1.3 cm) above the bottom tip. The rim will then sit 3.25 in (8.3 cm) above the tip. Pin it in place.
Rim line: Find the 15 straight back-wall sts of Round 13 and add 3 sts at each end curve, for 21 sts in total, about 4.7 in (11.9 cm). Whipstitch them one at a time, catching one rim st and the panel strand directly behind it each time.
Base line: Whipstitch the center 7 sts of the Round 6 ridge, about 1.5 in (3.8 cm), to the panel. The oval ends stay free so the pocket can open.
Tension: Pull each stitch snug but not tight. The panel must still lie flat. If it ripples, take the stitches out and sew more loosely.
Loop: Fold the strip in half. Overlap the ends by 0.5 in (1.3 cm) on the back of the top picot and sew them down firmly. About 2.25 in (5.7 cm) of loop shows above the tip.
Checkpoint: The panel should still measure 6.5 in (16.5 cm) across, and the rim 5.75 in (14.6 cm).
Border
Work the border on the panel right after Round 8, before joining. Border gauge: each round adds about 0.125 in (0.3 cm) per edge, so the two rounds add 0.25 in (0.6 cm) on every side.
Round 1 (Color B): Join with a sc in any sc between fans. Sc in each dc, tr, and sc around. In each ch-3 tip, work (2 sc, ch 2, 2 sc). Join.
- Each side fan: 11 sc
- Each point fan: 6 + 2 + 2 + 6 = 16 sc, plus a ch-2 tip
- Between fans: 1 sc each, 8 in total
- Total: 66 + 32 + 8 = 106 sc, 2 ch-2 tips
Round 2 (Color B): Ch 1, rev sc in each sc. In each ch-2 tip, work (rev sc, ch 3, rev sc). Join and fasten off.
- Each side fan: 11
- Each point fan: 18, plus a ch-3 picot
- Between fans: 8
- Total: 66 + 36 + 8 = 110 rev sc, 2 picots
Why the math works: Round 1 places exactly one sc on each of the 98 Round 8 stitches. The only extras are the 4 sc at each tip, which let the points turn without cupping: 98 + 8 = 106. Round 2 works one-for-one and adds 2 sts per tip: 106 + 4 = 110. Nothing is added along the curves, so the scallops stay flat.
Final Blocking
- Weave in all ends along stitches of the same color.
- Lay the panel right side up on the mat and spray it until it’s damp.
- Pin the panel to 6.5 x 8 in (16.5 x 20.3 cm). Put one pin in each picot tip and one at the center of each scallop.
- Open the petals and Round 5 windows with your fingertips.
- Stuff the basket firmly with a rolled towel so it holds an oval 5.75 x 2.25 in (14.6 x 5.7 cm). Spray it lightly.
- Let both pieces dry completely, for at least 12 hours, before joining.
- After joining, steam the seam lines lightly from the back.
Final Quality-Control Checklist
- Panel is 6.5 x 8 in (16.5 x 20.3 cm) and lies flat
- 8 ivory petals, 8 blue windows, 8 scallops
- Border counts are 106 sc, then 110 rev sc
- Basket walls have 60 sts in every round and 10 Flowers
- Basket is 2.75 in (7.0 cm) tall and its walls stand upright
- Base is centered, 0.5 in (1.3 cm) above the panel tip
- Loop is sewn securely, with no strain on the picot
- No ends show on the front
Troubleshooting
- Panel cups: Your chains are too short. Loosen the Round 3 and Round 7 chains, or go up a hook size.
- Panel ruffles: Your fans are too loose. Use a smaller hook for Round 8 only.
- Points too blunt: Make sure you used trebles, not dc, in the ch-9 loops.
- Basket flares: You added stitches by accident. Recount to 60 after Round 11.
- Basket leans forward: Sew more of the base line, up to 11 sts.
- Loop stretches: Work it with a smaller hook, or work a row of sl sts along it.
Care
Hand wash in cool water, press out the water in a towel, and reshape the piece while damp. Dry it flat, with the basket stuffed so it keeps its oval shape.
Final Notes
The measurements build on each other. The 2 in (5.1 cm) flower grows into a 4.5 in (11.4 cm) medallion, then into a 6 x 7.5 in (15.2 x 19.1 cm) panel, and the border brings it to 6.5 x 8 in (16.5 x 20.3 cm). The 5.75 x 2.25 in (14.6 x 5.7 cm) base becomes a 2.75 in (7.0 cm) tall basket, and with the loop the organizer is 10.25 in (26.0 cm) tall. If each checkpoint matches, the pieces will fit together.
Happy crocheting!