

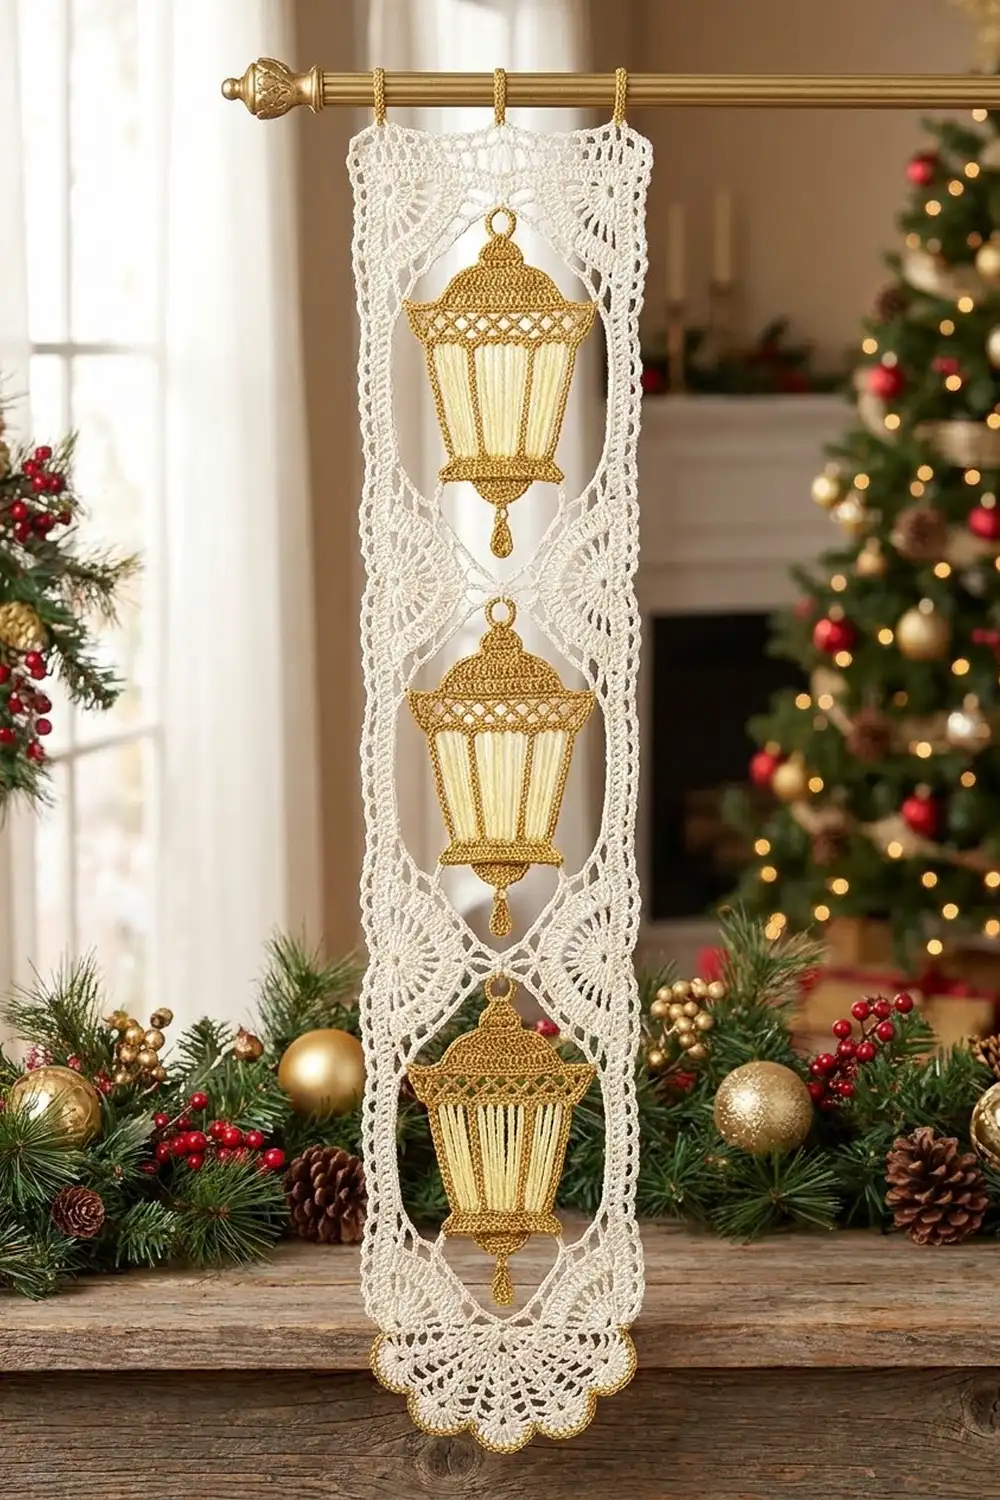
This lace strip is narrow, long and festive. Three gold lanterns sit in open net windows. Bands of ivory fans separate the windows, the bottom edge ends in a scalloped fan finish, and three small loops at the top let it hang from a rod, hook or ribbon.
The palette is ivory, antique gold and soft butter yellow. Ivory lace forms the strip. The lantern caps, lattice bands, brims, bases and hanging rings are gold. The glowing “glass” ribs are butter yellow. The finished piece looks vintage and holiday-bright without feeling heavy.
The pattern uses US crochet terms. The finished strip measures 3.5 in (8.9 cm) wide and 18.75 in (47.6 cm) long, or 19.5 in (49.5 cm) including the hanging loops.
The strip is worked bottom to top in rows as one continuous piece. You then make three small lantern appliqués, sew one into each net window, and finish with a border. The border adds a looped edge along the sides, fans along the bottom and hanging loops along the top.
Finished Size and Construction
- Finished size: 3.5 in x 18.75 in (8.9 cm x 47.6 cm); 19.5 in (49.5 cm) long including hanging loops
- Skill level: Intermediate
- Terminology: US crochet terms
- Yarn weight: Size 3 mercerized cotton crochet thread (Super Fine, #1)
- Hook: 2.5 mm
- Number of pieces: 1 lace strip plus 3 lantern appliqués sewn onto it, finished as one piece
- Layout: 3 lantern windows stacked vertically, with a fan band below and above each window
- Lantern appliqué size: about 2 in (5.1 cm) wide x 3.5 in (8.9 cm) tall, including the ring
- Size before border: 3 in x 17.75 in (7.6 cm x 45.1 cm)
- Border depth: 0.25 in (0.6 cm) on the sides and top; 0.75 in (1.9 cm) on the bottom; top hanging loops add 0.75 in (1.9 cm)
Materials
Use a smooth mercerized cotton thread in size 3. Mercerized cotton shows stitch definition, blocks crisply and holds the fans open. A metallic-blend gold thread works for the lanterns if it has the same thickness as the ivory.
- Ivory (main color, MC): 35 g, about 140 m
- Antique gold (CC1): 10 g, about 40 m
- Butter yellow (CC2): 5 g, about 20 m
These quantities include a margin of about 15% for your gauge swatch and tails.
Tools:
- 2.5 mm crochet hook
- Tapestry needle
- Sewing pins with heads, or locking stitch markers
- Blocking mat and rust-proof pins
- Spray bottle
- Scissors
- Measuring tape
Abbreviations (US Terms)
- ch – chain
- sl st – slip stitch
- sc – single crochet
- dc – double crochet
- tr – treble crochet
- sc2tog – single crochet 2 together
- sp – space
- st(s) – stitch(es)
- RS – right side
- MC, CC1, CC2 – main color, contrast colors
Special stitch – Fan: 7 dc worked into the same stitch.
Corner group (border): (sc, ch 3, sc) worked into a corner ch-2 space.
Gauge and Checkpoints
Gauge is checked on the strip itself. Work the foundation and Rows 1–12, which is one full section, then measure before you continue.
- Width gauge: 19 dc = 3 in (7.6 cm)
- Row 1: 0.25 in (0.6 cm) tall
- One fan band (3 rows): 1 in (2.5 cm) tall
- One window (8 rows): 4.5 in (11.4 cm) tall
- One full section (11 rows): 5.5 in (14.0 cm) tall
- Border side gauge: 124 sc along 17.75 in (45.1 cm), or about 7 sc per inch
If the work is too big: go down to a 2.25 mm hook. If it is too small: go up to a 2.75 mm hook. If only the windows run long, pull each ch-5 loop snug, but don’t tighten the dc rows.
Lace Strip
With MC, ch 21.
Row 1 (RS): Dc in 4th ch from hook and in each ch across. Turn. (19 sts; the skipped ch counts as the first dc)
Checkpoint: Row 1 measures 3 in (7.6 cm) wide.
Section (Rows 2–12)
Row 2 (fan row): Ch 1, sc in first st, skip 2 sts, Fan in next st, skip 2 sts, sc in next st; repeat from * 2 more times. Turn. (3 Fans and 4 sc = 25 sts)
Row 3 (conversion row): Ch 5 (counts as dc + ch 2), sc in 4th dc of first Fan, ch 2, dc in next sc, ch 2, sc in 4th dc of next Fan, ch 2, dc in next sc; repeat from * once more. Turn. (4 dc, 3 sc and 6 ch-2 sps)
Row 4: Ch 3 (counts as dc), 2 dc in next ch-2 sp, dc in next st; repeat from * 5 more times, with the last dc going into the 3rd ch of the turning ch. Turn. (1 + 6 x 3 = 19 dc)
The fan band is complete. It should measure 1 in (2.5 cm).
Row 5 (net row A): Ch 1, sc in first st, ch 5, skip 2 sts, sc in next st, ch 5, skip 3 sts, sc in next st; repeat from * 2 more times, ch 5, skip 2 sts, sc in last st. Turn. (6 sc, 5 ch-5 loops; stitches used: 1 + 3 + 12 + 3 = 19)
Row 6 (net row B): Ch 5 (counts as dc + ch 2), sc in first ch-5 loop, ch 5, sc in next ch-5 loop; repeat from * 3 more times, ch 2, dc in last sc. Turn. (4 ch-5 loops, 2 ch-2 half-loops)
Row 7: Ch 1, sc in first dc, ch 5, sc in next ch-5 loop; repeat from * 3 more times, ch 5, sc in 3rd ch of turning ch. Turn. (6 sc, 5 ch-5 loops)
Rows 8–11: Repeat Rows 6–7 twice. (Row 11 has 5 ch-5 loops)
The net rows form the diagonal chain lattice that frames each lantern.
Row 12 (closing row): Ch 3 (counts as dc), 2 dc in first loop, dc in next sc, 3 dc in next loop, dc in next sc; repeat from * 2 more times, 2 dc in last loop, dc in last sc. Turn. (1 + 2 + 1 + 12 + 2 + 1 = 19 dc)
Checkpoint: the piece measures 5.75 in (14.6 cm) from the foundation.
Remaining Sections
Rows 13–23: Repeat Rows 2–12. Checkpoint: 11.25 in (28.6 cm).
Rows 24–34: Repeat Rows 2–12. Checkpoint: 16.75 in (42.5 cm).
Rows 35–37 (top fan band): Repeat Rows 2–4. (19 dc)
Don’t fasten off. Mark the last stitch and set the strip aside.
Checkpoint: the body measures 3 in x 17.75 in (7.6 cm x 45.1 cm), with 37 rows and 3 net windows.
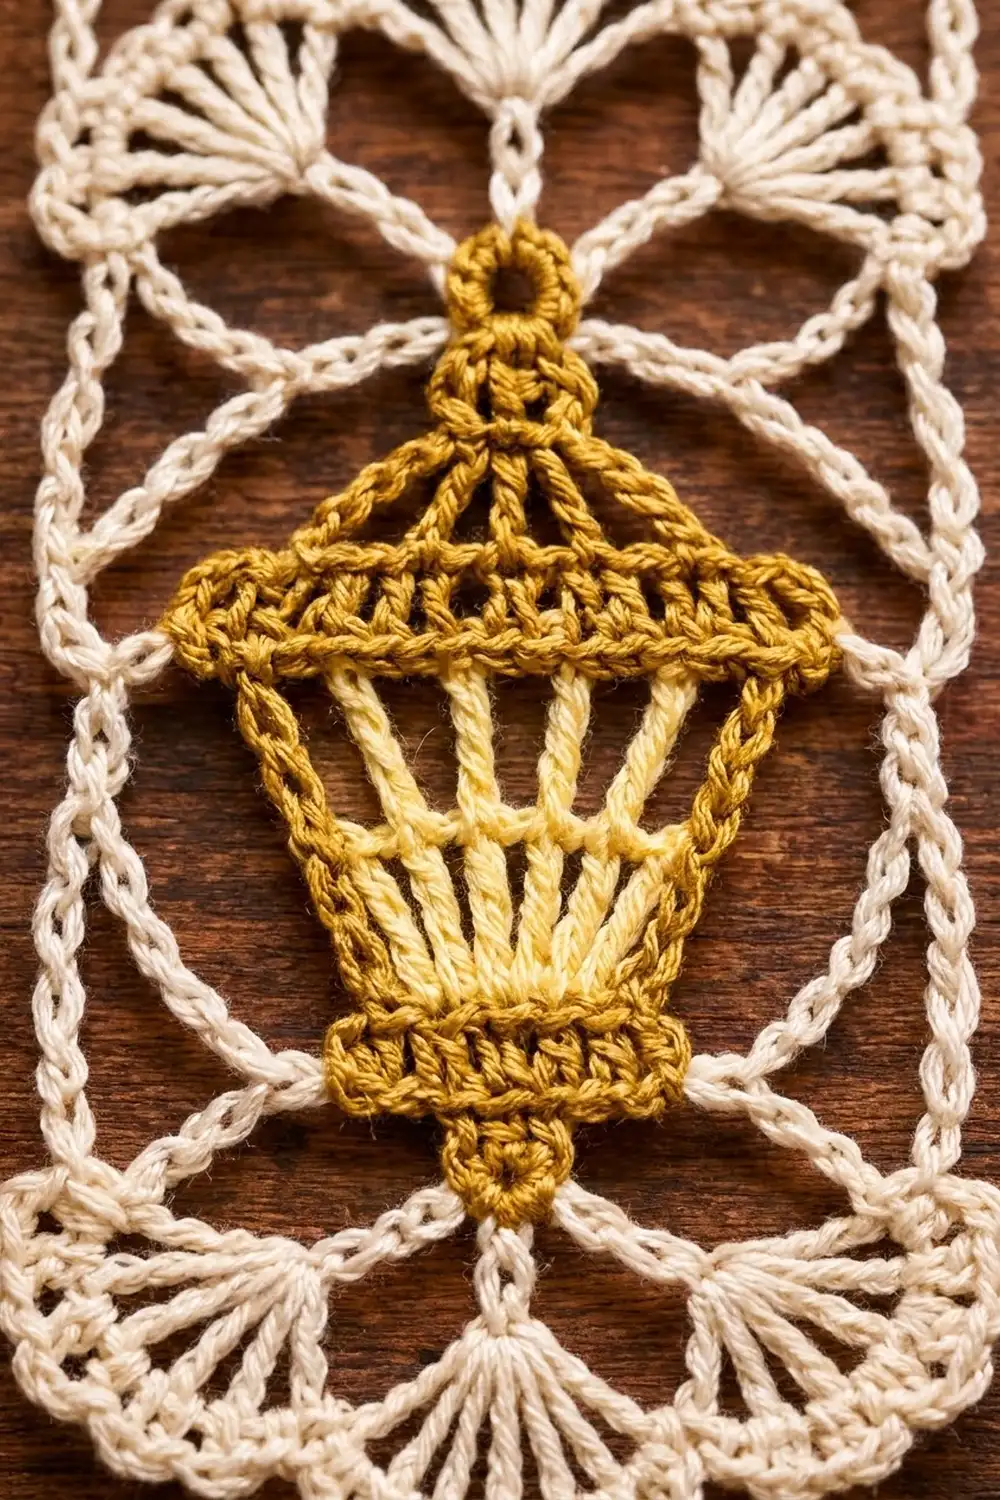
Lantern Appliqué (Make 3)
The lantern is worked top down, starting at the ring.
Ring: With CC1, ch 8, sl st in first ch to form a ring. Ch 1, 14 sc in ring, sl st in first sc. (14 sc)
Row 1: Ch 1, sc in the 3 sc at the bottom of the ring, opposite the joining point. Turn. (3 sc)
Row 2: Ch 3 (counts as dc), dc in same st, dc in next st, 2 dc in last st. Turn. (5 dc)
Row 3: Ch 3, dc in same st, dc in next 3 sts, 2 dc in last st. Turn. (7 dc)
This is the cap.
Row 4 (lattice band): Ch 4 (counts as dc + ch 1), (dc, ch 1) in next st; repeat from * 4 more times, dc in last st. Turn. (7 dc and 6 ch-1 sps = 13 sts)
Row 5 (brim): Ch 1, 2 sc in first st, sc in each ch-1 sp and dc across to the last st, 2 sc in last st. (15 sc) Change to CC2 on the last pull-through. Fasten off CC1. Turn.
Row 6 (glass ribs): With CC2, ch 4 (counts as tr), ch 1, skip 1 st, tr in next st; repeat from * 6 more times. Turn. (8 tr and 7 ch-1 sps)
Row 7 (taper): Ch 3 (counts as dc), dc in each tr across and skip the ch-1 sps. (8 dc) The skipped spaces draw the bottom in, so the body tapers like a lantern globe. Change to CC1 on the last pull-through. Fasten off CC2. Turn.
Row 8 (base): With CC1, ch 1, 2 sc in first st, sc in next 6 sts, 2 sc in last st. Turn. (10 sc)
Row 9: Ch 1, sc2tog, sc in next 6 sts, sc2tog. Turn. (8 sc)
Row 10 (drop): Sl st in first 3 sts, ch 1, sc in next 2 sts. Leave the remaining 3 sts unworked. Turn. (2 sc)
Row 11: Ch 1, sc2tog. (1 sc) Fasten off, leaving a 12 in (30.5 cm) tail.
Checkpoint: the lantern is about 2 in (5.1 cm) wide at the brim and 3.5 in (8.9 cm) tall.
Attach: Center one lantern in each net window. Leave about 0.5 in (1.3 cm) above the ring and below the drop, and 0.5 in (1.3 cm) on each side of the brim. Pin it, then whipstitch the outer edge to the net with the CC1 tail wherever an edge crosses a chain. Tack the top of the ring to the center chain of the net row above it.
Border
Border gauge is about 7 sc per inch along the sides. Corners are ch-2 spaces and aren’t counted in any side total.
Round 1 (MC): Pick up the live loop at the top. Ch 1, sc in each of the 19 sts across Row 37, ch 2 (corner). Work 124 sc down the side, ch 2. Sc in each of the 19 free loops of the foundation chain, ch 2. Work 124 sc up the second side, ch 2, and sl st to the first sc. (19 + 124 + 19 + 124 = 286 sc and 4 corner sps)
Side placement (124 sc): Work 2 sc in Row 1. Then, for each of the 3 sections, work 38 sc: 3 sc in the fan row, 3 sc in the conversion row, 2 sc in the dc row, 4 sc in each of the 7 net rows and 2 sc in the closing row. Finish with 8 sc in the top fan band. (2 + 3 x 38 + 8 = 124)
Round 2: Sl st into the first sc.
- Top: Sc in the first sc, ch 10, sl st in the same sc. Sc in the next 8 sc. In the 10th sc work sc, ch 10, sl st in the same sc. Sc in the next 8 sc. In the 19th sc work sc, ch 10, sl st in the same sc. (19 sc, 3 loops)
- Corner: Work a corner group in the ch-2 sp.
- Side: Sc in the first sc, ch 3, skip 2 sc, sc in next sc; repeat from * 40 more times. (42 sc, 41 ch-3 loops; stitches used: 1 + 3 x 41 = 124)
- Corner: Work a corner group.
- Bottom: Sc in the first sc, skip 2 sc, Fan in next sc, skip 2 sc, sc in next sc; repeat from * 2 more times. (4 sc and 3 Fans; stitches used: 1 + 6 x 3 = 19)
- Corner, side, corner: Repeat as before. Sl st to the first sc. Fasten off.
Round 3 (hanging loops only): Join MC in the first ch-10 loop. Work 14 sc in the loop. Sl st across the top sc to the next loop, then 14 sc in it. Repeat for the last loop. Fasten off.
Why the math works: Each side count matches a repeat exactly. A multiple of 6 + 1 fits the fans: 19 = 6 x 3 + 1. A multiple of 3 + 1 fits the ch-3 loops: 124 = 3 x 41 + 1. The top loops fall on sts 1, 10 and 19, so they are evenly spaced 9 sts apart, and nothing is added or skipped at the corners.
Final Blocking
- Weave in all ends along the dc rows, never through the net.
- Soak the strip in cool water for 10 minutes, then press out the water in a towel without wringing.
- Pin it to 3.5 in x 18.75 in (8.9 cm x 47.6 cm).
- Pin the point of each net diamond so the lattice opens evenly.
- Pin the tip of every bottom fan and fan-band dc into a smooth scallop.
- Pull each lantern flat and square, with the ribs straight and the ring round.
- Lightly mist and let it dry completely before unpinning (12–24 hours).
Final Quality-Control Checklist
- Body is 3 in x 17.75 in (7.6 cm x 45.1 cm) before the border
- Each window has 7 net rows ending with 5 loops
- Each section measures 5.5 in (14.0 cm)
- Each lantern is centered with an even margin
- Border Round 1 has 286 sc
- Each side has 41 ch-3 loops; the bottom has 3 Fans
- Three hanging loops sit at sts 1, 10 and 19
- Finished size: 3.5 in x 18.75 in (8.9 cm x 47.6 cm)
Troubleshooting
- The strip narrows in the windows: your ch-5 loops are too tight. Chain more loosely or work them with a 2.75 mm hook.
- The fans ruffle: go down a hook size for the fan rows only.
- The lantern is too wide for the window: check the brim. It should have 15 sc, not more.
- The ribs lean: you worked into the ch-1 sps in Row 7. Rework the row, placing dc only in tr.
- The sides wave after the border: recount to 124 sc per side.
- The top loops twist: pin them flat during blocking.
Care
Hand wash in cool water with a mild soap, press out the water in a towel and dry flat. Re-pin the fans if needed.
Final Notes
The measurement chain stays simple. Nineteen dc make 3 in (7.6 cm). Each 11-row section adds 5.5 in (14.0 cm), so the body reaches 17.75 in (45.1 cm). Three lanterns fill the three windows. The border brings the strip to 3.5 in x 18.75 in (8.9 cm x 47.6 cm). Check each stage as you go, and the finished piece will hang straight and glow.
Happy crocheting!