

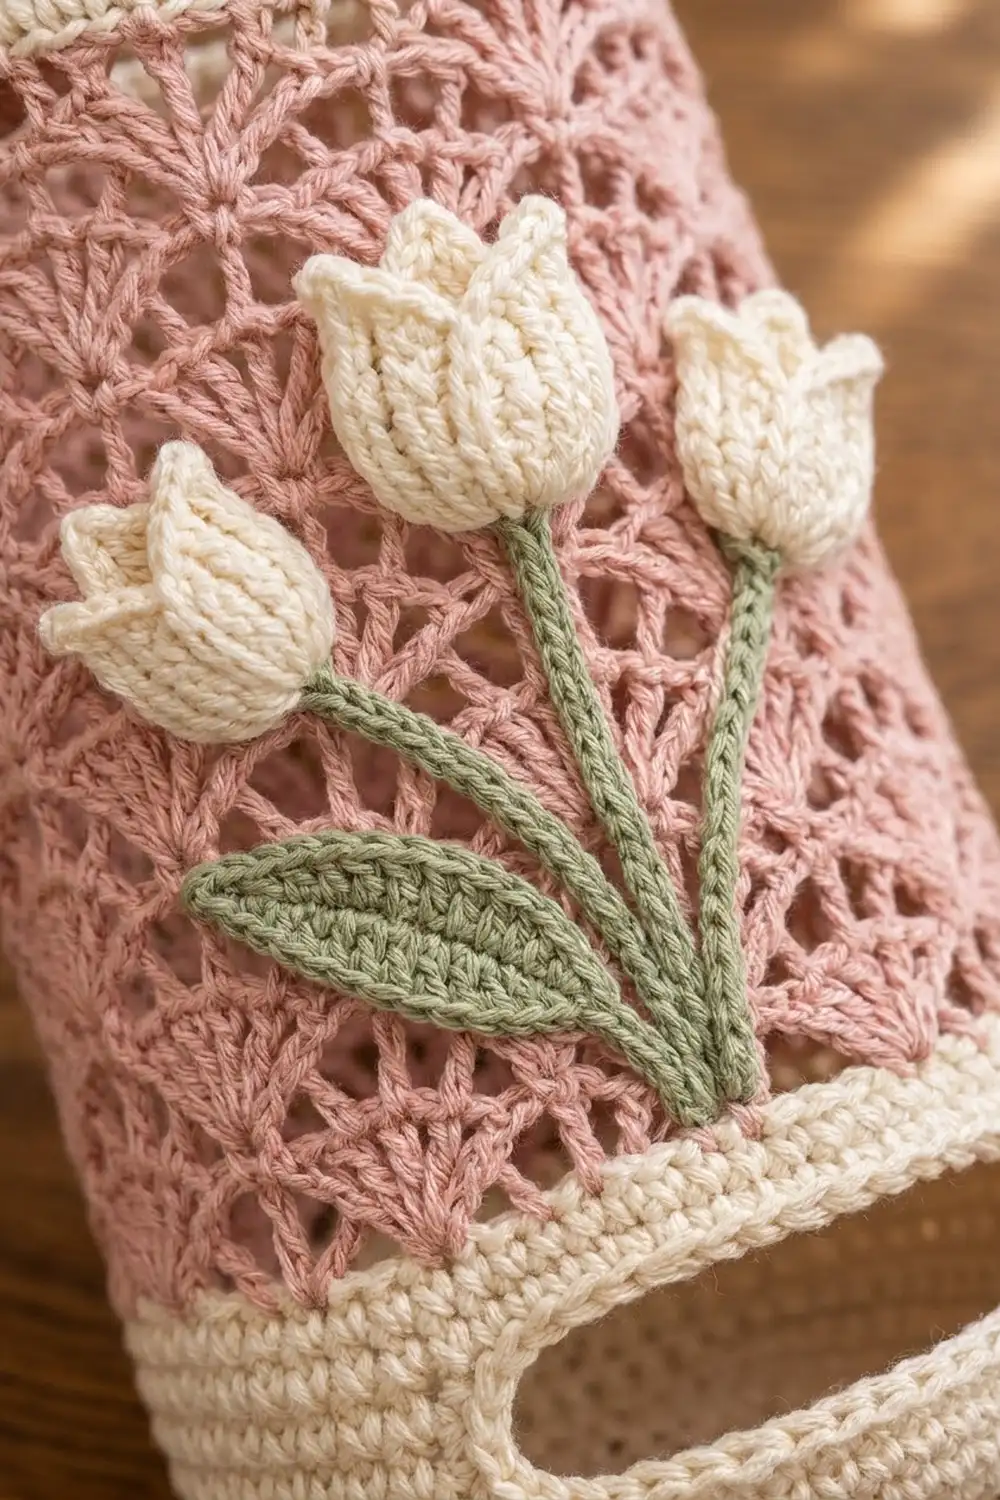
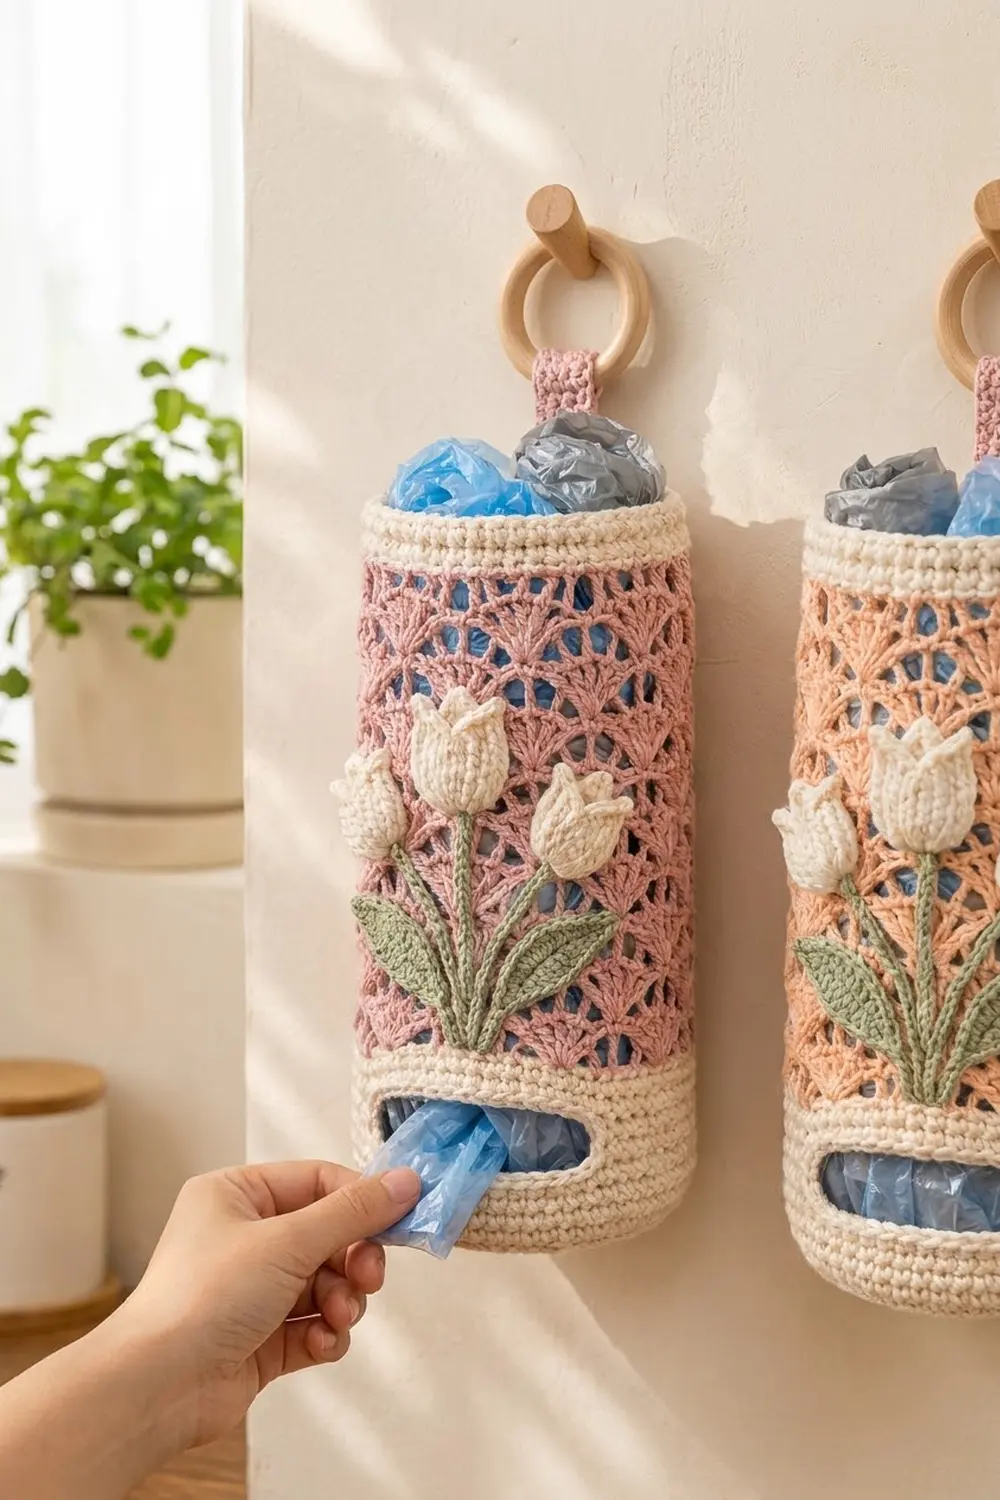
This hanging bag holder makes a kitchen chore look pretty. A tall tube of dusty pink fan lace sits on a solid cream base, and a wide oval slot near the bottom lets you pull out one bag at a time. A cream band finishes the rim. A pink strap with a wooden ring lets it hang from a hook or peg.
On the front, three cream tulips on sage green stems rise from the base band, with two pointed leaves at the bottom. The look is soft, cottage-style and a little vintage. The same pattern also works in peach with cream and green.
This pattern uses US crochet terms. The finished holder is about 5.7 in (14.5 cm) across and 12.2 in (31.0 cm) tall, not counting the strap. The circumference is 18 in (45.7 cm).
You make the holder in one piece from the bottom up. First you make a flat circle for the base. Then you work a solid single crochet band, with the bag slot made in short rows. Next comes the lace body, then a single crochet top band. You make the strap, tulips, stems and leaves separately and sew them on.
Finished Size and Construction
- Finished size: 5.7 in (14.5 cm) diameter x 12.2 in (31.0 cm) tall
- Skill level: Intermediate
- Terminology: US
- Yarn weight: Worsted (#4) cotton
- Hook: 4.5 mm (US 7)
- Number of pieces: 1 main body made in one piece, plus 1 strap, 3 tulips, 3 stems and 2 leaves sewn on
- Layout: A tube with a closed bottom. The strap is at the back; the slot and tulips are at the front.
- Base band: 2.9 in (7.4 cm) tall, with a 4 in (10.2 cm) x 1.1 in (2.8 cm) slot
- Lace body: 8 in (20.3 cm) tall
- Size before top band: 10.9 in (27.7 cm) tall
- Top band depth: 1.3 in (3.3 cm)
Materials
Use a smooth worsted cotton or cotton blend. Cotton holds the tube shape and won’t stretch out under the weight of the bags. The amounts below assume a yarn with about 1.5 m per gram, which is roughly 110 m per 70 g ball.
- Cream (base, bands, slot edging, tulips): 95 g, about 145 m
- Dusty pink (lace body, strap): 85 g, about 130 m
- Sage green (stems, leaves): 15 g, about 23 m
All quantities include an extra margin of about 15%.
Tools:
– 4.5 mm (US 7) crochet hook
– Wooden ring, 2.75 in (7.0 cm) across
– Tapestry needle
– 4 locking stitch markers
– Scissors
– Pins for placing the appliqués
– Optional: a 5.5 in (14.0 cm) cardboard or plastic circle to stiffen the base
Abbreviations (US Terms)
- ch – chain
- sl st – slip stitch
- sc – single crochet
- hdc – half double crochet
- dc – double crochet
- tr – treble crochet
- inc – 2 sc in the same stitch
- BLO – back loop only
- sk – skip
- sp – space
- MR – magic ring
- st(s) – stitch(es)
- rev sc – reverse single crochet (crab stitch): sc worked from left to right (right to left if you’re left-handed)
Shell: 7 dc in the stitch or space given.
Gauge and Checkpoints
Single crochet gauge: 16 sc and 18 rows = 4 in (10.2 cm). That’s 4 sc per inch, and each sc row is about 0.22 in (0.6 cm) tall.
Lace gauge: One lace repeat (one shell plus one sc) = 1.5 in (3.8 cm) wide. Two lace rounds (one chain round plus one shell round) = 1 in (2.5 cm) tall.
The base is your test piece. Make Rounds 1–12, then measure before you go on.
Checkpoints:
– After Rnd 12, the base is 5.7 in (14.5 cm) across.
– After Rnd 25, the base band is 2.9 in (7.4 cm) tall, measured from the fold made by Rnd 13. The circumference is 18 in (45.7 cm).
– After Rnd 41, the total height is 10.9 in (27.7 cm).
– After Rnd 47, the total height is 12.2 in (31.0 cm).
If the base is too big, go down half a hook size to 4.0 mm. If it’s too small, go up to 5.0 mm. Don’t change the stitch count, because the lace repeat needs exactly 72 stitches.
Main Pattern
Work in joined rounds. At the end of each round, sl st to the first st. Start each round with ch 1, which doesn’t count as a stitch, unless the pattern says otherwise.
Base (Cream)
Rnd 1: MR, 6 sc in ring, join. (6 sts)
Rnd 2: Inc in each st around. (12 sts)
Rnd 3: Sc 1, inc; repeat 6 times. (18 sts)
Rnd 4: Sc 2, inc; repeat 6 times. (24 sts)
Rnds 5–12: Keep going the same way, adding 1 more sc between increases each round. The totals are 30, 36, 42, 48, 54, 60, 66 and 72 sts. Rnd 12 is sc 10, inc worked 6 times. (72 sts)
To stop the circle from turning into a hexagon, shift the increases on every other round. Work half of the plain sc before the first inc, and the rest at the end of the round.
Checkpoint: The base is 5.7 in (14.5 cm) across.
Base Band and Bag Slot (Cream)
Rnd 13: Sc in BLO of each st around. (72 sts) The unused front loops make a crisp fold where the wall turns up.
Rnds 14–17: Sc in each st around. (72 sts)
Row 18: Ch 1, sc in the first 56 sts, turn. Leave the last 16 sts unworked for the slot. (56 sts)
Rows 19–22: Ch 1, sc in each of the 56 sts, turn. Don’t turn at the end of Row 22. (56 sts) Row 22 ends at the edge beside the unworked stitches.
Bridge: Ch 16. Sl st into the first sc of Row 22 so the chain crosses the gap.
Rnd 23: Ch 1. Sc in the same st and the next 55 sts, then sc in each of the 16 ch. Join. (56 + 16 = 72 sts)
Rnds 24–25: Sc in each st around. (72 sts) Fasten off cream.
The slot is 16 sts wide, or 4 in (10.2 cm), and 5 rows tall, or 1.1 in (2.8 cm). Its center marks the front of the holder, so place a marker there.
Checkpoint: The band is 2.9 in (7.4 cm) tall, with a circumference of 18 in (45.7 cm).
Fan Lace Body (Pink)
The lace is worked over a multiple of 6 sts, so 72 sts gives you 12 repeats.
Rnd 26 (setup shell round): Join pink in any st. Ch 1, sc in the same st, sk 2, shell in next st, sk 2, sc in next st. Repeat around, ending with sk 2, shell in next st, sk 2. Join to the first sc. (12 shells + 12 sc = 96 sts)
Each repeat uses 6 sts: 1 for the sc, 2 skipped, 1 for the shell and 2 skipped. That’s 12 x 6 = 72.
Rnd 27 (chain round): Sl st in the next 4 dc to reach the center dc of the first shell. Ch 1, sc in the same dc, ch 5, sc in the center (4th) dc of the next shell. Repeat around, ending with ch 5. Join to the first sc. (12 sc + 12 ch-5 sps)
Rnd 28 (shell round): Ch 1, sc in the first sc, shell in the next ch-5 sp, sc in the next sc. Repeat around, ending with a shell in the last ch-5 sp. Join. (12 shells + 12 sc = 96 sts)
Each new shell sits between two shells of the round below. This gives the staggered fan look.
Rnds 29–41: Alternate the two rounds:
– Rounds 29, 31, 33, 35, 37, 39 and 41: work as Rnd 27. (12 sc + 12 ch-5 sps)
– Rounds 30, 32, 34, 36, 38 and 40: work as Rnd 28. (12 shells + 12 sc = 96 sts)
End after Rnd 41, which is a chain round. Fasten off pink. The lace has 16 rounds in total: 8 shell rounds and 8 chain rounds.
Checkpoint: The lace is 8 in (20.3 cm) tall, and the total height is 10.9 in (27.7 cm).
Border: Top Band (Cream)
Border gauge: 16 sc = 4 in (10.2 cm), the same as the base band, so 72 sts = 18 in (45.7 cm).
On a tube, treat each “side” as one quarter of the round, which is 3 lace repeats.
Rnd 42 (conversion round): Join cream in any sc. Ch 1, sc in the same sc, 5 sc in the next ch-5 sp, sc in the next sc, 5 sc in the next ch-5 sp. Repeat around. Join.
– Count: 12 sc made 1 per existing sc, plus 60 sc made into spaces (12 x 5), for 72 sts.
– Per quarter: 3 + 15 = 18 sts.
Rnds 43–46: Sc in each st around. (72 sts; 18 per quarter)
Rnd 47: Rev sc in each st around. Join. (72 sts; 18 per quarter) Fasten off.
Why the math works: The base has 72 sts. The lace has 12 repeats of 6 sts, which is also 72. The conversion round puts back exactly 1 sc for each sc and 5 sc for each 5-chain space, so you’re back to 72. Because the count is the same at the bottom and the top, the walls stay straight and don’t flare or pull in. The six border rounds add 1.3 in (3.3 cm), for a total height of 12.2 in (31.0 cm).
Slot Edging (Cream)
Join cream at a lower corner of the slot. Work sc as follows:
– 16 sc into the free loops along the bottom edge
– 5 sc along the row ends of one side
– 16 sc into the underside of the bridge chain
– 5 sc along the row ends of the other side
Join. (16 + 5 + 16 + 5 = 42 sts) Fasten off. This round makes the opening firmer and rounder, so it looks oval and won’t stretch.
Hanging Strap (Pink)
Row 1: Ch 7, sc in 2nd ch from hook and each ch across, turn. (6 sts)
Rows 2–24: Ch 1, sc in each st, turn. (6 sts)
The strap is 1.5 in (3.8 cm) x 5.3 in (13.5 cm). Fasten off and leave a long tail.
Tulips (Cream, make 3)
Row 1: Ch 5, sc in 2nd ch from hook and each ch across, turn. (4 sts)
Row 2: Ch 1, inc, sc 2, inc, turn. (6 sts)
Row 3: Ch 1, sc 6, turn. (6 sts)
Row 4: Ch 1, inc, sc 4, inc, turn. (8 sts)
Rows 5–6: Ch 1, sc 8, turn. (8 sts)
Row 7 (petals): Ch 1, then work:
– sl st in st 1
– (hdc, dc, hdc) in st 2
– sl st in st 3
– (dc, tr) in st 4
– (tr, dc) in st 5
– sl st in st 6
– (hdc, dc, hdc) in st 7
– sl st in st 8
(14 sts)
This row makes three petal points, with the center point tallest. Each tulip is about 2 in (5.1 cm) wide and 1.75 in (4.4 cm) tall. Leave a long tail.
Stems (Green)
Center stem: Ch 23. Sl st in the back bump of the 2nd ch from hook and in each ch across. (22 sl st) It’s about 5.5 in (14.0 cm) long.
Side stems (make 2): Ch 19. Sl st in the back bump of the 2nd ch from hook and in each ch across. (18 sl st) Each is about 4.5 in (11.4 cm) long.
Leaves (Green, make 2)
Rnd 1: Ch 11.
– First side: sc in 2nd ch from hook, then 1 st in each of the next 8 ch in this order: hdc, dc, dc, tr, tr, dc, dc, hdc.
– Tip: 3 sc in the last ch.
– Second side: turn the piece and work along the other side of the chain: hdc, dc, dc, tr, tr, dc, dc, hdc, sc.
– Sl st to the first sc.
(9 + 3 + 9 = 21 sts)
Each leaf is about 2.5 in (6.4 cm) long and 1 in (2.5 cm) wide. The foundation chain forms a natural center vein.
Assembly
- Strap: Fold the top 1.25 in (3.2 cm) of the strap over the wooden ring and sew it down. Line the strap up directly opposite the slot. Sew the bottom 1.25 in (3.2 cm) to the inside of the top band. About 2.8 in (7.1 cm) of strap will show.
- Center stem: Pin the bottom end to the top edge of Rnd 25, directly above the slot marker, and run it straight up.
- Side stems: Start them at the same point and curve them outward. Their tops should end about 2.25 in (5.7 cm) to the left and right of center.
- Tulips: Sew a tulip to the top of each stem with the petals pointing up. Sew down only the sides and bottom so the petals stand slightly away from the lace.
- Leaves: Sew one leaf on each side at the base of the stems, angled upward.
- Securing: Whipstitch everything on with matching yarn. Catch the sc or dc posts, not the chain spaces.
Final Blocking
- Weave in all ends. Run them through the solid bands where you can, because tails show through the lace.
- If you’re using the optional circle, drop it into the base.
- Fill the holder firmly with a rolled towel, or slide it over a round container 5.7 in (14.5 cm) across.
- Spray it with water until it’s damp but not soaked.
- Ease the shells open so each fan sits evenly. Gently straighten the slot and the rim.
- Let it dry completely on the form, which usually takes about 24 hours.
- Take it off the form and check it against the final checkpoint.
Final Quality-Control Checklist
- The base lies flat and is 5.7 in (14.5 cm) across.
- The circumference is 18 in (45.7 cm) at the base band, the lace and the rim.
- The slot is 4 in (10.2 cm) x 1.1 in (2.8 cm) and edged with 42 sc.
- Every shell round has 12 shells, evenly staggered.
- The top band has 72 sts and a neat rev sc edge.
- The total height is 12.2 in (31.0 cm).
- The strap is directly opposite the slot and firmly sewn at both ends.
- The tulips and leaves are mirrored evenly around the center stem.
Troubleshooting
The base cups like a bowl: You may be short on stitches or increasing too tightly. Recount each round, or go up a hook size for the base only.
The lace flares out: Your shells are too loose. Pull each dc up a little less, or use a 4.0 mm hook for the lace only.
The lace pulls in: Your ch-5 spaces are too tight. Chain more loosely.
The shells stack instead of staggering: In each chain round, make sure every sc goes into the center (4th) dc of a shell.
The slot gapes or sags: Make the bridge chain firmer, and don’t skip the slot edging.
The holder leans when it hangs: The strap isn’t directly opposite the slot. Unpick it and sew it on again in the right place.
Care
Hand wash in cool water with mild soap and press out the water in a towel. Dry it over a form in its proper shape, and don’t tumble dry, because that can distort the lace.
Final Notes
Everything in this design comes from one number: 72 stitches. The 5.7 in (14.5 cm) base gives 72 sts and an 18 in (45.7 cm) circumference. That count carries into a 2.9 in (7.4 cm) base band with a 4 in (10.2 cm) slot, then 12 fan repeats for 8 in (20.3 cm) of lace. A 1.3 in (3.3 cm) top band finishes it, for a total height of 12.2 in (31.0 cm). Check each measurement as you go and the holder will hang straight.
Happy crocheting!