

Meet Honey, a cozy teddy bear who hangs on the wall and holds small treasures in a cream net pocket. She has a round caramel head, a soft cream muzzle, little round ears, puffy arms and feet, and a short hanging loop.
The colors are simple: caramel brown for the bear, cream for the muzzle and pocket, and dark brown for the embroidered nose and mouth. The style is warm and suits a nursery, with a solid textured body and a light, open pocket.
This pattern uses US crochet terms. The finished bear measures about 7.5 in (19.1 cm) wide across the arms and 11.7 in (29.7 cm) tall from ear to toe, plus a 3 in (7.6 cm) hanging loop.
You will crochet a flat round head, a flat body in rows, small ears, a muzzle, stuffed arms and feet, a net pocket, and a loop. The pocket gets a single crochet border and is then crocheted to the body. The arms go on last so they sit over the pocket rim.
Finished Size and Construction
- Finished size: 7.5 in (19.1 cm) wide x 11.7 in (29.7 cm) tall, plus 3 in (7.6 cm) loop
- Skill level: Easy to intermediate
- Terminology: US crochet terms
- Yarn weight: Worsted weight (#4)
- Hook: 4.0 mm (G-6)
- Number of pieces: 11 (head, muzzle, 2 ears, body, 2 arms, 2 feet, pocket, loop)
- Layout: One bear, with the head over the body and the pocket on the lower body
- Head size: 5.1 in (13.0 cm) diameter
- Body size: 5.8 in (14.7 cm) wide x 6.4 in (16.3 cm) tall
- Pocket size before border: 5.6 in (14.2 cm) wide x 4.0 in (10.2 cm) tall
- Pocket size after border: 6.0 in (15.2 cm) wide x 4.4 in (11.2 cm) tall
- Border depth: 1 round, about 0.2 in (0.5 cm)
Materials
Choose a smooth worsted weight cotton or cotton blend. Cotton holds its shape on the wall and shows the net pattern clearly. Acrylic also works but gives a softer, stretchier pocket.
- Caramel brown: 70 g, about 140 m
- Cream: 35 g, about 70 m
- Dark brown: 5 g, about 10 m (nose and mouth)
These amounts include a margin of roughly 20 percent for gauge differences and swatching.
Tools:
- 4.0 mm (G-6) crochet hook
- Two 9 mm black safety eyes
- About 10 g of polyester fiberfill
- Tapestry needle
- Stitch markers
- Rust-proof pins
- Scissors and a ruler
Abbreviations (US Terms)
- ch: chain
- sl st: slip stitch
- sc: single crochet
- dc: double crochet
- inc: 2 sc in the same stitch
- sc2tog: single crochet 2 together
- sk: skip
- sp: space
- MR: magic ring
- BLO: back loop only
- st(s): stitch(es)
Special stitch: mesh loop. Ch 5, then sc in the next ch-5 space. Rows of mesh loops stacked on top of each other form the diamond net.
Gauge and Checkpoints
Gauge: 18 sc and 20 rows = 4 in (10.2 cm) in sc worked in rows. That is 4.5 sts and 5 rows per inch.
Make the head first as your test piece. If the head matches the checkpoints, the rest of the bear will too.
Checkpoints:
- Head after Rnd 6: 2.5 in (6.4 cm) across
- Head after Rnd 12: 5.1 in (13.0 cm) across
- Body Row 5: 5.8 in (14.7 cm) wide
- Body after Row 22: 4.4 in (11.2 cm) tall
- Body after Row 32: 6.4 in (16.3 cm) tall
- Pocket after Row 11: 5.6 in (14.2 cm) x 4.0 in (10.2 cm)
If your pieces are too big, go down 0.5 mm. If they are too small, go up 0.5 mm. If the head cups, add one extra inc per round. If it ruffles, work your stitches more firmly.
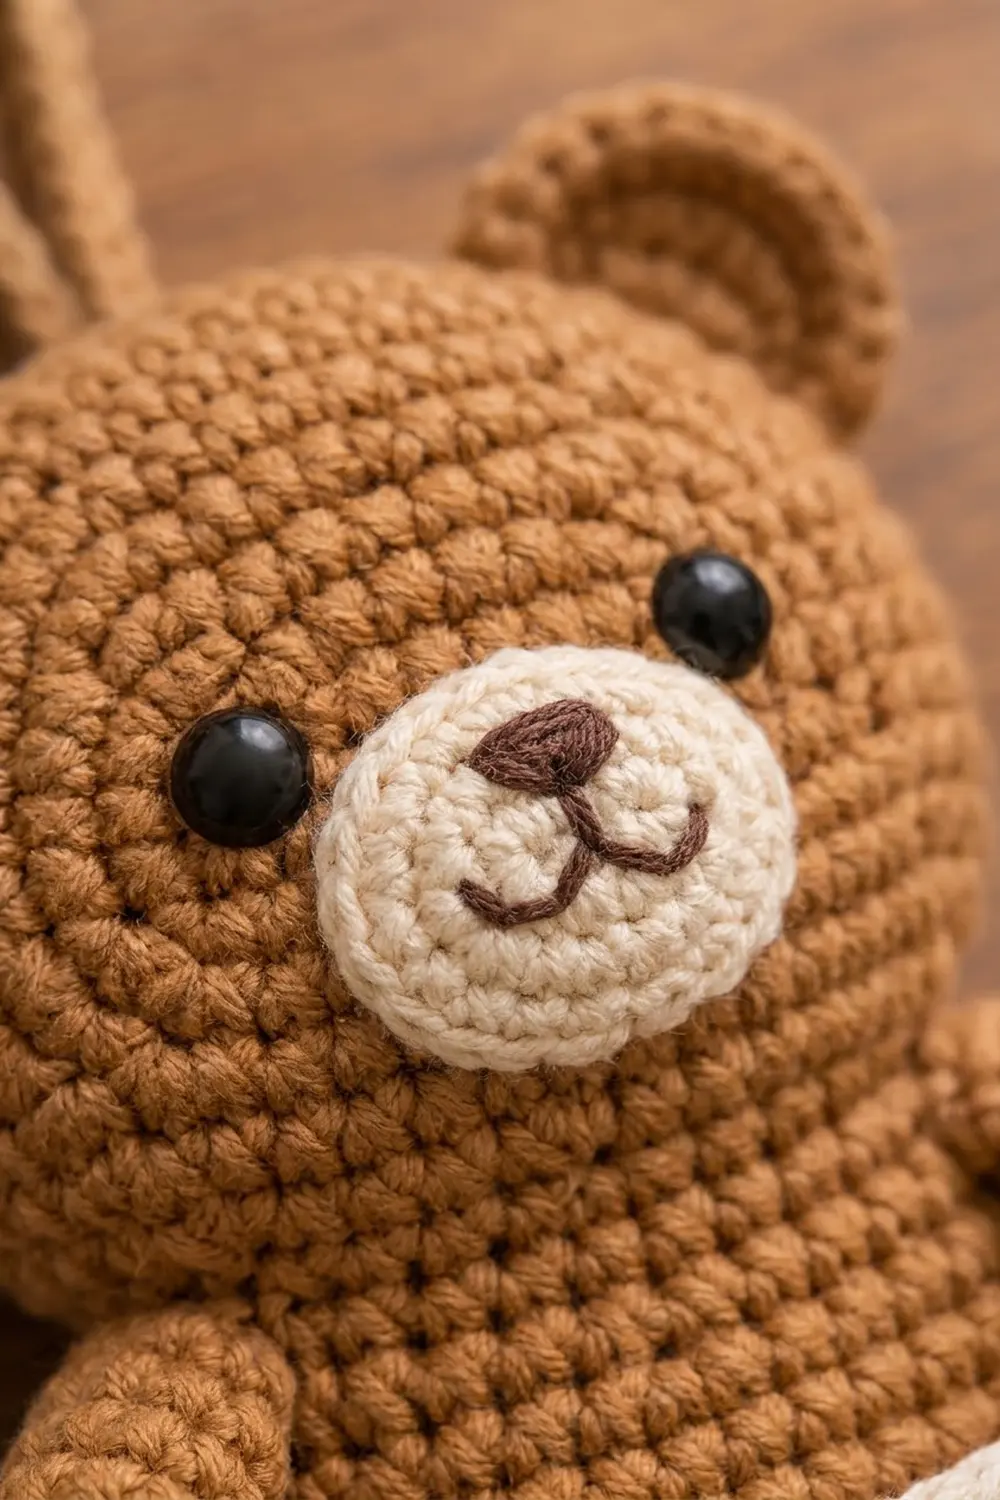
Head (make 1, caramel brown)
Work in continuous rounds. Mark the first stitch of each round.
- Rnd 1: 6 sc in MR. (6)
- Rnd 2: Inc in each st around. (12)
- Rnd 3: (Sc 1, inc) 6 times. (18)
- Rnd 4: (Sc 2, inc) 6 times. (24)
- Rnd 5: (Sc 3, inc) 6 times. (30)
- Rnd 6: (Sc 4, inc) 6 times. (36)
- Rnd 7: (Sc 5, inc) 6 times. (42)
- Rnd 8: (Sc 6, inc) 6 times. (48)
- Rnd 9: (Sc 7, inc) 6 times. (54)
- Rnd 10: (Sc 8, inc) 6 times. (60)
- Rnd 11: (Sc 9, inc) 6 times. (66)
- Rnd 12: (Sc 10, inc) 6 times. (72)
Sl st to the next st and fasten off. The head is flat and 5.1 in (13.0 cm) across.
Muzzle (make 1, cream)
- Rnd 1: Ch 5. Sc in 2nd ch from hook, sc in next 2 ch, 3 sc in last ch. Working along the opposite side, sc in next 2 ch, 2 sc in last ch (the same ch as the first sc). (10)
- Rnd 2: Inc in first st, sc 2, inc in each of next 3 sts, sc 2, inc in each of next 2 sts. (16)
- Rnd 3: Work (sc 1, inc) 3 times across the 6 sts at each end, and 1 sc in each of the 4 straight-side sts. (22)
Fasten off with a 12 in (30.5 cm) tail. The oval measures 1.7 in (4.3 cm) x 1.2 in (3.0 cm).
Ears (make 2, caramel brown)
- Rnd 1: 6 sc in MR. (6)
- Rnd 2: Inc in each st around. (12)
- Rnd 3: Working in BLO, (sc 1, inc) 6 times. (18)
Working Rnd 3 in the back loops leaves a small ridge that outlines the inner ear. Fasten off with a long tail. Each ear is 1.3 in (3.3 cm) across.
Body (make 1, caramel brown)
The body is worked flat in rows from the bottom up. The ch 1 at the start of each row does not count as a stitch.
- Row 1: Ch 19. Sc in 2nd ch from hook and in each ch across. (18)
- Row 2: Ch 1, turn. Inc in first st, sc 16, inc in last st. (20)
- Row 3: Ch 1, turn. Inc, sc 18, inc. (22)
- Row 4: Ch 1, turn. Inc, sc 20, inc. (24)
- Row 5: Ch 1, turn. Inc, sc 22, inc. (26)
- Rows 6–29: Ch 1, turn. Sc in each st across. (26)
- Row 30: Ch 1, turn. Sc2tog, sc 22, sc2tog. (24)
- Row 31: Ch 1, turn. Sc2tog, sc 20, sc2tog. (22)
- Row 32: Ch 1, turn. Sc2tog, sc 18, sc2tog. (20)
Fasten off. The body is 5.8 in (14.7 cm) wide at its widest point, 4.0 in (10.2 cm) across Row 1, and 4.4 in (11.2 cm) across Row 32. Rows 1–5 form the rounded bottom.
Arms (make 2, caramel brown)
- Rnd 1: 6 sc in MR. (6)
- Rnd 2: Inc in each st around. (12)
- Rnds 3–12: Sc in each st around. (12)
Stuff lightly so the arm stays soft and a little flat. Flatten the opening and sc through both layers. (6) Fasten off with a long tail. Each arm is 2.4 in (6.1 cm) long and 1.3 in (3.3 cm) wide.
Feet (make 2, caramel brown)
- Rnd 1: 6 sc in MR. (6)
- Rnd 2: Inc in each st around. (12)
- Rnd 3: (Sc 1, inc) 6 times. (18)
- Rnds 4–5: Sc in each st around. (18)
- Rnd 6: (Sc 1, sc2tog) 6 times. (12)
Stuff firmly.
- Rnd 7: Sc2tog 6 times. (6)
Close the hole and leave a long tail. Each foot is about 1.3 in (3.3 cm) across.
Net Pocket (make 1, cream)
The pocket is worked flat from the top band down.
- Row 1: Ch 26. Sc in 2nd ch from hook and in each ch across. (25)
- Rows 2–3: Ch 1, turn. Sc in each st across. (25)
These three rows form the solid top band, 0.6 in (1.5 cm) deep.
- Row 4: Ch 1, turn. Sc in first st, ch 5, sk 3 sts, sc in next st; repeat from * 5 more times. (6 loops, 7 sc)
- Row 5: Ch 5 (counts as dc + ch 2), turn. Sc in first ch-5 sp, ch 5, sc in next ch-5 sp; repeat from * 4 more times. Ch 2, dc in last sc. (5 full loops + 2 half loops)
- Row 6: Ch 1, turn. Sc in dc, ch 5, sc in next ch-5 sp; repeat from * 4 more times. Ch 5, sc in 3rd ch of turning ch. (6 loops, 7 sc)
- Rows 7–10: Repeat Rows 5–6 twice. Row 10 ends with 6 loops and 7 sc.
- Row 11: Ch 1, turn. Sc in first sc, 3 sc in next ch-5 sp, sc in next sc; repeat from * 5 more times. (25)
Count check: 1 + (6 x 4) = 25, the same as the top band. The pocket now measures 5.6 in (14.2 cm) x 4.0 in (10.2 cm).
Make All Pieces
Caramel brown: 1 head, 2 ears, 1 body, 2 arms, 2 feet, 1 loop (9 pieces)
Cream: 1 muzzle, 1 net pocket (2 pieces)
Dark brown: embroidery only
Hanging loop (caramel brown): Ch 31. Sl st in the back bump of the 2nd ch from hook and in each ch across. (30 sl st) The cord is 6 in (15.2 cm) long and folds into a 3 in (7.6 cm) loop.
Front view of the layout:
            [ Loop ]
     [Ear]  [ Head ]  [Ear]
            [Muzzle]
   [Arm]    [ Body ]    [Arm]
            [Pocket]
         [Foot]  [Foot]
Joining
Sew the pieces together with the long tails and a tapestry needle. Whipstitch one edge stitch of the top piece to one stitch or row end of the piece underneath. Keep the stitches snug but not tight, so the pieces lie flat without puckering.
- Face: Pin the muzzle so its top edge sits just below the head’s center ring. Insert the safety eyes between Rnds 4 and 5, about 1.5 in (3.8 cm) apart and level with the top of the muzzle. Sew around the muzzle edge, 1 stitch per muzzle stitch. (22)
- Embroidery: With dark brown, satin-stitch a small triangle nose at the top of the muzzle. Then backstitch a short line down from the nose and a curved “w” smile.
- Ears: Place each ear behind the head at the 10 o’clock and 2 o’clock positions, with 0.6 in (1.5 cm) showing past the head edge. Sew the overlapping part to the back of the head.
- Head to body: Lay the head over the top of the body so it covers Rows 28–32, an overlap of 1 in (2.5 cm). Sew the head’s lower edge to the body, then tack Row 32 to the back of the head.
- Feet: Sew each foot behind Rows 1–2, about 1 in (2.5 cm) in from each side, with 0.6 in (1.5 cm) showing below the body.
- Loop: Fold the cord in half. Sew both ends to the back of the head at the top center, 0.4 in (1.0 cm) below the edge.
Size checkpoint: Without arms, the bear should measure 11.7 in (29.7 cm) from the top of the ears to the bottom of the feet. Attach the arms after the pocket border.
Border: Pocket Edging and Attachment
The border uses the same gauge as the rest of the bear: 4.5 sc per inch. One round adds 0.2 in (0.5 cm) to every edge.
Rnd 1 (cream, conversion round): Ch 1, then work around the whole pocket:
- Bottom (Row 11): 1 sc in each st, with 3 sc in each corner st. (25 sts worked + 4 extra)
- Side: 1 sc in each band row end and in the Row 11 row end, and 2 sc in each mesh row end (Rows 4–10). (3 + 14 + 1 = 18)
- Top (foundation chain): 1 sc in each st, with 3 sc in each corner st. (25 sts worked + 4 extra)
- Other side: Work as the first side. (18)
Total: (25 + 25 + 18 + 18 = 86 worked one per stitch or row end) + 8 extra corner sts = 94. Sl st to the first sc and fasten off.
Per side, including both corner center stitches: top 27, bottom 27, each side 22. Check: 27 + 27 + 22 + 22 = 98, minus the 4 shared corners = 94.
Why the math works: The band and Row 11 each have 25 sts. The border adds one corner stitch past each end, so each width becomes 27 sts, or 6.0 in (15.2 cm). The 22 stitches on each side match the 22 body rows the pocket covers, so the sides join one to one.
Attachment pass (cream): Pin the pocket to the body with its bottom corners at the ends of body Row 1 and its top corners at the ends of Row 22. Slip stitch through one pocket border st and one body row end or st at the same time:
- Left side: Join 22 pocket sts to body Rows 1–22, one to one.
- Bottom: Join the 25 pocket sts between the corners to the 18 sts of body Row 1. Work 2 pocket sts into one body st at body sts 3, 5, 7, 9, 11, 13, and 15. (18 + 7 = 25)
- Right side: Join 22 pocket sts to body Rows 22–1, one to one.
Total: 22 + 25 + 22 = 69 pocket sts joined to 22 + 18 + 22 = 62 body points. The 7 eased stitches and the extra 0.2 in (0.5 cm) of width give the pocket depth and curve it into a U around the rounded bottom. Leave the top 27 sts free as the opening.
Arms: Sew each arm to the side of the body with its top at Row 27. Angle it down and inward so the hand rests on the pocket band, about 0.5 in (1.3 cm) in from the pocket’s top corner. Tack the hand lightly to the band. The bear now measures 7.5 in (19.1 cm) across the arms.
Final Blocking
- Lightly mist the bear with water.
- Lay it face up on a blocking mat.
- Pin the head into a 5.1 in (13.0 cm) circle.
- Pin the body to 5.8 in (14.7 cm) wide, keeping the bottom rounded.
- Straighten the pocket band to 6.0 in (15.2 cm) and open the net diamonds evenly.
- Leave the arms, feet, and ears unpinned so they stay puffy.
- Let the bear dry completely before you hang it.
Final Quality-Control Checklist
- Head is flat, 5.1 in (13.0 cm) across, with no cupping
- Eyes are level and locked with washers
- Nose and mouth are centered on the muzzle
- Ears match each other
- Head overlaps body by 1 in (2.5 cm)
- Pocket band is straight and the opening lies flat
- Net diamonds are even and open
- Pocket sides cover body Rows 1–22 on both sides
- Feet show 0.6 in (1.5 cm) below the body
- Loop is secure and centered
- All ends are woven in on the back
Troubleshooting
- Head ruffles: Your tension has loosened. Go down a hook size, or work Rnds 10–12 more firmly.
- Head cups: Add one extra inc in each of the last two rounds.
- Net loops sag: Work ch 4 instead of ch 5 throughout. The stitch counts stay the same.
- Pocket too wide: Check that Row 1 has exactly 25 sc and that your gauge is 4.5 sts per inch.
- Pocket puckers at the bottom: Spread the 7 eased stitches more evenly.
- Arms droop: Tack the hands to the pocket band.
- Bear tilts on the hook: Center the loop ends exactly and sew through two head rounds.
Care
Hand wash in cool water with mild soap, roll in a towel to press out the water, and dry flat. Take any toys out of the pocket before washing.

Final Notes
Everything builds from the gauge of 4.5 sts and 5 rows per inch, which gives a 5.1 in (13.0 cm) head and a 5.8 in (14.7 cm) x 6.4 in (16.3 cm) body. The 25-stitch pocket grows to 27 stitches with its border, or 6.0 in (15.2 cm), and its 22-stitch sides match body Rows 1–22. The head overlaps the body by 1 in (2.5 cm), and the ears and feet each add 0.6 in (1.5 cm). That brings the finished bear to 7.5 in (19.1 cm) x 11.7 in (29.7 cm), ready to hold small toys on a nursery wall.
Happy crocheting!