

Tame your stash of plastic grocery bags with a cheerful fish that hangs right in your kitchen. The Teal Tide Fish Bag Holder has a stretchy teal diamond-net body that shows off its contents, plus coral fins and a coral tail for a bright splash of color.
The style is playful but useful. Stuff bags in through the wide top band, then pull them out one at a time through the small opening at the tail end. Two black safety eyes on the top band give the fish its face, and a crocheted cord hangs it from any hook.
This pattern uses US crochet terms. The finished body is about 14¾ in (37.5 cm) long and 7 in (17.8 cm) wide when laid flat at its widest point. With the tail, it hangs about 19¼ in (48.9 cm) long, not counting the hanging loop.
Construction is simple. You work the body in one piece from the top down: a solid band first, then a spiral of chain-loop net. The loops get longer to widen the body and shorter to taper it. The fins, tail lobes, tail ring and cord are made separately and sewn on. A narrow solid band closes the bottom of the body.
Finished Size and Construction
- Finished body: 14¾ in (37.5 cm) long × 7 in (17.8 cm) wide flat at the widest point
- Total hanging length (without loop): 19¼ in (48.9 cm)
- Width across fins: about 11 in (27.9 cm)
- Skill level: Intermediate
- Terminology: US
- Yarn weight: Worsted (#4) cotton
- Hook: 5.0 mm (H-8)
- Number of pieces: 7 crocheted pieces (1 body, 2 fins, 2 tail lobes, 1 tail ring, 1 cord) plus 2 safety eyes
- Layout: Vertical fish: cord on top, body in the center, fins on the upper sides, tail below
- Top band: 9 in (22.9 cm) around, 4½ in (11.4 cm) flat, 1 in (2.5 cm) deep
- Body before bottom band: 14 in (35.6 cm) long (top band plus net)
- Bottom band (border) depth: ¾ in (1.9 cm)
Materials
Use a smooth 100% cotton or cotton blend in worsted weight. Cotton holds the net’s shape, doesn’t stretch out under the weight of the bags, and survives the washing machine. Avoid splitty or fuzzy yarns, because the net needs crisp chains to look good.
- Teal (main color): 85 g, about 145 m (159 yd)
- Coral (contrast color): 30 g, about 51 m (56 yd)
The quantities above include a margin of about 15% for your gauge swatch and weaving in ends.
Tools:
– 5.0 mm (H-8) crochet hook
– Two 9 mm black safety eyes with washers
– Tapestry needle
– 4 locking stitch markers
– Scissors
– Measuring tape
– Rustproof pins for blocking
Abbreviations (US Terms)
- ch – chain
- sl st – slip stitch
- sc – single crochet
- hdc – half double crochet
- dc – double crochet
- FPdc – front post double crochet
- BLO – back loop only
- sk – skip
- st(s) – stitch(es)
- rnd(s) – round(s)
- RS / WS – right side / wrong side
Special stitch – FPdc: Yarn over and insert the hook from front to back to front around the post of the stitch you’re told to use. Yarn over, pull up a loop, then [yarn over, pull through 2 loops] twice. This makes a raised rib on the side facing you.
Net loop: “Ch X, sc in next loop” makes one mesh diamond. Every net round has 12 loops.
Gauge and Checkpoints
Solid gauge: 16 sc and 16 rows = 4 in (10.2 cm).
Net gauge: 4 rnds of ch-5 net = 3 in (7.6 cm) tall, measured while hanging under gentle tension. A ch-7 round is about 1 in (2.5 cm) tall.
Test one piece first. Crochet a fin, which only takes a few minutes, and measure it. It should be about 2½ in (6.4 cm) tall × 3 in (7.6 cm) wide. If it’s within ¼ in (0.6 cm), your tension is good to go.
Checkpoints:
– Top band: 9 in (22.9 cm) around, 4½ in (11.4 cm) flat.
– After net Rnd 3: 2¼ in (5.7 cm) of net below the band.
– After net Rnd 10: 9 in (22.9 cm) of net, about 7 in (17.8 cm) flat.
– After net Rnd 15: 13 in (33.0 cm) of net.
– Finished body: 14¾ in (37.5 cm).
Too big? Go down to a 4.5 mm (7) hook, or remove 1 ch from each loop in the ch-7 section. Too small? Go up to a 5.5 mm (I-9) hook. Don’t add extra loops. Twelve loops are what fit the 36-stitch band.
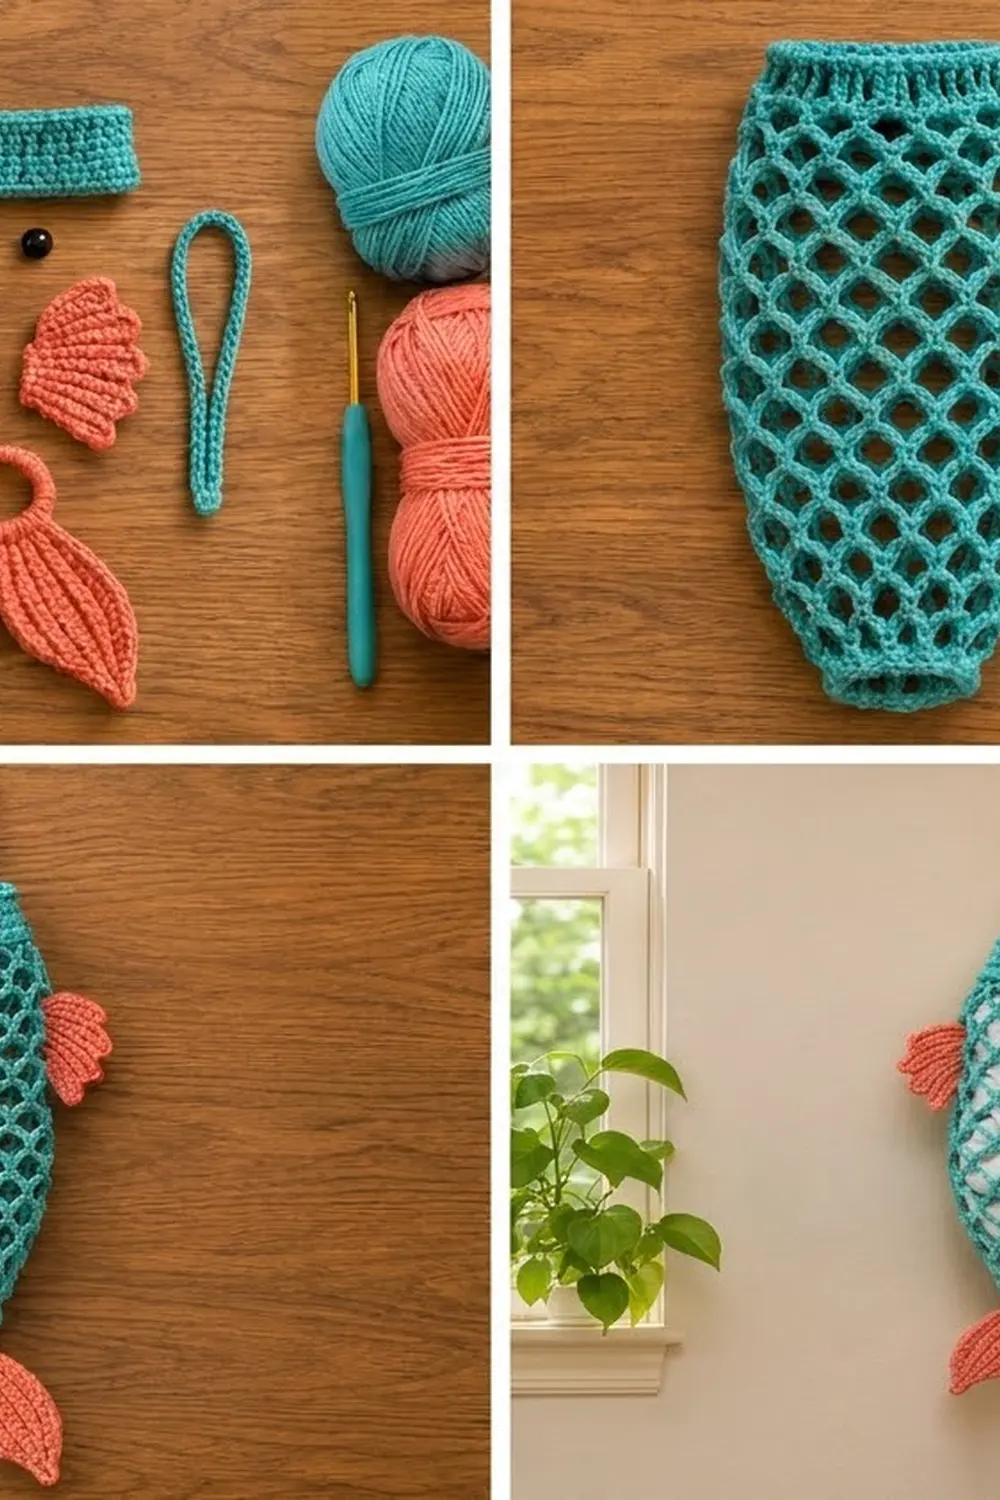
Body (Teal)
Top Band
Ch 36. Join with a sl st to the first ch, taking care not to twist the chain.
Rnd 1: Ch 1, sc in each ch around, sl st to the first sc to join. (36 sts)
Rnds 2–4: Ch 1, sc in each st around, join. (36 sts)
The band is now 1 in (2.5 cm) deep and 9 in (22.9 cm) around. The foundation chain edge becomes the top edge of the holder.
Net Body
From here on, work in a continuous spiral without joining. Put a marker in the first loop of each round and move it up as you go.
Net Rnd 1: Ch 5, sk next 2 sts, sc in next st; repeat from * 12 times. The 12th sc lands in the joining st of Rnd 4. (12 ch-5 loops)*
Math: 12 repeats × 3 sts per repeat = 36 sts, which uses the whole band.
Net Rnds 2–3: Ch 5, sc in next ch-5 loop; repeat from * around. (12 ch-5 loops per round)*
Checkpoint: 2¼ in (5.7 cm) of net.
Net Rnds 4–5 (growth): Ch 6, sc in next loop; repeat from * around. (12 ch-6 loops per round)*
Checkpoint: about 4 in (10.2 cm) of net.
Net Rnds 6–10 (widest section): Ch 7, sc in next loop; repeat from * around. (12 ch-7 loops per round)*
Checkpoint: 9 in (22.9 cm) of net. Flatten the tube: it should measure about 7 in (17.8 cm) across.
Net Rnds 11–12 (taper): Ch 6, sc in next loop; repeat from * around. (12 ch-6 loops per round)*
Net Rnds 13–14: Ch 5, sc in next loop; repeat from * around. (12 ch-5 loops per round)*
Net Rnd 15: Ch 4, sc in next loop; repeat from * around. (12 ch-4 loops)*
Checkpoint: 13 in (33.0 cm) of net, and 14 in (35.6 cm) for the whole body so far. Don’t fasten off. Put the live loop on a locking marker. You’ll work the bottom band in the Border section.
Fins (Coral, Make 2)
Ch 4.
Row 1 (WS): 7 dc in the 4th ch from the hook. The skipped ch-3 doesn’t count as a stitch. (7 dc)
Row 2 (RS): Ch 2 (doesn’t count), turn. (FPdc around the next dc, dc in the top of that same dc); repeat from * across. (14 sts: 7 FPdc + 7 dc)*
Row 3 (WS): Ch 1, turn. Sc in the next dc, (hdc, dc, hdc) in the next FPdc; repeat from * across. (28 sts: 7 sc + 21 scallop sts)*
Fasten off and leave a 10 in (25.4 cm) tail for sewing. The seven FPdc ribs fan out from the base, and each scallop sits on top of a rib. Each fin is 2½ in (6.4 cm) tall × 3 in (7.6 cm) wide.
Tail Lobes (Coral, Make 2)
Each lobe is a ridged leaf worked around both sides of a foundation chain.
Ch 15.
Row 1: Sc in the 2nd ch from the hook and in the next 12 ch, then 3 sc in the last ch (this is the tip). Rotate and sc in the other side of the next 13 ch. (29 sts: 13 + 3 + 13)
Row 2: Ch 1, turn. Working in BLO: sc in the next 14 sts, 3 sc in the center st of the tip, sc in the next 11 sts. Leave the last 3 sts unworked. (28 sts: 14 + 3 + 11)
Row 3: Ch 1, turn. Working in BLO: sc in the next 12 sts, 3 sc in the center tip st, sc in the next 12 sts. Leave 3 unworked. (27 sts: 12 + 3 + 12)
Row 4: Ch 1, turn. Working in BLO: sc in the next 13 sts, 3 sc in the center tip st, sc in the next 10 sts. Leave 3 unworked. (26 sts: 13 + 3 + 10)
Math: Each row loses 3 unworked stitches and gains 2 at the tip, so it’s 1 stitch shorter than the row before. The unworked stitches step the base down into a narrow stem, and the BLO ridges run lengthwise toward the point.
Fasten off and leave a 10 in (25.4 cm) tail. Each lobe is 4 in (10.2 cm) long × 2 in (5.1 cm) wide.
Tail Ring (Coral)
Ch 20. Join with a sl st to make a ring.
Rnd 1: Ch 1. Work 30 sc into the center of the ring, over the chain, packing the stitches tightly. Sl st to the first sc. (30 sc)
Fasten off and leave a 12 in (30.5 cm) tail. The ring is 2 in (5.1 cm) across the outside and 1¼ in (3.2 cm) across the opening.
Hanging Cord (Teal)
Ch 41.
Row 1: Sc in the 2nd ch from the hook and in each ch across. (40 sc)
Fasten off and leave an 8 in (20.3 cm) tail at each end. The cord is 10 in (25.4 cm) long.
Make All Pieces
Here’s what you need before assembly:
- Teal: 1 body (top band and net, with the bottom band still to come), 1 cord
- Coral: 2 fins, 2 tail lobes, 1 tail ring
- Hardware: 2 safety eyes
Layout (front view):
            ( cord loop )
          [ top band • • ]
   <fin  |   net body    |  fin>
         |   net body    |
         |   net body    |
          [ bottom band ]
               ( ring )
             /lobe  lobe\
Joining
Assemble the holder in this order: eyes, fins, cord. You’ll attach the tail after the bottom band is done.
Eyes: Flatten the body so the marker-free side faces you. Put the eyes between band Rnds 2 and 3, 3 in (7.6 cm) apart, centered on the front. Snap the washers on from inside the open top.
Fins: Lay the body flat. Each fin goes on a side fold, centered over net Rnds 4–5. Place the fin’s narrow base (the Row 1 starting point) against the fold, with the scalloped edge pointing outward. Whipstitch along the base for about 1 in (2.5 cm), catching the sc anchors and the chain of the net. Sew through 1 net strand for each fin stitch so you don’t pull the mesh tight. Keep your stitches snug but not tight. The net should stay as open as it is on the rest of the body.
Cord: Sew one end of the cord to the inside of the top band at each side fold, above the fins. Overlap the band by ½ in (1.3 cm) and sew through all 4 band rounds. The loop should rise about 4 in (10.2 cm) above the top edge.
Size checkpoint: With fins attached, the piece should measure about 11 in (27.9 cm) across the fins.
Border: Bottom Band and Tail Attachment
Border gauge: 16 sc = 4 in (10.2 cm), the same as the top band.
Put the live loop from net Rnd 15 back on your hook.
Rnd 1 (conversion): 2 sc in each ch-4 loop around. (24 sts = 12 loops × 2 sc + 0 extra) When the tube is flattened, that’s 12 sts on the front and 12 on the back. A tube has no corners, so there are no corner stitches to add.
Rnds 2–3: Sc in each st around. (24 sts) Sl st in the next st, fasten off, and weave in the end.
The band is ¾ in (1.9 cm) deep, and the body now measures 1 + 13 + ¾ = 14¾ in (37.5 cm).
Why the math works: 24 sts ÷ 4 sts per inch = 6 in (15.2 cm) around, or 3 in (7.6 cm) flat. That’s two-thirds the width of the top band, so the bottom gathers in to a taper. The opening is just big enough to pull bags out one at a time without them falling out. Twenty-four also divides evenly by the 12 loops, so the gathers are spread evenly. And the 2 in (5.1 cm) ring sits inside the 3 in (7.6 cm) band with ½ in (1.3 cm) to spare on each side.
Attach the tail: Center the ring under the bottom band. Sew the top 1 in (2.5 cm) of the ring to the back half of the band’s last round, so the ring hangs flat below the opening. Sew the stem of each lobe to the lower half of the ring, angling each lobe about 30° out from center so the two form a V. Sew through both layers twice at each joint so the tail holds up when bags are tugged.
Final Blocking
- Turn the holder right side out and weave in any remaining ends.
- Spritz the whole piece with water until it’s damp, not soaked.
- Slide a rolled towel into the body so the tube is about 7 in (17.8 cm) wide flat at net Rnds 6–10.
- Pin each fin into a fan, opening each scallop.
- Pin the tail lobes flat, pulling the points out sharply and keeping the V even.
- Pull the net down gently so the body is 14¾ in (37.5 cm) long, with the diamonds open and even.
- Let everything dry completely before you unpin it.
Final Quality-Control Checklist
- [ ] Top band: 36 sts, 4½ in (11.4 cm) flat
- [ ] Every net round has 12 loops, with no skipped or doubled loops
- [ ] Body is 7 in (17.8 cm) at its widest, flat
- [ ] Bottom band: 24 sts, 3 in (7.6 cm) flat
- [ ] Body is 14¾ in (37.5 cm) long
- [ ] Eyes are 3 in (7.6 cm) apart, level, with washers locked
- [ ] Fins sit at the same height and point outward
- [ ] Tail lobes are symmetrical and the ring is centered
- [ ] Cord holds firmly when tugged
- [ ] All ends are woven in through solid stitches, not through net chains
Troubleshooting
Net spirals or leans to one side: You’ve probably skipped a loop or worked into a chain instead of the loop space. Count to 12 at the marker every round.
Body bulges too much: Your chains are loose. Use 6 ch instead of 7 in Rnds 6–10.
Fins cup instead of fanning: Your Row 2 tension is tight. Loosen your FPdc stitches, or block the fins flat while damp.
Lobes twist: Make sure you’re working into the back loop only on every row, and that you turn after every row.
Bags fall out: Your bottom band is loose. Rework it with a 4.5 mm (7) hook.
Eyes wobble: Push the washer all the way down onto the post.
Care
Hand wash or machine wash on a gentle cycle in cool water, then reshape and lay flat to dry. Don’t tumble dry, because the heat can shrink cotton and loosen the safety eye washers.

Final Notes
Here’s the measurement chain from start to finish. A 36-stitch band that’s 4½ in (11.4 cm) flat becomes 12 net loops. Longer loops widen the body to 7 in (17.8 cm), shorter loops taper it back, and 24 bottom stitches close it to 3 in (7.6 cm) flat. That gives a body 14¾ in (37.5 cm) long. Add the fins, the tail and the cord, and your fish hangs 19¼ in (48.9 cm) long, ready to swallow every bag you bring home. If you check each measurement as you go, the finished piece will come out to size.
Happy crocheting!